
Owner's Manual
Page 3
... make sure to fully disassemble it, taking care to time using the instrument outdoors. Never use the supplied AC adapter. q Power Supply Make sure to turn off using a small amount of the striking surface (YV3910/3710/3700: P. 18, YV-2700/2700G/ 1600A/520: P 25) should be tightened securely ... the performance and functionality of the instrument or cause noise. • Make sure to adjust the wire clip positions after assembly. (YV-3910/3710/3700: P. 17) • Height adjustment of ethyl alcohol. The resulting dents or scratches in particular, must be wiped off the power...
... make sure to fully disassemble it, taking care to time using the instrument outdoors. Never use the supplied AC adapter. q Power Supply Make sure to turn off using a small amount of the striking surface (YV3910/3710/3700: P. 18, YV-2700/2700G/ 1600A/520: P 25) should be tightened securely ... the performance and functionality of the instrument or cause noise. • Make sure to adjust the wire clip positions after assembly. (YV-3910/3710/3700: P. 17) • Height adjustment of ethyl alcohol. The resulting dents or scratches in particular, must be wiped off the power...
Owner's Manual
Page 21
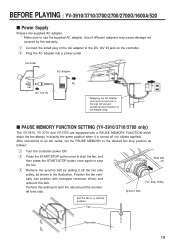
c Remove the synchro belt by the warranty. Slide belt off (no vibrato applied). BEFORE PLAYING : YV-3910/3710/3700/2700/2700G/1600A/520 s Power Supply Prepare the supplied AC adapter. * Make sure to stop position as shown in exactly the same position when it off ... AC adapter into a power outlet. x Press the START/STOP button once to start the fan, and then press the START/STOP button once again to use the supplied AC adapter. After connection to an AC outlet, set the PAUSE MEMORY to a vertical position. Position the fan vertically (fan position with a PAUSE...
c Remove the synchro belt by the warranty. Slide belt off (no vibrato applied). BEFORE PLAYING : YV-3910/3710/3700/2700/2700G/1600A/520 s Power Supply Prepare the supplied AC adapter. * Make sure to stop position as shown in exactly the same position when it off ... AC adapter into a power outlet. x Press the START/STOP button once to start the fan, and then press the START/STOP button once again to use the supplied AC adapter. After connection to an AC outlet, set the PAUSE MEMORY to a vertical position. Position the fan vertically (fan position with a PAUSE...
Owner's Manual
Page 26
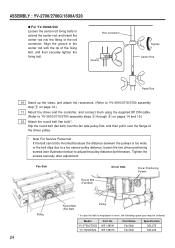
... If the belt cannot be mounted because the distance between the pulleys is misplaced or worn, the following spare part may be ordered: Model YV-2700/2700G YV-1600A/520 Part No. Tighten the screws securely after adjustment. W5 128041 W5 128070 Part Name Fan Belt Fan Belt Specification 3ØL275 3&#... Tighten Center Rod Pedal Rod 10 Stand up the vibes, and attach the resonators. (Refer to YV-3910/3710/3700 assembly step v on page 12.) 11 Mount the driver and the controller, and connect them using the supplied 8P DIN cable. (Refer to extend the center rod, and insert the center rod...
... If the belt cannot be mounted because the distance between the pulleys is misplaced or worn, the following spare part may be ordered: Model YV-2700/2700G YV-1600A/520 Part No. Tighten the screws securely after adjustment. W5 128041 W5 128070 Part Name Fan Belt Fan Belt Specification 3ØL275 3&#... Tighten Center Rod Pedal Rod 10 Stand up the vibes, and attach the resonators. (Refer to YV-3910/3710/3700 assembly step v on page 12.) 11 Mount the driver and the controller, and connect them using the supplied 8P DIN cable. (Refer to extend the center rod, and insert the center rod...
