Yamaha YV-1605J Support and Manuals
Get Help and Manuals for this Yamaha item

View All Support Options Below
Free Yamaha YV-1605J manuals!
Problems with Yamaha YV-1605J?
Ask a Question
Free Yamaha YV-1605J manuals!
Problems with Yamaha YV-1605J?
Ask a Question
Popular Yamaha YV-1605J Manual Pages
Owner's Manual - Page 2
... discard these products correctly, you , Please contact Yamaha directly. This Product should record the model number, serial number, and the date of purchase in the manual, on the player side of knowledge relating to update existing units.
Please study this product in this plate.
EN
17
SPECIFICATIONS SUBJECT TO CHANGE: The information contained in a position...
Owner's Manual - Page 3
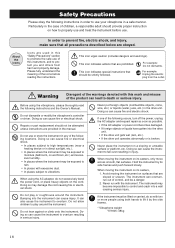
..., etc. The instrument may be strictly followed.
Repairs or part replacement should provide proper instruction
on surfaces that are provided in the manual. Doing so can also cause the instrument to ... from harm and property damage. Do not dismantle or modify the vibraphone's controller or driver.
Avoid moving the instrument on wet floors, etc.) and excessive humidity.
• ...
Owner's Manual - Page 4
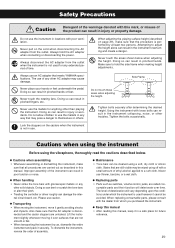
...that meets YAMAHA specifications. Always disconnect the AC adapter from the outlet when the instrument is not in this manual, keep ...securely. sumable parts and their pitch. • Treating the controller or driver roughly can result in any other troubles.
Make sure ... described below when adjusting the height. When replacing consumable parts, please consult with a small amount of ...
Owner's Manual - Page 5

...
Resonators (Natural Tone Side)
Leg (Large)
Resonators (Accidental Tone Side)
Pedal
Pedal Stay Caster
Fan Belt Frame End (Small)
Slide Leg
Driver Leg (Small)
AC Adapter
■ Vibes Drive Unit
● Controller (Player Side)
START / STOP
SLOW
MOTOR SPEED
FAST
POWER
ON
... u MOTOR IN Terminal i 8P DIN Cable o AC Adapter
20
● Controller (Right Side) ● Driver (Player Side)
Owner's Manual - Page 6
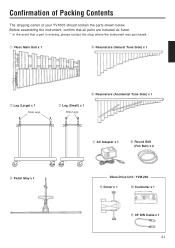
... * In the event that a part is missing, please contact the shop where the instrument was purchased.
q Vibes Main Unit x 1
t Resonators (Natural Tone Side) x 1
w Leg (Large) x 1
Slide Legs
y Resonators (Accidental Tone Side) x 1
e Leg (Small) x 1
Slide Legs
u AC Adapter x 1
i Round Belt (Fan Belt) x 2
r Pedal Stay x 1
Vibes Drive Unit: YVM-200
o Driver x 1
!0 Controller x 1
!1 8P DIN...
Owner's Manual - Page 8
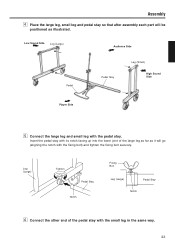
... other end of the large leg as far as illustrated.
Assembly
v Place the large leg, small leg and pedal stay so that after assembly each part will be
positioned as it will go (aligning the notch with the fixing bolt) and tighten the fixing bolt securely. Low Sound Side Leg (Large...
Owner's Manual - Page 9
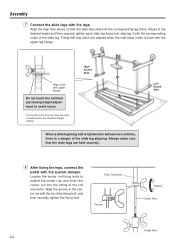
...in the center rod with upper flange.
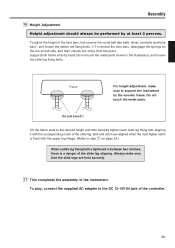
Loosen the center rod fixing bolts to the standard height setting.
Always make sure that the slide legs slide into the fitting of the slide leg slipping.... of the fixing bolt, and then securely tighten the fixing bolt. Do not touch the notched part during height adjustment to avoid injury.
* The fourth notch from above so that the slide legs...
Owner's Manual - Page 11
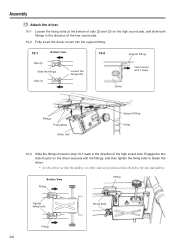
... the fittings, and then tighten the fixing bolts to fasten the driver.
* Set the driver so that the pulleys on the high sound side, and slide both fittings in the direction of the low sound side.
10-2 Fully insert the driver mount into the support fitting.
10-1
Bottom View
Rail (2) Slide the fittings. Rail (3)
Loosen...
Owner's Manual - Page 12

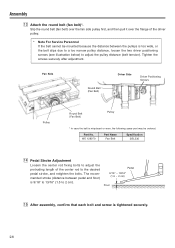
... hook the controller onto the pins one side at a time. Connect the MOTOR IN terminal of rail (1). W5 128092
Part Name 8P DIN Cable
Specification L=220
27 To connect align the arrow mark ( ) on the high sound side of the driver with the screw next to the jack.
Assembly
⁄1 Attach the controller.
Owner's Manual - Page 13
W5 128070
Part Name Fan Belt
Specification 3ØL236
⁄4 Pedal Stroke Adjustment
Loosen the center rod fixing bolts to adjust the protruding length of the driver pulley.
* Note For Service Personnel If the belt cannot be ordered:
Part No. Pedal 9/16" ~ 13/16" (1.5 ~ 2 cm)
Floor
⁄5 After assembly, confirm that each bolt and screw is...
Owner's Manual - Page 14
....
⁄7 This completes the assembly of the tone bars, first remove the round belt (fan belt), driver, controller and tone bars*, and loosen the center rod fixing bolts. (* To remove the tone bars, ... low sound side, and then unhook the string from the post.) Support both frame ends by hand (do not touch the metal parts shown in between two notches, there is tightened in the illustration),...
Owner's Manual - Page 15
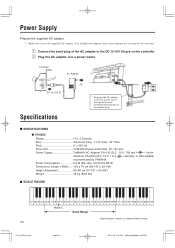
Controller
AC Adapter
DC 12-15V IN
Specifications
AC
* Wrapping the AC adapter cord once around one of the legs will prevent accidental disconnection of different adapters may cause damage not covered by YAMAHA. x Plug the AC adapter into a ... 73 75 76 78 80 81 83 85 87 88
Middle C
Scale Range
* Specifications subject to the DC 12-15V IN jack on the controller. z Connect the small...
Yamaha YV-1605J Reviews
We have not received any reviews for Yamaha yet.