Owner's Manual
Page 5
...6 Front panel 6 Front panel display 7 Rear panel 8 Remote control 9 PREPARATION INSTALLATION 11 Before installing this unit 11 Installing this unit 11 CONNECTIONS 14 Connecting a TV 15 Connecting a DVD player/recorder 16 Connecting a VCR 17 Connecting a digital satellite tuner or a cable TV tuner 18 Connecting other external... 51 Adjusting CINEMA DSP effect levels 51 USING THE VOLUME MODE (Night listening mode/TV volume equal mode 52 USING BASS SOUND ENHANCER (TruBass 54 USING THE SLEEP TIMER 55 Setting the sleep timer 55 Canceling the sleep timer 56 ADVANCED OPERATION MANUAL ...
...6 Front panel 6 Front panel display 7 Rear panel 8 Remote control 9 PREPARATION INSTALLATION 11 Before installing this unit 11 Installing this unit 11 CONNECTIONS 14 Connecting a TV 15 Connecting a DVD player/recorder 16 Connecting a VCR 17 Connecting a digital satellite tuner or a cable TV tuner 18 Connecting other external... 51 Adjusting CINEMA DSP effect levels 51 USING THE VOLUME MODE (Night listening mode/TV volume equal mode 52 USING BASS SOUND ENHANCER (TruBass 54 USING THE SLEEP TIMER 55 Setting the sleep timer 55 Canceling the sleep timer 56 ADVANCED OPERATION MANUAL ...
Owner's Manual
Page 7
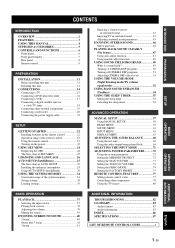
...YAMAHA Corporation. The " " logo and "Cinema DSP" are trademarks of YAMAHA Corporation. "Dolby", "Pro Logic", and the double-D symbol are trademarks of 1 Ltd. The " " logo and "Digital Sound Projector...remote control. INTRODUCTION FEATURES FEATURES Digital Sound Projector This unit employs the digital sound projector technology that allows one slim unit to control and steer multiple channels of sound to generate multi channel surround sound...that you can avoid troublesome listening-based speaker setup and achieve highly accurate sound beam adjustments that best match your ...
...YAMAHA Corporation. The " " logo and "Cinema DSP" are trademarks of YAMAHA Corporation. "Dolby", "Pro Logic", and the double-D symbol are trademarks of 1 Ltd. The " " logo and "Digital Sound Projector...remote control. INTRODUCTION FEATURES FEATURES Digital Sound Projector This unit employs the digital sound projector technology that allows one slim unit to control and steer multiple channels of sound to generate multi channel surround sound...that you can avoid troublesome listening-based speaker setup and achieve highly accurate sound beam adjustments that best match your ...
Owner's Manual
Page 8
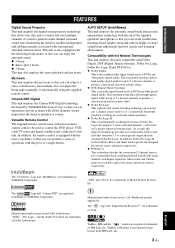
... etc. See "INSTALLATION" on page 11. 2 Connect this unit in your listening room. See "GETTING STARTED" on page 40. See "ENJOYING SURROUND SOUND" on page 22. 4 Run AUTO SETUP. If you want to make additional settings and adjustments 7 Run MANUAL SETUP to the supplied owner's manual for... on page 27. 5 Play back a source. In such cases, the operation is printed prior to your operation. • This manual is described using remote control operation. • y indicates a tip for the component. • Some operations can be performed by using either the buttons on the main unit or...
... etc. See "INSTALLATION" on page 11. 2 Connect this unit in your listening room. See "GETTING STARTED" on page 40. See "ENJOYING SURROUND SOUND" on page 22. 4 Run AUTO SETUP. If you want to make additional settings and adjustments 7 Run MANUAL SETUP to the supplied owner's manual for... on page 27. 5 Play back a source. In such cases, the operation is printed prior to your operation. • This manual is described using remote control operation. • y indicates a tip for the component. • Some operations can be performed by using either the buttons on the main unit or...
Owner's Manual
Page 9
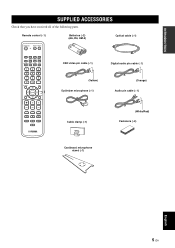
...Remote control (×1) Batteries (×2) (AA, R6, UM-3) Optical cable (×1) STANDBY/ON POWER POWER AV TV STB VCR DVD AUX TV INPUT1 INPUT2 MACRO TV AUTO VOL MODE SETUP INPUTMODE SLEEP 5BEAM 1 ST+3BEAM 2 3BEAM 3 STEREO 4 MY BEAM SURROUND 5 6 MUSIC 7 MOVIE 8 SPORTS 9 OFF 0 +10 CH LEVEL MENU TEST ENTER TV/AV YSP... RETURN VOLUME CH TV VOL OSD video pin cable (×1) Digital audio pin cable (×1) (Yellow) Optimizer microphone (×1) (Orange) Audio pin ...
...Remote control (×1) Batteries (×2) (AA, R6, UM-3) Optical cable (×1) STANDBY/ON POWER POWER AV TV STB VCR DVD AUX TV INPUT1 INPUT2 MACRO TV AUTO VOL MODE SETUP INPUTMODE SLEEP 5BEAM 1 ST+3BEAM 2 3BEAM 3 STEREO 4 MY BEAM SURROUND 5 6 MUSIC 7 MOVIE 8 SPORTS 9 OFF 0 +10 CH LEVEL MENU TEST ENTER TV/AV YSP... RETURN VOLUME CH TV VOL OSD video pin cable (×1) Digital audio pin cable (×1) (Yellow) Optimizer microphone (×1) (Orange) Audio pin ...

Owner's Manual
Page 10
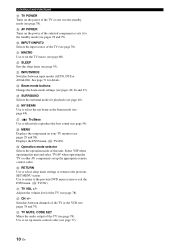
... page 23). Notes • When you turn on the power of this unit or sets it can reproduce sound. • In the standby mode, this unit. 3 Remote control sensor Receives infrared signals from the remote control. 6 En See page 37 for details. CONTROLS AND FUNCTIONS CONTROLS AND FUNCTIONS Front panel 1 2 3 4 5 6 INPUT VOLUME...Front panel display Shows information about the operational status of this unit consumes a small amount of power in order to receive infrared-signals from the remote control. 4 INPUT Press repeatedly to switch between input sources (TV, VCR, DVD or AUX).
... page 23). Notes • When you turn on the power of this unit or sets it can reproduce sound. • In the standby mode, this unit. 3 Remote control sensor Receives infrared signals from the remote control. 6 En See page 37 for details. CONTROLS AND FUNCTIONS CONTROLS AND FUNCTIONS Front panel 1 2 3 4 5 6 INPUT VOLUME...Front panel display Shows information about the operational status of this unit consumes a small amount of power in order to receive infrared-signals from the remote control. 4 INPUT Press repeatedly to switch between input sources (TV, VCR, DVD or AUX).
Owner's Manual
Page 13
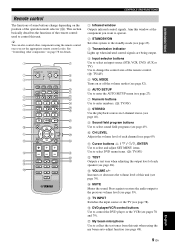
...SLEEP 5BEAM ST+3BEAM 3BEAM 1 2 3 STEREO MY BEAM SURROUND 4 5 6 MUSIC 7 MOVIE 8 SPORTS 9 OFF 0 +10 CH LEVEL MENU TEST ENTER TV/AV YSP RETURN VOLUME CH TV VOL MUTE TV INPUT TV MUTE CODE SET 1 Infrared window Outputs infrared control signals. Use to change depending on or... the volume level of this window at the component you set the appropriate remote control codes. Press again to restore the audio output to select sound field programs (see page 49). 0 CH LEVEL Adjusts the volume level of each speaker (see page 39). Aim this unit (see page 78). A Cursor ...
...SLEEP 5BEAM ST+3BEAM 3BEAM 1 2 3 STEREO MY BEAM SURROUND 4 5 6 MUSIC 7 MOVIE 8 SPORTS 9 OFF 0 +10 CH LEVEL MENU TEST ENTER TV/AV YSP RETURN VOLUME CH TV VOL MUTE TV INPUT TV MUTE CODE SET 1 Infrared window Outputs infrared control signals. Use to change depending on or... the volume level of this window at the component you set the appropriate remote control codes. Press again to restore the audio output to select sound field programs (see page 49). 0 CH LEVEL Adjusts the volume level of each speaker (see page 39). Aim this unit (see page 78). A Cursor ...
Owner's Manual
Page 14
... details. R MENU Displays the setup menu on your TV monitor (see page 80). Select YSP when operating this unit. Use to set the TV macro (see pages 29 and 58). K MACRO Use to set up the appropriate remote control codes. M INPUTMODE Switches between channels of the TV or the VCR (see page... output of the TV (see page 54). See page 71 for playback (see page 77). 10 En Q TruBass Use to effectively reproduce the bass sound (see page 78). V CH +/- CONTROLS AND FUNCTIONS H TV POWER Turns on the power of the TV or sets it to the standby mode (see page 78). I AV...
... details. R MENU Displays the setup menu on your TV monitor (see page 80). Select YSP when operating this unit. Use to set the TV macro (see pages 29 and 58). K MACRO Use to set up the appropriate remote control codes. M INPUTMODE Switches between channels of the TV or the VCR (see page... output of the TV (see page 54). See page 71 for playback (see page 77). 10 En Q TruBass Use to effectively reproduce the bass sound (see page 78). V CH +/- CONTROLS AND FUNCTIONS H TV POWER Turns on the power of the TV or sets it to the standby mode (see page 78). I AV...

Owner's Manual
Page 26
...as near a bath - Approximately 6 m (20 ft) Notes • Do not spill water or other components by setting the appropriate The remote control transmits a directional infrared beam. places of high temperatures, such as inverted fluorescent lamps. • If the batteries grow old, the effective... operation distance of the remote control decreases considerably. the operation range of the remote control decreases, the indicator does not blink or its light becomes dim. • Do not use different ...
...as near a bath - Approximately 6 m (20 ft) Notes • Do not spill water or other components by setting the appropriate The remote control transmits a directional infrared beam. places of high temperatures, such as inverted fluorescent lamps. • If the batteries grow old, the effective... operation distance of the remote control decreases considerably. the operation range of the remote control decreases, the indicator does not blink or its light becomes dim. • Do not use different ...
Owner's Manual
Page 27
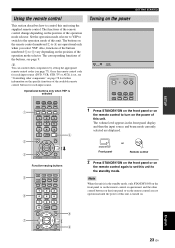
... MODE SETUP INPUTMODE SLEEP 5BEAM ST+3BEAM 3BEAM 1 2 3 STEREO MY BEAM SURROUND 4 5 6 MUSIC 7 MOVIE 8 SPORTS 9 OFF 0 +10 CH LEVEL MENU TEST ENTER TV/AV YSP RETURN VOLUME CH TV VOL 4 Function-varying buttons 5 6 7 STB VCR DVD AUX TV INPUT1 INPUT2 MACRO TV AUTO VOL MODE SETUP INPUTMODE SLEEP 5BEAM...TV/AV YSP RETURN VOLUME CH TV VOL 8 9 Turning on the power VOLUME + STANDBY/ON STANDBY/ON POWER POWER AV TV STB VCR DVD AUX TV INPUT1 INPUT2 MACRO TV 1 Press STANDBY/ON on the front panel or on the remote control to 4 are operational only when you select YSP. Note...
... MODE SETUP INPUTMODE SLEEP 5BEAM ST+3BEAM 3BEAM 1 2 3 STEREO MY BEAM SURROUND 4 5 6 MUSIC 7 MOVIE 8 SPORTS 9 OFF 0 +10 CH LEVEL MENU TEST ENTER TV/AV YSP RETURN VOLUME CH TV VOL 4 Function-varying buttons 5 6 7 STB VCR DVD AUX TV INPUT1 INPUT2 MACRO TV AUTO VOL MODE SETUP INPUTMODE SLEEP 5BEAM...TV/AV YSP RETURN VOLUME CH TV VOL 8 9 Turning on the power VOLUME + STANDBY/ON STANDBY/ON POWER POWER AV TV STB VCR DVD AUX TV INPUT1 INPUT2 MACRO TV 1 Press STANDBY/ON on the front panel or on the remote control to 4 are operational only when you select YSP. Note...
Owner's Manual
Page 28
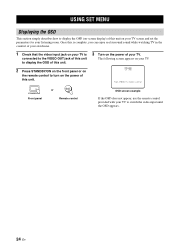
... OSD This section simply describes how to display the OSD (on-screen display) of your TV. Once this is complete, you can enjoy real surround sound while watching TV in the comfort of your own home. 1 Check that the video input jack on your TV is connected to the VIDEO OUT... the OSD of this unit. 2 Press STANDBY/ON on the front panel or on the remote control to turn on the power of this unit. 3 Turn on the power of this unit on your listening room. YSP-900 Push [MENU] to switch the video input until the OSD appears. 24 En The following...
... OSD This section simply describes how to display the OSD (on-screen display) of your TV. Once this is complete, you can enjoy real surround sound while watching TV in the comfort of your own home. 1 Check that the video input jack on your TV is connected to the VIDEO OUT... the OSD of this unit. 2 Press STANDBY/ON on the front panel or on the remote control to turn on the power of this unit. 3 Turn on the power of this unit on your listening room. YSP-900 Push [MENU] to switch the video input until the OSD appears. 24 En The following...

Owner's Manual
Page 30
... SETUP . CHANGING OSD LANGUAGE CHANGING OSD LANGUAGE This feature allows you to select the language of your TV. The following screen appears on the remote control. • To cancel the SET MENU screen, press MENU once more. • You can also perform the following operations in the ...SETUP and then press ENTER. ENGLISH DEUTSCH Francais ESPANOL [ ]/[ ]:Select [ENTER]:Return 26 En The SET MENU screen appears on the remote control. TV/AV YSP 2 Press MENU on your choice that appears in the front panel display. 3 Press / to select the language and then press ENTER.
... SETUP . CHANGING OSD LANGUAGE CHANGING OSD LANGUAGE This feature allows you to select the language of your TV. The following screen appears on the remote control. • To cancel the SET MENU screen, press MENU once more. • You can also perform the following operations in the ...SETUP and then press ENTER. ENGLISH DEUTSCH Francais ESPANOL [ ]/[ ]:Select [ENTER]:Return 26 En The SET MENU screen appears on the remote control. TV/AV YSP 2 Press MENU on your choice that appears in the front panel display. 3 Press / to select the language and then press ENTER.
Owner's Manual
Page 32
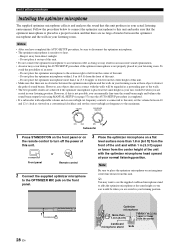
... crossover/high cut frequency controls is placed at the same height as your ears would be regarded as these objects obstruct the path of sound beams. However, any objects that are in your listening position. To avoid the possibility of this unit. • Do not connect... Do not place the optimizer microphone to turn off the power of this unit. Note Be sure to place the optimizer microphone on the remote control to the extreme right or left from this unit. - AUTO SETUP (IntelliBeam) Installing the optimizer microphone The supplied optimizer microphone collects ...
... crossover/high cut frequency controls is placed at the same height as your ears would be regarded as these objects obstruct the path of sound beams. However, any objects that are in your listening position. To avoid the possibility of this unit. • Do not connect... Do not place the optimizer microphone to turn off the power of this unit. Note Be sure to place the optimizer microphone on the remote control to the extreme right or left from this unit. - AUTO SETUP (IntelliBeam) Installing the optimizer microphone The supplied optimizer microphone collects ...
Owner's Manual
Page 33
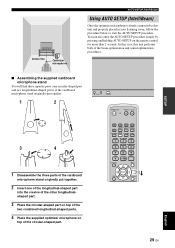
...optimizer microphone is firmly connected to this unit performs both of the beam optimization and sound optimization procedures. ■ Assembling the supplied cardboard microphone stand You will find three separate... of the two combined longitudinal-shaped parts. 4 Place the supplied optimizer microphone on the remote control for more than 2 seconds. VOLUME + STANDBY/ON STANDBY/ON POWER POWER AV ...MY BEAM SURROUND 4 5 6 MUSIC 7 MOVIE 8 SPORTS 9 OFF 0 +10 CH LEVEL MENU TEST ENTER TV/AV YSP RETURN English 29 En You can also enter the AUTO SETUP procedure simply by pressing ...
...optimizer microphone is firmly connected to this unit performs both of the beam optimization and sound optimization procedures. ■ Assembling the supplied cardboard microphone stand You will find three separate... of the two combined longitudinal-shaped parts. 4 Place the supplied optimizer microphone on the remote control for more than 2 seconds. VOLUME + STANDBY/ON STANDBY/ON POWER POWER AV ...MY BEAM SURROUND 4 5 6 MUSIC 7 MOVIE 8 SPORTS 9 OFF 0 +10 CH LEVEL MENU TEST ENTER TV/AV YSP RETURN English 29 En You can also enter the AUTO SETUP procedure simply by pressing ...
Owner's Manual
Page 34
...one of the rooms described in the front panel display. 4 Press / on the power of this unit, turn on the remote control to improve sound reflection. 2. A set of your listening environment can also perform the following screen appears on your TV. The SET MENU ...or Remote control 2 Set the operation mode selector to YSP to switch to the operation mode of this unit. In such cases, run successfully if this unit is connected to specific conditions of settings optimized according to this unit. ;AUTO SETUP . 1)BEAM+SOUND OPTIMZ 2)BEAM OPTIMZ only 3)SOUND OPTIMZ ...
...one of the rooms described in the front panel display. 4 Press / on the power of this unit, turn on the remote control to improve sound reflection. 2. A set of your listening environment can also perform the following screen appears on your TV. The SET MENU ...or Remote control 2 Set the operation mode selector to YSP to switch to the operation mode of this unit. In such cases, run successfully if this unit is connected to specific conditions of settings optimized according to this unit. ;AUTO SETUP . 1)BEAM+SOUND OPTIMZ 2)BEAM OPTIMZ only 3)SOUND OPTIMZ ...

Owner's Manual
Page 37
... sure that the optimizer microphone is too low. If the problem persists, contact the nearest YAMAHA service center for AUTO SETUP AUTO SETUP (IntelliBeam) Before the AUTO SETUP procedure starts Error message...other operations while the AUTO SETUP procedure is not placed in progress If one of YSP. MIC should be set above 1.8m/6ft. SETUP English 33 En Make sure ...the optimizer microphone in quieter environment. The optimizer microphone cannot collect the sound produced by pressing MENU on the remote control in step 3, run the procedure again from step 4 after once...
... sure that the optimizer microphone is too low. If the problem persists, contact the nearest YAMAHA service center for AUTO SETUP AUTO SETUP (IntelliBeam) Before the AUTO SETUP procedure starts Error message...other operations while the AUTO SETUP procedure is not placed in progress If one of YSP. MIC should be set above 1.8m/6ft. SETUP English 33 En Make sure ...the optimizer microphone in quieter environment. The optimizer microphone cannot collect the sound produced by pressing MENU on the remote control in step 3, run the procedure again from step 4 after once...

Owner's Manual
Page 38
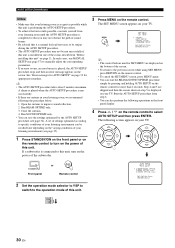
... . 1)LOAD 2)SAVE [ ]/[ ]:Up/Down [ENTER]:Enter p p Saving settings 1 Set the operation mode selector to YSP to switch to the previous screen while using SET MENU, press RETURN on the remote control. • To cancel the SET MENU screen, press MENU once more. • You can save certain settings... in the system memory of this unit. The SET MENU screen appears on the remote control. ENTER ENTER 2 Press MENU on your listening environment. The following screen appears on your TV. TV/AV YSP 4 Press / to select SAVE and then press ENTER. The following screen appears on...
... . 1)LOAD 2)SAVE [ ]/[ ]:Up/Down [ENTER]:Enter p p Saving settings 1 Set the operation mode selector to YSP to switch to the previous screen while using SET MENU, press RETURN on the remote control. • To cancel the SET MENU screen, press MENU once more. • You can save certain settings... in the system memory of this unit. The SET MENU screen appears on the remote control. ENTER ENTER 2 Press MENU on your listening environment. The following screen appears on your TV. TV/AV YSP 4 Press / to select SAVE and then press ENTER. The following screen appears on...
Owner's Manual
Page 39
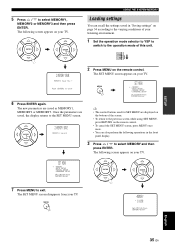
...34 according to the varying conditions of the screen. • To return to the previous screen while using SET MENU, press RETURN on the remote control. • To cancel the SET MENU screen, press MENU once more. • You can also perform the following operations in the front... ]:Up/Down [ENTER]:Enter English p 35 En SETUP p 5 Press / to Save 2 Press MENU on the remote control. The following screen appears on the bottom of your listening environment. 1 Set the operation mode selector to YSP to switch to exit. Push [ENTER] to select MEMORY1, MEMORY2 or MEMORY3 and then press ENTER...
...34 according to the varying conditions of the screen. • To return to the previous screen while using SET MENU, press RETURN on the remote control. • To cancel the SET MENU screen, press MENU once more. • You can also perform the following operations in the front... ]:Up/Down [ENTER]:Enter English p 35 En SETUP p 5 Press / to Save 2 Press MENU on the remote control. The following screen appears on the bottom of your listening environment. 1 Set the operation mode selector to YSP to switch to exit. Push [ENTER] to select MEMORY1, MEMORY2 or MEMORY3 and then press ENTER...
Owner's Manual
Page 41
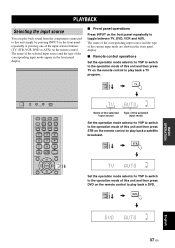
...input mode are shown in the front panel display. ■ Front panel operations Press INPUT on the remote control. PLAYBACK PLAYBACK Selecting the input source You can play back sound from the components connected to this unit simply by pressing INPUT on the front panel repeatedly or pressing ... TV AUTO VOL MODE SETUP INPUTMODE SLEEP 5BEAM ST+3BEAM 3BEAM 1 2 3 STEREO MY BEAM SURROUND 4 5 6 MUSIC 7 MOVIE 8 SPORTS 9 OFF 0 +10 CH LEVEL MENU TEST ENTER TV/AV YSP RETURN VOL Name of the selected Type of the selected input source input mode Set the operation mode selector to...
...input mode are shown in the front panel display. ■ Front panel operations Press INPUT on the remote control. PLAYBACK PLAYBACK Selecting the input source You can play back sound from the components connected to this unit simply by pressing INPUT on the front panel repeatedly or pressing ... TV AUTO VOL MODE SETUP INPUTMODE SLEEP 5BEAM ST+3BEAM 3BEAM 1 2 3 STEREO MY BEAM SURROUND 4 5 6 MUSIC 7 MOVIE 8 SPORTS 9 OFF 0 +10 CH LEVEL MENU TEST ENTER TV/AV YSP RETURN VOL Name of the selected Type of the selected input source input mode Set the operation mode selector to...
Owner's Manual
Page 42
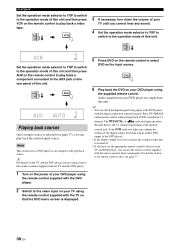
...optical/ coaxial jack. Audio signals from this unit. DVD 6 Play back the DVD on the remote control while playing back a DVD recorded in 5.1 channel. The DIGITAL or indicator lights up , confirm the settings of the digital output, bitstream output, and/or DTS output of the DVD player. • If the ...too low, increase the volume on this unit to around 45. • If you have set remote control codes, see page 37), you cannot hear any sound. 4 Set the operation mode selector to YSP to switch to play back a component connected to select DVD as an example of this unit detects...
...optical/ coaxial jack. Audio signals from this unit. DVD 6 Play back the DVD on the remote control while playing back a DVD recorded in 5.1 channel. The DIGITAL or indicator lights up , confirm the settings of the digital output, bitstream output, and/or DTS output of the DVD player. • If the ...too low, increase the volume on this unit to around 45. • If you have set remote control codes, see page 37), you cannot hear any sound. 4 Set the operation mode selector to YSP to switch to play back a component connected to select DVD as an example of this unit detects...
Owner's Manual
Page 43
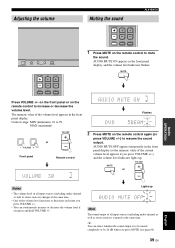
...CODE SET Press VOLUME +/- Adjusting the volume Muting the sound VOLUME CH TV VOL PLAYBACK INPUT VOLUME + STANDBY/ON VOLUME CH TV VOL MUTE TV INPUT TV MUTE CODE SET 1 Press MUTE on the remote control again (or press VOLUME +/-) to resume the sound output. Control range: MIN (minimum), 01 to ...99, MAX (maximum) VOLUME VOLUME + Front panel or Remote control VOL VOL Flashes VOL ...
...CODE SET Press VOLUME +/- Adjusting the volume Muting the sound VOLUME CH TV VOL PLAYBACK INPUT VOLUME + STANDBY/ON VOLUME CH TV VOL MUTE TV INPUT TV MUTE CODE SET 1 Press MUTE on the remote control again (or press VOLUME +/-) to resume the sound output. Control range: MIN (minimum), 01 to ...99, MAX (maximum) VOLUME VOLUME + Front panel or Remote control VOL VOL Flashes VOL ...


