
Owner's Manual
Page 5
... Front panel 6 Front panel display 7 Rear panel 8 Remote control 9 PREPARATION INSTALLATION 11 Before installing this unit 11 Installing this unit 11 CONNECTIONS 14 Connecting a TV 15 Connecting a DVD player/recorder 16 Connecting a VCR 17 Connecting a digital satellite tuner or a cable TV tuner 18 Connecting other ...55 Canceling the sleep timer 56 ADVANCED OPERATION BASIC SETUP 57 MANUAL SETUP 63 Using MANUAL SETUP 64 BEAM MENU 65 SOUND MENU 69 INPUT MENU 71 DISPLAY MENU 73 ADJUSTING SYSTEM PARAMETERS ...........75 Setting the maximum volume level 75 Protecting the current...
... Front panel 6 Front panel display 7 Rear panel 8 Remote control 9 PREPARATION INSTALLATION 11 Before installing this unit 11 Installing this unit 11 CONNECTIONS 14 Connecting a TV 15 Connecting a DVD player/recorder 16 Connecting a VCR 17 Connecting a digital satellite tuner or a cable TV tuner 18 Connecting other ...55 Canceling the sleep timer 56 ADVANCED OPERATION BASIC SETUP 57 MANUAL SETUP 63 Using MANUAL SETUP 64 BEAM MENU 65 SOUND MENU 69 INPUT MENU 71 DISPLAY MENU 73 ADJUSTING SYSTEM PARAMETERS ...........75 Setting the maximum volume level 75 Protecting the current...

Owner's Manual
Page 7
... FEATURES FEATURES Digital Sound Projector This unit employs the digital sound projector technology that allows one slim unit to control and steer multiple channels of sound to generate full, physical 5.1 channel surround sound, thus eliminating the need for satellite loudspeakers and cabling normally associated with conventional surround sound systems. This unit is also equipped with preset remote control codes to...
... FEATURES FEATURES Digital Sound Projector This unit employs the digital sound projector technology that allows one slim unit to control and steer multiple channels of sound to generate full, physical 5.1 channel surround sound, thus eliminating the need for satellite loudspeakers and cabling normally associated with conventional surround sound systems. This unit is also equipped with preset remote control codes to...

Owner's Manual
Page 8
... production. See "CONNECTIONS" on page 14. 3 Prepare the remote control and turn on page 26. 5 Play back a source and enjoy surround sound. If you want to make additional settings and adjustments 6 Run MANUAL SETUP and set remote control codes to your TV and other external components. See ..."MANUAL SETUP" on page 63 and "REMOTE CONTROL FEATURES" on page 22. 4 Run AUTO ...
... production. See "CONNECTIONS" on page 14. 3 Prepare the remote control and turn on page 26. 5 Play back a source and enjoy surround sound. If you want to make additional settings and adjustments 6 Run MANUAL SETUP and set remote control codes to your TV and other external components. See ..."MANUAL SETUP" on page 63 and "REMOTE CONTROL FEATURES" on page 22. 4 Run AUTO ...
Owner's Manual
Page 9
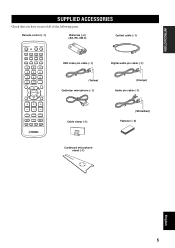
... Check that you have received all of the following parts. Remote control (×1) Batteries (×2) (AA, R6, UM-3) Optical cable (×1) STANDBY/ON POWER POWER AV TV DVD AUX VCR INPUT1 STB TV INPUT2 TV MACRO YSP 5BEAM 1 INPUTMODE SLEEP ST+3BEAM 2 3BEAM 3 STEREO TARGET... 4 5 6 MUSIC 7 MOVIE 8 VOL MODE 9 SPORTS 0 OFF +10 SURROUND CH LEVEL CINEMA DSP MENU TEST ENTER RETURN VOLUME CH TV VOL OSD video pin cable (×1) Digital audio pin cable (×1) ...
... Check that you have received all of the following parts. Remote control (×1) Batteries (×2) (AA, R6, UM-3) Optical cable (×1) STANDBY/ON POWER POWER AV TV DVD AUX VCR INPUT1 STB TV INPUT2 TV MACRO YSP 5BEAM 1 INPUTMODE SLEEP ST+3BEAM 2 3BEAM 3 STEREO TARGET... 4 5 6 MUSIC 7 MOVIE 8 VOL MODE 9 SPORTS 0 OFF +10 SURROUND CH LEVEL CINEMA DSP MENU TEST ENTER RETURN VOLUME CH TV VOL OSD video pin cable (×1) Digital audio pin cable (×1) ...

Owner's Manual
Page 10
... display Shows information about the operational status of this unit or sets it can reproduce sound. • In the standby mode, this unit consumes a small amount of power in order to receive infrared-signals from the remote control. 4 INPUT Press repeatedly to the standby mode (see page 38). 6 STANDBY/ON Turns on...
... display Shows information about the operational status of this unit or sets it can reproduce sound. • In the standby mode, this unit consumes a small amount of power in order to receive infrared-signals from the remote control. 4 INPUT Press repeatedly to the standby mode (see page 38). 6 STANDBY/ON Turns on...

Owner's Manual
Page 13
...items. A TEST Outputs a test tone when adjusting the output level of each speaker (see page 78). INTRODUCTION CONTROLS AND FUNCTIONS Remote control This section describes the function of each control on the remote control used to the previous volume level (see page 39). See "Controlling ... 5 TruBass Use to effectively reproduce the bass sound (see page 54). 6 YSP Switches to the operation mode of this unit. 7 Numeric buttons Use to enter numbers. 8 Sound field program buttons Use to select sound field programs (see page 49). 9 CH LEVEL Adjusts the volume level of each channel (...
...items. A TEST Outputs a test tone when adjusting the output level of each speaker (see page 78). INTRODUCTION CONTROLS AND FUNCTIONS Remote control This section describes the function of each control on the remote control used to the previous volume level (see page 39). See "Controlling ... 5 TruBass Use to effectively reproduce the bass sound (see page 54). 6 YSP Switches to the operation mode of this unit. 7 Numeric buttons Use to enter numbers. 8 Sound field program buttons Use to select sound field programs (see page 49). 9 CH LEVEL Adjusts the volume level of each channel (...

Owner's Manual
Page 14
... modes (see page 83). P RETURN Use to select sleep timer settings or return to set the TV macro (see page 85). R CH +/- CONTROLS AND FUNCTIONS I MACRO Use to set up remote control codes (see page 82). 10 Use to the previous SET MENU screen. Note The DVD menu is displayed when DVD...
... modes (see page 83). P RETURN Use to select sleep timer settings or return to set the TV macro (see page 85). R CH +/- CONTROLS AND FUNCTIONS I MACRO Use to set up remote control codes (see page 82). 10 Use to the previous SET MENU screen. Note The DVD menu is displayed when DVD...
Owner's Manual
Page 26
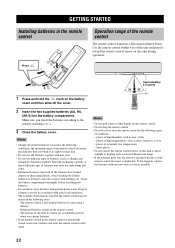
... leak. Read the packaging carefully as these different types of batteries (such as possible. 22 places of them correctly in the remote control is left without batteries for more than 2 minutes. - Exhausted batteries remain in the following cases: - The buttons on.... Make sure you change batteries. • If the memory stored in accordance with your local regulations. • The contents of the remote control decreases considerably. If the batteries have the same shape and color. • Exhausted batteries may have leaked, dispose of extremely low temperatures...
... leak. Read the packaging carefully as these different types of batteries (such as possible. 22 places of them correctly in the remote control is left without batteries for more than 2 minutes. - Exhausted batteries remain in the following cases: - The buttons on.... Make sure you change batteries. • If the memory stored in accordance with your local regulations. • The contents of the remote control decreases considerably. If the batteries have the same shape and color. • Exhausted batteries may have leaked, dispose of extremely low temperatures...

Owner's Manual
Page 27
... unit. English 23 STANDBY/ON Front panel or Remote control 2 Press STANDBY/ON on the front panel or on the remote control numbered 3 to set , see page 82). Note that the buttons on the remote control numbered 3 to 9 have different functions depending...SLEEP ST+3BEAM 2 TARGET 5 3BEAM 3 TV 6 MUSIC 7 MOVIE 8 VOL MODE 9 SPORTS 0 OFF +10 SURROUND TV CH LEVEL CINEMA DSP MENU 5 TEST ENTER RETURN 6 7 8 9 1 Input selector buttons 2 YSP 3 Beam mode buttons 4 Sound field program buttons 5 Cursor buttons / / / , ENTER 6 VOL MODE 7 SURROUND 8 MENU 9 RETURN Turning on the ...
... unit. English 23 STANDBY/ON Front panel or Remote control 2 Press STANDBY/ON on the front panel or on the remote control numbered 3 to set , see page 82). Note that the buttons on the remote control numbered 3 to 9 have different functions depending...SLEEP ST+3BEAM 2 TARGET 5 3BEAM 3 TV 6 MUSIC 7 MOVIE 8 VOL MODE 9 SPORTS 0 OFF +10 SURROUND TV CH LEVEL CINEMA DSP MENU 5 TEST ENTER RETURN 6 7 8 9 1 Input selector buttons 2 YSP 3 Beam mode buttons 4 Sound field program buttons 5 Cursor buttons / / / , ENTER 6 VOL MODE 7 SURROUND 8 MENU 9 RETURN Turning on the ...
Owner's Manual
Page 28
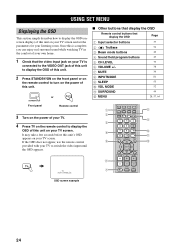
... the OSD appears. If the OSD does not appear, use the remote control provided with your own home. 1 Check that display the OSD Page 1 Input selector buttons 37 2 TruBass 3 Beam mode buttons 4 Sound field program buttons 5 CH LEVEL 6 VOLUME +/- 7 MUTE 8 INPUTMODE 9 SLEEP 0 VOL ... 4 5 6 7 DVD AUX VCR INPUT1 STB TV INPUT2 TV MACRO YSP 5BEAM 1 INPUTMODE SLEEP ST+3BEAM 2 3BEAM 3 STEREO TARGET 4 5 6 MUSIC 7 MOVIE 8 VOL MODE 9 SPORTS 0 OFF +10 SURROUND TV CH LEVEL CINEMA DSP MENU TEST ENTER RETURN VOLUME CH TV VOL MUTE TV INPUT TV MUTE CODE SET 8 9 0 A ...
... the OSD appears. If the OSD does not appear, use the remote control provided with your own home. 1 Check that display the OSD Page 1 Input selector buttons 37 2 TruBass 3 Beam mode buttons 4 Sound field program buttons 5 CH LEVEL 6 VOLUME +/- 7 MUTE 8 INPUTMODE 9 SLEEP 0 VOL ... 4 5 6 7 DVD AUX VCR INPUT1 STB TV INPUT2 TV MACRO YSP 5BEAM 1 INPUTMODE SLEEP ST+3BEAM 2 3BEAM 3 STEREO TARGET 4 5 6 MUSIC 7 MOVIE 8 VOL MODE 9 SPORTS 0 OFF +10 SURROUND TV CH LEVEL CINEMA DSP MENU TEST ENTER RETURN VOLUME CH TV VOL MUTE TV INPUT TV MUTE CODE SET 8 9 0 A ...

Owner's Manual
Page 33
... the AUTO SETUP procedure (see "Error messages for AUTO SETUP" on page 33 for appropriate remedies. STANDBY/ON Front panel or Remote control ENTER ENTER 2 Press YSP on the remote control to switch to the operation mode of the rooms described in "Before installing this unit" on page 11. MENU p SET... yourself from your TV. SETUP p AUTO SETUP Notes • If your listening room has curtains, open the curtains before starting the BEAM OPT+SOUND OPTIMZ or the BEAM OPTIMZ only procedure. • Make sure that your listening room is as quiet as possible while this unit is performing the...
... the AUTO SETUP procedure (see "Error messages for AUTO SETUP" on page 33 for appropriate remedies. STANDBY/ON Front panel or Remote control ENTER ENTER 2 Press YSP on the remote control to switch to the operation mode of the rooms described in "Before installing this unit" on page 11. MENU p SET... yourself from your TV. SETUP p AUTO SETUP Notes • If your listening room has curtains, open the curtains before starting the BEAM OPT+SOUND OPTIMZ or the BEAM OPTIMZ only procedure. • Make sure that your listening room is as quiet as possible while this unit is performing the...

Owner's Manual
Page 38
.... p p ENTER ENTER 2)MEMORY SAVE USER1 USER2 USER3 [p]/[ ]:Select 34 When the curtains are closed . YSP 4 Press / to the previous screen while using SET MENU, press RETURN on the remote control. • To resume cursor button operations after changing the control area by pressing an input selector button,... example, if there are displayed on the bottom of the beams will vary depending on your TV. p p p p 2 Press MENU on the remote control. • To cancel the SET MENU screen, press MENU once more. • You can save certain settings according to the operation mode of...
.... p p ENTER ENTER 2)MEMORY SAVE USER1 USER2 USER3 [p]/[ ]:Select 34 When the curtains are closed . YSP 4 Press / to the previous screen while using SET MENU, press RETURN on the remote control. • To resume cursor button operations after changing the control area by pressing an input selector button,... example, if there are displayed on the bottom of the beams will vary depending on your TV. p p p p 2 Press MENU on the remote control. • To cancel the SET MENU screen, press MENU once more. • You can save certain settings according to the operation mode of...

Owner's Manual
Page 39
...SETUP [ ]/[ ]:Up/Down [ENTER]:Enter y • The control buttons used for SET MENU are displayed on your TV. The SET MENU screen appears on the remote control. In this unit. ENTER 2)MEMORY SAVE USER1 Saving ! []:Select SET MENU . ;MEMORY ;AUTO SETUP ;BASIC SETUP ;MANUAL SETUP [ ]/[ ]:Up/Down [...ENTER]:Enter p p p 2 Press MENU on your TV. The SET MENU screen disappears from your listening environment. 1 Press YSP on the remote control to switch to the operation mode of the screen. • To return to the previous screen while using SET MENU, press RETURN on...
...SETUP [ ]/[ ]:Up/Down [ENTER]:Enter y • The control buttons used for SET MENU are displayed on your TV. The SET MENU screen appears on the remote control. In this unit. ENTER 2)MEMORY SAVE USER1 Saving ! []:Select SET MENU . ;MEMORY ;AUTO SETUP ;BASIC SETUP ;MANUAL SETUP [ ]/[ ]:Up/Down [...ENTER]:Enter p p p 2 Press MENU on your TV. The SET MENU screen disappears from your listening environment. 1 Press YSP on the remote control to switch to the operation mode of the screen. • To return to the previous screen while using SET MENU, press RETURN on...

Owner's Manual
Page 41
The name of the selected input source and the type of the corresponding input mode appear in the front panel display. ■ Remote control operations Press TV on the remote control to play back a TV program. The name of the corresponding input source and the type of the current input mode are shown... VOL Name of the selected Type of the selected input source input mode 37 English PLAYBACK PLAYBACK Selecting the input source You can play back sound from the components connected to this unit. Press STB on the...
The name of the selected input source and the type of the corresponding input mode appear in the front panel display. ■ Remote control operations Press TV on the remote control to play back a TV program. The name of the corresponding input source and the type of the current input mode are shown... VOL Name of the selected Type of the selected input source input mode 37 English PLAYBACK PLAYBACK Selecting the input source You can play back sound from the components connected to this unit. Press STB on the...

Owner's Manual
Page 42
... appears at the same time. • 0.5 dB of your TV until you cannot hear any sound. 4 Press DVD on this unit. y For details on the TV and the DVD player you can use the remote control supplied with the TV so that the DVD menu screen is displayed. 3 If necessary, turn...output volume is too low, increase the volume on the remote control to increase or decrease the volume level. DVD Adjusting the volume INPUT VOLUME + STANDBY/ON VOLUME CH TV VOL MUTE TV INPUT TV MUTE Press VOLUME +/- Audio signals from the speakers of the playback source. PLAYBACK Playing back sources Once an...
... appears at the same time. • 0.5 dB of your TV until you cannot hear any sound. 4 Press DVD on this unit. y For details on the TV and the DVD player you can use the remote control supplied with the TV so that the DVD menu screen is displayed. 3 If necessary, turn...output volume is too low, increase the volume on the remote control to increase or decrease the volume level. DVD Adjusting the volume INPUT VOLUME + STANDBY/ON VOLUME CH TV VOL MUTE TV INPUT TV MUTE Press VOLUME +/- Audio signals from the speakers of the playback source. PLAYBACK Playing back sources Once an...

Owner's Manual
Page 43
... (including multi-channel as well as stereo sources) is to resume the sound output. MUTE Flashes VOL 2 Press MUTE on the remote control to mute the sound. Muting the sound VOLUME CH TV VOL MUTE TV INPUT TV MUTE 1 Press MUTE on the remote control again (or press VOLUME +/-) to be muted completely or by 20...
... (including multi-channel as well as stereo sources) is to resume the sound output. MUTE Flashes VOL 2 Press MUTE on the remote control to mute the sound. Muting the sound VOLUME CH TV VOL MUTE TV INPUT TV MUTE 1 Press MUTE on the remote control again (or press VOLUME +/-) to be muted completely or by 20...
Owner's Manual
Page 44
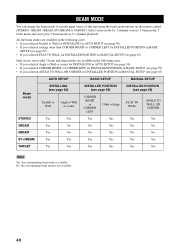
... Beam mode INSTALLING (see page 30) Parallel to Wall Angle to suit the input source of this unit using the beam mode buttons on the remote control (STEREO, 3BEAM, 5BEAM, ST+3BEAM or TARGET). Select stereo mode for 2-channel sources, 3 beam mode, 5 beam mode and stereo plus 3 beam and target modes...
... Beam mode INSTALLING (see page 30) Parallel to Wall Angle to suit the input source of this unit using the beam mode buttons on the remote control (STEREO, 3BEAM, 5BEAM, ST+3BEAM or TARGET). Select stereo mode for 2-channel sources, 3 beam mode, 5 beam mode and stereo plus 3 beam and target modes...

Owner's Manual
Page 45
... on the remote control to select the 5 beam mode. 5BEAM 1 1 Press YSP on your listening room. Vocals and instrumental sounds can be heard close to the center of the listening position while sound reflections from the front left and right, center, and surround left and right speakers. Press ST... are no obstacles placed in the path of sound beams in front of the stage. Stereo plus 3 beam mode. YSP 5BEAM 1 INPUTMODE SLEEP ST+3BEAM 2 3BEAM 3 STEREO TARGET 4 5 6 MUSIC 7 MOVIE 8 VOL MODE 9 SPORTS 0 OFF +10 SURROUND CH LEVEL CINEMA DSP MENU TEST ENTER RETURN BEAM ...
... on the remote control to select the 5 beam mode. 5BEAM 1 1 Press YSP on your listening room. Vocals and instrumental sounds can be heard close to the center of the listening position while sound reflections from the front left and right, center, and surround left and right speakers. Press ST... are no obstacles placed in the path of sound beams in front of the stage. Stereo plus 3 beam mode. YSP 5BEAM 1 INPUTMODE SLEEP ST+3BEAM 2 3BEAM 3 STEREO TARGET 4 5 6 MUSIC 7 MOVIE 8 VOL MODE 9 SPORTS 0 OFF +10 SURROUND CH LEVEL CINEMA DSP MENU TEST ENTER RETURN BEAM ...

Owner's Manual
Page 46
..., the surround modes (see page 44) and the CINEMA DSP programs (see page 68). STEREO 4 3BEAM 3 y You can enjoy excellent quality surround sound over a wider area. No audio is widened, you can achieve a more realistic surround effect if you play back multi-channel sources, surround left and ... whole family. Press STEREO on the remote control to replace your listening room. This mode is ideal for the front left and right speakers are output towards the walls in your TV speakers. This mode is selected. • When you play back Dolby Digital audio signals in the stereo mode, ...
..., the surround modes (see page 44) and the CINEMA DSP programs (see page 68). STEREO 4 3BEAM 3 y You can enjoy excellent quality surround sound over a wider area. No audio is widened, you can achieve a more realistic surround effect if you play back multi-channel sources, surround left and ... whole family. Press STEREO on the remote control to replace your listening room. This mode is ideal for the front left and right speakers are output towards the walls in your TV speakers. This mode is selected. • When you play back Dolby Digital audio signals in the stereo mode, ...

Owner's Manual
Page 47
... are not rebounded off the walls in your listening room or if you do not want the sound beams to be reflected on the remote control to select the target mode and then press / to adjust the angle. This mode is selected as the kitchen area in a single channel. TARGET 5 ...; • Press repeatedly to increase the horizontal angle on the left side. • Press repeatedly to this unit. BASIC OPERATION English 43 Target mode Outputs sound beams in your listening room. • If the target mode is ideal if you can adjust the horizontal angle of the...
... are not rebounded off the walls in your listening room or if you do not want the sound beams to be reflected on the remote control to select the target mode and then press / to adjust the angle. This mode is selected as the kitchen area in a single channel. TARGET 5 ...; • Press repeatedly to increase the horizontal angle on the left side. • Press repeatedly to this unit. BASIC OPERATION English 43 Target mode Outputs sound beams in your listening room. • If the target mode is ideal if you can adjust the horizontal angle of the...


