Owner's Manual
Page 2
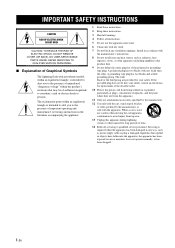
... an equilateral triangle, is damaged, liquid has been spilled or objects have fallen into your outlet, consult an electrician for your safety. NO USER-SERVICEABLE PARTS INSIDE. i En A polarized plug has two blades with the manufacturer's instructions. 8 Do not install near water. 6 Clean only with the apparatus. IMPORTANT SAFETY INSTRUCTIONS IMPORTANT...
... an equilateral triangle, is damaged, liquid has been spilled or objects have fallen into your outlet, consult an electrician for your safety. NO USER-SERVICEABLE PARTS INSIDE. i En A polarized plug has two blades with the manufacturer's instructions. 8 Do not install near water. 6 Clean only with the apparatus. IMPORTANT SAFETY INSTRUCTIONS IMPORTANT...

Owner's Manual
Page 3
... distribute this manual, meets FCC requirements. IMPORTANT SAFETY INSTRUCTIONS FCC INFORMATION (for Class "B" digital devices. IMPORTANT: When connecting this product is too late, Yamaha and the Electronic Industries Association's Consumer Electronics Group recommend you to comply with other electronic ...sounds is being affected by the FCC, to follow instructions could void your authority, granted by the interference. IMPORTANT NOTICE: DO NOT MODIFY THIS UNIT! NOTE: This product has been tested and found to be used according to the instructions found in FCC Regulations, Part...
... distribute this manual, meets FCC requirements. IMPORTANT SAFETY INSTRUCTIONS FCC INFORMATION (for Class "B" digital devices. IMPORTANT: When connecting this product is too late, Yamaha and the Electronic Industries Association's Consumer Electronics Group recommend you to comply with other electronic ...sounds is being affected by the FCC, to follow instructions could void your authority, granted by the interference. IMPORTANT NOTICE: DO NOT MODIFY THIS UNIT! NOTE: This product has been tested and found to be used according to the instructions found in FCC Regulations, Part...

Owner's Manual
Page 9
See "Enjoying surround sound" on page 32. 4 Run AUTO SETUP. For details regarding the operation of external components, refer to the supplied owner's manual for your operation. • This ... remote control of differences between the manual and the product, the product has priority. 1 Install this unit. Designs and specifications are subject to change in part as a result of this unit. If you want to make additional settings and adjustments 7 Run MANUAL SETUP to your TV and other external components. INTRODUCTION...
See "Enjoying surround sound" on page 32. 4 Run AUTO SETUP. For details regarding the operation of external components, refer to the supplied owner's manual for your operation. • This ... remote control of differences between the manual and the product, the product has priority. 1 Install this unit. Designs and specifications are subject to change in part as a result of this unit. If you want to make additional settings and adjustments 7 Run MANUAL SETUP to your TV and other external components. INTRODUCTION...
Owner's Manual
Page 10
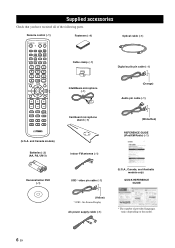
DECODE 0 +10 ENHANCER ENTRY MENU CAT/ A-E DISPLAY ENTER TV/AV YSP RETURN VOLUME CH TV VOL Fasteners (×4) Cable clamp (×1) IntelliBeam microphone (×1) Optical cable (×1) Digital audio pin cable (×1) (Orange) Audio pin cable (×1) MUTE TV INPUT TV MUTE CODE SET CH LEVEL ... models only) QUICK REFERENCE GUIDE (Yellow) * OSD: On-Screen Display AC power supply cable (×1) * The number of the following parts. Remote control (×1) STANDBY/ON POWER POWER AV TV DOCK DVD AUX1 AUX2 AUX3 TV INPUT1 MACRO STB TV PRESET/TUNE SEARCH MEMORY FM...
DECODE 0 +10 ENHANCER ENTRY MENU CAT/ A-E DISPLAY ENTER TV/AV YSP RETURN VOLUME CH TV VOL Fasteners (×4) Cable clamp (×1) IntelliBeam microphone (×1) Optical cable (×1) Digital audio pin cable (×1) (Orange) Audio pin cable (×1) MUTE TV INPUT TV MUTE CODE SET CH LEVEL ... models only) QUICK REFERENCE GUIDE (Yellow) * OSD: On-Screen Display AC power supply cable (×1) * The number of the following parts. Remote control (×1) STANDBY/ON POWER POWER AV TV DOCK DVD AUX1 AUX2 AUX3 TV INPUT1 MACRO STB TV PRESET/TUNE SEARCH MEMORY FM...
Owner's Manual
Page 41
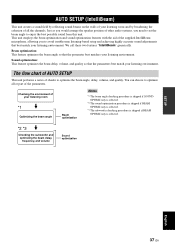
...AUTO SETUP (INTELLIBEAM) AUTO SETUP (IntelliBeam) This unit creates a sound field by reflecting sound beams on the walls of your listening room and by broadening the cohesion of all or part of the parameters. Sound optimization: This feature optimizes the beam delay, volume, and quality so...OPTIMZ only is selected. *2 *3 Checking the subwoofer and optimizing the beam delay, frequency, and volume Sound optimization SETUP English 37 En Checking the environment of other audio systems, you to optimize the beam angle, delay, volume, and quality. This unit employs the beam ...
...AUTO SETUP (INTELLIBEAM) AUTO SETUP (IntelliBeam) This unit creates a sound field by reflecting sound beams on the walls of your listening room and by broadening the cohesion of all or part of the parameters. Sound optimization: This feature optimizes the beam delay, volume, and quality so...OPTIMZ only is selected. *2 *3 Checking the subwoofer and optimizing the beam delay, frequency, and volume Sound optimization SETUP English 37 En Checking the environment of other audio systems, you to optimize the beam angle, delay, volume, and quality. This unit employs the beam ...

Owner's Manual
Page 42
... the front of this unit. - AUTO SETUP (IntelliBeam) Installing the IntelliBeam microphone The supplied IntelliBeam microphone collects and analyzes the sound that are in contact with the IntelliBeam microphone facing upward at your normal listening position. Notes • After you are no ...and set VOLUME CROSSOVER HIGH CUT the crossover/high-cut frequency to affix the IntelliBeam microphone at the same height as a protruding part of the walls. • The best possible results are achieved if the IntelliBeam microphone is not properly placed in your listening ...
... the front of this unit. - AUTO SETUP (IntelliBeam) Installing the IntelliBeam microphone The supplied IntelliBeam microphone collects and analyzes the sound that are in contact with the IntelliBeam microphone facing upward at your normal listening position. Notes • After you are no ...and set VOLUME CROSSOVER HIGH CUT the crossover/high-cut frequency to affix the IntelliBeam microphone at the same height as a protruding part of the walls. • The best possible results are achieved if the IntelliBeam microphone is not properly placed in your listening ...
Owner's Manual
Page 43
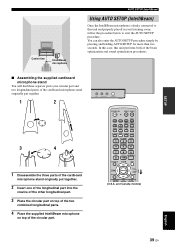
... the procedure below to start the AUTO SETUP procedure. DECODE 0 +10 ENHANCER ENTRY MENU CAT/ A-E DISPLAY ENTER TV/AV YSP RETURN VOLUME CH TV VOL (U.S.A. and Canada models) English 39 En INPUT VOLUME + STANDBY/ON STANDBY/ON POWER POWER AV ... of the beam optimization and sound optimization procedures. ■ Assembling the supplied cardboard microphone stand You will find three separate parts (one circular part and two longitudinal parts) of the cardboard microphone stand originally put together. 1 2 3 4 1 Disassemble the three parts of the cardboard microphone stand ...
... the procedure below to start the AUTO SETUP procedure. DECODE 0 +10 ENHANCER ENTRY MENU CAT/ A-E DISPLAY ENTER TV/AV YSP RETURN VOLUME CH TV VOL (U.S.A. and Canada models) English 39 En INPUT VOLUME + STANDBY/ON STANDBY/ON POWER POWER AV ... of the beam optimization and sound optimization procedures. ■ Assembling the supplied cardboard microphone stand You will find three separate parts (one circular part and two longitudinal parts) of the cardboard microphone stand originally put together. 1 2 3 4 1 Disassemble the three parts of the cardboard microphone stand ...

