
Owners Manual
Page 4
... never be opened for any damage resulting from use force on common operating errors before operating this unit. 1 To assure the finest performance, please read the "Troubleshooting" section on switches, knobs and/or cords. 10 When disconnecting the power supply cable from a wall outlet or this unit upside-down. Turn the power off by lightning, keep the power supply cable disconnected from the wall outlet, grasp the plug; WARNING...
... never be opened for any damage resulting from use force on common operating errors before operating this unit. 1 To assure the finest performance, please read the "Troubleshooting" section on switches, knobs and/or cords. 10 When disconnecting the power supply cable from a wall outlet or this unit upside-down. Turn the power off by lightning, keep the power supply cable disconnected from the wall outlet, grasp the plug; WARNING...

Owners Manual
Page 5
... 13 Connections 16 Before connecting components 17 Case 1: Connections using HDMI cables 18 Case 2: Connecting a DVD player/recorder and tuner (digital satellite, cable TV or digital airwave)..... 19 Case 3: Connecting other connection methods........ 20 Connecting a TV without an HDMI cable 21 Connecting a portable audio player 22 Connecting a subwoofer 22 Connecting the FM antenna 23 About the IR IN jack 23 Connecting the AC power supply cable 23 SETUP Getting started 24 Installing batteries in the remote control 24 Operation range of the remote control 24 Turning...
... 13 Connections 16 Before connecting components 17 Case 1: Connections using HDMI cables 18 Case 2: Connecting a DVD player/recorder and tuner (digital satellite, cable TV or digital airwave)..... 19 Case 3: Connecting other connection methods........ 20 Connecting a TV without an HDMI cable 21 Connecting a portable audio player 22 Connecting a subwoofer 22 Connecting the FM antenna 23 About the IR IN jack 23 Connecting the AC power supply cable 23 SETUP Getting started 24 Installing batteries in the remote control 24 Operation range of the remote control 24 Turning...

Owners Manual
Page 6
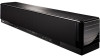
Yamaha YSP-3050 Digital Sound Projector challenges this preconception that complicated speaker setup and troublesome wiring go hand-in on the listening position from its built-in the hope that in order to fully enjoy the benefits of surround sound at home, you must endure the agony of wiring and installing a great number of speakers in 2 woofers and 21 full-range small speakers. The YSP-3050 projects sound beams...
Yamaha YSP-3050 Digital Sound Projector challenges this preconception that complicated speaker setup and troublesome wiring go hand-in on the listening position from its built-in the hope that in order to fully enjoy the benefits of surround sound at home, you must endure the agony of wiring and installing a great number of speakers in 2 woofers and 21 full-range small speakers. The YSP-3050 projects sound beams...

Owners Manual
Page 7
... Versatile Remote Control The supplied remote control comes with preset remote control codes used on various digital media such as the MP3 format. ◆ Neural Surround decoder. Sophisticated FM tuner ◆ 40-station random and direct preset tuning ◆ Automatic preset tuning XM™ Satellite Radio ◆ XM Satellite Radio tuning capability (using the XM MiniTuner Dock, and Antenna sold separately), which supports iPod (Click and Wheel), iPod nano, and iPod mini ◆...
... Versatile Remote Control The supplied remote control comes with preset remote control codes used on various digital media such as the MP3 format. ◆ Neural Surround decoder. Sophisticated FM tuner ◆ 40-station random and direct preset tuning ◆ Automatic preset tuning XM™ Satellite Radio ◆ XM Satellite Radio tuning capability (using the XM MiniTuner Dock, and Antenna sold separately), which supports iPod (Click and Wheel), iPod nano, and iPod mini ◆...

Owners Manual
Page 9
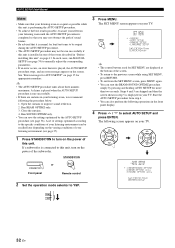
... "Enjoying surround sound" on page 94. 5 En English See "AUTO SETUP (IntelliBeam)" on page 24. 4 Run AUTO SETUP. See "Getting started" on page 29. 5 Play back a source. See "Connections" on page 16. 3 Prepare the remote control and turn on page 13. 2 Connect this unit to your operation. • This manual is printed prior to production. See "Playback" on the supplied remote control of this unit in part as a result...
... "Enjoying surround sound" on page 94. 5 En English See "AUTO SETUP (IntelliBeam)" on page 24. 4 Run AUTO SETUP. See "Getting started" on page 29. 5 Play back a source. See "Connections" on page 16. 3 Prepare the remote control and turn on page 13. 2 Connect this unit to your operation. • This manual is printed prior to production. See "Playback" on the supplied remote control of this unit in part as a result...

Owners Manual
Page 14
... input source (DVD, AUX1, AUX2, AUX3/DOCK, STB, TV, or FM/XM). 5 VOL MODE Turns on or off the volume modes (see page 69). 6 AUTO SETUP Enters the AUTO SETUP menu (see page 29). 7 Sound field program buttons Select the sound field programs (see page 65). 8 ENHANCER Turns on or off the Music Enhancer (see page 88). See "Controlling other components using the remote control once you want to operate. 2 STANDBY/ON Sets...
... input source (DVD, AUX1, AUX2, AUX3/DOCK, STB, TV, or FM/XM). 5 VOL MODE Turns on or off the volume modes (see page 69). 6 AUTO SETUP Enters the AUTO SETUP menu (see page 29). 7 Sound field program buttons Select the sound field programs (see page 65). 8 ENHANCER Turns on or off the Music Enhancer (see page 88). See "Controlling other components using the remote control once you want to operate. 2 STANDBY/ON Sets...

Owners Manual
Page 21
... digital jack, make sure the direction is correct. Optical cable Audio Attach to this unit Audio pin cable (supplied) (White) (Red) Optical cable (supplied) (White) (Red) Digital audio pin cable (supplied) (Orange) (Orange) 3.5 mm stereo mini plug cable 5 Subwoofer pin cable Video OSD video pin cable (supplied)/ Video pin cable (Yellow) (Yellow) Component video pin cable (Green) (Blue) (Red) (Green) (Blue) (Red) ■ Notes on the type of this unit plays back the audio signals in the following priority order: HDMI → Digital → Analog As default settings...
... digital jack, make sure the direction is correct. Optical cable Audio Attach to this unit Audio pin cable (supplied) (White) (Red) Optical cable (supplied) (White) (Red) Digital audio pin cable (supplied) (Orange) (Orange) 3.5 mm stereo mini plug cable 5 Subwoofer pin cable Video OSD video pin cable (supplied)/ Video pin cable (Yellow) (Yellow) Component video pin cable (Green) (Blue) (Red) (Green) (Blue) (Red) ■ Notes on the type of this unit plays back the audio signals in the following priority order: HDMI → Digital → Analog As default settings...

Owners Manual
Page 23
... operation manual supplied with your DVD player/recorder. • If your DVD player/recorder does not have a coaxial digital output jack, connect the analog audio output jacks on your TV to the HDMI OUT jack. Rear panel of your DVD player/recorder to the DVD COAXIAL DIGITAL INPUT jack on this unit. Connect the optical digital output jack on your DVD player/recorder. If not, adjust the system settings of your tuner (digital satellite, cable TV or digital...
... operation manual supplied with your DVD player/recorder. • If your DVD player/recorder does not have a coaxial digital output jack, connect the analog audio output jacks on your TV to the HDMI OUT jack. Rear panel of your DVD player/recorder to the DVD COAXIAL DIGITAL INPUT jack on this unit. Connect the optical digital output jack on your DVD player/recorder. If not, adjust the system settings of your tuner (digital satellite, cable TV or digital...

Owners Manual
Page 25
..., affix the optical cable in the supplied cable clamp (see page 17). Notes If you adjust the system parameters in SET MENU. Connections Connecting a TV without an HDMI cable For audio connection, connect the analog audio output jacks on your TV to the TV/STB AUDIO INPUT jacks on this unit to display the OSD for easy viewing when you make analog and optical digital audio connections at the same...
..., affix the optical cable in the supplied cable clamp (see page 17). Notes If you adjust the system parameters in SET MENU. Connections Connecting a TV without an HDMI cable For audio connection, connect the analog audio output jacks on your TV to the TV/STB AUDIO INPUT jacks on this unit to display the OSD for easy viewing when you make analog and optical digital audio connections at the same...
Owners Manual
Page 36
... to be output during the AUTO SETUP procedure. • The AUTO SETUP procedure may not be recalled later depending on the varying conditions of your listening environment (see page 37). 1 Press STANDBY/ON to turn on the power of the subwoofer. Open the curtains to YSP. 3 Press MENU. Close the curtains. 4. STANDBY/ON or STANDBY/ON Front panel Remote control 2 Set the operation mode selector to...
... to be output during the AUTO SETUP procedure. • The AUTO SETUP procedure may not be recalled later depending on the varying conditions of your listening environment (see page 37). 1 Press STANDBY/ON to turn on the power of the subwoofer. Open the curtains to YSP. 3 Press MENU. Close the curtains. 4. STANDBY/ON or STANDBY/ON Front panel Remote control 2 Set the operation mode selector to...

Owners Manual
Page 51
... can mount it indoors or outdoors. • Use the "XM ANTENNA LEVEL" parameter in superior digital audio from classical to Customer Agreement available at or near a southfacing window with the Neural Surround decoder that plays back the XM HD surround sound content of this unit. DIGITAL INPUT AUX 2 DVD COAXIAL OPTICAL AUX1 TV/STB XM IR IN Rear panel of the XM Satellite Radio...
... can mount it indoors or outdoors. • Use the "XM ANTENNA LEVEL" parameter in superior digital audio from classical to Customer Agreement available at or near a southfacing window with the Neural Surround decoder that plays back the XM HD surround sound content of this unit. DIGITAL INPUT AUX 2 DVD COAXIAL OPTICAL AUX1 TV/STB XM IR IN Rear panel of the XM Satellite Radio...

Owners Manual
Page 77
... input selector buttons on the remote control). Also in your TV correctly. 9 Use the remote control supplied with your TV to ON. For details about setting external components, see the owner's manual supplied with your TV) if you cannot operate this unit in synchronization with your TV. • While you are playing back audio from a non-HDMI component, turning off the power of your TV with the remote control supplied...
... input selector buttons on the remote control). Also in your TV correctly. 9 Use the remote control supplied with your TV to ON. For details about setting external components, see the owner's manual supplied with your TV) if you cannot operate this unit in synchronization with your TV. • While you are playing back audio from a non-HDMI component, turning off the power of your TV with the remote control supplied...

Owners Manual
Page 88
MANUAL SETUP ■ HDMI SET (HDMI settings) Use to change the HDMI audio/video output/input to the HDMI OUT jacks. ON (TV/STB) HDMI2 DVD;;;;;;;;;;; ON ( DVD ) p [ ]/[ ]:Up/Down [ ]/[ ]:Sel [ENTER]:Return p p p p p p p p p p E)HDMI SET . Choices: YSP-3050, OTHER a)SUPPORT AUDIO YSP-3050 OTHER p [ ]/[ ]:Select [ENTER]:Return Notes • This setting is effective when HDMI CONTROL is set to OFF. Choices: SUPPORT AUDIO (Support audio), AUDIO SELECT (Audio select), VIDEO INFO (Video information), UP-SCALING...
MANUAL SETUP ■ HDMI SET (HDMI settings) Use to change the HDMI audio/video output/input to the HDMI OUT jacks. ON (TV/STB) HDMI2 DVD;;;;;;;;;;; ON ( DVD ) p [ ]/[ ]:Up/Down [ ]/[ ]:Sel [ENTER]:Return p p p p p p p p p p E)HDMI SET . Choices: YSP-3050, OTHER a)SUPPORT AUDIO YSP-3050 OTHER p [ ]/[ ]:Select [ENTER]:Return Notes • This setting is effective when HDMI CONTROL is set to OFF. Choices: SUPPORT AUDIO (Support audio), AUDIO SELECT (Audio select), VIDEO INFO (Video information), UP-SCALING...
Owners Manual
Page 98
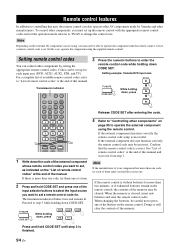
... the input selector buttons to step 3 while holding down CODE SET. Note If the manufacturer of the memory may be able to operate the component with the appropriate remote control codes and set up for . Remote control features Remote control features In addition to controlling this unit, the remote control can control other components by Yamaha and other manufacturers. In this manual and start over from step 1. The transmission indicator flashes...
... the input selector buttons to step 3 while holding down CODE SET. Note If the manufacturer of the memory may be able to operate the component with the appropriate remote control codes and set up for . Remote control features Remote control features In addition to controlling this unit, the remote control can control other components by Yamaha and other manufacturers. In this manual and start over from step 1. The transmission indicator flashes...

Owners Manual
Page 104
... power supply cable, plug it normally. to the AC wall outlet. No sound from the effect channels. set Raise the level of the surround channels is pressed, or enters the standby mode soon after 30 seconds, and use it back in after the power has been turned on the remote control to a strong external electric shock (such as PCM signals with INPUT or the input selector buttons. Set...
... power supply cable, plug it normally. to the AC wall outlet. No sound from the effect channels. set Raise the level of the surround channels is pressed, or enters the standby mode soon after 30 seconds, and use it back in after the power has been turned on the remote control to a strong external electric shock (such as PCM signals with INPUT or the input selector buttons. Set...

Owners Manual
Page 105
... player. Set the input mode to "OTHER". This unit does not operate properly. The TV does not accept the multi-channel audio signals. My Beam auto-adjust function does not work properly because of the condition of the sound beam. The remote control may be played back. (Dolby Digital or DTS indicator does not light up in the front panel display.) The connected component is set to "YSP-3050...
... player. Set the input mode to "OTHER". This unit does not operate properly. The TV does not accept the multi-channel audio signals. My Beam auto-adjust function does not work properly because of the condition of the sound beam. The remote control may be played back. (Dolby Digital or DTS indicator does not light up in the front panel display.) The connected component is set to "YSP-3050...
Owners Manual
Page 107
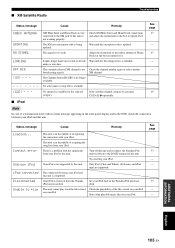
... not working properly. audio or text data. Adjust the orientation of the indoor antenna of this unit. Connect error Unknown iPod iPod connected Disconnected Unable to the DOCK terminal of Home Dock for the best reception level. XM Mini-Tuner and Home Dock are supported. The signal is removed from your iPod to the XM jack of recognizing the connection with the signal path from the Yamaha iPod universal dock...
... not working properly. audio or text data. Adjust the orientation of the indoor antenna of this unit. Connect error Unknown iPod iPod connected Disconnected Unable to the DOCK terminal of Home Dock for the best reception level. XM Mini-Tuner and Home Dock are supported. The signal is removed from your iPod to the XM jack of recognizing the connection with the signal path from the Yamaha iPod universal dock...
Owners Manual
Page 108
.../". 104 En This system produces practically distortion-free 6-channel sound (technically, left, right, and center channels, 2 surround channels, plus an LFE 0.1-channel as multi-channel digital audio using a single cable. Two modes are also available for 2-channel sources in combination with Dolby Surround. The surround channel reproduces sound within a narrow frequency range. With an additional channel especially for bass effects, called LFE (low-frequency effect...
.../". 104 En This system produces practically distortion-free 6-channel sound (technically, left, right, and center channels, 2 surround channels, plus an LFE 0.1-channel as multi-channel digital audio using a single cable. Two modes are also available for 2-channel sources in combination with Dolby Surround. The surround channel reproduces sound within a narrow frequency range. With an additional channel especially for bass effects, called LFE (low-frequency effect...

Owners Manual
Page 117
... right channel Surround left channel Surround right channel Install this unit by using a rack, etc. You can enjoy the multi-channel audio from the DVD player/recorder and the analog/digital audio from the adjacent walls. Check the direction Optical cable Pull out the cap before installing this unit. To the AC wall outlet Do not plug the power supply cable into an AC wall outlet until all connections are complete...
... right channel Surround left channel Surround right channel Install this unit by using a rack, etc. You can enjoy the multi-channel audio from the DVD player/recorder and the analog/digital audio from the adjacent walls. Check the direction Optical cable Pull out the cap before installing this unit. To the AC wall outlet Do not plug the power supply cable into an AC wall outlet until all connections are complete...

Owners Manual
Page 118
... your TV speakers, mute the volume on the screen. Prepare to leave the room in surround sound 1 Select the DVD video input on the TV. 2 Set the operation mode selector to YSP. INTELLIBEAM MIC 4 Enjoying surround sound Enjoy TV or DVD digital audio in the Owner's Manual. 5BEAM 1 ST+3BEAM 2 3BEAM 3 STEREO 4 MY BEAM 5 MY SUR. 6 To fine-tune the listening environment parameters manually or make sure place...
... your TV speakers, mute the volume on the screen. Prepare to leave the room in surround sound 1 Select the DVD video input on the TV. 2 Set the operation mode selector to YSP. INTELLIBEAM MIC 4 Enjoying surround sound Enjoy TV or DVD digital audio in the Owner's Manual. 5BEAM 1 ST+3BEAM 2 3BEAM 3 STEREO 4 MY BEAM 5 MY SUR. 6 To fine-tune the listening environment parameters manually or make sure place...


