
Owner's Manual
Page 5
...digital airwave tuner 20 Connecting other external components 21 Connecting a subwoofer 22 Affixing the optical cable 23 Connecting the power supply cable 23 About the RS-232C/REMOTE IN/ IR-OUT terminals 23 SETUP GETTING STARTED 24 Installing batteries in the remote control 24 Operation range of the remote control 24 Using the remote control... 37 BASIC OPERATION PLAYBACK 39 Selecting the input source 39 Playing back sources 40 Adjusting the volume 40 Muting the sound 41 BEAM MODE 42 5 beam mode 43 Stereo plus 3 beam mode 43 3 beam mode 44 Stereo mode 44 Target ...
...digital airwave tuner 20 Connecting other external components 21 Connecting a subwoofer 22 Affixing the optical cable 23 Connecting the power supply cable 23 About the RS-232C/REMOTE IN/ IR-OUT terminals 23 SETUP GETTING STARTED 24 Installing batteries in the remote control 24 Operation range of the remote control 24 Using the remote control... 37 BASIC OPERATION PLAYBACK 39 Selecting the input source 39 Playing back sources 40 Adjusting the volume 40 Muting the sound 41 BEAM MODE 42 5 beam mode 43 Stereo plus 3 beam mode 43 3 beam mode 44 Stereo mode 44 Target ...
Owner's Manual
Page 7
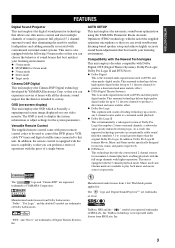
... sources respectively. In addition, the remote control is equipped with all the dramatic sound impact that best matches your listening environment. ◆ 5 beam mode ◆ ST(STEREO)+3 beam mode ◆ 3 beam mode ◆ Stereo mode ◆ Target mode Cinema DSP Digital This unit employs the Cinema DSP Digital technology developed by YAMAHA Electronics Corp. As a result...
... sources respectively. In addition, the remote control is equipped with all the dramatic sound impact that best matches your listening environment. ◆ 5 beam mode ◆ ST(STEREO)+3 beam mode ◆ 3 beam mode ◆ Stereo mode ◆ Target mode Cinema DSP Digital This unit employs the Cinema DSP Digital technology developed by YAMAHA Electronics Corp. As a result...
Owner's Manual
Page 8
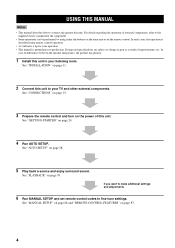
... priority. 1 Install this unit to your listening room. See "PLAYBACK" on page 28. 5 Play back a source and enjoy surround sound. See "INSTALLATION" on the remote control. See "AUTO SETUP" on page 39. In case of improvements, etc. See "GETTING STARTED" on page 87. 4 Design and ... other external components. If you want to make additional settings and adjustments 6 Run MANUAL SETUP and set remote control codes to production. See "MANUAL SETUP" on page 68 and "REMOTE CONTROL FEATURES" on page 24. 4 Run AUTO SETUP. USING THIS MANUAL USING THIS MANUAL Notes •...
... priority. 1 Install this unit to your listening room. See "PLAYBACK" on page 28. 5 Play back a source and enjoy surround sound. See "INSTALLATION" on the remote control. See "AUTO SETUP" on page 39. In case of improvements, etc. See "GETTING STARTED" on page 87. 4 Design and ... other external components. If you want to make additional settings and adjustments 6 Run MANUAL SETUP and set remote control codes to production. See "MANUAL SETUP" on page 68 and "REMOTE CONTROL FEATURES" on page 24. 4 Run AUTO SETUP. USING THIS MANUAL USING THIS MANUAL Notes •...

Owner's Manual
Page 9
...ACCESSORIES Check that you have received all of the following parts. Remote control (×1) Batteries (×2) (AA, R6, UM-3) Optical cable (×1) STANDBY/ON POWER POWER AV TV DVD AUX VCR INPUT1 STB TV INPUT2 TV MACRO YSP 5BEAM 1 INPUTMODE SLEEP ST+3BEAM 2 3BEAM 3 STEREO TARGET ...4 5 6 MUSIC 7 MOVIE 8 VOL MODE 9 SPORTS 0 OFF +10 SURROUND CH LEVEL CINEMA DSP MENU TEST ENTER RETURN VOLUME CH TV VOL Video pin cable (×1) Digital audio pin cable (×1) ...
...ACCESSORIES Check that you have received all of the following parts. Remote control (×1) Batteries (×2) (AA, R6, UM-3) Optical cable (×1) STANDBY/ON POWER POWER AV TV DVD AUX VCR INPUT1 STB TV INPUT2 TV MACRO YSP 5BEAM 1 INPUTMODE SLEEP ST+3BEAM 2 3BEAM 3 STEREO TARGET ...4 5 6 MUSIC 7 MOVIE 8 VOL MODE 9 SPORTS 0 OFF +10 SURROUND CH LEVEL CINEMA DSP MENU TEST ENTER RETURN VOLUME CH TV VOL Video pin cable (×1) Digital audio pin cable (×1) ...

Owner's Manual
Page 10
... volume level of this unit or sets it can reproduce sound. • In the standby mode, this unit. 3 Remote control sensor Receives infrared signals from the remote control. 6 Notes • When you will hear a click and there will be used to run AUTO SETUP (see page 28). 2 Front panel ...display Shows information about the operational status of this unit consumes a small amount of power in order to receive infrared-signals from the remote control. 4 INPUT Press repeatedly to the standby mode (see page 40). 6 STANDBY/ON Turns on the power of this unit, you turn on ...
... volume level of this unit or sets it can reproduce sound. • In the standby mode, this unit. 3 Remote control sensor Receives infrared signals from the remote control. 6 Notes • When you will hear a click and there will be used to run AUTO SETUP (see page 28). 2 Front panel ...display Shows information about the operational status of this unit consumes a small amount of power in order to receive infrared-signals from the remote control. 4 INPUT Press repeatedly to the standby mode (see page 40). 6 STANDBY/ON Turns on the power of this unit, you turn on ...

Owner's Manual
Page 13
... selected component or sets it to control the DVD player of the VCR (see pages 88 and 89). Increases or decreases the volume level of this window at the component you set the appropriate remote control codes. INTRODUCTION CONTROLS AND FUNCTIONS Remote control This section describes the function of each speaker (see page 83). C MUTE Mutes the sound.
... selected component or sets it to control the DVD player of the VCR (see pages 88 and 89). Increases or decreases the volume level of this window at the component you set the appropriate remote control codes. INTRODUCTION CONTROLS AND FUNCTIONS Remote control This section describes the function of each speaker (see page 83). C MUTE Mutes the sound.
Owner's Manual
Page 14
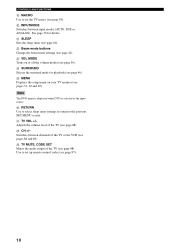
... 69). M VOL MODE Turns on your TV monitor (see pages 88 and 89). See page 39 for playback (see page 87). 10 CONTROLS AND FUNCTIONS I MACRO Use to set up remote control codes (see page 46). J INPUTMODE Switches between channels of the TV (see page 56). K SLEEP Sets the sleep timer (see page... when DVD is selected as the input source. P RETURN Use to select sleep timer settings or return to set the TV macro (see page 60). R CH +/- Use to the previous SET MENU screen.
... 69). M VOL MODE Turns on your TV monitor (see pages 88 and 89). See page 39 for playback (see page 87). 10 CONTROLS AND FUNCTIONS I MACRO Use to set up remote control codes (see page 46). J INPUTMODE Switches between channels of the TV (see page 56). K SLEEP Sets the sleep timer (see page... when DVD is selected as the input source. P RETURN Use to select sleep timer settings or return to set the TV macro (see page 60). R CH +/- Use to the previous SET MENU screen.

Owner's Manual
Page 28
...remote control may leak. Exhausted batteries remain in the remote control Operation range of conditions: - The buttons on the remote control. • Do not drop the remote control. • Do not leave or store the remote control in the following cases: - Make sure you notice the following types of the remote control The remote control... 3 Close the battery cover. Use the remote control within 6 m (19.7 ft) of the remote control decreases considerably. GETTING STARTED GETTING STARTED Installing batteries in the remote control. - Press Approximately 6 m (19.7 ft...
...remote control may leak. Exhausted batteries remain in the remote control Operation range of conditions: - The buttons on the remote control. • Do not drop the remote control. • Do not leave or store the remote control in the following cases: - Make sure you notice the following types of the remote control The remote control... 3 Close the battery cover. Use the remote control within 6 m (19.7 ft) of the remote control decreases considerably. GETTING STARTED GETTING STARTED Installing batteries in the remote control. - Press Approximately 6 m (19.7 ft...

Owner's Manual
Page 29
...5 3BEAM 3 TV 6 MUSIC 7 MOVIE 8 VOL MODE 9 SPORTS 0 OFF +10 SURROUND TV CH LEVEL CINEMA DSP MENU 5 TEST ENTER RETURN 6 7 8 9 1 Input selector buttons 2 YSP 3 Beam mode buttons 4 Sound field program buttons 5 Cursor buttons / / / , ENTER 6 VOL MODE 7 SURROUND 8 MENU ...9 RETURN Turning on the power INPUT VOLUME + STANDBY/ON STANDBY/ON POWER POWER AV TV DVD AUX VCR INPUT1 STB TV INPUT2 TV MACRO 1 Press STANDBY/ON on the front panel or on the remote control...
...5 3BEAM 3 TV 6 MUSIC 7 MOVIE 8 VOL MODE 9 SPORTS 0 OFF +10 SURROUND TV CH LEVEL CINEMA DSP MENU 5 TEST ENTER RETURN 6 7 8 9 1 Input selector buttons 2 YSP 3 Beam mode buttons 4 Sound field program buttons 5 Cursor buttons / / / , ENTER 6 VOL MODE 7 SURROUND 8 MENU ...9 RETURN Turning on the power INPUT VOLUME + STANDBY/ON STANDBY/ON POWER POWER AV TV DVD AUX VCR INPUT1 STB TV INPUT2 TV MACRO 1 Press STANDBY/ON on the front panel or on the remote control...
Owner's Manual
Page 30
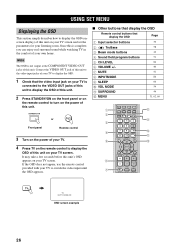
...to display the OSD. 1 Check that display the OSD Page 1 Input selector buttons 39 2 TruBass 3 Beam mode buttons 4 Sound field program buttons 5 CH LEVEL 6 VOLUME +/- 7 MUTE 8 INPUTMODE 9 SLEEP 0 VOL MODE A SURROUND B MENU 58 42 51 84 40 41 86...YSP 5BEAM 1 INPUTMODE SLEEP ST+3BEAM 2 3BEAM 3 STEREO TARGET 4 5 6 MUSIC 7 MOVIE 8 VOL MODE 9 SPORTS 0 OFF +10 SURROUND TV CH LEVEL CINEMA DSP MENU TEST ENTER RETURN VOLUME CH TV VOL MUTE TV INPUT TV MUTE CODE SET 8 9 0 A B TV TV AUTO:ANALOG OSD screen example 26 STANDBY/ON or Front panel Remote control...
...to display the OSD. 1 Check that display the OSD Page 1 Input selector buttons 39 2 TruBass 3 Beam mode buttons 4 Sound field program buttons 5 CH LEVEL 6 VOLUME +/- 7 MUTE 8 INPUTMODE 9 SLEEP 0 VOL MODE A SURROUND B MENU 58 42 51 84 40 41 86...YSP 5BEAM 1 INPUTMODE SLEEP ST+3BEAM 2 3BEAM 3 STEREO TARGET 4 5 6 MUSIC 7 MOVIE 8 VOL MODE 9 SPORTS 0 OFF +10 SURROUND TV CH LEVEL CINEMA DSP MENU TEST ENTER RETURN VOLUME CH TV VOL MUTE TV INPUT TV MUTE CODE SET 8 9 0 A B TV TV AUTO:ANALOG OSD screen example 26 STANDBY/ON or Front panel Remote control...
Owner's Manual
Page 33
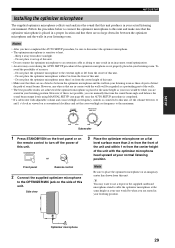
... unit. - SETUP AUTO SETUP Installing the optimizer microphone The supplied optimizer microphone collects and analyzes the sound that this unit produces in your listening room. Front panel Remote control 2 Connect the supplied optimizer microphone to the OPTIMIZER MIC jack on top of this unit. •... as viewed on the remote control to the maximum. To avoid the possibility of this unit. Notes • After you have completed the AUTO SETUP procedure, be when you can manually fine-tune the sound beam angle and balance the sound beam output levels using MANUAL...
... unit. - SETUP AUTO SETUP Installing the optimizer microphone The supplied optimizer microphone collects and analyzes the sound that this unit produces in your listening room. Front panel Remote control 2 Connect the supplied optimizer microphone to the OPTIMIZER MIC jack on top of this unit. •... as viewed on the remote control to the maximum. To avoid the possibility of this unit. Notes • After you have completed the AUTO SETUP procedure, be when you can manually fine-tune the sound beam angle and balance the sound beam output levels using MANUAL...

Owner's Manual
Page 35
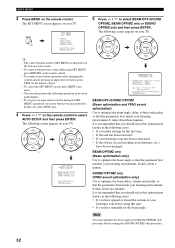
...and properly placed in "Before installing this unit" on the power of this unit. STANDBY/ON or TEST ENTER RETURN Front panel Remote control 2 Press YSP on page 35 for appropriate remedies. INPUT VOLUME + STANDBY/ON STANDBY/ON POWER POWER AV TV DVD VCR STB TV AUX ...3BEAM 3 STEREO UNIVERSAL 4 5 6 MUSIC 7 MOVIE 8 NIGHT 9 SPORTS 0 OFF +10 SURROUND CH LEVEL CINEMA DSP MENU Notes • If your listening room has curtains, open the curtains before starting the BEAM OPT+SOUND OPTIMZ or the BEAM OPTIMZ only procedure. • Make sure that your listening room is as...
...and properly placed in "Before installing this unit" on the power of this unit. STANDBY/ON or TEST ENTER RETURN Front panel Remote control 2 Press YSP on page 35 for appropriate remedies. INPUT VOLUME + STANDBY/ON STANDBY/ON POWER POWER AV TV DVD VCR STB TV AUX ...3BEAM 3 STEREO UNIVERSAL 4 5 6 MUSIC 7 MOVIE 8 NIGHT 9 SPORTS 0 OFF +10 SURROUND CH LEVEL CINEMA DSP MENU Notes • If your listening room has curtains, open the curtains before starting the BEAM OPT+SOUND OPTIMZ or the BEAM OPTIMZ only procedure. • Make sure that your listening room is as...
Owner's Manual
Page 36
...cursor buttons become ineffective. BEAM OPTIMZ only (Beam optimization only) Use to select BEAM OPT+SOUND OPTIMZ, BEAM OPTIMZ only or SOUND OPTIMZ only and then press ENTER. The following screen appears on the remote control. • To cancel the SET MENU screen, press MENU once more. • You...: • If you make settings for SET MENU are displayed on the bottom of YSP MIN 2m/6.5ft [ ]/[ ]:Up/Down/[p]/[ ]:Sel [ENTER]:Start BEAM OPT+SOUND OPTIMZ (Beam optimization and YPAO sound optimization) Use to the previous screen while using this optimization feature in front of the ...
...cursor buttons become ineffective. BEAM OPTIMZ only (Beam optimization only) Use to select BEAM OPT+SOUND OPTIMZ, BEAM OPTIMZ only or SOUND OPTIMZ only and then press ENTER. The following screen appears on the remote control. • To cancel the SET MENU screen, press MENU once more. • You...: • If you make settings for SET MENU are displayed on the bottom of YSP MIN 2m/6.5ft [ ]/[ ]:Up/Down/[p]/[ ]:Sel [ENTER]:Start BEAM OPT+SOUND OPTIMZ (Beam optimization and YPAO sound optimization) Use to the previous screen while using this optimization feature in front of the ...
Owner's Manual
Page 40
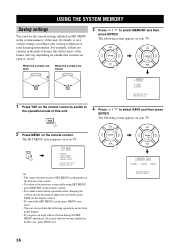
...the effectiveness of this unit. In this unit. ENTER ENTER ;MEMORY 1)LOAD 2)SAVE [ ]/[ ]:Up/Down [ENTER]:Enter 1 Press YSP on the remote control to switch to the operation mode of the screen. • To return to the previous screen while using SET MENU, press RETURN ... MENU once more. • You can save certain settings according to select MEMORY and then press ENTER. The SET MENU screen appears on the remote control. p p p p 2 Press MENU on your listening environment. The following screen appears on your TV. The following screen appears on your TV...
...the effectiveness of this unit. In this unit. ENTER ENTER ;MEMORY 1)LOAD 2)SAVE [ ]/[ ]:Up/Down [ENTER]:Enter 1 Press YSP on the remote control to switch to the operation mode of the screen. • To return to the previous screen while using SET MENU, press RETURN ... MENU once more. • You can save certain settings according to select MEMORY and then press ENTER. The SET MENU screen appears on the remote control. p p p p 2 Press MENU on your listening environment. The following screen appears on your TV. The following screen appears on your TV...

Owner's Manual
Page 41
...; If you press an input selector button during the SET MENU operations, the cursor buttons become ineffective. The following operations in "Saving settings" on the remote control. ENTER 2)MEMORY SAVE USER1 Saving ! []:Select SET MENU . ;MEMORY ;AUTO SETUP ;BASIC SETUP ;MANUAL SETUP [ ]/[ ]:Up/Down [ENTER]:Enter p...and then press ENTER. The SET MENU screen disappears from your TV. The new parameters are saved, the display returns to exit. YSP 2)MEMORY SAVE USER1 Save Now? [ENTER]:Enter 6 Press ENTER again. ENTER ENTER USING THE SYSTEM MEMORY Loading settings You can also...
...; If you press an input selector button during the SET MENU operations, the cursor buttons become ineffective. The following operations in "Saving settings" on the remote control. ENTER 2)MEMORY SAVE USER1 Saving ! []:Select SET MENU . ;MEMORY ;AUTO SETUP ;BASIC SETUP ;MANUAL SETUP [ ]/[ ]:Up/Down [ENTER]:Enter p...and then press ENTER. The SET MENU screen disappears from your TV. The new parameters are saved, the display returns to exit. YSP 2)MEMORY SAVE USER1 Save Now? [ENTER]:Enter 6 Press ENTER again. ENTER ENTER USING THE SYSTEM MEMORY Loading settings You can also...
Owner's Manual
Page 43
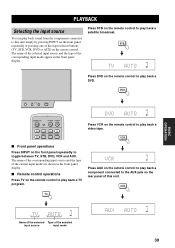
... on the remote control to play back a component connected to the AUX jack on the rear panel of this unit simply by pressing INPUT on the front panel repeatedly or pressing one of the selected input source input mode 39 PLAYBACK PLAYBACK Selecting the input source You can play back sound from the...
... on the remote control to play back a component connected to the AUX jack on the rear panel of this unit simply by pressing INPUT on the front panel repeatedly or pressing one of the selected input source input mode 39 PLAYBACK PLAYBACK Selecting the input source You can play back sound from the...

Owner's Manual
Page 44
.../ON VOLUME CH TV VOL 2 Switch to the video input on your TV using the remote control supplied with the TV and the DVD player. 1 Turn on this unit to around -25 dB. • If you can use the remote control supplied with the DVD player. Audio signals from the speakers of the ...volume level increases or decreases each time you press VOLUME +/-. • You can continuously increase or decrease the volume level if you cannot hear any sound. 4 Press DVD on how to set the appropriate remote control codes for your DVD player using ...
.../ON VOLUME CH TV VOL 2 Switch to the video input on your TV using the remote control supplied with the TV and the DVD player. 1 Turn on this unit to around -25 dB. • If you can use the remote control supplied with the DVD player. Audio signals from the speakers of the ...volume level increases or decreases each time you press VOLUME +/-. • You can continuously increase or decrease the volume level if you cannot hear any sound. 4 Press DVD on how to set the appropriate remote control codes for your DVD player using ...

Owner's Manual
Page 45
MUTE Flashes VOL 2 Press MUTE on the remote control to mute the sound. y You can select whether the sound output is to be muted completely or by 20 dB when you press VOLUME +/-), and the volume level indicator lights up VOL Note The sound output of the current volume level appears if you press MUTE (...OFF appears temporarily in the front panel display, and the volume level indicator flashes. PLAYBACK 41 BASIC OPERATION MUTE VOLUME or Lights up . Muting the sound VOLUME CH TV VOL MUTE TV INPUT TV MUTE 1 Press MUTE on the remote control again (or press VOLUME +/-) to resume the...
MUTE Flashes VOL 2 Press MUTE on the remote control to mute the sound. y You can select whether the sound output is to be muted completely or by 20 dB when you press VOLUME +/-), and the volume level indicator lights up VOL Note The sound output of the current volume level appears if you press MUTE (...OFF appears temporarily in the front panel display, and the volume level indicator flashes. PLAYBACK 41 BASIC OPERATION MUTE VOLUME or Lights up . Muting the sound VOLUME CH TV VOL MUTE TV INPUT TV MUTE 1 Press MUTE on the remote control again (or press VOLUME +/-) to resume the...

Owner's Manual
Page 46
... in BASIC SETUP (see page 33) Parallel to Wall Angle to suit the input source of this unit using the beam mode buttons on the remote control (STEREO, 3BEAM, 5BEAM, ST+3BEAM or TARGET). All the beam modes are available in the following cases: • If you selected Parallel to Wall for...
... in BASIC SETUP (see page 33) Parallel to Wall Angle to suit the input source of this unit using the beam mode buttons on the remote control (STEREO, 3BEAM, 5BEAM, ST+3BEAM or TARGET). All the beam modes are available in the following cases: • If you selected Parallel to Wall for...

Owner's Manual
Page 47
... the remote control to switch to the listening position. 43 YSP 5BEAM 1 INPUTMODE SLEEP ST+3BEAM 2 3BEAM 3 STEREO TARGET 4 5 6 MUSIC 7 MOVIE 8 VOL MODE 9 SPORTS 0 OFF +10 SURROUND CH LEVEL CINEMA DSP MENU TEST ENTER RETURN BEAM MODE 5 beam mode Outputs sound beams from the front left and right, center, and surround left and right speakers. ST...
... the remote control to switch to the listening position. 43 YSP 5BEAM 1 INPUTMODE SLEEP ST+3BEAM 2 3BEAM 3 STEREO TARGET 4 5 6 MUSIC 7 MOVIE 8 VOL MODE 9 SPORTS 0 OFF +10 SURROUND CH LEVEL CINEMA DSP MENU TEST ENTER RETURN BEAM MODE 5 beam mode Outputs sound beams from the front left and right, center, and surround left and right speakers. ST...


