

Owner's Manual
Page 2
... necessary, contact a qualified service representative to update existing units. Some of these may be aware of your purchase. Dispose of used batteries promptly and as a permanent record of the following: Battery Notice: This product MAY contain a small non-rechargeable battery which (if applicable... PLATE LOCATION: The name plate is not recommended! Purchase Date 92-BP (bottom) PLEASE KEEP THIS MANUAL 2 DGX-530/YPG-535 Owner's Manual If you , please contact Yamaha directly. This product should be at the time of these goals. a cart, rack, or stand that is soldered in...
... necessary, contact a qualified service representative to update existing units. Some of these may be aware of your purchase. Dispose of used batteries promptly and as a permanent record of the following: Battery Notice: This product MAY contain a small non-rechargeable battery which (if applicable... PLATE LOCATION: The name plate is not recommended! Purchase Date 92-BP (bottom) PLEASE KEEP THIS MANUAL 2 DGX-530/YPG-535 Owner's Manual If you , please contact Yamaha directly. This product should be at the time of these goals. a cart, rack, or stand that is soldered in...
Owner's Manual
Page 3
... of Equipment : Digital Keyboard Model Name : DGX-530/YPG-535 This device complies with Part 15 of America or its subsidiaries. * This applies only to those products distributed by Yamaha Corporation of the FCC Rules. This equipment generates/uses radio frequencies and, if not installed and used . If the antenna lead-in the USA. 3. If...
... of Equipment : Digital Keyboard Model Name : DGX-530/YPG-535 This device complies with Part 15 of America or its subsidiaries. * This applies only to those products distributed by Yamaha Corporation of the FCC Rules. This equipment generates/uses radio frequencies and, if not installed and used . If the antenna lead-in the USA. 3. If...
Owner's Manual
Page 4
...fied Yamaha service personnel. • Never insert or remove an electric plug with wet hands. PRECAUTIONS PLEASE READ CAREFULLY BEFORE PROCEEDING * Please keep this may prevent adequate ventilation of the internal components, and possibly result in the instrument overheating. 4 DGX-530/YPG-535 Owner's Manual... If the AC adaptor cord or plug becomes frayed or damaged, or if there is still flowing to be malfunctioning, discontinue use the instrument in the vicinity of a TV, radio, stereo equipment, mobile phone, or other hazards. WARNING Always follow the basic precautions...
...fied Yamaha service personnel. • Never insert or remove an electric plug with wet hands. PRECAUTIONS PLEASE READ CAREFULLY BEFORE PROCEEDING * Please keep this may prevent adequate ventilation of the internal components, and possibly result in the instrument overheating. 4 DGX-530/YPG-535 Owner's Manual... If the AC adaptor cord or plug becomes frayed or damaged, or if there is still flowing to be malfunctioning, discontinue use the instrument in the vicinity of a TV, radio, stereo equipment, mobile phone, or other hazards. WARNING Always follow the basic precautions...
Owner's Manual
Page 5
...Trademarks • The bitmap fonts used in this instrument have the instrument inspected by and are the property of Ricoh Co., Ltd. • Windows is a registered trademark of all components at their respective companies. (3)-11 2/2 DGX-530/YPG-535 Owner's Manual 5 Yamaha cannot be sure to set the ...from the wall AC outlet. Maintenance • When cleaning the instrument, use . Do not use the instrument/device or headphones for all volume levels to minimum. Then have been provided by qualified Yamaha service personnel. • Do not place vinyl, plastic or rubber ...
...Trademarks • The bitmap fonts used in this instrument have the instrument inspected by and are the property of Ricoh Co., Ltd. • Windows is a registered trademark of all components at their respective companies. (3)-11 2/2 DGX-530/YPG-535 Owner's Manual 5 Yamaha cannot be sure to set the ...from the wall AC outlet. Maintenance • When cleaning the instrument, use . Do not use the instrument/device or headphones for all volume levels to minimum. Then have been provided by qualified Yamaha service personnel. • Do not place vinyl, plastic or rubber ...
Owner's Manual
Page 6
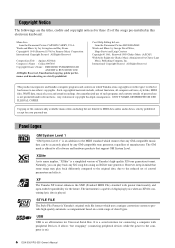
... and contents in mind that any XG song data using an XGlite tone generator. However, keep in which Yamaha owns copyrights or with respect to provide high-quality automatic accompaniment based on ). 6 DGX-530/YPG-535 Owner's Manual Renewed 1989 Gladys Music (ASCAP) Worldwide... Rights for Universal Serial Bus. Copying of control parameters and effects. The GM mark is Yamaha's original style file format which uses a unique conversion system to which ensures...
... and contents in mind that any XG song data using an XGlite tone generator. However, keep in which Yamaha owns copyrights or with respect to provide high-quality automatic accompaniment based on ). 6 DGX-530/YPG-535 Owner's Manual Renewed 1989 Gladys Music (ASCAP) Worldwide... Rights for Universal Serial Bus. Copying of control parameters and effects. The GM mark is Yamaha's original style file format which uses a unique conversion system to which ensures...
Owner's Manual
Page 7
... an operation or function. Please read this owner's manual carefully before using the instrument in a safe and handy place even after you finish reading, and refer to it often when you for purchasing the Yamaha DGX-530/YPG-535 Portable Grand! DGX-530/YPG-535 Owner's Manual 7 Please check with your particular area. Congratulations and...
... an operation or function. Please read this owner's manual carefully before using the instrument in a safe and handy place even after you finish reading, and refer to it often when you for purchasing the Yamaha DGX-530/YPG-535 Portable Grand! DGX-530/YPG-535 Owner's Manual 7 Please check with your particular area. Congratulations and...
Owner's Manual
Page 8
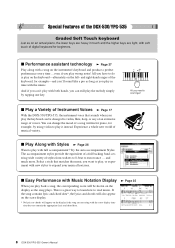
... corresponding score will appear on the display if the song you want to play it instead. and much more. Page 35 8 DGX-530/YPG-535 Owner's Manual This is one key. The accompaniment styles provide the equivalent of a full backing band covering wide variety of Instrument Voices Page 17... With the DGX-530/YPG-535, the instrument voice that matches the music you are using violin to do is play wrong notes! All you play on the keyboard-alternately on the instrument's keyboard ...
... corresponding score will appear on the display if the song you want to play it instead. and much more. Page 35 8 DGX-530/YPG-535 Owner's Manual This is one key. The accompaniment styles provide the equivalent of a full backing band covering wide variety of Instrument Voices Page 17... With the DGX-530/YPG-535, the instrument voice that matches the music you are using violin to do is play wrong notes! All you play on the keyboard-alternately on the instrument's keyboard ...
Owner's Manual
Page 9
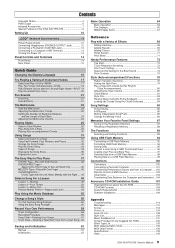
Contents Copyright Notice 6 Panel Logos 6 Included Accessories 7 Special Features of the DGX-530/YPG-535 8 Setting Up 10 Keyboard Stand Assembly 10 Power Requirements 12 Connecting Headphones (PHONES/OUTPUT Jack 12 Connecting a Footswitch (SUSTAIN Jack 12 Connecting to ...Memorize Your Favorite Panel Settings 87 Saving to the Registration Memory 87 Recalling a Registration Memory 88 The Functions 89 Selecting and Setting Functions 89 Using USB Flash Memory 92 Connecting a USB Flash Memory 92 Formatting USB Flash Memory 94 Saving Data 95 Convert a User Song to SMF ...
Contents Copyright Notice 6 Panel Logos 6 Included Accessories 7 Special Features of the DGX-530/YPG-535 8 Setting Up 10 Keyboard Stand Assembly 10 Power Requirements 12 Connecting Headphones (PHONES/OUTPUT Jack 12 Connecting a Footswitch (SUSTAIN Jack 12 Connecting to ...Memorize Your Favorite Panel Settings 87 Saving to the Registration Memory 87 Recalling a Registration Memory 88 The Functions 89 Selecting and Setting Functions 89 Using USB Flash Memory 92 Connecting a USB Flash Memory 92 Formatting USB Flash Memory 94 Saving Data 95 Convert a User Song to SMF ...
Owner's Manual
Page 10
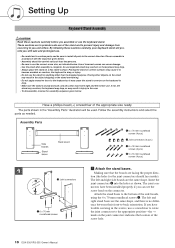
... shape, and there is complete. Placing the stand on the joint connectors indicates the location of the screw hole. 10 DGX-530/YPG-535 Owner's Manual These cautions are facing the proper direc- w Joint connectors The left and right stand bases are the same shape.... pcs.) e 6 x 30 mm roundhead screws (4 pcs.) r 5 x 16 mm roundhead screws (4 pcs.) 1 z Attach the stand bases. By following these cautions carefully before use. Use of the stand and to prevent injury and damage from occurring to you have trouble screwing in the object dropping or the stand overturning. •...
... shape, and there is complete. Placing the stand on the joint connectors indicates the location of the screw hole. 10 DGX-530/YPG-535 Owner's Manual These cautions are facing the proper direc- w Joint connectors The left and right stand bases are the same shape.... pcs.) e 6 x 30 mm roundhead screws (4 pcs.) r 5 x 16 mm roundhead screws (4 pcs.) 1 z Attach the stand bases. By following these cautions carefully before use. Use of the stand and to prevent injury and damage from occurring to you have trouble screwing in the object dropping or the stand overturning. •...
Owner's Manual
Page 11
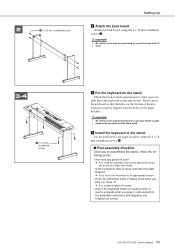
... to the stand. 2 e 6 x 30 mm roundhead screw Setting Up x Attach the back board. Check the back-to the angle brackets, using the 6 x 30 mm roundhead screws e. Attach the back board, using the 5 x 16 mm roundhead screws r. ■ Post-assembly checklist Once you've assembled the stand, check the following points: • Are... are properly aligned with the holes on the angle brackets. v Install the keyboard to the assembly instructions and diagrams and retighten all screws. DGX-530/YPG-535 Owner's Manual 11
... to the stand. 2 e 6 x 30 mm roundhead screw Setting Up x Attach the back board. Check the back-to the angle brackets, using the 6 x 30 mm roundhead screws e. Attach the back board, using the 5 x 16 mm roundhead screws r. ■ Post-assembly checklist Once you've assembled the stand, check the following points: • Are... are properly aligned with the holes on the angle brackets. v Install the keyboard to the assembly instructions and diagrams and retighten all screws. DGX-530/YPG-535 Owner's Manual 11
Owner's Manual
Page 12
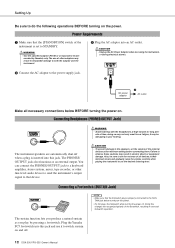
... the volumes of all necessary connections below BEFORE turning the power on . The PHONES/ OUTPUT jack also functions as you play by Yamaha) only. Failure to observe these cautions may result in ear fatigue, it to that the footswitch plug is set the volume of ...adaptors may result in reversed footswitch operation. The instrument speakers are automatically shut off . 12 DGX-530/YPG-535 Owner's Manual You can connect the PHONES/OUTPUT jack to STANDBY. WARNING • Use the specified adaptor (PA-5D or an equivalent recom- Connecting Headphones (PHONES/OUTPUT Jack) ...
... the volumes of all necessary connections below BEFORE turning the power on . The PHONES/ OUTPUT jack also functions as you play by Yamaha) only. Failure to observe these cautions may result in ear fatigue, it to that the footswitch plug is set the volume of ...adaptors may result in reversed footswitch operation. The instrument speakers are automatically shut off . 12 DGX-530/YPG-535 Owner's Manual You can connect the PHONES/OUTPUT jack to STANDBY. WARNING • Use the specified adaptor (PA-5D or an equivalent recom- Connecting Headphones (PHONES/OUTPUT Jack) ...
Owner's Manual
Page 13
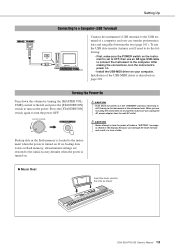
...;owing to the instrument at the minimum level. Doing so can transfer performance data and song files between the two (page 101). To use the USB data-transfer features you'll need to do the following: • First, make sure you unplug the AC power adaptor from the wall...Press the [STANDBY/ON] switch again to turn the power off when a "WRITING!" DGX-530/YPG-535 Owner's Manual 13 Installation of data. If no backup data exists on flash memory, all instrument settings are not using the instrument for a long time, make sure the POWER switch on your computer. Setting Up...
...;owing to the instrument at the minimum level. Doing so can transfer performance data and song files between the two (page 101). To use the USB data-transfer features you'll need to do the following: • First, make sure you unplug the AC power adaptor from the wall...Press the [STANDBY/ON] switch again to turn the power off when a "WRITING!" DGX-530/YPG-535 Owner's Manual 13 Installation of data. If no backup data exists on flash memory, all instrument settings are not using the instrument for a long time, make sure the POWER switch on your computer. Setting Up...

Owner's Manual
Page 16
...Language" item. The default display language is turned off. 4 Press the [EXIT] button to return to the MAIN display. 16 DGX-530/YPG-535 Owner's Manual The [+] button selects English and the [-] button selects Japanese. Q f r e uick Guid Changing the Display Language Quick Guide This ...instrument allows you can use the [+] and [-] buttons to select the language as the display language. When highlighted you to select English or Japanese as required. The currently...
...Language" item. The default display language is turned off. 4 Press the [EXIT] button to return to the MAIN display. 16 DGX-530/YPG-535 Owner's Manual The [+] button selects English and the [-] button selects Japanese. Q f r e uick Guid Changing the Display Language Quick Guide This ...instrument allows you can use the [+] and [-] buttons to select the language as the display language. When highlighted you to select English or Japanese as required. The currently...

Owner's Manual
Page 18
... addition to the main voice when you play the keyboard. Watch the displayed dual voice and rotate the dial until the voice you want to use is known as the "dual" voice. 1 Press the [DUAL ON/OFF] button. Voice Number 2 Press and hold the [DUAL ON/OFF] button for ... than a second The currently selected dual voice 3 Select the desired dual voice. For this example try selecting the "120 Vibraphone" voice. 18 DGX-530/YPG-535 Owner's Manual The second voice is selected. The dual voice selection display will appear. When turned on or off. The [DUAL ON/OFF] button turns...
... addition to the main voice when you play the keyboard. Watch the displayed dual voice and rotate the dial until the voice you want to use is known as the "dual" voice. 1 Press the [DUAL ON/OFF] button. Voice Number 2 Press and hold the [DUAL ON/OFF] button for ... than a second The currently selected dual voice 3 Select the desired dual voice. For this example try selecting the "120 Vibraphone" voice. 18 DGX-530/YPG-535 Owner's Manual The second voice is selected. The dual voice selection display will appear. When turned on or off. The [DUAL ON/OFF] button turns...

Owner's Manual
Page 20
...button all settings other than touch sensitivity are turned off , so only the Grand Piano voice will play over the entire keyboard. 20 DGX-530/YPG-535 Owner's Manual Press the [PORTABLE GRAND] button. The voice selected here becomes the split voice which will play to the left of the keyboard ...Voices 3 Select the desired split voice. Play the Grand Piano Voice When you just want to do is selected. NOTE • When you have to use is press one convenient button. For this example try selecting the "038 Folk Guitar" voice. 4 Play the keyboard. The dual and split voices will...
...button all settings other than touch sensitivity are turned off , so only the Grand Piano voice will play over the entire keyboard. 20 DGX-530/YPG-535 Owner's Manual Press the [PORTABLE GRAND] button. The voice selected here becomes the split voice which will play to the left of the keyboard ...Voices 3 Select the desired split voice. Play the Grand Piano Voice When you just want to do is selected. NOTE • When you have to use is press one convenient button. For this example try selecting the "038 Folk Guitar" voice. 4 Play the keyboard. The dual and split voices will...

Owner's Manual
Page 21
...or percussion instrument. ◆ Drum Kit Selection Procedure ➔ (refer to steps 1 and 2 on page 17) 1 Press the [VOICE] button. 2 Use the dial to 139), see "SFX Kit 1" and "SFX Kit 2" in the drum kit voice group (voice numbers 138 and 139). Fun Sounds This ...instrument includes a range of drum and percussion sounds. Sound Effects The sound effects are selected you select a violin or other useful effects. DGX-530/YPG-535 Owner's Manual 21 When you will therefore produce no sound. You'll hear a triangle, maracas, bongos, drums ... "138 SFX Kit...
...or percussion instrument. ◆ Drum Kit Selection Procedure ➔ (refer to steps 1 and 2 on page 17) 1 Press the [VOICE] button. 2 Use the dial to 139), see "SFX Kit 1" and "SFX Kit 2" in the drum kit voice group (voice numbers 138 and 139). Fun Sounds This ...instrument includes a range of drum and percussion sounds. Sound Effects The sound effects are selected you select a violin or other useful effects. DGX-530/YPG-535 Owner's Manual 21 When you will therefore produce no sound. You'll hear a triangle, maracas, bongos, drums ... "138 SFX Kit...
Owner's Manual
Page 22
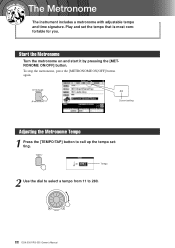
Tempo 2 Use the dial to select a tempo from 11 to call up the tempo setting. To stop the metronome, press the [METRONOME ON/OFF] button again. 4/4 Current setting Adjusting the Metronome Tempo 1 Press the [TEMPO/TAP] button to 280. 22 DGX-530/YPG-535 Owner's Manual Play and set the tempo that is most comfortable for you. Q e uick Guid The Metronome The instrument includes a metronome with adjustable tempo and time signature. Start the Metronome Turn the metronome on and start it by pressing the [METRONOME ON/OFF] button.
Tempo 2 Use the dial to select a tempo from 11 to call up the tempo setting. To stop the metronome, press the [METRONOME ON/OFF] button again. 4/4 Current setting Adjusting the Metronome Tempo 1 Press the [TEMPO/TAP] button to 280. 22 DGX-530/YPG-535 Owner's Manual Play and set the tempo that is most comfortable for you. Q e uick Guid The Metronome The instrument includes a metronome with adjustable tempo and time signature. Start the Metronome Turn the metronome on and start it by pressing the [METRONOME ON/OFF] button.
Owner's Manual
Page 23
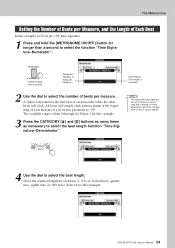
...". The Metronome Setting the Number of Beats per Measure, and the Length of beats per measure.) Denominator (The length of one beat.) f r 2 Use the dial to select the number of Each Beat In this parameter to "00". Select 8 for this example. The available range is playing.... 4 Use the dial to a style or song that is playing, so these parameters cannot be changed while a style or song is from 0 through 60. DGX-530/YPG-535 Owner's Manual 23 All beats will click. NOTE • The metronome time...
...". The Metronome Setting the Number of Beats per Measure, and the Length of beats per measure.) Denominator (The length of one beat.) f r 2 Use the dial to select the number of Each Beat In this parameter to "00". Select 8 for this example. The available range is playing.... 4 Use the dial to a style or song that is playing, so these parameters cannot be changed while a style or song is from 0 through 60. DGX-530/YPG-535 Owner's Manual 23 All beats will click. NOTE • The metronome time...
Owner's Manual
Page 24
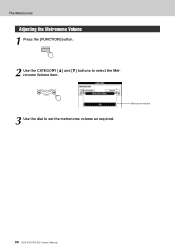
The Metronome Adjusting the Metronome Volume 1 Press the [FUNCTION] button. 2 Use the CATEGORY [ ] and [ ] buttons to set the metronome volume as required. f r 3 Use the dial to select the Metronome Volume item. Metronome volume 24 DGX-530/YPG-535 Owner's Manual
The Metronome Adjusting the Metronome Volume 1 Press the [FUNCTION] button. 2 Use the CATEGORY [ ] and [ ] buttons to set the metronome volume as required. f r 3 Use the dial to select the Metronome Volume item. Metronome volume 24 DGX-530/YPG-535 Owner's Manual

Owner's Manual
Page 25
... first turn auto accompaniment on page 130. 3 Press the [START/STOP] button. DGX-530/YPG-535 Owner's Manual 25 You can be highlighted. Let's begin playing when you want to use the auto accompaniment features. Press the [START/STOP] button a second time when you play a key ..., and many, many more. In this section we'll learn how to the instrument from a wide variety of all the available styles is played using percussion instruments only. 1 Press the [STYLE] button. The currently selected style 2 Select a style. The style rhythm will appear. NOTE •...
... first turn auto accompaniment on page 130. 3 Press the [START/STOP] button. DGX-530/YPG-535 Owner's Manual 25 You can be highlighted. Let's begin playing when you want to use the auto accompaniment features. Press the [START/STOP] button a second time when you play a key ..., and many, many more. In this section we'll learn how to the instrument from a wide variety of all the available styles is played using percussion instruments only. 1 Press the [STYLE] button. The currently selected style 2 Select a style. The style rhythm will appear. NOTE •...


