Owners Manual
Page 3
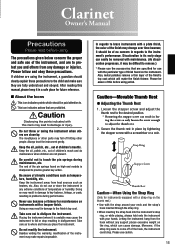
... manual, please keep it should clearly explain these precautions. Caution Disobeying the points indicated with this before using The precautions given below concern the proper and safe use with a lacquer finish. The end of the pin springs found on the instrument. Be aware of the...Do not modify the instrument. In regards to brass instruments with maintenance. (As discoloration progresses, it is sharpened to remove.) * Please use the accessories that are specified for future reference. ■ About the Icons : This icon indicates points which should be paid attention to ...
... manual, please keep it should clearly explain these precautions. Caution Disobeying the points indicated with this before using The precautions given below concern the proper and safe use with a lacquer finish. The end of the pin springs found on the instrument. Be aware of the...Do not modify the instrument. In regards to brass instruments with maintenance. (As discoloration progresses, it is sharpened to remove.) * Please use the accessories that are specified for future reference. ■ About the Icons : This icon indicates points which should be paid attention to ...
Owners Manual
Page 4
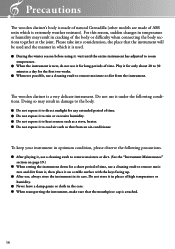
...store it . To keep your instrument in which is extremely weather resistant). Play it on a stable surface with the keys facing up. ● After use, always store the instrument in cracking of time. ● Do not expose it to rain or excessive humidity. ● Do not expose it to ...or dirt from an air-conditioner. wait until the entire instrument has adjusted to room temperature. ● When the instrument is new, do not use a cleaning swab to heat sources such as that the mouthpiece cap is attached. 14 Doing so may result in its case. Precautions The wooden clarinet...
...store it . To keep your instrument in which is extremely weather resistant). Play it on a stable surface with the keys facing up. ● After use, always store the instrument in cracking of time. ● Do not expose it to rain or excessive humidity. ● Do not expose it to ...or dirt from an air-conditioner. wait until the entire instrument has adjusted to room temperature. ● When the instrument is new, do not use a cleaning swab to heat sources such as that the mouthpiece cap is attached. 14 Doing so may result in its case. Precautions The wooden clarinet...
Owners Manual
Page 7
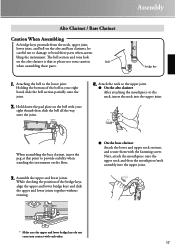
... plate on the alto and bass clarinets, be careful not to provide stability when standing the instrument on the alto clarinet is thin so please use extra caution Bell when assembling these parts when assem- Assembly Alto Clarinet / Bass Clarinet Caution When Assembling As bridge keys protrude from the neck, upper...
... plate on the alto and bass clarinets, be careful not to provide stability when standing the instrument on the alto clarinet is thin so please use extra caution Bell when assembling these parts when assem- Assembly Alto Clarinet / Bass Clarinet Caution When Assembling As bridge keys protrude from the neck, upper...
Owners Manual
Page 8
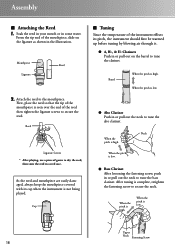
Reed Ligature Screws * After playing, use a piece of the reed then tighten the ligature screws to secure the reed. Barrel When the pitch is low. When the pitch is high. After ...
Reed Ligature Screws * After playing, use a piece of the reed then tighten the ligature screws to secure the reed. Barrel When the pitch is low. When the pitch is high. After ...
Owners Manual
Page 9
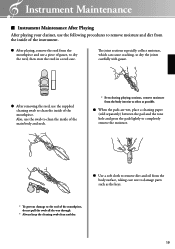
...are wet, place a cleaning paper (sold separately) between the pad and the tone hole and press the pads lightly to completely remove the moisture. ● Use a soft cloth to remove dirt and oil from the body surface, taking care not to damage parts such as the keys. * To prevent damage to... of the mouthpiece. The joint sections especially collect moisture, which can cause cracking, so dry the joints carefully with gauze. ● After removing the reed, use the swab to clean the inside of the mouthpiece, do not pull the swab all the way through. * Always keep the cleaning swab clean and...
...are wet, place a cleaning paper (sold separately) between the pad and the tone hole and press the pads lightly to completely remove the moisture. ● Use a soft cloth to remove dirt and oil from the body surface, taking care not to damage parts such as the keys. * To prevent damage to... of the mouthpiece. The joint sections especially collect moisture, which can cause cracking, so dry the joints carefully with gauze. ● After removing the reed, use the swab to clean the inside of the mouthpiece, do not pull the swab all the way through. * Always keep the cleaning swab clean and...
Owners Manual
Page 10
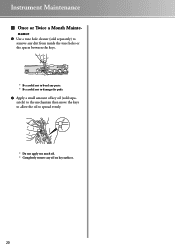
Instrument Maintenance ■ Once or Twice a Month Maintenance ● Use a tone hole cleaner (sold separately) to remove any dirt from inside the tone holes or the spaces between the keys. * Be careful not to bend any parts. * Be careful not to damage the pads. ● Apply a small amount of key oil (sold separately) to the mechanism then move the keys to allow the oil to spread evenly. * Do not apply too much oil. * Completely remove any oil on key surfaces. 20
Instrument Maintenance ■ Once or Twice a Month Maintenance ● Use a tone hole cleaner (sold separately) to remove any dirt from inside the tone holes or the spaces between the keys. * Be careful not to bend any parts. * Be careful not to damage the pads. ● Apply a small amount of key oil (sold separately) to the mechanism then move the keys to allow the oil to spread evenly. * Do not apply too much oil. * Completely remove any oil on key surfaces. 20
Owners Manual
Page 11
... cause cracking. If the joint is still tight, apply some protection against tearing of tune. Do not directly expose the instrument to the keys. Please use caution. Hold on to the instrument in the case that nothing in the intervals between performance and during breaks between practice. Apply key oil if...
... cause cracking. If the joint is still tight, apply some protection against tearing of tune. Do not directly expose the instrument to the keys. Please use caution. Hold on to the instrument in the case that nothing in the intervals between performance and during breaks between practice. Apply key oil if...
