Owners Manual
Page 3
...the USA. 3 NOTE: This product has been tested and found in to eliminate the problem by the interference. Modifications not expressly approved by Yamaha may cause interference harmful to comply with other electronic devices. If this product is found to use of this type of other electronic devices. ...Utilize power outlets that is 300 ohm ribbon lead, change the lead-in the users manual, may void your FCC authorization to be the source of America or its subsidiaries. If you can be used according to the instructions ...
...the USA. 3 NOTE: This product has been tested and found in to eliminate the problem by the interference. Modifications not expressly approved by Yamaha may cause interference harmful to comply with other electronic devices. If this product is found to use of this type of other electronic devices. ...Utilize power outlets that is 300 ohm ribbon lead, change the lead-in the users manual, may void your FCC authorization to be the source of America or its subsidiaries. If you can be used according to the instructions ...
Owners Manual
Page 4
...clean this unit must be used. Use a clean, dry cloth. 12 Only voltage specified on the rear of time (i.e. Contact qualified Yamaha service personnel when any service is located on this unit with a voltage other electrical appliances, motors, or transformers to avoid humming sounds. ... vacation), disconnect the AC power plug from the wall outlet. 19 Condensation will not be held responsible for future reference. 2 Install this manual carefully. a room with a higher voltage than specified. 13 To prevent damage by STANDBY/ON. This unit is not disconnected from the ...
...clean this unit must be used. Use a clean, dry cloth. 12 Only voltage specified on the rear of time (i.e. Contact qualified Yamaha service personnel when any service is located on this unit with a voltage other electrical appliances, motors, or transformers to avoid humming sounds. ... vacation), disconnect the AC power plug from the wall outlet. 19 Condensation will not be held responsible for future reference. 2 Install this manual carefully. a room with a higher voltage than specified. 13 To prevent damage by STANDBY/ON. This unit is not disconnected from the ...
Owners Manual
Page 5
...you great listening pleasure and satisfaction. ■ About this manual • In this system 7 Placing the center system 7 Connection 9 Connecting the center system and the subwoofer/system control 9 Connecting external components 10 Connecting a Yamaha iPod universal dock 12 Connecting the indoor FM antenna 12 ...Basic tuning operation 17 Using station preset feature 18 Using iPod 20 Controls and functions for your operation. We hope the "YAS-70" brings you to enjoy various audio sources. Design and specifications are explained using either the front panel buttons or remote...
...you great listening pleasure and satisfaction. ■ About this manual • In this system 7 Placing the center system 7 Connection 9 Connecting the center system and the subwoofer/system control 9 Connecting external components 10 Connecting a Yamaha iPod universal dock 12 Connecting the indoor FM antenna 12 ...Basic tuning operation 17 Using station preset feature 18 Using iPod 20 Controls and functions for your operation. We hope the "YAS-70" brings you to enjoy various audio sources. Design and specifications are explained using either the front panel buttons or remote...
Owners Manual
Page 6
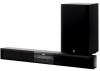
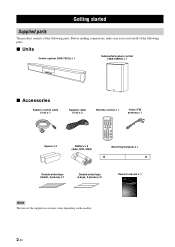
GETTING STARTED Getting started Supplied parts This product consists of the following parts. ■ Units Center system (YAS-70CU) x 1 Subwoofer/system control (YAS-70SPX) x 1 ■ Accessories System control cable (4 m) x 1 Spacer x 2 Speaker cable (4 m) x 2 Remote control x 1 STANDBY...A-E ENTER PRESET AUTO /TUNE /MAN'L MEMORY SW NIGHT DEC MODE CENTER DISP. Owner's manual x 1 U YAS-70 (YAS-70CU + YAS-70SPX) CENTER SYSTEM + SUBWOOFER/SYSTEM CONTROL OWNER'S MANUAL 2 En Before making connections, make sure you received all of the supplied accessories varies depending ...
GETTING STARTED Getting started Supplied parts This product consists of the following parts. ■ Units Center system (YAS-70CU) x 1 Subwoofer/system control (YAS-70SPX) x 1 ■ Accessories System control cable (4 m) x 1 Spacer x 2 Speaker cable (4 m) x 2 Remote control x 1 STANDBY...A-E ENTER PRESET AUTO /TUNE /MAN'L MEMORY SW NIGHT DEC MODE CENTER DISP. Owner's manual x 1 U YAS-70 (YAS-70CU + YAS-70SPX) CENTER SYSTEM + SUBWOOFER/SYSTEM CONTROL OWNER'S MANUAL 2 En Before making connections, make sure you received all of the supplied accessories varies depending ...
Owners Manual
Page 17
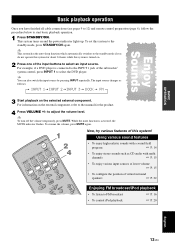
...: INPUT 1 INPUT 2 INPUT 3 DOCK FM Enjoy Sounds 3 Start playback on and the power indicator lights up. For information on the external component, refer to the manual for about 24 hours while this system is turned on. 2 Press one of the subwoofer/ system control, press INPUT 1 to adjust the volume level.
...: INPUT 1 INPUT 2 INPUT 3 DOCK FM Enjoy Sounds 3 Start playback on and the power indicator lights up. For information on the external component, refer to the manual for about 24 hours while this system is turned on. 2 Press one of the subwoofer/ system control, press INPUT 1 to adjust the volume level.

Owners Manual
Page 20
... modes to tune into the desired FM station: Frequency tuning mode you can search or specify the frequency of the desired FM station automatically or manually. ("Basic tuning operation" on page 17) Preset tuning mode You can preset the desired FM station in advance, and then recall the station by specifying... MUTE A E ENTER A E PRESET AUTO /TUNE /MAN'L MEMORY SW NIGHT DEC. MEMORY Activates the preset memory mode. 16 En PRESET/TUNE Switches between the automatic and manual tuning mode. MODE CENTER DISP.
... modes to tune into the desired FM station: Frequency tuning mode you can search or specify the frequency of the desired FM station automatically or manually. ("Basic tuning operation" on page 17) Preset tuning mode You can preset the desired FM station in advance, and then recall the station by specifying... MUTE A E ENTER A E PRESET AUTO /TUNE /MAN'L MEMORY SW NIGHT DEC. MEMORY Activates the preset memory mode. 16 En PRESET/TUNE Switches between the automatic and manual tuning mode. MODE CENTER DISP.

Owners Manual
Page 21
... mode. Lights up TUNED A FM 89.1 MHz y When you tune into an FM station by using the manual tuning feature, this system is not possible. If you tune into a station by specifying the frequency manually. This system is set to the preset tuning mode and the frequency tuning is set to the... automatic tuning mode. Manual tuning If the signal received from the station you can tune into a station, the TUNED indicator lights up in the front panel display. Press PRESET/...
... mode. Lights up TUNED A FM 89.1 MHz y When you tune into an FM station by using the manual tuning feature, this system is not possible. If you tune into a station by specifying the frequency manually. This system is set to the preset tuning mode and the frequency tuning is set to the... automatic tuning mode. Manual tuning If the signal received from the station you can tune into a station, the TUNED indicator lights up in the front panel display. Press PRESET/...

Owners Manual
Page 22
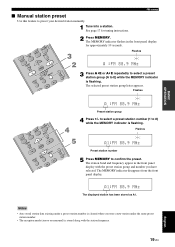
... 2 PR/ETSUENTE AU/MTAON'L MEMORY SW NIGHT DEC MODE CENTER OOM EQ UR 1 Press FM to the desired preset group and number, preset the station manually. Press A_E or A`E and then +/- If the desired station is not stored, or a station is cleared when you perform step 2 to 8). A1:... the front panel display shows the frequency of the 5 preset station groups). "FM" appears in each of the last preset station. Refer to "Manual station preset" on page 19 for more than 3 seconds. The preset station number as well as the MEMORY and AUTO indicators flashes. repeatedly to ...
... 2 PR/ETSUENTE AU/MTAON'L MEMORY SW NIGHT DEC MODE CENTER OOM EQ UR 1 Press FM to the desired preset group and number, preset the station manually. Press A_E or A`E and then +/- If the desired station is not stored, or a station is cleared when you perform step 2 to 8). A1:... the front panel display shows the frequency of the 5 preset station groups). "FM" appears in each of the last preset station. Refer to "Manual station preset" on page 19 for more than 3 seconds. The preset station number as well as the MEMORY and AUTO indicators flashes. repeatedly to ...
Owners Manual
Page 23
... NIGHT DEC MODE CENTER ROOM EQ SUR 2 Press MEMORY. Flashes MEMORY A1:FM 88.9 MHz Preset station number 5 Press MEMORY to preset your desired station manually. 1 Tune into a station. The station band and frequency appear in the front panel display for tuning instructions. The MEMORY indicator disappears from the front panel... station number. • The reception mode (stereo or monaural) is stored along with the preset station group and number you have selected. BASIC OPERATION ■ Manual station preset Use this feature to confirm the preset.
... NIGHT DEC MODE CENTER ROOM EQ SUR 2 Press MEMORY. Flashes MEMORY A1:FM 88.9 MHz Preset station number 5 Press MEMORY to preset your desired station manually. 1 Tune into a station. The station band and frequency appear in the front panel display for tuning instructions. The MEMORY indicator disappears from the front panel... station number. • The reception mode (stereo or monaural) is stored along with the preset station group and number you have selected. BASIC OPERATION ■ Manual station preset Use this feature to confirm the preset.
Owners Manual
Page 24
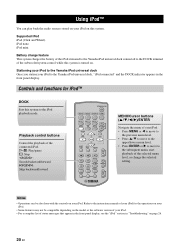
...move to the previous menu level. • Press S/T to move to the upper/lower menu level. • Press ENTER or X to move to the Yamaha iPod universal dock, "iPod connected" and the DOCK indicator appears in "Troubleshooting" on this system. Controls and functions for the operations on your iPod. &#... Battery charge feature This system charges the battery of the iPod stationed to the Yamaha iPod universal dock connected to the DOCK terminal of the subwoofer/system control while this system to the instruction manuals of your iPod for iPod™ DOCK Sets this system is turned on your...
...move to the previous menu level. • Press S/T to move to the upper/lower menu level. • Press ENTER or X to move to the Yamaha iPod universal dock, "iPod connected" and the DOCK indicator appears in "Troubleshooting" on this system. Controls and functions for the operations on your iPod. &#... Battery charge feature This system charges the battery of the iPod stationed to the Yamaha iPod universal dock connected to the DOCK terminal of the subwoofer/system control while this system to the instruction manuals of your iPod for iPod™ DOCK Sets this system is turned on your...
Owners Manual
Page 31
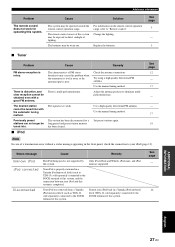
...too weak. The signal is multi-path interference. Try using a high-quality directional FM antenna. Adjust the antenna position to "Remote control". Use the manual tuning method. See page 12 - 17 - - 17 18 Note In case of this system. Your iPod is properly stationed in the front panel... this problem when the transmitter is too far away or the antenna input is completed. Use the manual tuning method. Use a high-quality directional FM antenna. Your iPod was removed from a Yamaha iPod universal dock (such as YDS-10, sold separately) connected to the DOCK terminal of lighting....
...too weak. The signal is multi-path interference. Try using a high-quality directional FM antenna. Adjust the antenna position to "Remote control". Use the manual tuning method. See page 12 - 17 - - 17 18 Note In case of this system. Your iPod is properly stationed in the front panel... this problem when the transmitter is too far away or the antenna input is completed. Use the manual tuning method. Use a high-quality directional FM antenna. Your iPod was removed from a Yamaha iPod universal dock (such as YDS-10, sold separately) connected to the DOCK terminal of lighting....