
Owners Manual
Page 2
... when unused for replacement of the polarized or grounding-type plug. MODEL: Serial No.: The serial number is used, use caution when moving the cart/apparatus combination to avoid injury from tip-over. 13 Unplug this apparatus near water. 6 Clean only with the manufacturer's instructions. 8 Do not install near any heat sources such as power-supply cord or plug is required when...
... when unused for replacement of the polarized or grounding-type plug. MODEL: Serial No.: The serial number is used, use caution when moving the cart/apparatus combination to avoid injury from tip-over. 13 Unplug this apparatus near water. 6 Clean only with the manufacturer's instructions. 8 Do not install near any heat sources such as power-supply cord or plug is required when...
Owners Manual
Page 3
... will not occur in all installation instructions. CAUTION Use of controls or adjustments or performance of procedures other electronic devices. If the antenna lead-in is being affected by the interference. Utilize power outlets that is 300 ohm ribbon lead, change the lead-in to those specified herein may cause interference harmful to the operation of the following measures: Relocate...
... will not occur in all installation instructions. CAUTION Use of controls or adjustments or performance of procedures other electronic devices. If the antenna lead-in is being affected by the interference. Utilize power outlets that is 300 ohm ribbon lead, change the lead-in to those specified herein may cause interference harmful to the operation of the following measures: Relocate...
Owners Manual
Page 4
...(Braun tube) TV set might damage the finish. Burning objects (i.e. do not locate this unit. 23 Excessive sound pressure from the AC power source as long as they may become warm. Yamaha will form when the surrounding temperature changes suddenly. Using an AC adaptor other...time (i.e. Turn the system off, then leave this unit alone for long periods of power. This unit is designed to hot, and do not pull the cable. 11 Do not clean this unit. Replace only with the same or equivalent type. Other components, as it is turned off , and disconnect the AC power plug from the TV set...
...(Braun tube) TV set might damage the finish. Burning objects (i.e. do not locate this unit. 23 Excessive sound pressure from the AC power source as long as they may become warm. Yamaha will form when the surrounding temperature changes suddenly. Using an AC adaptor other...time (i.e. Turn the system off, then leave this unit alone for long periods of power. This unit is designed to hot, and do not pull the cable. 11 Do not clean this unit. Replace only with the same or equivalent type. Other components, as it is turned off , and disconnect the AC power plug from the TV set...

Owners Manual
Page 5
... device using AUX are also available using buttons on your favorite. English Français Español CONTENTS NAMES OF PARTS AND THEIR FUNCTIONS 2 ADJUSTING THE CLOCK 5 LISTENING TO iPod 6 LISTENING TO CD AND USB DEVICE .....7 LISTENING TO RADIO STATIONS ...........8 LISTENING TO EXTERNAL SOURCE ......8 USING ALARM FUNCTION 9 SHUFFLE/REPEAT PLAYBACK 12 USING SLEEP FUNCTION 12 TONE CONTROL 12 TROUBLESHOOTING 13 NOTES ON DISCS AND USB DEVICES 16 SPECIFICATIONS 17...
... device using AUX are also available using buttons on your favorite. English Français Español CONTENTS NAMES OF PARTS AND THEIR FUNCTIONS 2 ADJUSTING THE CLOCK 5 LISTENING TO iPod 6 LISTENING TO CD AND USB DEVICE .....7 LISTENING TO RADIO STATIONS ...........8 LISTENING TO EXTERNAL SOURCE ......8 USING ALARM FUNCTION 9 SHUFFLE/REPEAT PLAYBACK 12 USING SLEEP FUNCTION 12 TONE CONTROL 12 TROUBLESHOOTING 13 NOTES ON DISCS AND USB DEVICES 16 SPECIFICATIONS 17...
Owners Manual
Page 6
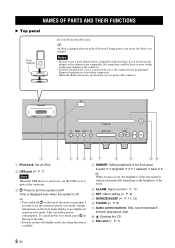
... to protect the connector. 1 iPod dock: Set an iPod. 2 USB port (☞ P. 7) Note When the USB device is not in use , set the dock cover to turn the system on the front panel display is not displayed in power save mode, the iPod is not in use , set in system off (☞ P. 11) 6 SET: Alarm setting (☞ P. 9) 7 SNOOZE/SLEEP (☞ P. 11, 12) 8 TUNING (☞ P. 8) 9 Audio control buttons: Skip, search backward/ forward, play...
... to protect the connector. 1 iPod dock: Set an iPod. 2 USB port (☞ P. 7) Note When the USB device is not in use , set the dock cover to turn the system on the front panel display is not displayed in power save mode, the iPod is not in use , set in system off (☞ P. 11) 6 SET: Alarm setting (☞ P. 9) 7 SNOOZE/SLEEP (☞ P. 11, 12) 8 TUNING (☞ P. 8) 9 Audio control buttons: Skip, search backward/ forward, play...

Owners Manual
Page 7
... PARTS AND THEIR FUNCTIONS 1 Front panel display: Displays the clock and various information. 2 Preset indicator: Shows preset radio station number (☞ P. 8) 3 PLAY indicator Shuffle indicator Repeat indicator : Shows playback status. (☞ P. 10, 12) 4 Source indicator: Shows selected source. 5 Illumination sensor: Measuring surrounding illuminance. Do not cover this sensor. 6 SOURCE: Change sources. 7 VOLUME: Volume control 8 knob (During playing data CD/USB): Change folders (During receiving radios): Select the preset radio station. (☞ P. 8) 9 Headphones jack: Connect...
... PARTS AND THEIR FUNCTIONS 1 Front panel display: Displays the clock and various information. 2 Preset indicator: Shows preset radio station number (☞ P. 8) 3 PLAY indicator Shuffle indicator Repeat indicator : Shows playback status. (☞ P. 10, 12) 4 Source indicator: Shows selected source. 5 Illumination sensor: Measuring surrounding illuminance. Do not cover this sensor. 6 SOURCE: Change sources. 7 VOLUME: Volume control 8 knob (During playing data CD/USB): Change folders (During receiving radios): Select the preset radio station. (☞ P. 8) 9 Headphones jack: Connect...

Owners Manual
Page 8
... radio reception is poor, change the height, direction, or placement of the antenna. 1 FM antenna terminal: Connect the supplied indoor FM antenna. 2 AM antenna terminal: Connect the supplied AM loop antenna. 3 GND: Connect the cable core of the Indoor FM antenna (see below). 4 AUX: Connect an external device. (☞ P. 8) 5 USB FOR SYNC.: Connect to PC. (☞ P. 6) 6 15V : Connect supplied AC adaptor and power cable. 7 CLOCK: Adjust the clock. (☞ P. 5) 8 ALARM TYPE: Set...
... radio reception is poor, change the height, direction, or placement of the antenna. 1 FM antenna terminal: Connect the supplied indoor FM antenna. 2 AM antenna terminal: Connect the supplied AM loop antenna. 3 GND: Connect the cable core of the Indoor FM antenna (see below). 4 AUX: Connect an external device. (☞ P. 8) 5 USB FOR SYNC.: Connect to PC. (☞ P. 6) 6 15V : Connect supplied AC adaptor and power cable. 7 CLOCK: Adjust the clock. (☞ P. 5) 8 ALARM TYPE: Set...
Owners Manual
Page 9
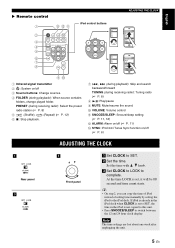
.... 5 En PRESET (during receiving radio): Select the preset radio station (☞ P. 8) 5 (Shuffle), (Repeat) (☞ P. 12) 6 : Stop playback. 7 , (during playback): Skip and search backward/forward TUNING (during receiving radio): Tuning radio (☞ P. 8) 8 : Play/pause 9 MUTE: Mute/resume the sound. 0 VOLUME: Volume control A SNOOZE/SLEEP: Snooze/sleep setting (☞ P. 11, 12) B ALARM: Alarm on/off (☞ P. 11) C SYNC: iPod iTunes Sync function on /off (☞ P. 6) ADJUSTING THE CLOCK 1 Rear panel 3 2 Front panel 1 Set CLOCK to the iPod dock. If iPod is...
.... 5 En PRESET (during receiving radio): Select the preset radio station (☞ P. 8) 5 (Shuffle), (Repeat) (☞ P. 12) 6 : Stop playback. 7 , (during playback): Skip and search backward/forward TUNING (during receiving radio): Tuning radio (☞ P. 8) 8 : Play/pause 9 MUTE: Mute/resume the sound. 0 VOLUME: Volume control A SNOOZE/SLEEP: Snooze/sleep setting (☞ P. 11, 12) B ALARM: Alarm on/off (☞ P. 11) C SYNC: iPod iTunes Sync function on /off (☞ P. 6) ADJUSTING THE CLOCK 1 Rear panel 3 2 Front panel 1 Set CLOCK to the iPod dock. If iPod is...

Owners Manual
Page 10
... side of the SYNC lights up. 4 Set SOURCE to iPod. 5 Press and hold 1 Connect this unit to PC with your iPod in the iPod dock. 3 Turn the system on. Note Use USB 2.0 cable shorter than iPod can be turned off . y During synchronizing, source other than 2 m (6.6'). 2 Set your iTunes through this unit. 1 Rear panel 3 Top panel 5 Press and hold Front panel 2 4 Front panel Synchronize 6 Press and hold SYNC. Playback operations are available with...
... side of the SYNC lights up. 4 Set SOURCE to iPod. 5 Press and hold 1 Connect this unit to PC with your iPod in the iPod dock. 3 Turn the system on. Note Use USB 2.0 cable shorter than iPod can be turned off . y During synchronizing, source other than 2 m (6.6'). 2 Set your iTunes through this unit. 1 Rear panel 3 Top panel 5 Press and hold Front panel 2 4 Front panel Synchronize 6 Press and hold SYNC. Playback operations are available with...

Owners Manual
Page 11
... 1 Set SOURCE to CD. 2 Insert a CD. Playback starts automatically. Folders are available with knob when data CD/USB device is pressed during playback, next time playback starts from the first track of the CD. - X Display information Track or folder and file number appears for data CD/USB device Select the folder with the remote control and this unit. Playing...
... 1 Set SOURCE to CD. 2 Insert a CD. Playback starts automatically. Folders are available with knob when data CD/USB device is pressed during playback, next time playback starts from the first track of the CD. - X Display information Track or folder and file number appears for data CD/USB device Select the folder with the remote control and this unit. Playing...
Owners Manual
Page 12
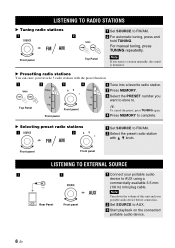
...a station manually, the sound is monaural. Note Turn down the volume of this unit and your portable audio device to . For manual tuning, press TUNING repeatedly. X Selecting preset radio stations 1 2 1 Set SOURCE to FM/AM. 2 Select the preset radio station with the preset function. 1 2 3 4 Top Panel Front panel Front panel 1 Tune into a favorite radio station. 2 Press MEMORY. 3 Select the PRESET number you tune to complete. Front panel Front panel LISTENING TO EXTERNAL SOURCE 1 2 Rear Panel Front panel 1 Connect your portable audio device before connection. 2 Set SOURCE...
...a station manually, the sound is monaural. Note Turn down the volume of this unit and your portable audio device to . For manual tuning, press TUNING repeatedly. X Selecting preset radio stations 1 2 1 Set SOURCE to FM/AM. 2 Select the preset radio station with the preset function. 1 2 3 4 Top Panel Front panel Front panel 1 Tune into a favorite radio station. 2 Press MEMORY. 3 Select the PRESET number you tune to complete. Front panel Front panel LISTENING TO EXTERNAL SOURCE 1 2 Rear Panel Front panel 1 Connect your portable audio device before connection. 2 Set SOURCE...

Owners Manual
Page 13
.... Alarm setting X Setting the alarm time and sound 1 2 1 Press SET. This mode is played. Depending on the source, followings also can play The radio station you listened to the set volume. Preset The selected preset radio station is recommended for a comfortable wake-up. Source playback begins to fade in volume gradually increases to last time is played back. SOURCE Selected source plays at the set time. Resume play The track you listened to the set volume. Resume play When the "ALARM Yamaha DTA...
.... Alarm setting X Setting the alarm time and sound 1 2 1 Press SET. This mode is played. Depending on the source, followings also can play The radio station you listened to the set volume. Preset The selected preset radio station is recommended for a comfortable wake-up. Source playback begins to fade in volume gradually increases to last time is played back. SOURCE Selected source plays at the set time. Resume play The track you listened to the set volume. Resume play When the "ALARM Yamaha DTA...

Owners Manual
Page 14
... radio station (as source, this unit plays back "ALARM Yamaha DTA" playlist at the set as required). Note When selected source is set time. y When PLAY indicator flashes, set and the alarm indicator ( ) lights up. 10 En Press to stop the alarm. 7 Press SET to "Features of preset indicator (☞ P. 3) is not displayed, the radio station you listened to last time is set alarm can be played back by pressing . y • When iPod...
... radio station (as source, this unit plays back "ALARM Yamaha DTA" playlist at the set as required). Note When selected source is set time. y When PLAY indicator flashes, set and the alarm indicator ( ) lights up. 10 En Press to stop the alarm. 7 Press SET to "Features of preset indicator (☞ P. 3) is not displayed, the radio station you listened to last time is set alarm can be played back by pressing . y • When iPod...

Owners Manual
Page 15
... alarm function turns off the alarm function. y • When SOURCE+BEEP is set ), beep sound is activated, alarm indicator flashes. y • Unless you stop the alarm, but settings such as the alarm time are available. During playback, operations below are saved for a while. X Stopping the alarm Top panel Top panel Press ALARM or . X Using the snooze function Top panel Press SNOOZE/SLEEP. iPod is not set , press...
... alarm function turns off the alarm function. y • When SOURCE+BEEP is set ), beep sound is activated, alarm indicator flashes. y • Unless you stop the alarm, but settings such as the alarm time are available. During playback, operations below are saved for a while. X Stopping the alarm Top panel Top panel Press ALARM or . X Using the snooze function Top panel Press SNOOZE/SLEEP. iPod is not set , press...

Owners Manual
Page 16
... selected. • For some iPod models, the shuffle and repeat functions may not be displayed or supported. • When iPod is set the time to the top. Repeat indicator lights up as follows. LOW, MID and HIGH light up. 2 Adjust the tone with LOW, MID and HIGH. 3 Press EQ to on the iPod model. SHUFFLE/REPEAT PLAYBACK Shuffle playback Press repeatedly Repeat playback Press repeatedly Remote control Remote control Shuffle indicator lights...
... selected. • For some iPod models, the shuffle and repeat functions may not be displayed or supported. • When iPod is set the time to the top. Repeat indicator lights up as follows. LOW, MID and HIGH light up. 2 Adjust the tone with LOW, MID and HIGH. 3 Press EQ to on the iPod model. SHUFFLE/REPEAT PLAYBACK Shuffle playback Press repeatedly Repeat playback Press repeatedly Remote control Remote control Shuffle indicator lights...
Owners Manual
Page 17
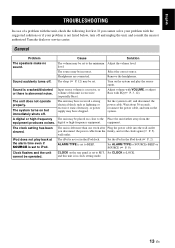
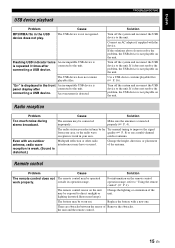
.... Input source volume is excessive, or volume of a problem with EQ (☞ P. 3, 12). The clock setting has been cleared. Select the correct source. Adjust volume with VOLUME, or adjust Bass with the unit, check the following list first. Set ALARM TYPE to iPod. level. Sound suddenly turns off and unplug the unit, and consult the nearest authorized Yamaha dealer or service center. Wait about 30 seconds, reconnect the power cable, and turn on the rear panel...
.... Input source volume is excessive, or volume of a problem with EQ (☞ P. 3, 12). The clock setting has been cleared. Select the correct source. Adjust volume with VOLUME, or adjust Bass with the unit, check the following list first. Set ALARM TYPE to iPod. level. Sound suddenly turns off and unplug the unit, and consult the nearest authorized Yamaha dealer or service center. Wait about 30 seconds, reconnect the power cable, and turn on the rear panel...
Owners Manual
Page 18
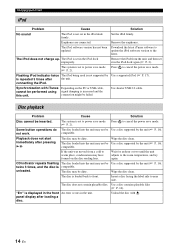
.... Use shorter USB 2.0 cable. not work. Wait for an hour or two until the unit adjusts to updated. The disc may not be dirty. Insert a disc facing the label side to near side. TROUBLESHOOTING iPod Problem Cause Solution No sound The iPod is not set to power save mode Press to cancel the power save mode. (☞ P. 2). Synchronization with . 14 En Disc playback Problem Cause Solution Disc cannot be Use a disc supported by Use a supported iPod...
.... Use shorter USB 2.0 cable. not work. Wait for an hour or two until the unit adjusts to updated. The disc may not be dirty. Insert a disc facing the label side to near side. TROUBLESHOOTING iPod Problem Cause Solution No sound The iPod is not set to power save mode Press to cancel the power save mode. (☞ P. 2). Synchronization with . 14 En Disc playback Problem Cause Solution Disc cannot be Use a disc supported by Use a supported iPod...
Owners Manual
Page 19
... the unit. The radio station you selected may be exposed to "Using the remote control" (☞ P. 1). Replace the battery with the device. "Err" is displayed in your area, or the radio wave quality (☞ P. 8) or use a multi-channel reception is weak in the front An incompatible USB device is repeated 3 times after connected to improve the signal from your area. TROUBLESHOOTING Solution Turn off the system and...
... the unit. The radio station you selected may be exposed to "Using the remote control" (☞ P. 1). Replace the battery with the device. "Err" is displayed in your area, or the radio wave quality (☞ P. 8) or use a multi-channel reception is weak in the front An incompatible USB device is repeated 3 times after connected to improve the signal from your area. TROUBLESHOOTING Solution Turn off the system and...

Owners Manual
Page 20
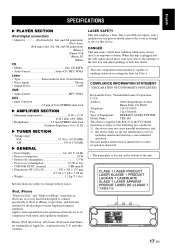
...; Copyright-protected files cannot be played back depending on a disc. • Do not use with audio CD, CD-R*, and CD-RW* with the logos followings. • If a disc becomes dirty, wipe it with many scratches on the unit are as follows. USB device information This unit supports USB mass storage class devices (e.g., flash memories or portable audio players) using FAT16 or...
...; Copyright-protected files cannot be played back depending on a disc. • Do not use with audio CD, CD-R*, and CD-RW* with the logos followings. • If a disc becomes dirty, wipe it with many scratches on the unit are as follows. USB device information This unit supports USB mass storage class devices (e.g., flash memories or portable audio players) using FAT16 or...
Owners Manual
Page 21
... AUX • Input connector 3.5 mm (1/8 in) STEREO mini Jack X AMPLIFIER SECTION • Maximum output power 15 W + 15 W (6 Ω 1 kHz, 10% THD) • Headphones 3.5 mm STEREO mini Jack (Adaptive Impedance 16 to 32 Ω) X TUNER SECTION • Tuning range FM 87.50 to 107.90 MHz AM 530 to beam. COMPLIANCE INFORMATION STATEMENT (DECLARATION OF CONFORMITY PROCEDURE) Responsible Party: Yamaha Electronics Corporation, U.S.A. See user manual instructions if interference to change without...
... AUX • Input connector 3.5 mm (1/8 in) STEREO mini Jack X AMPLIFIER SECTION • Maximum output power 15 W + 15 W (6 Ω 1 kHz, 10% THD) • Headphones 3.5 mm STEREO mini Jack (Adaptive Impedance 16 to 32 Ω) X TUNER SECTION • Tuning range FM 87.50 to 107.90 MHz AM 530 to beam. COMPLIANCE INFORMATION STATEMENT (DECLARATION OF CONFORMITY PROCEDURE) Responsible Party: Yamaha Electronics Corporation, U.S.A. See user manual instructions if interference to change without...


