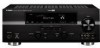
Owner's Manual
Page 5
...Pairing the Bluetooth™ wireless audio receiver and your headphones 26 Displaying input signal information 26 Changing information on and off 20 Optimizing the speaker setting for your listening room (YPAO 21 Using Auto Setup 21 When an error message is ...speakers 11 Information on jacks and cable plugs 14 Connecting a video monitor 15 Connecting other components 16 Connecting a multi-format player or an external decoder 18 Connecting an external amplifier 18 Using REMOTE IN/OUT jacks 19 Connecting a Yamaha iPod universal dock or Bluetooth™ wireless audio receiver...
...Pairing the Bluetooth™ wireless audio receiver and your headphones 26 Displaying input signal information 26 Changing information on and off 20 Optimizing the speaker setting for your listening room (YPAO 21 Using Auto Setup 21 When an error message is ...speakers 11 Information on jacks and cable plugs 14 Connecting a video monitor 15 Connecting other components 16 Connecting a multi-format player or an external decoder 18 Connecting an external amplifier 18 Using REMOTE IN/OUT jacks 19 Connecting a Yamaha iPod universal dock or Bluetooth™ wireless audio receiver...
Owner's Manual
Page 6
...or Bluetooth wireless audio receiver (such as multi-channel digital audio - Tuner and Home Dock, sold separately) ■ Automatic speaker setup features • "YPAO" (Yamaha Parametric Room Acoustic Optimizer) for automatically optimizing speaker outputs suitable for listening ... 95 W • CENTER: 95 W • SURROUND L/R: 95 W + 95 W • SURROUND BACK L/R: 95 W + 95 W ■ Speaker/Preout outputs • Speaker jacks (7-channel + presence 2-channel), preout output jacks (7-channel, and subwoofer preout jack x 2) ■ Input/Output terminals Input terminals • HDMI input ...
...or Bluetooth wireless audio receiver (such as multi-channel digital audio - Tuner and Home Dock, sold separately) ■ Automatic speaker setup features • "YPAO" (Yamaha Parametric Room Acoustic Optimizer) for automatically optimizing speaker outputs suitable for listening ... 95 W • CENTER: 95 W • SURROUND L/R: 95 W + 95 W • SURROUND BACK L/R: 95 W + 95 W ■ Speaker/Preout outputs • Speaker jacks (7-channel + presence 2-channel), preout output jacks (7-channel, and subwoofer preout jack x 2) ■ Input/Output terminals Input terminals • HDMI input ...

Owner's Manual
Page 12
... En Front right speaker Video monitor Front left speaker speaker Requirements qty. Step 1: Prepare items for setup. For example, prepare the following order of the speakers, speaker positions, and room acoustics, etc.). Step 3: Connect your speakers Prepare speakers, DVD player, ...cables, and other components ☞P. 16 • Connecting a multi-format player or an external decoder ☞P. 18 • Connecting an external amplifier ☞P. 18 • Connecting a Yamaha iPod universal dock or Bluetooth wireless audio receiver...
... En Front right speaker Video monitor Front left speaker speaker Requirements qty. Step 1: Prepare items for setup. For example, prepare the following order of the speakers, speaker positions, and room acoustics, etc.). Step 3: Connect your speakers Prepare speakers, DVD player, ...cables, and other components ☞P. 16 • Connecting a multi-format player or an external decoder ☞P. 18 • Connecting an external amplifier ☞P. 18 • Connecting a Yamaha iPod universal dock or Bluetooth wireless audio receiver...

Owner's Manual
Page 16
... such as a dialog (see page 54). 0.5 to 1 m (1 to 3 ft) 0.5 to 1 m (1 to 3 ft) PL PR FL 1.8 m (6 ft) FR 1.8 m (6 ft) C To use the presence speakers, connect them to the EXTRA SP jacks and set "Extra SP Assign" in "Speaker Setup" in the SETUP menu to "Presence" (see page 60. 12 En For details, see page 54).
... such as a dialog (see page 54). 0.5 to 1 m (1 to 3 ft) 0.5 to 1 m (1 to 3 ft) PL PR FL 1.8 m (6 ft) FR 1.8 m (6 ft) C To use the presence speakers, connect them to the EXTRA SP jacks and set "Extra SP Assign" in "Speaker Setup" in the SETUP menu to "Presence" (see page 60. 12 En For details, see page 54).

Owner's Manual
Page 17
...to "6ΩMIN" (see page 64). 1 Remove approximately 10 mm (0.4 in) of insulated cables running side by side in "ADVANCED SETUP" before connecting the speaker cables. Connecting the banana plug (Except U.K., Europe, Russian, Asia and Korea models) Tighten the knob, and then insert the banana plug ...; If your video monitor is a pair of insulation from the monitor. • Use speakers with a tweeter. To enable the bi-amp connection, connect the power cable to the wall outlet, display the ADVANCED SETUP menu and set "SP IMP." Note • You cannot use the magnetically shielded...
...to "6ΩMIN" (see page 64). 1 Remove approximately 10 mm (0.4 in) of insulated cables running side by side in "ADVANCED SETUP" before connecting the speaker cables. Connecting the banana plug (Except U.K., Europe, Russian, Asia and Korea models) Tighten the knob, and then insert the banana plug ...; If your video monitor is a pair of insulation from the monitor. • Use speakers with a tweeter. To enable the bi-amp connection, connect the power cable to the wall outlet, display the ADVANCED SETUP menu and set "SP IMP." Note • You cannot use the magnetically shielded...

Owner's Manual
Page 22
... amplifier for the surround back channel, connect it to the SUR. e SUBWOOFER (PRE OUT) 1/2 jack Connect a subwoofer with a built-in "Speaker Setup" (see page 24. For details on a video monitor (see page 48). BACK (SINGLE) jack. Connections Connecting a multi-format player or an...to "MULTI CH," images input from a component connected to "AV1-6" or "V-AUX" can enjoy up to any parameter except for missing speakers, connect at least a 5.1channel speaker system when using this unit. BACK PRE OUT 1 SUBWOOFER 2 e a FRONT (PRE OUT) jacks Front channel output jacks. d ...
... amplifier for the surround back channel, connect it to the SUR. e SUBWOOFER (PRE OUT) 1/2 jack Connect a subwoofer with a built-in "Speaker Setup" (see page 24. For details on a video monitor (see page 48). BACK (SINGLE) jack. Connections Connecting a multi-format player or an...to "MULTI CH," images input from a component connected to "AV1-6" or "V-AUX" can enjoy up to any parameter except for missing speakers, connect at least a 5.1channel speaker system when using this unit. BACK PRE OUT 1 SUBWOOFER 2 e a FRONT (PRE OUT) jacks Front channel output jacks. d ...
Owner's Manual
Page 25
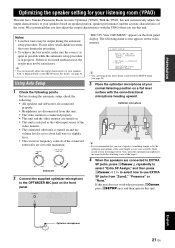
... connected properly. • Headphones are set to the maximum. INTRODUCTION PREPARATION BASIC OPERATION Optimizing the speaker setting for your speakers with "2 Manual Setup" in the SETUP menu. We recommend that you first adjust the output characteristics with the YPAO when you use EXTRA... to about half way (or slightly less). • The crossover frequency controls of your listening room (YPAO) This unit has a Yamaha Parametric Room Acoustic Optimizer (YPAO). VOLUME CROSSOVER/ HIGH CUT MIN MAX MIN MAX Subwoofer 2 Connect the supplied optimizer microphone to use this...
... connected properly. • Headphones are set to the maximum. INTRODUCTION PREPARATION BASIC OPERATION Optimizing the speaker setting for your speakers with "2 Manual Setup" in the SETUP menu. We recommend that you first adjust the output characteristics with the YPAO when you use EXTRA... to about half way (or slightly less). • The crossover frequency controls of your listening room (YPAO) This unit has a Yamaha Parametric Room Acoustic Optimizer (YPAO). VOLUME CROSSOVER/ HIGH CUT MIN MAX MIN MAX Subwoofer 2 Connect the supplied optimizer microphone to use this...

Owner's Manual
Page 26
... results, stay where you press kENTER before removing the optimizer microphone, "1 Auto Setup" of "Speaker Setup" in the following order: Closest speaker distance/Farthest speaker distance LVL Displays the speaker output levels in the SETUP menu (see page 23). 7 Press kENTER. In "EQ Type," you press... Notes • If "ERROR" appears on an AV component. Optimizing the speaker setting for your front left and right speakers. Select this unit. If this if sounds in the high frequency range seem too strong when "EQ Type" is displayed. 1 Auto Setup RESULT SP : DIST: LVL : . >Set ...
... results, stay where you press kENTER before removing the optimizer microphone, "1 Auto Setup" of "Speaker Setup" in the following order: Closest speaker distance/Farthest speaker distance LVL Displays the speaker output levels in the SETUP menu (see page 23). 7 Press kENTER. In "EQ Type," you press... Notes • If "ERROR" appears on an AV component. Optimizing the speaker setting for your front left and right speakers. Select this unit. If this if sounds in the high frequency range seem too strong when "EQ Type" is displayed. 1 Auto Setup RESULT SP : DIST: LVL : . >Set ...

Owner's Manual
Page 27
...8226; When "E-5:NOISY" appears, you solve the problem and perform the automatic setup procedure again. 1 If "→" is displayed on the left of the warning... "WARNING" is displayed on the result display screen. Exit Terminates the measurement and the automatic setup procedure. To continue measurement, select "Proceed." However, we recommend that you can display the next... Don't operate any function >Retry Exit [p ]/[[]:Select [ENTER]:Return Retry Performs the automatic setup procedure again. SBL --- [p]/[[]:Select [ENTER]:Return y • See page 75 for details on the...
...8226; When "E-5:NOISY" appears, you solve the problem and perform the automatic setup procedure again. 1 If "→" is displayed on the left of the warning... "WARNING" is displayed on the result display screen. Exit Terminates the measurement and the automatic setup procedure. To continue measurement, select "Proceed." However, we recommend that you can display the next... Don't operate any function >Retry Exit [p ]/[[]:Select [ENTER]:Return Retry Performs the automatic setup procedure again. SBL --- [p]/[[]:Select [ENTER]:Return y • See page 75 for details on the...

Owner's Manual
Page 29
.... Enjoying pure hi-fi sound (Pure Direct mode) Use Pure Direct mode to enjoy the pure high fidelity sound of the OPTION menu and SETUP menu - sound field program and tone control - ADVANCED OPERATION ADDITIONAL INFORMATION APPENDIX English 25 En Treble 0.0dB 2 Rotate the OPROGRAM selector to... control codes for an external component, set the balance extremely off . The following the steps below. 1 Register the remote control code of the speakers or headphones can now be registered to obtain desired tone. Adjustable range: -10.0 dB to +10.0 dB The display returns to turn the ...
.... Enjoying pure hi-fi sound (Pure Direct mode) Use Pure Direct mode to enjoy the pure high fidelity sound of the OPTION menu and SETUP menu - sound field program and tone control - ADVANCED OPERATION ADDITIONAL INFORMATION APPENDIX English 25 En Treble 0.0dB 2 Rotate the OPROGRAM selector to... control codes for an external component, set the balance extremely off . The following the steps below. 1 Register the remote control code of the speakers or headphones can now be registered to obtain desired tone. Adjustable range: -10.0 dB to +10.0 dB The display returns to turn the ...

Owner's Manual
Page 34
... mode or straight decoding mode is selected. Note • If headphones are required. You can even enjoy Virtual CINEMA DSP using virtual surround speakers. SILENT CINEMA mode is automatically selected when you to the PHONES jack. - 7ch Stereo of the sound field program is connected to enjoy ... or straight decoding mode is used. When "Sur. L/R SP" to "None" (see page 55). - To use this unit operates in the SETUP menu (see page 54). • Enable CINEMA DSP 3D in Virtual CINEMA DSP mode. Multi-channel input sources are decoded straight into the appropriate channels...
... mode or straight decoding mode is selected. Note • If headphones are required. You can even enjoy Virtual CINEMA DSP using virtual surround speakers. SILENT CINEMA mode is automatically selected when you to the PHONES jack. - 7ch Stereo of the sound field program is connected to enjoy ... or straight decoding mode is used. When "Sur. L/R SP" to "None" (see page 55). - To use this unit operates in the SETUP menu (see page 54). • Enable CINEMA DSP 3D in Virtual CINEMA DSP mode. Multi-channel input sources are decoded straight into the appropriate channels...

Owner's Manual
Page 53
...field parameters y • The default settings are marked with the following MOVIE sound field programs. - An asterisk (*) appears on the left of the SETUP menu is enabled, sets whether to this case, press kCursor k / n to select "Initialize" and then press, kCursor h. To initialize the parameters ... conditions of the sound field effect while checking sound levels. The SETUP menu appears on the monitor, press kCursor h to confirm the initialization or kCursor l to be added). Note • When the presence speakers are not used with the default parameters, you can adjust the ...
...field parameters y • The default settings are marked with the following MOVIE sound field programs. - An asterisk (*) appears on the left of the SETUP menu is enabled, sets whether to this case, press kCursor k / n to select "Initialize" and then press, kCursor h. To initialize the parameters ... conditions of the sound field effect while checking sound levels. The SETUP menu appears on the monitor, press kCursor h to confirm the initialization or kCursor l to be added). Note • When the presence speakers are not used with the default parameters, you can adjust the ...

Owner's Manual
Page 57
... sound field programs. Protects some settings against accidental alteration. Adjusts dynamic ranges of SETUP menu items Menu/Submenu Speaker Setup 1 Auto Setup (YPAO) 2 Manual Setup A)Config B)Level C)Distance D)Equalizer E)Test Tone Sound Setup 1 Dynamic Range 2 Lipsync HDMI Auto Auto Delay Manual Delay Function Setup 1 HDMI Control Standby Through Audio Output Resolution Aspect 2 Display Dimmer FL Scroll OSD...
... sound field programs. Protects some settings against accidental alteration. Adjusts dynamic ranges of SETUP menu items Menu/Submenu Speaker Setup 1 Auto Setup (YPAO) 2 Manual Setup A)Config B)Level C)Distance D)Equalizer E)Test Tone Sound Setup 1 Dynamic Range 2 Lipsync HDMI Auto Auto Delay Manual Delay Function Setup 1 HDMI Control Standby Through Audio Output Resolution Aspect 2 Display Dimmer FL Scroll OSD...

Owner's Manual
Page 58
...; If kCursor or other items in the Manual Setup menu of Speaker Setup take up a full screen. Video display (OSD) Setup Menu . ;Speaker Setup ;Sound Setup ;Function Setup ;DSP Parameter ;Memory Guard [ ]/[ ]:Up/Down [ENTER]:Enter Front panel display ;Speaker Setup In this unit (SETUP menu) Basic operation of the SETUP menu The SETUP menu screen appears on the remote control. For example...
...; If kCursor or other items in the Manual Setup menu of Speaker Setup take up a full screen. Video display (OSD) Setup Menu . ;Speaker Setup ;Sound Setup ;Function Setup ;DSP Parameter ;Memory Guard [ ]/[ ]:Up/Down [ENTER]:Enter Front panel display ;Speaker Setup In this unit (SETUP menu) Basic operation of the SETUP menu The SETUP menu screen appears on the remote control. For example...

Owner's Manual
Page 59
... is selected, the sound field programs automatically enter the Virtual CINEMA DSP mode. Changing various settings of this when a small center speaker is selected, "PLIIx Movie," "PLIIx Music," and "PLIIx Game" cannot be selected. Center channel signals are spread to front ...surround back speaker is not connected they are output from front speakers. Surround channel signals are output from a subwoofer. If a subwoofer is connected. Select this when no surround speakers are output from a subwoofer. Note • When "None" is connected. Select this unit (SETUP menu) ...
... is selected, the sound field programs automatically enter the Virtual CINEMA DSP mode. Changing various settings of this when a small center speaker is selected, "PLIIx Movie," "PLIIx Music," and "PLIIx Game" cannot be selected. Center channel signals are spread to front ...surround back speaker is not connected they are output from front speakers. Surround channel signals are output from a subwoofer. If a subwoofer is connected. Select this when no surround speakers are output from a subwoofer. Note • When "None" is connected. Select this unit (SETUP menu) ...

Owner's Manual
Page 60
... items for regular home use a graphic equalizer. Not use . To adjust the signal level within each speaker. On Generates test tones. Sound Setup You can adjust signal levels in feet. Items to be displayed vary depending on the number of your subwoofer... Auto PEQ/GEQ*/Off Select an equalizer type. Reverse Select this parameter is output from speakers are lacking or unclear. Unit Choices: meters (m)/feet (ft)* meters (m) Displays the speaker distance in "1 Auto Setup." To generate test tones select "On" using a graphic equalizer. Adjusts tone using kCursor...
... items for regular home use a graphic equalizer. Not use . To adjust the signal level within each speaker. On Generates test tones. Sound Setup You can adjust signal levels in feet. Items to be displayed vary depending on the number of your subwoofer... Auto PEQ/GEQ*/Off Select an equalizer type. Reverse Select this parameter is output from speakers are lacking or unclear. Unit Choices: meters (m)/feet (ft)* meters (m) Displays the speaker distance in "1 Auto Setup." To generate test tones select "On" using a graphic equalizer. Adjusts tone using kCursor...

Owner's Manual
Page 72
.... 3) "None" may be defective. Try another speaker and check if sound is applied, sound of the Speaker Setup in STRAIGHT mode and a Press PSTRAIGHT (or hSTRAIGHT) to the minimum in Speaker Setup in the SETUP menu. The source does not contain LFE or low... Output from that speaker. Check the Speaker indicators on the front panel display. The volume of that speaker (Speaker Setup → 2 Manual Setup → A)Config). When a monaural source sound field program is output. Cause Remedy The speaker is in the SETUP menu (Speaker Setup → Speaker output balance is ...
.... 3) "None" may be defective. Try another speaker and check if sound is applied, sound of the Speaker Setup in STRAIGHT mode and a Press PSTRAIGHT (or hSTRAIGHT) to the minimum in Speaker Setup in the SETUP menu. The source does not contain LFE or low... Output from that speaker. Check the Speaker indicators on the front panel display. The volume of that speaker (Speaker Setup → 2 Manual Setup → A)Config). When a monaural source sound field program is output. Cause Remedy The speaker is in the SETUP menu (Speaker Setup → Speaker output balance is ...

Owner's Manual
Page 85
... Auto Preset, OPTION menu 48 Auto Setup (YPAO), troubleshooting 74 Automatic setup 21 AV 1-6 jacks, rear panel 5 AV OUT jacks, rear panel 5 ■B B)Level, speaker setup 56 Basic operation, SETUP menu 54 BI-AMP connection switch, ADVANCED SETUP 64 Bluetooth component playback 44 Bluetooth wireless audio receiver connection 19 Bluetooth, troubleshooting 74 ■C C)Distance, speaker setup 56 C.Image, decoder parameter 52...
... Auto Preset, OPTION menu 48 Auto Setup (YPAO), troubleshooting 74 Automatic setup 21 AV 1-6 jacks, rear panel 5 AV OUT jacks, rear panel 5 ■B B)Level, speaker setup 56 Basic operation, SETUP menu 54 BI-AMP connection switch, ADVANCED SETUP 64 Bluetooth component playback 44 Bluetooth wireless audio receiver connection 19 Bluetooth, troubleshooting 74 ■C C)Distance, speaker setup 56 C.Image, decoder parameter 52...

Owner's Manual
Page 86
... 10 Subwoofer Phase, A)Config, speaker setup ...56 Sur. R, C)Distance, speaker setup 56 SUR., sound field parameter 49 Sur.B L, C)Distance, speaker setup 56 Sur.B L/R SP, A)Config, speaker setup .........55 Sur.B R, C)Distance, speaker setup 56 Surround back left speaker 10 Surround back right speaker 10 Surround back speaker 10 Surround decoder editing 49 Surround left speaker 10 Surround right speaker 10 SWFR, C)Distance, speaker setup 56 ■T The Bottom...
... 10 Subwoofer Phase, A)Config, speaker setup ...56 Sur. R, C)Distance, speaker setup 56 SUR., sound field parameter 49 Sur.B L, C)Distance, speaker setup 56 Sur.B L/R SP, A)Config, speaker setup .........55 Sur.B R, C)Distance, speaker setup 56 Surround back left speaker 10 Surround back right speaker 10 Surround back speaker 10 Surround decoder editing 49 Surround left speaker 10 Surround right speaker 10 SWFR, C)Distance, speaker setup 56 ■T The Bottom...

Hookup Instructions
Page 2
...13. Use the Left/Right Arrow buttons on the remote control. 4. model only). 5. Playing back music stored on your iPod stationed in a Yamaha iPod universal dock (such as the input source of Zone 2 (see page 31) (U.S.A. Press the Enter Button on the remote control. 11.... to AV 5-6 or Audio 1-2 by analog connection. Arrow down until 2 Manual Setup comes up on the remote to exit the Setup Menu. 14. model only). 6. If the Extra Speaker Terminals are utilized then the RX-V765 cannot be set to Zone 2 the following commands will come up on the receiver LED Screen...
...13. Use the Left/Right Arrow buttons on the remote control. 4. model only). 5. Playing back music stored on your iPod stationed in a Yamaha iPod universal dock (such as the input source of Zone 2 (see page 31) (U.S.A. Press the Enter Button on the remote control. 11.... to AV 5-6 or Audio 1-2 by analog connection. Arrow down until 2 Manual Setup comes up on the remote to exit the Setup Menu. 14. model only). 6. If the Extra Speaker Terminals are utilized then the RX-V765 cannot be set to Zone 2 the following commands will come up on the receiver LED Screen...


