Owner's Manual
Page 5
...Information on jacks and cable plugs 13 Connecting a TV monitor or projector 14 Connecting other components 15 Connecting a Yamaha iPod universal dock or Bluetooth™ wireless audio receiver 16 Using the VIDEO AUX jacks on the front panel .... 16 Connecting the FM and AM antennas 17 Connecting...frequency sound (tone control 22 Enjoying pure hi-fi sound 22 Using the sleep timer 22 Using your headphones 22 Displaying input signal information 23 Changing information on the front panel display .... 23 Enjoy the sound field programs 24 Selecting sound field programs 24 ...
...Information on jacks and cable plugs 13 Connecting a TV monitor or projector 14 Connecting other components 15 Connecting a Yamaha iPod universal dock or Bluetooth™ wireless audio receiver 16 Using the VIDEO AUX jacks on the front panel .... 16 Connecting the FM and AM antennas 17 Connecting...frequency sound (tone control 22 Enjoying pure hi-fi sound 22 Using the sleep timer 22 Using your headphones 22 Displaying input signal information 23 Changing information on the front panel display .... 23 Enjoy the sound field programs 24 Selecting sound field programs 24 ...
Owner's Manual
Page 6
... x 4 • Audio input (analog) x 2 • Dock input x 1 • V-AUX input [Audio] Analog x 1 [Video] Composite video x 1 Output terminals • Monitor output [Audio/Video] HDMI x 1 [Video] Component video x 1, Composite video x 1 • Audio/Visual output [Audio] Analog x 1 [Video] Composite video x 1 • Audio output Analog x 1 ■ Proprietary Yamaha technology for the creation of sound... • HDMI interface for standard, enhanced or highdefinition video as well as YBA-10, sold separately) or Bluetooth wireless audio receiver (such as multi-channel digital audio. -
... x 4 • Audio input (analog) x 2 • Dock input x 1 • V-AUX input [Audio] Analog x 1 [Video] Composite video x 1 Output terminals • Monitor output [Audio/Video] HDMI x 1 [Video] Component video x 1, Composite video x 1 • Audio/Visual output [Audio] Analog x 1 [Video] Composite video x 1 • Audio output Analog x 1 ■ Proprietary Yamaha technology for the creation of sound... • HDMI interface for standard, enhanced or highdefinition video as well as YBA-10, sold separately) or Bluetooth wireless audio receiver (such as multi-channel digital audio. -

Owner's Manual
Page 8
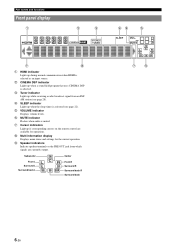
... (see page 29). D MEMORY Registers FM/AM stations as preset stations (see page 21). N INPUT l / h Selects an input source (see page 29). O OPTIMIZER MIC jack For connecting the supplied optimizer microphone and adjusting output characteristics of an HDMI signal...PHONES SILENT CINEMA HDMI THROUGH INFO MEMORY l PRESET h FM BD/DVD SCENE TV CD AM RADIO l TUNING h TONE CONTROL PROGRAM l h STRAIGHT EFFECT DIRECT INPUT OPTIMIZER MIC l h VOLUME VIDEO AUX VIDEO AUDIO PORTABLE A B C JK LM N O I SCENE Switches between standby and on the front panel display ...
... (see page 29). D MEMORY Registers FM/AM stations as preset stations (see page 21). N INPUT l / h Selects an input source (see page 29). O OPTIMIZER MIC jack For connecting the supplied optimizer microphone and adjusting output characteristics of an HDMI signal...PHONES SILENT CINEMA HDMI THROUGH INFO MEMORY l PRESET h FM BD/DVD SCENE TV CD AM RADIO l TUNING h TONE CONTROL PROGRAM l h STRAIGHT EFFECT DIRECT INPUT OPTIMIZER MIC l h VOLUME VIDEO AUX VIDEO AUDIO PORTABLE A B C JK LM N O I SCENE Switches between standby and on the front panel display ...
Owner's Manual
Page 9
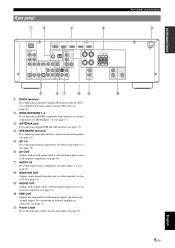
...b HDMI OUT/HDMI 1-4 For connecting an HDMI-compatible video monitor or external components for HDMI inputs 1-4 (see page 15). e AV 1-6 For connecting external components for audio inputs 1-2 (see page 14). INTRODUCTION PREPARATION BASIC OPERATION Rear panel a c b Part names and...SURROUND OPTICAL ( TV ) AV 1 COAXIAL AV 2 COAXIAL (CD) AV 3 OPTICAL AV 4 AV 5 AV 6 AV OUT AUDIO1 AUDIO2 AUDIO OUT SURROUND BACK SUBWOOFER PRE OUT e fg hi j a DOCK terminal For connecting an optional Yamaha iPod universal dock (YDS11) or Bluetooth wireless audio receiver (YBA-10) (see...
...b HDMI OUT/HDMI 1-4 For connecting an HDMI-compatible video monitor or external components for HDMI inputs 1-4 (see page 15). e AV 1-6 For connecting external components for audio inputs 1-2 (see page 14). INTRODUCTION PREPARATION BASIC OPERATION Rear panel a c b Part names and...SURROUND OPTICAL ( TV ) AV 1 COAXIAL AV 2 COAXIAL (CD) AV 3 OPTICAL AV 4 AV 5 AV 6 AV OUT AUDIO1 AUDIO2 AUDIO OUT SURROUND BACK SUBWOOFER PRE OUT e fg hi j a DOCK terminal For connecting an optional Yamaha iPod universal dock (YDS11) or Bluetooth wireless audio receiver (YBA-10) (see...
Owner's Manual
Page 10
c Tuner indicator Lights up while receiving a radio broadcast signal from which signals are available for the current operation. d SLEEP indicator Lights up when the sleep timer is selected as an input source. e VOLUME indicator Displays volume levels. MUTE SW L CR SL SR SBL SB SBR g i 6 En b CINEMA DSP indicator Lights up when a sound...
c Tuner indicator Lights up while receiving a radio broadcast signal from which signals are available for the current operation. d SLEEP indicator Lights up when the sleep timer is selected as an input source. e VOLUME indicator Displays volume levels. MUTE SW L CR SL SR SBL SB SBR g i 6 En b CINEMA DSP indicator Lights up when a sound...

Owner's Manual
Page 11
...21). s Numeric keys Enter numbers. To control external components using the rExternal component operation keys separately from the remote control. Selects a Yamaha iPod universal dock/ Bluetooth wireless audio receiver connected to the previous screen or ends the menu screen. INTRODUCTION PREPARATION BASIC OPERATION ADVANCED OPERATION Remote control a d g h i ... external component operations (see page 33). e SLEEP Switches the sleep timer operations (see page 22). Selects AV inputs 1 through 4. o VOLUME +/- t TV control keys Operate a monitor such as a TV or projector.
...21). s Numeric keys Enter numbers. To control external components using the rExternal component operation keys separately from the remote control. Selects a Yamaha iPod universal dock/ Bluetooth wireless audio receiver connected to the previous screen or ends the menu screen. INTRODUCTION PREPARATION BASIC OPERATION ADVANCED OPERATION Remote control a d g h i ... external component operations (see page 33). e SLEEP Switches the sleep timer operations (see page 22). Selects AV inputs 1 through 4. o VOLUME +/- t TV control keys Operate a monitor such as a TV or projector.

Owner's Manual
Page 12
...by pressing a remote control key. See the related pages for details on room acoustic characteristics (audio characteristics of other speakers is as an input source and start playback. • Basic procedure • Selecting sound field programs ☞P. 21 ☞P. 24 y • This ... a another amplifier connected. • If your TV, DVD player, or other components ☞P. 15 • Connecting a Yamaha iPod universal dock or Bluetooth wireless audio receiver ☞P. 16 • Connecting the FM and AM antennas ☞P. 17 Step 4: Turn on the power Connect the power...
...by pressing a remote control key. See the related pages for details on room acoustic characteristics (audio characteristics of other speakers is as an input source and start playback. • Basic procedure • Selecting sound field programs ☞P. 21 ☞P. 24 y • This ... a another amplifier connected. • If your TV, DVD player, or other components ☞P. 15 • Connecting a Yamaha iPod universal dock or Bluetooth wireless audio receiver ☞P. 16 • Connecting the FM and AM antennas ☞P. 17 Step 4: Turn on the power Connect the power...

Owner's Manual
Page 17
... optical fiber cables for digital audio signals. Use HDMI cables. Use jacks and cables appropriate for the same kind of signal as the input signal. ADVANCED OPERATION ADDITIONAL INFORMATION APPENDIX English 13 En For example, if a VCR with a composite output signal and a DVD player with... the HDMI logo printed on it. • You can check error information on jacks and cable plugs This unit has the following input and output jacks. To transmit optical digital audio signals. y • We recommend that you use a commercially available 19-pin HDMI cable no...
... optical fiber cables for digital audio signals. Use HDMI cables. Use jacks and cables appropriate for the same kind of signal as the input signal. ADVANCED OPERATION ADDITIONAL INFORMATION APPENDIX English 13 En For example, if a VCR with a composite output signal and a DVD player with... the HDMI logo printed on it. • You can check error information on jacks and cable plugs This unit has the following input and output jacks. To transmit optical digital audio signals. y • We recommend that you use a commercially available 19-pin HDMI cable no...

Owner's Manual
Page 18
... b Component video output MONITOR OUT (COMPONENT VIDEO) ■ To connect composite video monitor Note • Only video signals input from this unit to the AV input 1 with the remote control of a TV from this unit. Jacks on components Jacks on standby. If the TV supports ...this unit can select one of this unit To output sound of the TV. FM GND AM O OPTICAL ( TV ) AV 1 COAXIAL AV 2 COAXIAL (CD) AV 3 OPTICAL AV 4 AV 5 AV 6 AV OUT AUDIO1 14 En Connecting to the AV input 1 allows you to switch an input source to the video monitor, make connection between the...
... b Component video output MONITOR OUT (COMPONENT VIDEO) ■ To connect composite video monitor Note • Only video signals input from this unit to the AV input 1 with the remote control of a TV from this unit. Jacks on components Jacks on standby. If the TV supports ...this unit can select one of this unit To output sound of the TV. FM GND AM O OPTICAL ( TV ) AV 1 COAXIAL AV 2 COAXIAL (CD) AV 3 OPTICAL AV 4 AV 5 AV 6 AV OUT AUDIO1 14 En Connecting to the AV input 1 allows you to switch an input source to the video monitor, make connection between the...

Owner's Manual
Page 19
... (see page 21). • You can switch the input source to the respective jacks. If your Yamaha component has the Remote in parentheses are recommended to connect to that component with the front panel display or remote control. Audio / video input (AV 1-6) Audio / video output (AV OUT) INTRODUCTION PREPARATION BASIC OPERATION ADVANCED OPERATION ADDITIONAL INFORMATION...
... (see page 21). • You can switch the input source to the respective jacks. If your Yamaha component has the Remote in parentheses are recommended to connect to that component with the front panel display or remote control. Audio / video input (AV 1-6) Audio / video output (AV OUT) INTRODUCTION PREPARATION BASIC OPERATION ADVANCED OPERATION ADDITIONAL INFORMATION...
Owner's Manual
Page 20
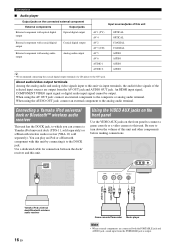
...STRAIGHT EFFECT DIRECT INPUT OPTIMIZER MIC l h VIDEO AUX VIDEO AUDIO PORTABLE VIDEO L AUDIO R PORTABLE V L R Analog audio output Analog audio output Video output Yamaha iPod universal dock/Bluetooth wireless audio receiver 16 En Game...input from the AV OUT jack and AUDIO OUT jack. AUDIO About audio/video output terminals Among the analog audio and analog video signals input to the analog audio terminal. When using the AUDIO OUT jack: connect an external component to this unit. Connecting a Yamaha iPod universal dock or Bluetooth™ wireless audio receiver...
...STRAIGHT EFFECT DIRECT INPUT OPTIMIZER MIC l h VIDEO AUX VIDEO AUDIO PORTABLE VIDEO L AUDIO R PORTABLE V L R Analog audio output Analog audio output Video output Yamaha iPod universal dock/Bluetooth wireless audio receiver 16 En Game...input from the AV OUT jack and AUDIO OUT jack. AUDIO About audio/video output terminals Among the analog audio and analog video signals input to the analog audio terminal. When using the AUDIO OUT jack: connect an external component to this unit. Connecting a Yamaha iPod universal dock or Bluetooth™ wireless audio receiver...

Owner's Manual
Page 25
... manufacturer of the external component for different usages, such as playing movies or music. Input source Sound field program BD/DVD TV CD RADIO HDMI 1 AV 1 AV 3 TUNER Straight Straight Straight 7ch Enhancer y • When this unit is not properly input to this unit by pressing the SCENE key. Volume VOL. Four scenes are...
... manufacturer of the external component for different usages, such as playing movies or music. Input source Sound field program BD/DVD TV CD RADIO HDMI 1 AV 1 AV 3 TUNER Straight Straight Straight 7ch Enhancer y • When this unit is not properly input to this unit by pressing the SCENE key. Volume VOL. Four scenes are...

Owner's Manual
Page 26
... temporarily (MUTE) 1 Press qMUTE on the remote control to resume audio output. Sleep 90min. Playback 2 Press gInput selection keys on the remote control for the input source whose remote control code was registered in step 1 for about 3 seconds while pressing down kSCENE key whose assignment you release the key. Press eSLEEP...
... temporarily (MUTE) 1 Press qMUTE on the remote control to resume audio output. Sleep 90min. Playback 2 Press gInput selection keys on the remote control for the input source whose remote control code was registered in step 1 for about 3 seconds while pressing down kSCENE key whose assignment you release the key. Press eSLEEP...

Owner's Manual
Page 27
... display an error message. 4 To end the information display, press mOPTION. HDMI1-4: Input, DSP Program, Audio Decoder AV1-6: Input, DSP Program, Audio Decoder AUDIO1-2: Input, DSP Program, Audio Decoder V-AUX: Input, DSP Program, Audio Decoder FM/AM: Frequency, DSP Program, Audio Decoder iPod (Simple... nCursor to select the desired item. INTRODUCTION PREPARATION Playback Displaying input signal information You can display information on audio/video signals input to this unit for each input source. Changing information on the front panel display Information displayed ...
... display an error message. 4 To end the information display, press mOPTION. HDMI1-4: Input, DSP Program, Audio Decoder AV1-6: Input, DSP Program, Audio Decoder AUDIO1-2: Input, DSP Program, Audio Decoder V-AUX: Input, DSP Program, Audio Decoder FM/AM: Frequency, DSP Program, Audio Decoder iPod (Simple... nCursor to select the desired item. INTRODUCTION PREPARATION Playback Displaying input signal information You can display information on audio/video signals input to this unit for each input source. Changing information on the front panel display Information displayed ...

Owner's Manual
Page 28
... designed with the concept of "an ideal movie theater," in straight decode mode. • If the sampling frequency of an input source is higher than 96 kHz, this unit does not apply any sound field programs. Sound field program descriptions This unit provides... program clearly reproduces the finely elaborated sound design of cinematographically created virtual spaces reproduced with a Yamaha digital sound field processing (DSP) chip. Sound field programs for almost all input sources using various sound field programs stored on the front panel display. Stereo reproduction Press jSTEREO...
... designed with the concept of "an ideal movie theater," in straight decode mode. • If the sampling frequency of an input source is higher than 96 kHz, this unit does not apply any sound field programs. Sound field program descriptions This unit provides... program clearly reproduces the finely elaborated sound design of cinematographically created virtual spaces reproduced with a Yamaha digital sound field processing (DSP) chip. Sound field programs for almost all input sources using various sound field programs stored on the front panel display. Stereo reproduction Press jSTEREO...

Owner's Manual
Page 29
... an image of a concert hall for the interior finishing as a classic movie in the game. y • When multi-channel signals (Dolby Digital and DTS) are input, they are suitable for "Action Game" to create a comfortable space with approximately 460 seats. ADVANCED OPERATION ADDITIONAL INFORMATION APPENDIX English 25 En The program produces...
... an image of a concert hall for the interior finishing as a classic movie in the game. y • When multi-channel signals (Dolby Digital and DTS) are input, they are suitable for "Action Game" to create a comfortable space with approximately 460 seats. ADVANCED OPERATION ADDITIONAL INFORMATION APPENDIX English 25 En The program produces...

Owner's Manual
Page 30
... sources with selected decoders. Dolby Pro Logic IIx (or Dolby Pro Logic II) decoder suitable for music. If your listening environment is input. 26 En You can playback 2-channel sources on multi-channels. If your listening environment is played back in 7-channel stereo. Decoder Descriptions...Logic PLIIx Movie / PLII Movie Dolby Pro Logic decoder suitable for games. If your listening environment is ideal for movies. y • An input source is as follows, you cannot select the Dolby Pro Logic IIx decoder. • When the surround back speakers are not connected •...
... sources with selected decoders. Dolby Pro Logic IIx (or Dolby Pro Logic II) decoder suitable for music. If your listening environment is input. 26 En You can playback 2-channel sources on multi-channels. If your listening environment is played back in 7-channel stereo. Decoder Descriptions...Logic PLIIx Movie / PLII Movie Dolby Pro Logic decoder suitable for games. If your listening environment is ideal for movies. y • An input source is as follows, you cannot select the Dolby Pro Logic IIx decoder. • When the surround back speakers are not connected •...

Owner's Manual
Page 31
...Sur. SILENT CINEMA mode is connected to the PHONES jack. direct mode or straight decoding mode is used. Multi-channel input sources are decoded straight into the appropriate channels and multi-channel sounds are reproduced without sound field effect. 2-channel stereo ...OPERATION ADDITIONAL INFORMATION APPENDIX English 27 En L/R" in Virtual CINEMA DSP mode. INTRODUCTION PREPARATION Enjoy the sound field programs Enjoying unprocessed input sources (Straight decoding mode) In straight decoding mode, sounds are output from only the front left and right speakers. "Straight...
...Sur. SILENT CINEMA mode is connected to the PHONES jack. direct mode or straight decoding mode is used. Multi-channel input sources are decoded straight into the appropriate channels and multi-channel sounds are reproduced without sound field effect. 2-channel stereo ...OPERATION ADDITIONAL INFORMATION APPENDIX English 27 En L/R" in Virtual CINEMA DSP mode. INTRODUCTION PREPARATION Enjoy the sound field programs Enjoying unprocessed input sources (Straight decoding mode) In straight decoding mode, sounds are output from only the front left and right speakers. "Straight...
Owner's Manual
Page 32
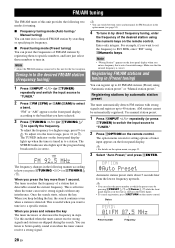
... (or n). Once the search starts, release the key. This is detectable around the current frequency. Use this method when the tuner cannot receive strong signals and stations are skipped during the search. Note • "Wrong Station!" The option menu screen for tuning. ■ Frequency ... / n or nCursor k / n while the front panel display is out of receivable range. AM stations cannot be automatically registered. Use manual station preset. 1 Press NINPUT l / h repeatedly (or press gTUNER) to switch the input source to "TUNER." 2 Press mOPTION on the front panel display when you enter a...
... (or n). Once the search starts, release the key. This is detectable around the current frequency. Use this method when the tuner cannot receive strong signals and stations are skipped during the search. Note • "Wrong Station!" The option menu screen for tuning. ■ Frequency ... / n or nCursor k / n while the front panel display is out of receivable range. AM stations cannot be automatically registered. Use manual station preset. 1 Press NINPUT l / h repeatedly (or press gTUNER) to switch the input source to "TUNER." 2 Press mOPTION on the front panel display when you enter a...

Owner's Manual
Page 33
... numbers to which no station is displayed on the remote control or leave the tuner without any operations for setting options of tuner input appears on the display. The option menu screen for about 30 seconds. To end the operation, press mOPTION. When registration is ...want to clear. When registration is registered. Clearing the preset station 1 Press NINPUT l / h repeatedly (or press gTUNER) to switch the input source to "TUNER." 2 Press mOPTION on the remote control, the screen returns to the original state. ADVANCED OPERATION ADDITIONAL INFORMATION APPENDIX English ...
... numbers to which no station is displayed on the remote control or leave the tuner without any operations for setting options of tuner input appears on the display. The option menu screen for about 30 seconds. To end the operation, press mOPTION. When registration is ...want to clear. When registration is registered. Clearing the preset station 1 Press NINPUT l / h repeatedly (or press gTUNER) to switch the input source to "TUNER." 2 Press mOPTION on the remote control, the screen returns to the original state. ADVANCED OPERATION ADDITIONAL INFORMATION APPENDIX English ...


