MCXSP10 Manual
Page 5
... OPERATION CONTENTS INTRODUCTION FEATURES 2 GETTING STARTED 3 Supplied accessories 3 Installing batteries in the remote controls 4 CONTROLS AND FUNCTIONS 5 Front panel 5 Remote control 7 GUI remote control 8 Using the remote controls 9 Front panel display 10 Rear panel 12 PREPARATION SPEAKER SETUP 13 Speaker placement 13 ... the power supply cord 29 Speaker impedance setting 30 Turning on the power 30 USING THE GUI REMOTE CONTROL ......... 31 GUI remote control operations 31 AUTO SETUP 33 Introduction 33 Optimizer microphone setup 33 Starting the setup 34 Confirming the ...
... OPERATION CONTENTS INTRODUCTION FEATURES 2 GETTING STARTED 3 Supplied accessories 3 Installing batteries in the remote controls 4 CONTROLS AND FUNCTIONS 5 Front panel 5 Remote control 7 GUI remote control 8 Using the remote controls 9 Front panel display 10 Rear panel 12 PREPARATION SPEAKER SETUP 13 Speaker placement 13 ... the power supply cord 29 Speaker impedance setting 30 Turning on the power 30 USING THE GUI REMOTE CONTROL ......... 31 GUI remote control operations 31 AUTO SETUP 33 Introduction 33 Optimizer microphone setup 33 Starting the setup 34 Confirming the ...
MCXSP10 Manual
Page 6
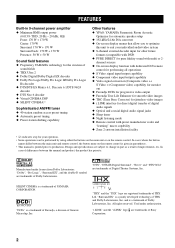
... decoder input for other future formats (compatible with multi or 2- In case of differences between the main unit and remote control, the button name on the remote control is given in parentheses. • This manual is printed prior to suit your operation. • Some operations can...◆ 40-station random access preset tuning ◆ Automatic preset tuning ◆ Preset station shifting capability Other features ◆ YPAO: YAMAHA Parametric Room Acoustic Optimizer for automatic speaker setup ◆ 192-kHz/24-bit D/A converter ◆ On-screen display menus that allow ...
... decoder input for other future formats (compatible with multi or 2- In case of differences between the main unit and remote control, the button name on the remote control is given in parentheses. • This manual is printed prior to suit your operation. • Some operations can...◆ 40-station random access preset tuning ◆ Automatic preset tuning ◆ Preset station shifting capability Other features ◆ YPAO: YAMAHA Parametric Room Acoustic Optimizer for automatic speaker setup ◆ 192-kHz/24-bit D/A converter ◆ On-screen display menus that allow ...
MCXSP10 Manual
Page 7
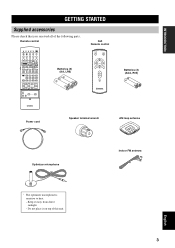
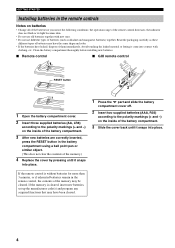
Remote control MACRO TRANSMIT RE-NAME CLEAR LEARN MACRO OFF ON SYSTEM POWER STANDBY V-AUX TUNER PHONO CABLE SAT MD/TAPE CD-R CD DTV/LD VCR 1 VCR 2 ... +10 NIGHT +100 TV INPUT TV VOL CH TV MUTE MUTE STRAIGHT VOLUME DISC EFFECT ON SCREEN SLEEP TEST A SPEAKERS B PUSH Batteries (3) (AA, LR6) GUI Remote control SYSTEM POWER STANDBY ENTER TOP EXIT + VOL - INTRODUCTION GETTING STARTED Supplied accessories Please check that you received all of this unit.
Remote control MACRO TRANSMIT RE-NAME CLEAR LEARN MACRO OFF ON SYSTEM POWER STANDBY V-AUX TUNER PHONO CABLE SAT MD/TAPE CD-R CD DTV/LD VCR 1 VCR 2 ... +10 NIGHT +100 TV INPUT TV VOL CH TV MUTE MUTE STRAIGHT VOLUME DISC EFFECT ON SCREEN SLEEP TEST A SPEAKERS B PUSH Batteries (3) (AA, LR6) GUI Remote control SYSTEM POWER STANDBY ENTER TOP EXIT + VOL - INTRODUCTION GETTING STARTED Supplied accessories Please check that you received all of this unit.
MCXSP10 Manual
Page 8
...such as these different types of batteries may be cleared. Avoid touching the leaked material or letting it come into place. If the remote control is cleared, insert new batteries, set up the manufacturer code(s) and program any acquired functions that may have leaked, dispose of the... have been cleared. 4 If the memory is without batteries for more than 3 minutes, or if exhausted batteries remain in the remote control, the contents of them immediately. Read the packaging carefully as alkaline and manganese batteries) together. GETTING STARTED Installing batteries in the...
...such as these different types of batteries may be cleared. Avoid touching the leaked material or letting it come into place. If the remote control is cleared, insert new batteries, set up the manufacturer code(s) and program any acquired functions that may have leaked, dispose of the... have been cleared. 4 If the memory is without batteries for more than 3 minutes, or if exhausted batteries remain in the remote control, the contents of them immediately. Read the packaging carefully as alkaline and manganese batteries) together. GETTING STARTED Installing batteries in the...
MCXSP10 Manual
Page 9
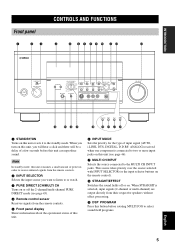
..., you want to listen to or watch. 3 PURE DIRECT 2CH/MULTI CH Turns on this unit (see page 45). 4 Remote control sensor Receives signals from the remote controls. 5 Front panel display Shows information about the operational status of this unit or sets it to select sound field programs. 5 ...the sound fields off the 2-channel/multi-channel PURE DIRECT mode (see page 46). 7 MULTI CH INPUT Selects the source connected to receive infrared-signals from the remote controls. 2 INPUT SELECTOR Selects the input source you will hear a click and there will be a delay of input signal (AUTO, i....
..., you want to listen to or watch. 3 PURE DIRECT 2CH/MULTI CH Turns on this unit (see page 45). 4 Remote control sensor Receives signals from the remote controls. 5 Front panel display Shows information about the operational status of this unit or sets it to select sound field programs. 5 ...the sound fields off the 2-channel/multi-channel PURE DIRECT mode (see page 46). 7 MULTI CH INPUT Selects the source connected to receive infrared-signals from the remote controls. 2 INPUT SELECTOR Selects the input source you will hear a click and there will be a delay of input signal (AUTO, i....

MCXSP10 Manual
Page 11
.../AMP Slide to 10KEY to operate. 2 RE-NAME Used for the type of the input component selected with this unit (see page 46). INTRODUCTION CONTROLS AND FUNCTIONS Remote control This section describes the functions of multi-channel software. CHAPTER + POWER REC STOP PAUSE PLAY F G H I J K L M N A B C ...Shows the name of the selected source component that you can control. 8 SOURCE SELECT k/n Selects another component that you can control independently of input signal (AUTO, i.LINK, DTS, DIGITAL, D.D.RF, ANALOG) received when one component is sending signals. 4 STANDBY Sets this...
.../AMP Slide to 10KEY to operate. 2 RE-NAME Used for the type of the input component selected with this unit (see page 46). INTRODUCTION CONTROLS AND FUNCTIONS Remote control This section describes the functions of multi-channel software. CHAPTER + POWER REC STOP PAUSE PLAY F G H I J K L M N A B C ...Shows the name of the selected source component that you can control. 8 SOURCE SELECT k/n Selects another component that you can control independently of input signal (AUTO, i.LINK, DTS, DIGITAL, D.D.RF, ANALOG) received when one component is sending signals. 4 STANDBY Sets this...

MCXSP10 Manual
Page 12
...88 and 89). H MACRO Used to the previous volume level. Press again to restore the audio output to program a series of other remote controls (see page 91). Increases or decreases the volume level. 7 MUTE Mutes the sound. M EXIT Press to exit the on -screen display menus. ...field program Use to the MULTI CH INPUT jacks. R STRAIGHT/EFFECT Switches the sound fields off the set of the GUI remote control. See "USING THE GUI REMOTE CONTROL" on . CONTROLS AND FUNCTIONS G LEARN Used for setting up /down to the previous volume level. 8 J Input selector buttons Selects the ...
...88 and 89). H MACRO Used to the previous volume level. Press again to restore the audio output to program a series of other remote controls (see page 91). Increases or decreases the volume level. 7 MUTE Mutes the sound. M EXIT Press to exit the on -screen display menus. ...field program Use to the MULTI CH INPUT jacks. R STRAIGHT/EFFECT Switches the sound fields off the set of the GUI remote control. See "USING THE GUI REMOTE CONTROL" on . CONTROLS AND FUNCTIONS G LEARN Used for setting up /down to the previous volume level. 8 J Input selector buttons Selects the ...

MCXSP10 Manual
Page 13
... directional infrared beams. Be sure to aim the remote controls directly at the remote control sensor on the main unit during operation. ■ Handling the remote controls • Do not spill water or other liquids on the remote controls. • Do not drop the remote controls. • Do not leave or store the remote controls in the following types of conditions: - extremely...
... directional infrared beams. Be sure to aim the remote controls directly at the remote control sensor on the main unit during operation. ■ Handling the remote controls • Do not spill water or other liquids on the remote controls. • Do not drop the remote controls. • Do not leave or store the remote controls in the following types of conditions: - extremely...

MCXSP10 Manual
Page 31
..., connect the external preamplifier to the FRONT IN/ CENTER IN jacks. CONNECTIONS ■ Connecting external preamplifiers If you want to this unit's remote control (see page 76). • Some signals may not be output from the SUBWOOFER jack depending on the subwoofer. Set the volume of the...jacks. 5 PRESENCE jacks Presence channel line output jacks. 6 SUBWOOFER jacks Connect one or two subwoofer(s) with built-in amplifier, such as the YAMAHA Active Servo Processing Subwoofer System, to these jacks, signals input to "ZONE B" (see page 84) and SPEAKERS A is turned off (see page ...
..., connect the external preamplifier to the FRONT IN/ CENTER IN jacks. CONNECTIONS ■ Connecting external preamplifiers If you want to this unit's remote control (see page 76). • Some signals may not be output from the SUBWOOFER jack depending on the subwoofer. Set the volume of the...jacks. 5 PRESENCE jacks Presence channel line output jacks. 6 SUBWOOFER jacks Connect one or two subwoofer(s) with built-in amplifier, such as the YAMAHA Active Servo Processing Subwoofer System, to these jacks, signals input to "ZONE B" (see page 84) and SPEAKERS A is turned off (see page ...
MCXSP10 Manual
Page 34
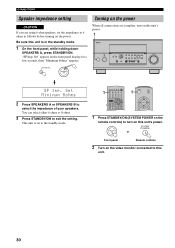
... on the power When all connections are using 6-ohm speakers, set to select the impedance of your speakers. "SP Imp. Set" appears on the remote controls) to this unit. 30 This unit is in the standby mode. 1 On the front panel, while holding down SPEAKERS A, press STANDBY/ON. CONNECTIONS.../ON to 6 ohms as follows before turning on this unit is set the impedance to exit the setting. STANDBY /ON SYSTEM POWER or Front panel Remote controls 2 Turn on the video monitor connected to turn on this unit's power. 1 STANDBY /ON PURE DIRECT 2CH/8CH INPUT SELECTOR SPEAKERS A B REC ...
... on the power When all connections are using 6-ohm speakers, set to select the impedance of your speakers. "SP Imp. Set" appears on the remote controls) to this unit. 30 This unit is in the standby mode. 1 On the front panel, while holding down SPEAKERS A, press STANDBY/ON. CONNECTIONS.../ON to 6 ohms as follows before turning on this unit is set the impedance to exit the setting. STANDBY /ON SYSTEM POWER or Front panel Remote controls 2 Turn on the video monitor connected to turn on this unit's power. 1 STANDBY /ON PURE DIRECT 2CH/8CH INPUT SELECTOR SPEAKERS A B REC ...

MCXSP10 Manual
Page 35
...; Display information about audio and video signals 3 Press k/n repeatedly to select a category (i.e., Manual Setup), then press h to control this unit and your video monitor. PREPARATION USING THE GUI REMOTE CONTROL USING THE GUI REMOTE CONTROL GUI remote control operations The GUI (graphical user interface) remote control provides a simple and convenient way to enter the selected category (i.e., Basic). English 31
...; Display information about audio and video signals 3 Press k/n repeatedly to select a category (i.e., Manual Setup), then press h to control this unit and your video monitor. PREPARATION USING THE GUI REMOTE CONTROL USING THE GUI REMOTE CONTROL GUI remote control operations The GUI (graphical user interface) remote control provides a simple and convenient way to enter the selected category (i.e., Basic). English 31
MCXSP10 Manual
Page 36
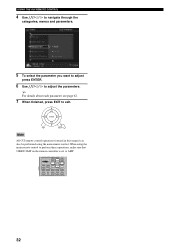
...MENU SELECT SEARCH ENTER EXIT SOUND - y For details about each parameter see page 62. 7 When finished, press EXIT to adjust the parameters. USING THE GUI REMOTE CONTROL 4 Use k/n/l / h to navigate through the categories, menus and parameters. 5 To select the parameter you want to adjust press ENTER. 6 Use k/n/l .../ h to exit. ENTER TOP EXIT Note All GUI remote control operations featured in this manual can also be performed using the main remote control to perform these operations, make sure that 10KEY/AMP on the...
...MENU SELECT SEARCH ENTER EXIT SOUND - y For details about each parameter see page 62. 7 When finished, press EXIT to adjust the parameters. USING THE GUI REMOTE CONTROL 4 Use k/n/l / h to navigate through the categories, menus and parameters. 5 To select the parameter you want to adjust press ENTER. 6 Use k/n/l .../ h to exit. ENTER TOP EXIT Note All GUI remote control operations featured in this manual can also be performed using the main remote control to perform these operations, make sure that 10KEY/AMP on the...
MCXSP10 Manual
Page 38
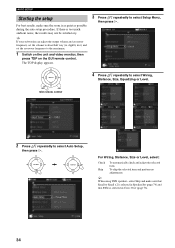
...The TOP display appears. 3 Press k/n repeatedly to the maximum. 1 Switch on the unit and video monitor, then press TOP on the GUI remote control. If there is selected in Speaker Set (page 74) and that 80Hz is too much ambient noise, the results may not be satisfactory. To..., set the volume to about half way (or slightly less), and set the crossover frequency to select Setup Menu, then press h. ENTER TOP EXIT GUI remote control 4 Press k/n repeatedly to select Wiring, Distance, Size, Equalizing or Level. 2 Press k/n repeatedly to select Auto Setup, then press h. ENTER ENTER For ...
...The TOP display appears. 3 Press k/n repeatedly to the maximum. 1 Switch on the unit and video monitor, then press TOP on the GUI remote control. If there is selected in Speaker Set (page 74) and that 80Hz is too much ambient noise, the results may not be satisfactory. To..., set the volume to about half way (or slightly less), and set the crossover frequency to select Setup Menu, then press h. ENTER TOP EXIT GUI remote control 4 Press k/n repeatedly to select Wiring, Distance, Size, Equalizing or Level. 2 Press k/n repeatedly to select Auto Setup, then press h. ENTER ENTER For ...
MCXSP10 Manual
Page 43
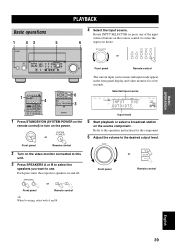
...component. 6 Adjust the volume to use. Each press turns the respective speakers on the source component. SPEAKERS A B or A SPEAKERS B Front panel Remote control y When bi-wiring, select both A and B. Refer to the operation instructions for a few seconds. Selected input source MULTI CH V-AUX DVR VCR... STANDBY/ON (SYSTEM POWER on the power. Rotate INPUT SELECTOR (or press one of the input selector buttons on the remote control) to turn on the remote control) to select the 6 input you want to the desired output level. INPUT SELECTOR or V-AUX TUNER PHONO CABLE SAT MD...
...component. 6 Adjust the volume to use. Each press turns the respective speakers on the source component. SPEAKERS A B or A SPEAKERS B Front panel Remote control y When bi-wiring, select both A and B. Refer to the operation instructions for a few seconds. Selected input source MULTI CH V-AUX DVR VCR... STANDBY/ON (SYSTEM POWER on the power. Rotate INPUT SELECTOR (or press one of the input selector buttons on the remote control) to turn on the remote control) to select the 6 input you want to the desired output level. INPUT SELECTOR or V-AUX TUNER PHONO CABLE SAT MD...

MCXSP10 Manual
Page 44
...10KEY AMP STEREO 1 JAZZ 5 6.1/5.1 CHP/INDEX MOVIE 9 HALL#1 2 ROCK 6 THX 0 HALL#2 3 CHURCH 4 MUSIC ENTERTAIN 7 8 /DTS +10 NIGHT +100 Remote control Note When this unit detects Dolby Digital signals, the following display appears for the front left to CINEMA DSP or HiFi DSP sound field programs.... The "SILENT CINEMA" indicator lights up on the remote control. To cancel the tone control, press TONE CONTROL repeatedly to become -27 dB (THX recommendation). Notes • If you listen with headphones (SILENT CINEMA) The...
...10KEY AMP STEREO 1 JAZZ 5 6.1/5.1 CHP/INDEX MOVIE 9 HALL#1 2 ROCK 6 THX 0 HALL#2 3 CHURCH 4 MUSIC ENTERTAIN 7 8 /DTS +10 NIGHT +100 Remote control Note When this unit detects Dolby Digital signals, the following display appears for the front left to CINEMA DSP or HiFi DSP sound field programs.... The "SILENT CINEMA" indicator lights up on the remote control. To cancel the tone control, press TONE CONTROL repeatedly to become -27 dB (THX recommendation). Notes • If you listen with headphones (SILENT CINEMA) The...
MCXSP10 Manual
Page 45
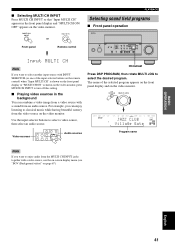
MULTI CH INPUT MULTI CH IN or Front panel Remote control PLAYBACK Selecting sound field programs ■ Front panel operation STANDBY /ON PURE DIRECT 2CH/8CH INPUT SELECTOR SPEAKERS A B REC OUT/ZONE 2 SOURCE/REMOTE DTV/LD DVD CABLE MD/TAPE SAT CD-R VCR 1 CD VCR 2 DVR VIDEO AUX TUNER PHONO INPUT ... DSP PROGRAM, then rotate MULTI JOG to select a video source, then select an audio source. The name of the input selector buttons on the remote control) when "Input MULTI CH" is shown on the front panel display or "MULTI CH ON" is shown on the video monitor, press MULTI CH...
MULTI CH INPUT MULTI CH IN or Front panel Remote control PLAYBACK Selecting sound field programs ■ Front panel operation STANDBY /ON PURE DIRECT 2CH/8CH INPUT SELECTOR SPEAKERS A B REC OUT/ZONE 2 SOURCE/REMOTE DTV/LD DVD CABLE MD/TAPE SAT CD-R VCR 1 CD VCR 2 DVR VIDEO AUX TUNER PHONO INPUT ... DSP PROGRAM, then rotate MULTI JOG to select a video source, then select an audio source. The name of the input selector buttons on the remote control) when "Input MULTI CH" is shown on the front panel display or "MULTI CH ON" is shown on the video monitor, press MULTI CH...

MCXSP10 Manual
Page 46
...the left SURROUND BACK speaker terminals. 42 Notes • When you are playing. OFF Decoders are applied. The name of the program. PLAYBACK ■ Remote control operation 10KEY/AMP 10KEY AMP STEREO 1 HALL#1 2 JAZZ 5 ROCK 6 EX/ES CHP/INDEX MOVIE 9 THX 0 A/B/C/D/E PRESET HALL#2 3 CHURCH 4 ... program used to create 6.1/7.1 channels. and 6.1/7.1- EX For playing back Dolby Digital or DTS signals in 6.1/7.1 channels using the GUI remote control (see page 75), the surround back channel is displayed. AUTO When a signal (flag) that source. • Sound field programs...
...the left SURROUND BACK speaker terminals. 42 Notes • When you are playing. OFF Decoders are applied. The name of the program. PLAYBACK ■ Remote control operation 10KEY/AMP 10KEY AMP STEREO 1 HALL#1 2 JAZZ 5 ROCK 6 EX/ES CHP/INDEX MOVIE 9 THX 0 A/B/C/D/E PRESET HALL#2 3 CHURCH 4 ... program used to create 6.1/7.1 channels. and 6.1/7.1- EX For playing back Dolby Digital or DTS signals in 6.1/7.1 channels using the GUI remote control (see page 75), the surround back channel is displayed. AUTO When a signal (flag) that source. • Sound field programs...

MCXSP10 Manual
Page 47
... Surround Back in the Input Select menu, then set Input Channels to "None" (see page 75). • "PLIIx Movie" cannot be played back on the remote control to select from the following cases: - PLAYBACK ■ Enjoying 2-channel software Signals input from 2-channel sources can select the decoder used for each decoding mode...
... Surround Back in the Input Select menu, then set Input Channels to "None" (see page 75). • "PLIIx Movie" cannot be played back on the remote control to select from the following cases: - PLAYBACK ■ Enjoying 2-channel software Signals input from 2-channel sources can select the decoder used for each decoding mode...

MCXSP10 Manual
Page 48
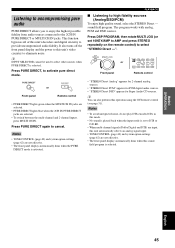
... to select STRAIGHT. 2-channel stereo sources are decoded straight into the appropriate channels without surround speakers. STRAIGHT EFFECT Front panel STRAIGHT or EFFECT Remote control ■ Downmixing to "None" (see page 74). Press DSP PROGRAM, then rotate MULTI JOG (or set to 2 channels You can...• You can also perform this program when SWFR or Both is set 10KEY/AMP to AMP then press STEREO repeatedly on the remote control) to reproduce the natural sound field. Press NIGHT on . It creates virtual speakers to select "STEREO 2ch Stereo". The NIGHT indicator...
... to select STRAIGHT. 2-channel stereo sources are decoded straight into the appropriate channels without surround speakers. STRAIGHT EFFECT Front panel STRAIGHT or EFFECT Remote control ■ Downmixing to "None" (see page 74). Press DSP PROGRAM, then rotate MULTI JOG (or set to 2 channels You can...• You can also perform this program when SWFR or Both is set 10KEY/AMP to AMP then press STEREO repeatedly on the remote control) to reproduce the natural sound field. Press NIGHT on . It creates virtual speakers to select "STEREO 2ch Stereo". The NIGHT indicator...
MCXSP10 Manual
Page 49
... AMP STEREO 1 JAZZ 5 6.1/5.1 CHP/INDEX MOVIE 9 HALL#1 2 ROCK 6 THX 0 HALL#2 3 CHURCH 4 MUSIC ENTERTAIN 7 8 /DTS +10 NIGHT +100 Remote control • "STEREO Direct Analog" appears for 2-channel analog sources. • "STEREO Direct PCM" appears for PCM digital audio sources. • "STEREO Direct DSD" ...can also perform this unit's decoders and digital circuitry to provide uncompromised audio fidelity. PURE DIRECT or PURE DIRECT 0 Front panel Remote control • PURE DIRECT lights green when the MULTI CH IN jacks are selected. • PURE DIRECT lights blue when the 2CH...
... AMP STEREO 1 JAZZ 5 6.1/5.1 CHP/INDEX MOVIE 9 HALL#1 2 ROCK 6 THX 0 HALL#2 3 CHURCH 4 MUSIC ENTERTAIN 7 8 /DTS +10 NIGHT +100 Remote control • "STEREO Direct Analog" appears for 2-channel analog sources. • "STEREO Direct PCM" appears for PCM digital audio sources. • "STEREO Direct DSD" ...can also perform this unit's decoders and digital circuitry to provide uncompromised audio fidelity. PURE DIRECT or PURE DIRECT 0 Front panel Remote control • PURE DIRECT lights green when the MULTI CH IN jacks are selected. • PURE DIRECT lights blue when the 2CH...


