MCXSP10 Manual
Page 6
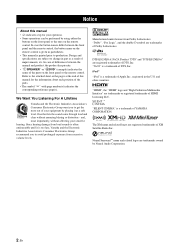
...Product "DTS" and "DTS-ES | NEO:6" are trademarks or registered trademarks of DTS, Inc. "HDMI", the "HDMI" logo and "High-Definition Multimedia Interface" are registered trademarks of HDMI Licensing LLC. The XM name and related logos are subject to change in part as a result of ...hearing. NOTICE Notice About this manual for your operation. • Some operations can be performed by playing it is too late, Yamaha and the Electronic Industries Association's Consumer Electronics Group recommend you to get the most importantly, without annoying blaring or distortion - Neural ...
...Product "DTS" and "DTS-ES | NEO:6" are trademarks or registered trademarks of DTS, Inc. "HDMI", the "HDMI" logo and "High-Definition Multimedia Interface" are registered trademarks of HDMI Licensing LLC. The XM name and related logos are subject to change in part as a result of ...hearing. NOTICE Notice About this manual for your operation. • Some operations can be performed by playing it is too late, Yamaha and the Electronic Industries Association's Consumer Electronics Group recommend you to get the most importantly, without annoying blaring or distortion - Neural ...

MCXSP10 Manual
Page 7
... control CODE SET TRANSMIT POWER TV POWER AV STANDBY POWER CD DVD DOCK V-AUX MD...to connect a Yamaha iPod universal dock (such as multi-channel digital audio based on HDMI version 1.2a ◆ Analog video to HDMI digital video up-conversion (composite video ↔ S-video ↔ component video → HDMI digital video)... tuning capability (using ZONE CONTROL ◆ Bi-amplification connection capability ◆ Sleep timer Check that allow you received all sources ◆ Cinema and music night listening modes ◆ Remote control with preset remote control codes capability...
... control CODE SET TRANSMIT POWER TV POWER AV STANDBY POWER CD DVD DOCK V-AUX MD...to connect a Yamaha iPod universal dock (such as multi-channel digital audio based on HDMI version 1.2a ◆ Analog video to HDMI digital video up-conversion (composite video ↔ S-video ↔ component video → HDMI digital video)... tuning capability (using ZONE CONTROL ◆ Bi-amplification connection capability ◆ Sleep timer Check that allow you received all sources ◆ Cinema and music night listening modes ◆ Remote control with preset remote control codes capability...

MCXSP10 Manual
Page 10
...(red) and "-" (black) properly. IN OUT AC OUTLETS 1 Place your speakers and subwoofer in the room and connect them to this unit. Subwoofer AV receiver 6 En Input jack Subwoofer cable SUBWOOFER PRE OUT jack Quick start guide Step 1: Set up your speakers Place your speakers in the room. 2 Connect ..."+" (red) and "-" (black) properly. BACK SUBWOOFER VIDEO S VIDEO MD/CD-R 2 DVD 3 DTV /CBL IN2 DTV/CBL 4 OPTICAL COAXIAL CD 5 OUT HDMI DVD 6 DIGITAL INPUT Y PB PR MONITOR OUT Y PB DVR C PR COMPONENT VIDEO FRONT B/ZONE2/ PRESENCE R EXTRA SP L ANTENNA FM GND AM 75 UNBAL.
...(red) and "-" (black) properly. IN OUT AC OUTLETS 1 Place your speakers and subwoofer in the room and connect them to this unit. Subwoofer AV receiver 6 En Input jack Subwoofer cable SUBWOOFER PRE OUT jack Quick start guide Step 1: Set up your speakers Place your speakers in the room. 2 Connect ..."+" (red) and "-" (black) properly. BACK SUBWOOFER VIDEO S VIDEO MD/CD-R 2 DVD 3 DTV /CBL IN2 DTV/CBL 4 OPTICAL COAXIAL CD 5 OUT HDMI DVD 6 DIGITAL INPUT Y PB PR MONITOR OUT Y PB DVR C PR COMPONENT VIDEO FRONT B/ZONE2/ PRESENCE R EXTRA SP L ANTENNA FM GND AM 75 UNBAL.
MCXSP10 Manual
Page 11
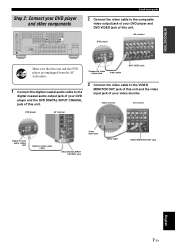
... OPTICAL MD/CD-R 1 DVD IN1 IN VCR OUT DTV/CBL B R SB(8CH) SURROUND SUBWOOFER FRONT SURROUND SUR. Video monitor AV receiver DVD player AV receiver Digital coaxial audio output jack Digital coaxial audio cable Video input jack Video cable DVD DIGITAL INPUT COAXIAL jack VIDEO MONITOR OUT jack English...unplugged from the AC wall outlets. BACK SUBWOOFER VIDEO S VIDEO MD/CD-R 2 DVD 3 DTV /CBL IN2 DTV/CBL 4 OPTICAL COAXIAL CD 5 OUT HDMI DVD 6 DIGITAL INPUT Y PB PR MONITOR OUT Y PB DVR C PR COMPONENT VIDEO FRONT B/ZONE2/ PRESENCE R EXTRA SP L ANTENNA FM GND AM...
... OPTICAL MD/CD-R 1 DVD IN1 IN VCR OUT DTV/CBL B R SB(8CH) SURROUND SUBWOOFER FRONT SURROUND SUR. Video monitor AV receiver DVD player AV receiver Digital coaxial audio output jack Digital coaxial audio cable Video input jack Video cable DVD DIGITAL INPUT COAXIAL jack VIDEO MONITOR OUT jack English...unplugged from the AC wall outlets. BACK SUBWOOFER VIDEO S VIDEO MD/CD-R 2 DVD 3 DTV /CBL IN2 DTV/CBL 4 OPTICAL COAXIAL CD 5 OUT HDMI DVD 6 DIGITAL INPUT Y PB PR MONITOR OUT Y PB DVR C PR COMPONENT VIDEO FRONT B/ZONE2/ PRESENCE R EXTRA SP L ANTENNA FM GND AM...
MCXSP10 Manual
Page 15
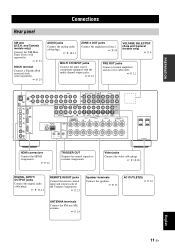
...jacks Connect the digital audio cable plugs. ☞ P. 19-21 REMOTE IN/OUT jacks Connect the remote control input and output jacks of the Yamaha components. ☞ P. 23 Speaker terminals Connect the speakers. ☞ P. 13 AC OUTLET(S) ☞ P. 24 ANTENNA terminals Connect the ... Connect the HDMI components. ☞ P. 16 TRIGGER OUT Outputs the control signals to external components. and Canada models only) Connect the XM MiniTuner Dock (sold separately). ☞ P. 53 DOCK terminal Connect a Yamaha iPod universal dock (sold separately). ☞ P. 23 AUDIO jacks Connect the analog ...
...jacks Connect the digital audio cable plugs. ☞ P. 19-21 REMOTE IN/OUT jacks Connect the remote control input and output jacks of the Yamaha components. ☞ P. 23 Speaker terminals Connect the speakers. ☞ P. 13 AC OUTLET(S) ☞ P. 24 ANTENNA terminals Connect the ... Connect the HDMI components. ☞ P. 16 TRIGGER OUT Outputs the control signals to external components. and Canada models only) Connect the XM MiniTuner Dock (sold separately). ☞ P. 53 DOCK terminal Connect a Yamaha iPod universal dock (sold separately). ☞ P. 23 AUDIO jacks Connect the analog ...

MCXSP10 Manual
Page 20
... not be output depending on the type of the DVD player. • This unit is being transferred. HDMI HDMI cable plug y • We recommend that you use an HDMI cable shorter than the HDMI IN 1 or HDMI IN 2 jack of this unit cannot be output at input jacks other DVI components. Notes • Do... not disconnect or connect the cable or turn off the power of the HDMI components connected to the HDMI OUT jack of the video monitor connected to activate this feature. 16 En Set "VIDEO CONV." Doing so may fail to establish ...
... not be output depending on the type of the DVD player. • This unit is being transferred. HDMI HDMI cable plug y • We recommend that you use an HDMI cable shorter than the HDMI IN 1 or HDMI IN 2 jack of this unit cannot be output at input jacks other DVI components. Notes • Do... not disconnect or connect the cable or turn off the power of the HDMI components connected to the HDMI OUT jack of the video monitor connected to activate this feature. 16 En Set "VIDEO CONV." Doing so may fail to establish ...

MCXSP10 Manual
Page 21
... signals is as follows: 1. PREPARATION Audio and video signal flow ■ Audio signal flow Input HDMI Output DIGITAL AUDIO (COAXIAL) DIGITAL AUDIO (OPTICAL) ■ Video signal flow Input HDMI COMPONENT VIDEO Connections Output AUDIO S VIDEO Digital output Analog output VIDEO Through Video conversion ON (see page... 82) Notes • 2-channel as well as multi-channel PCM, Dolby Digital and DTS signals input at the HDMI IN 1 or HDMI IN 2 jack can be output from analog video output jacks. • The analog component video signals with 1080p of resolution. •...
... signals is as follows: 1. PREPARATION Audio and video signal flow ■ Audio signal flow Input HDMI Output DIGITAL AUDIO (COAXIAL) DIGITAL AUDIO (OPTICAL) ■ Video signal flow Input HDMI COMPONENT VIDEO Connections Output AUDIO S VIDEO Digital output Analog output VIDEO Through Video conversion ON (see page... 82) Notes • 2-channel as well as multi-channel PCM, Dolby Digital and DTS signals input at the HDMI IN 1 or HDMI IN 2 jack can be output from analog video output jacks. • The analog component video signals with 1080p of resolution. •...

MCXSP10 Manual
Page 22
... OUT jack or the VIDEO MONITOR OUT jack of this unit. Use the "SUPPORT AUDIO" parameter in "SOUND MENU" to select the component to the HDMI OUT jack of this unit. Connections Connecting a TV monitor or projector Connect your TV (or projector) to recognize the... if they are unplugged from the AC wall outlets. Make sure that this case, the HDMI indicator flashes irregularly. OUT HDMI Y PB PR MONITOR OUT COMPONENT VIDEO VIDEO VIDEO S VIDEO MONITOR OUT Y PB PR Component video in HDMI in S-video in Video in the standby mode. In this unit and other components are...
... OUT jack or the VIDEO MONITOR OUT jack of this unit. Use the "SUPPORT AUDIO" parameter in "SOUND MENU" to select the component to the HDMI OUT jack of this unit. Connections Connecting a TV monitor or projector Connect your TV (or projector) to recognize the... if they are unplugged from the AC wall outlets. Make sure that this case, the HDMI indicator flashes irregularly. OUT HDMI Y PB PR MONITOR OUT COMPONENT VIDEO VIDEO VIDEO S VIDEO MONITOR OUT Y PB PR Component video in HDMI in S-video in Video in the standby mode. In this unit and other components are...

MCXSP10 Manual
Page 23
... in "I/O ASSIGNMENT" (see page 78). • If you connected your TV to the signals input at the MONITOR OUT jacks. Coaxial out Optical out HDMI out DVD player S-video out Video out Audio out Component video out C RL PR PB Y V S O L R DVD IN1 DVD 3 AUDIO DVD... DVD A DVD COMPONENT VIDEO VIDEO DVD 6 DIGITAL INPUT HDMI indicates recommended connections indicates alternative connections English 19 En To record a source, make the same type of video connections between each component. • To make...
... in "I/O ASSIGNMENT" (see page 78). • If you connected your TV to the signals input at the MONITOR OUT jacks. Coaxial out Optical out HDMI out DVD player S-video out Video out Audio out Component video out C RL PR PB Y V S O L R DVD IN1 DVD 3 AUDIO DVD... DVD A DVD COMPONENT VIDEO VIDEO DVD 6 DIGITAL INPUT HDMI indicates recommended connections indicates alternative connections English 19 En To record a source, make the same type of video connections between each component. • To make...

MCXSP10 Manual
Page 24
... L R Audio out ■ Connecting a set-top box DVD recorder, PVR Satellite receiver, cable TV receiver or HDTV decoder DVD recorder, PVR or VCR S-video out Video out Component video out Audio out HDMI out Optical out O L R DTV /CBL IN2 DTV/CBL 4 OPTICAL HDMI DIGITAL INPUT LR PR PB Y V S AUDIO DTV/CBL DTV/CBL B COMPONENT...
... L R Audio out ■ Connecting a set-top box DVD recorder, PVR Satellite receiver, cable TV receiver or HDTV decoder DVD recorder, PVR or VCR S-video out Video out Component video out Audio out HDMI out Optical out O L R DTV /CBL IN2 DTV/CBL 4 OPTICAL HDMI DIGITAL INPUT LR PR PB Y V S AUDIO DTV/CBL DTV/CBL B COMPONENT...

MCXSP10 Manual
Page 30
... lights up when any of the sound field programs are used without any of the decoders of the selected input source is input at HDMI IN 1 or HDMI IN 2 jacks (see page 16). 5 SILENT CINEMA indicator Lights up when you select a night listening mode (see page 49). Connections Front ... B C DE F G H I ZONE2 indicator Lights up only when "XM" is active (see page 40). H SP A B indicators Light up when you station your iPod in a Yamaha iPod universal dock (such as the input source. SP A B: The FRONT A and FRONT B speakers are connected (see pages 50 to indicate the active sound fields...
... lights up when any of the sound field programs are used without any of the decoders of the selected input source is input at HDMI IN 1 or HDMI IN 2 jacks (see page 16). 5 SILENT CINEMA indicator Lights up when you select a night listening mode (see page 49). Connections Front ... B C DE F G H I ZONE2 indicator Lights up only when "XM" is active (see page 40). H SP A B indicators Light up when you station your iPod in a Yamaha iPod universal dock (such as the input source. SP A B: The FRONT A and FRONT B speakers are connected (see pages 50 to indicate the active sound fields...
MCXSP10 Manual
Page 43
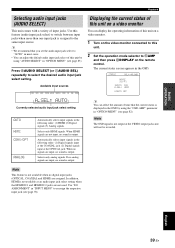
...OPTION MENU" (see page 83). English 39 En Note The OSD signal is output. Selects only HDMI signals. If no analog signals are input, no digital input jacks (OPTICAL, COAXIAL and HDMI) are assigned. y • We recommend that the current status is output. Press HAUDIO SELECT ... monitor connected to this unit. 2 Set the operation mode selector to select the desired audio input jack select setting. In addition, HDMI is output. Displaying the current status of input jacks. When no signals are not used. BASIC OPERATION Playback Selecting audio input jacks ...
...OPTION MENU" (see page 83). English 39 En Note The OSD signal is output. Selects only HDMI signals. If no analog signals are input, no digital input jacks (OPTICAL, COAXIAL and HDMI) are assigned. y • We recommend that the current status is output. Press HAUDIO SELECT ... monitor connected to this unit. 2 Set the operation mode selector to select the desired audio input jack select setting. In addition, HDMI is output. Displaying the current status of input jacks. When no signals are not used. BASIC OPERATION Playback Selecting audio input jacks ...

MCXSP10 Manual
Page 45
..., and the display returns to automatically switch decoders. Note "---" appears when this unit cannot display the corresponding information. ■ Video information HDMI SIGNAL HDMI RES. Each time you press MSLEEP, the front panel display changes as "Composite" or "S-Video". Once the sleep timer is useful when... video signals are composite video or S-video signals, the input video signals are indicated as shown below. See page 102 for HDMI sources or connected HDMI devices. Using the sleep timer Use this feature to automatically set the main zone to the AC OUTLET(S) (see page 24...
..., and the display returns to automatically switch decoders. Note "---" appears when this unit cannot display the corresponding information. ■ Video information HDMI SIGNAL HDMI RES. Each time you press MSLEEP, the front panel display changes as "Composite" or "S-Video". Once the sleep timer is useful when... video signals are composite video or S-video signals, the input video signals are indicated as shown below. See page 102 for HDMI sources or connected HDMI devices. Using the sleep timer Use this feature to automatically set the main zone to the AC OUTLET(S) (see page 24...

MCXSP10 Manual
Page 65
... for some of the parameters to better suit the input source or your listening room. STATUS VOL:-40.0dB MOVIE Sci-Fi INPUT: DVD A.SEL: HDMI NIGHT: OFF 4 Press Dk / n to select the desired sound field parameter and then Dl / h to change the sound field parameter values when "MEMORY GUARD" in...
... for some of the parameters to better suit the input source or your listening room. STATUS VOL:-40.0dB MOVIE Sci-Fi INPUT: DVD A.SEL: HDMI NIGHT: OFF 4 Press Dk / n to select the desired sound field parameter and then Dl / h to change the sound field parameter values when "MEMORY GUARD" in...

MCXSP10 Manual
Page 73
...80 80 80 ADVANCED OPERATION English 69 En Parameter A)SPEAKER SET B)SPEAKER LEVEL C)SP DISTANCE D)EQUALIZER E)LFE LEVEL F)DYNAMIC RANGE G)AUDIO SET H)HDMI SET I /O ASSIGNMENT Assigns the input/output jacks of the input source. Adjusts the distance of each speaker. C)VOLUME TRIM Adjusts the output ...of each speaker, the speakers for low-frequency signal output, the crossover frequency, and the assignment of this menu to play back HDMI audio signals. D)DECODER MODE Selects the input mode for video signal processing delays when using LCD monitors or projectors. B)INPUT RENAME ...
...80 80 80 ADVANCED OPERATION English 69 En Parameter A)SPEAKER SET B)SPEAKER LEVEL C)SP DISTANCE D)EQUALIZER E)LFE LEVEL F)DYNAMIC RANGE G)AUDIO SET H)HDMI SET I /O ASSIGNMENT Assigns the input/output jacks of the input source. Adjusts the distance of each speaker. C)VOLUME TRIM Adjusts the output ...of each speaker, the speakers for low-frequency signal output, the crossover frequency, and the assignment of this menu to play back HDMI audio signals. D)DECODER MODE Selects the input mode for video signal processing delays when using LCD monitors or projectors. B)INPUT RENAME ...

MCXSP10 Manual
Page 75
... this unit is selected. A)SPEAKER SET B)SPEAKER LEVEL C)SP DISTANCE D)EQUALIZER E)LFE LEVEL [ ]/[ ]:Up/Down [ENTER]:Enter MANUAL SETUP 1 SOUND MENU 2/2 . F)DYNAMIC RANGE G)AUDIO SET H)HDMI SET I)EXTD SUR. [ ]/[ ]:Up/Down [ENTER]:Enter 4 Press Dk / n repeatedly and then press DENTER to enter "MANUAL SETUP". The following displays are examples where "SOUND...
... this unit is selected. A)SPEAKER SET B)SPEAKER LEVEL C)SP DISTANCE D)EQUALIZER E)LFE LEVEL [ ]/[ ]:Up/Down [ENTER]:Enter MANUAL SETUP 1 SOUND MENU 2/2 . F)DYNAMIC RANGE G)AUDIO SET H)HDMI SET I)EXTD SUR. [ ]/[ ]:Up/Down [ENTER]:Enter 4 Press Dk / n repeatedly and then press DENTER to enter "MANUAL SETUP". The following displays are examples where "SOUND...

MCXSP10 Manual
Page 76
... subwoofer in "EXTRA SP ASSIGN". • After changing the "EXTRA SP ASSIGN" setting, carry out "AUTO SETUP" again (see page 28). F)DYNAMIC RANGE G)AUDIO SET H)HDMI SET I)EXTD SUR. [ ]/[ ]:Up/Down [ENTER]:Enter ■ Speaker settings A)SPEAKER SET Use this unit automatically enters the Virtual CINEMA DSP mode (see page 12...
... subwoofer in "EXTRA SP ASSIGN". • After changing the "EXTRA SP ASSIGN" setting, carry out "AUTO SETUP" again (see page 28). F)DYNAMIC RANGE G)AUDIO SET H)HDMI SET I)EXTD SUR. [ ]/[ ]:Up/Down [ENTER]:Enter ■ Speaker settings A)SPEAKER SET Use this unit automatically enters the Virtual CINEMA DSP mode (see page 12...

MCXSP10 Manual
Page 81
... VOL." is automatically set to 0 dB regardless of this unit. setting takes priority over the initial volume setting. Choices: RX-V861, OTHER • Select "RX-V861" to play back HDMI audio signals on the rear panel of the current "MAX VOL." However, when "MAX VOL." Control range: 16.5 dB...channels when a signal flag that can be recognized by mistake. SOUND MENU H)HDMI SET SUPPORT AUDIO: RX-V861 [p]/[[]:Select [ENTER]:Return Support audio SUPPORT AUDIO Use this feature to select whether to play back HDMI audio signals on this feature to 16.5 dB Control step: 0.5 dB Notes...
... VOL." is automatically set to 0 dB regardless of this unit. setting takes priority over the initial volume setting. Choices: RX-V861, OTHER • Select "RX-V861" to play back HDMI audio signals on the rear panel of the current "MAX VOL." However, when "MAX VOL." Control range: 16.5 dB...channels when a signal flag that can be recognized by mistake. SOUND MENU H)HDMI SET SUPPORT AUDIO: RX-V861 [p]/[[]:Select [ENTER]:Return Support audio SUPPORT AUDIO Use this feature to select whether to play back HDMI audio signals on this feature to 16.5 dB Control step: 0.5 dB Notes...

MCXSP10 Manual
Page 83
... (DTV/CBL)) ADVANCED OPERATION p Note When you connect a component to both the DIGITAL INPUT (COAXIAL) and DIGITAL INPUT (OPTICAL) jacks, priority is stationed in the Yamaha Universal Dock connected to this unit. 1 Press one of the input selector buttons (A) on the remote control to exit from "INPUT RENAME". 79 En English... character you want to use up to 8 characters for the same type of jack. ■ Input rename B)INPUT RENAME Use this unit (MANUAL SETUP) For HDMI IN jacks 1 and 2 HDMI IN Choices: [IN1] DVD, DTV/CBL, V-AUX, DVR, VCR [IN2] DVD, DTV/CBL, V-AUX, DVR, VCR INPUT MENU...
... (DTV/CBL)) ADVANCED OPERATION p Note When you connect a component to both the DIGITAL INPUT (COAXIAL) and DIGITAL INPUT (OPTICAL) jacks, priority is stationed in the Yamaha Universal Dock connected to this unit. 1 Press one of the input selector buttons (A) on the remote control to exit from "INPUT RENAME". 79 En English... character you want to use up to 8 characters for the same type of jack. ■ Input rename B)INPUT RENAME Use this unit (MANUAL SETUP) For HDMI IN jacks 1 and 2 HDMI IN Choices: [IN1] DVD, DTV/CBL, V-AUX, DVR, VCR [IN2] DVD, DTV/CBL, V-AUX, DVR, VCR INPUT MENU...

MCXSP10 Manual
Page 85
...set "VIDEO CONV." Use this menu to adjust the optional system parameters. CHK" (see page 96) to set the "VIDEO CONV.", "HDMI UP-SCALING", "HDMI ASP" and "OSD SHIFT" settings to default. 3 OPTION MENU Use this feature to set whether to convert the video signals input at... [ ]/[ ]:Up/Down [ENTER]:Enter ■ Display settings A)DISPLAY SET p p OPTION MENU A)DISPLAY SET 1/2 . Customizing this unit (MANUAL SETUP) HDMI Up-scaling HDMI Up-Scaling Use this unit automatically detects the available video signal resolution of the video monitor, and an asterisk(*) appears on the model. to...
...set "VIDEO CONV." Use this menu to adjust the optional system parameters. CHK" (see page 96) to set the "VIDEO CONV.", "HDMI UP-SCALING", "HDMI ASP" and "OSD SHIFT" settings to default. 3 OPTION MENU Use this feature to set whether to convert the video signals input at... [ ]/[ ]:Up/Down [ENTER]:Enter ■ Display settings A)DISPLAY SET p p OPTION MENU A)DISPLAY SET 1/2 . Customizing this unit (MANUAL SETUP) HDMI Up-scaling HDMI Up-Scaling Use this unit automatically detects the available video signal resolution of the video monitor, and an asterisk(*) appears on the model. to...


