
MCXSP10 Manual
Page 4
... and/or this unit may overheat, possibly causing damage. 9 Do not use this unit upside-down. this unit must be used. Contact qualified Yamaha service personnel when any reasons. 15 When not planning to obstruct heat radiation. vacation), disconnect the AC power plug from the AC wall outlet. .... 11 Do not clean this unit with a higher voltage than specified. 13 To prevent damage by MASTER ON/OFF. Using this unit must be set for any damage resulting from use of this unit with a voltage other electrical appliances, motors, or transformers to avoid humming sounds. 4 Do not ...
... and/or this unit may overheat, possibly causing damage. 9 Do not use this unit upside-down. this unit must be used. Contact qualified Yamaha service personnel when any reasons. 15 When not planning to obstruct heat radiation. vacation), disconnect the AC power plug from the AC wall outlet. .... 11 Do not clean this unit with a higher voltage than specified. 13 To prevent damage by MASTER ON/OFF. Using this unit must be set for any damage resulting from use of this unit with a voltage other electrical appliances, motors, or transformers to avoid humming sounds. 4 Do not ...
MCXSP10 Manual
Page 5
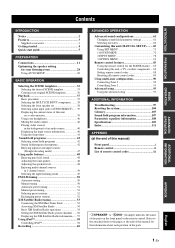
... Satellite Radio tuning 53 Connecting the XM Mini-Tuner Dock 53 Activating XM Satellite Radio 54 Basic XM Satellite Radio operations 54 Setting the XM Satellite Radio preset channels ...... 56 Displaying the XM Satellite Radio information...... 57 Using iPod 58 Controlling iPod 58 Recording... 39 Using your original SCENE templates 36 Playback 37 Basic procedure 37 Selecting the MULTI CH INPUT component......... 38 Selecting the front speaker set 38 Selecting audio input jacks (AUDIO SELECT)...... 39 Displaying the current status of this manual) Front panel i Remote control ii List...
... Satellite Radio tuning 53 Connecting the XM Mini-Tuner Dock 53 Activating XM Satellite Radio 54 Basic XM Satellite Radio operations 54 Setting the XM Satellite Radio preset channels ...... 56 Displaying the XM Satellite Radio information...... 57 Using iPod 58 Controlling iPod 58 Recording... 39 Using your original SCENE templates 36 Playback 37 Basic procedure 37 Selecting the MULTI CH INPUT component......... 38 Selecting the front speaker set 38 Selecting audio input jacks (AUDIO SELECT)...... 39 Displaying the current status of this manual) Front panel i Remote control ii List...

MCXSP10 Manual
Page 7
... ◆ Playback information displaying capability ◆ Battery charging capability Other features ◆ YPAO (Yamaha Parametric Room Acoustic Optimizer) for automatic speaker setup ◆ 192-kHz/24-bit D/A converter ...Zone 2 using ZONE CONTROL ◆ Bi-amplification connection capability ◆ Sleep timer Check that you received all of the supplied accessories varies depending on the models. 3 En DISPLAY REC SCENE 1 2 3... for pure hi-fi sound for discrete multi- Remote control CODE SET TRANSMIT POWER TV POWER AV STANDBY POWER CD DVD DOCK V-AUX MD CD-R CBL DTV MULTI...
... ◆ Playback information displaying capability ◆ Battery charging capability Other features ◆ YPAO (Yamaha Parametric Room Acoustic Optimizer) for automatic speaker setup ◆ 192-kHz/24-bit D/A converter ...Zone 2 using ZONE CONTROL ◆ Bi-amplification connection capability ◆ Sleep timer Check that you received all of the supplied accessories varies depending on the models. 3 En DISPLAY REC SCENE 1 2 3... for pure hi-fi sound for discrete multi- Remote control CODE SET TRANSMIT POWER TV POWER AV STANDBY POWER CD DVD DOCK V-AUX MD CD-R CBL DTV MULTI...
MCXSP10 Manual
Page 8
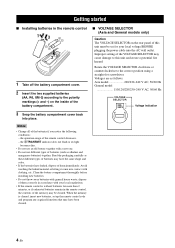
...the following conditions: - GETTING STARTED Getting started ■ Installing batteries in the remote control, the contents of the memory may be set up the remote control code and program any acquired functions that may have been cleared. 4 En Rotate the VOLTAGE SELECTOR clockwise or counterclockwise...batteries. • Do not throw away batteries with your local regulations. • If the remote control is cleared, insert new batteries, set for your local voltage BEFORE plugging the power cable into place. ■ VOLTAGE SELECTOR (Asia and General models only) Caution The VOLTAGE ...
...the following conditions: - GETTING STARTED Getting started ■ Installing batteries in the remote control, the contents of the memory may be set up the remote control code and program any acquired functions that may have been cleared. 4 En Rotate the VOLTAGE SELECTOR clockwise or counterclockwise...batteries. • Do not throw away batteries with your local regulations. • If the remote control is cleared, insert new batteries, set for your local voltage BEFORE plugging the power cable into place. ■ VOLTAGE SELECTOR (Asia and General models only) Caution The VOLTAGE ...

MCXSP10 Manual
Page 9
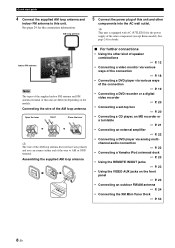
... accessories. ❏ AM loop antenna ❏ Indoor FM antenna Center speaker DVD player Surround left speaker Surround back right speaker Surround back left speaker Step 1: Set up your speakers ☞ P. 6 Step 2: Connect your home theater. The priority of the requirement of this unit. ❏ Speakers ❏ Front speakers 2 ❏ Center speaker...
... accessories. ❏ AM loop antenna ❏ Indoor FM antenna Center speaker DVD player Surround left speaker Surround back right speaker Surround back left speaker Step 1: Set up your speakers ☞ P. 6 Step 2: Connect your home theater. The priority of the requirement of this unit. ❏ Speakers ❏ Front speakers 2 ❏ Center speaker...

MCXSP10 Manual
Page 10
... speakers in the room. 2 Connect speaker cables to each other. 4 Do not let the bare speaker wires touch any metal part of the subwoofer. Subwoofer AV receiver 6 En Input jack Subwoofer cable SUBWOOFER PRE OUT jack BACK SUBWOOFER VIDEO S VIDEO MD/CD-R 2 DVD 3 DTV /CBL IN2 DTV/CBL 4 OPTICAL COAXIAL CD 5 OUT...-R (REC) DVD A DIGITAL OUTPUT OPTICAL MD/CD-R 1 DVD IN1 IN VCR OUT DTV/CBL B R SB(8CH) SURROUND SUBWOOFER FRONT SURROUND SUR. Quick start guide Step 1: Set up your speakers Place your speaker.
... speakers in the room. 2 Connect speaker cables to each other. 4 Do not let the bare speaker wires touch any metal part of the subwoofer. Subwoofer AV receiver 6 En Input jack Subwoofer cable SUBWOOFER PRE OUT jack BACK SUBWOOFER VIDEO S VIDEO MD/CD-R 2 DVD 3 DTV /CBL IN2 DTV/CBL 4 OPTICAL COAXIAL CD 5 OUT...-R (REC) DVD A DIGITAL OUTPUT OPTICAL MD/CD-R 1 DVD IN1 IN VCR OUT DTV/CBL B R SB(8CH) SURROUND SUBWOOFER FRONT SURROUND SUR. Quick start guide Step 1: Set up your speakers Place your speaker.
MCXSP10 Manual
Page 12
...can connect either end of the connection ☞ P. 19 • Connecting a DVD recorder or a digital video recorder ☞ P. 20 • Connecting a set-top box ☞ P. 20 • Connecting a CD player, an MD recorder or a turntable ☞ P. 21 • Connecting an external amplifier ☞...; P. 22 • Connecting a DVD player via analog multichannel audio connection ☞ P. 22 • Connecting a Yamaha iPod universal dock ☞ P. 23 • Using the REMOTE IN/OUT jacks ☞ P. 23 • Using the VIDEO AUX jacks on the ...
...can connect either end of the connection ☞ P. 19 • Connecting a DVD recorder or a digital video recorder ☞ P. 20 • Connecting a set-top box ☞ P. 20 • Connecting a CD player, an MD recorder or a turntable ☞ P. 21 • Connecting an external amplifier ☞...; P. 22 • Connecting a DVD player via analog multichannel audio connection ☞ P. 22 • Connecting a Yamaha iPod universal dock ☞ P. 23 • Using the REMOTE IN/OUT jacks ☞ P. 23 • Using the VIDEO AUX jacks on the ...
MCXSP10 Manual
Page 13
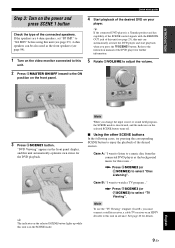
...desired sources. Note To use the "TV Viewing" template (Case B), you must connect a satellite receiver, a cable TV receiver or an HDTV decoder to this unit. 4 Start playback of this unit (see page 23),...BMASTER ON/OFF inward to watch a TV program..." y If the connected DVD player is a Yamaha product and has capability of the SCENE control signals with the REMOTE OUT jack of the desired DVD...English Case A: "I want to listen to select "TV Viewing". If the speakers are 6 ohm speakers, set "SP IMP." Press FSCENE3 (or FSCENE3) to a music disc from the connected DVD player as the ...
...desired sources. Note To use the "TV Viewing" template (Case B), you must connect a satellite receiver, a cable TV receiver or an HDTV decoder to this unit. 4 Start playback of this unit (see page 23),...BMASTER ON/OFF inward to watch a TV program..." y If the connected DVD player is a Yamaha product and has capability of the SCENE control signals with the REMOTE OUT jack of the desired DVD...English Case A: "I want to listen to select "TV Viewing". If the speakers are 6 ohm speakers, set "SP IMP." Press FSCENE3 (or FSCENE3) to a music disc from the connected DVD player as the ...
MCXSP10 Manual
Page 14
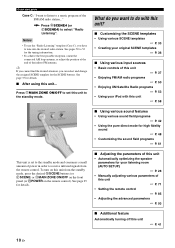
..., you have to tune into the desired radio station. What do you want to listen to a music program of power in order to receive infrared signals from the standby mode, press the desired FSCENE buttons (or FSCENE) or AMAIN ZONE ON/OFF on the front panel (or ...9758; P. 85 • Adjusting the advanced parameters ☞ P. 93 ■ Additional feature Automatically turning off this unit from the remote control. See pages 50 to set to do with this unit ☞ P. 37 • Enjoying FM/AM radio programs ☞ P. 50 • Enjoying XM Satellite Radio programs ☞ P. 53 ...
..., you have to tune into the desired radio station. What do you want to listen to a music program of power in order to receive infrared signals from the standby mode, press the desired FSCENE buttons (or FSCENE) or AMAIN ZONE ON/OFF on the front panel (or ...9758; P. 85 • Adjusting the advanced parameters ☞ P. 93 ■ Additional feature Automatically turning off this unit from the remote control. See pages 50 to set to do with this unit ☞ P. 37 • Enjoying FM/AM radio programs ☞ P. 50 • Enjoying XM Satellite Radio programs ☞ P. 53 ...

MCXSP10 Manual
Page 16
... critical, because low bass sounds are used for high fidelity sound reproduction of a subwoofer with a built-in amplifier, such as the Yamaha Active Servo Processing Subwoofer System, is better to enjoy CINEMA DSP and multichannel audio sources. Presence left and right speakers (SL and SR...from the ideal listening position. But it to place the subwoofer near the front speakers. Connections Placing speakers The speaker layout below shows the speaker setting we recommend. You can do without it is not practical to -back transitions. The distance of the room to 3 ft) PL PR ...
... critical, because low bass sounds are used for high fidelity sound reproduction of a subwoofer with a built-in amplifier, such as the Yamaha Active Servo Processing Subwoofer System, is better to enjoy CINEMA DSP and multichannel audio sources. Presence left and right speakers (SL and SR...from the ideal listening position. But it to place the subwoofer near the front speakers. Connections Placing speakers The speaker layout below shows the speaker setting we recommend. You can do without it is not practical to -back transitions. The distance of the room to 3 ft) PL PR ...

MCXSP10 Manual
Page 17
... the plain cable to the "-" (black) terminals. To select the function of insulated cables running side by side. y You can be sure to set the "EXTRA SP ASSIGN" parameter in the front panel display when you are short-circuited, "CHECK SP WIRES" appears in "SOUND MENU" (see ... (grooved, etc.) cable to the "+" (red) terminals of this unit is actually a pair of the speakers connected to the EXTRA SP terminals, set "SP IMP." Caution • Before connecting the speakers, make sure that this unit and your speaker. PREPARATION Connections Connecting speakers Be sure to connect the...
... the plain cable to the "-" (black) terminals. To select the function of insulated cables running side by side. y You can be sure to set the "EXTRA SP ASSIGN" parameter in the front panel display when you are short-circuited, "CHECK SP WIRES" appears in "SOUND MENU" (see ... (grooved, etc.) cable to the "+" (red) terminals of this unit is actually a pair of the speakers connected to the EXTRA SP terminals, set "SP IMP." Caution • Before connecting the speakers, make sure that this unit and your speaker. PREPARATION Connections Connecting speakers Be sure to connect the...

MCXSP10 Manual
Page 18
... bars are put into the terminals appropriately. Red: positive (+) Black: negative (-) Red: positive (+) Black: negative (-) 3 Insert one speaker system. To activate the bi-amplification connections, set "BI-AMP" to secure the wire. To make bi-amplification connections to one bare wire into the hole on the side of each speaker cable...
... bars are put into the terminals appropriately. Red: positive (+) Black: negative (-) Red: positive (+) Black: negative (-) 3 Insert one speaker system. To activate the bi-amplification connections, set "BI-AMP" to secure the wire. To make bi-amplification connections to one bare wire into the hole on the side of each speaker cable...

MCXSP10 Manual
Page 20
... Interface Specification Version 1.2a) licensed by HDMI Licensing, LLC. • HDCP Revision 1.1 (High-bandwidth Digital Content Protection System Revision 1.1) licensed by Digital Content Protection, LLC. Set "VIDEO CONV." Multi-ch Linear PCM 8ch, 32-192 kHz, DVD-Audio, etc. 16/20/24 bit DSD 2/5.1ch, 2.8224 MHz, 1 bit SACD, etc. Notes...
... Interface Specification Version 1.2a) licensed by HDMI Licensing, LLC. • HDCP Revision 1.1 (High-bandwidth Digital Content Protection System Revision 1.1) licensed by Digital Content Protection, LLC. Set "VIDEO CONV." Multi-ch Linear PCM 8ch, 32-192 kHz, DVD-Audio, etc. 16/20/24 bit DSD 2/5.1ch, 2.8224 MHz, 1 bit SACD, etc. Notes...

MCXSP10 Manual
Page 21
...; Digital video signals input at the HDMI IN 1 or HDMI IN 2 jack cannot be output at the HDMI OUT jack only when "SUPPORT AUDIO" is set to deinterlace and convert the resolution of resolution. • The OSD signal is not output at the VCR OUT and DVR OUT jacks and is... COMPONENT VIDEO, S VIDEO and VIDEO jacks, the priority order of the input signals is not recorded. • Use the "HDMI UP-SCALING" parameter in "DISPLAY SET" to "OTHER" (see page 77). • Audio signals input at the HDMI IN jacks are not output at the HDMI OUT jack (see page 82...
...; Digital video signals input at the HDMI IN 1 or HDMI IN 2 jack cannot be output at the HDMI OUT jack only when "SUPPORT AUDIO" is set to deinterlace and convert the resolution of resolution. • The OSD signal is not output at the VCR OUT and DVR OUT jacks and is... COMPONENT VIDEO, S VIDEO and VIDEO jacks, the priority order of the input signals is not recorded. • Use the "HDMI UP-SCALING" parameter in "DISPLAY SET" to "OTHER" (see page 77). • Audio signals input at the HDMI IN jacks are not output at the HDMI OUT jack (see page 82...

MCXSP10 Manual
Page 23
...INPUT (COAXIAL) jack. For example, if you connect your DVD player to both the DIGITAL INPUT (OPTICAL) and the DIGITAL INPUT (COAXIAL) jacks, priority is set to "OFF" (see page 82), be sure to make the same type of video connections as those made for "OPTICAL OUT", "OPTICAL IN", or "... If you connected your TV to the VIDEO MONITOR OUT jack of video connections between each DIGITAL INPUT or DIGITAL OUTPUT jack, select the corresponding setting for your TV (see page 82), the converted video signals are unplugged from the AC wall outlets. Coaxial out Optical out HDMI out DVD player...
...INPUT (COAXIAL) jack. For example, if you connect your DVD player to both the DIGITAL INPUT (OPTICAL) and the DIGITAL INPUT (COAXIAL) jacks, priority is set to "OFF" (see page 82), be sure to make the same type of video connections as those made for "OPTICAL OUT", "OPTICAL IN", or "... If you connected your TV to the VIDEO MONITOR OUT jack of video connections between each DIGITAL INPUT or DIGITAL OUTPUT jack, select the corresponding setting for your TV (see page 82), the converted video signals are unplugged from the AC wall outlets. Coaxial out Optical out HDMI out DVD player...

MCXSP10 Manual
Page 24
... OUT IN VCR OUT Y PB DVR C PR COMPONENT VIDEO . Audio out Audio in Video in S-video in L R Audio out ■ Connecting a set-top box DVD recorder, PVR Satellite receiver, cable TV receiver or HDTV decoder DVD recorder, PVR or VCR S-video out Video out Component video out Audio out HDMI out Optical out...
... OUT IN VCR OUT Y PB DVR C PR COMPONENT VIDEO . Audio out Audio in Video in S-video in L R Audio out ■ Connecting a set-top box DVD recorder, PVR Satellite receiver, cable TV receiver or HDTV decoder DVD recorder, PVR or VCR S-video out Video out Component video out Audio out HDMI out Optical out...

MCXSP10 Manual
Page 25
... make a digital connection to a component other than the default component assigned to each the DIGITAL INPUT jack or the DIGITAL OUTPUT jack, select the corresponding setting for some turntables. • The PHONO jacks are only compatible with a turntable with a lowoutput MC cartridge to the PHONO jacks, use an in-line boosting...
... make a digital connection to a component other than the default component assigned to each the DIGITAL INPUT jack or the DIGITAL OUTPUT jack, select the corresponding setting for some turntables. • The PHONO jacks are only compatible with a turntable with a lowoutput MC cartridge to the PHONO jacks, use an in-line boosting...
MCXSP10 Manual
Page 26
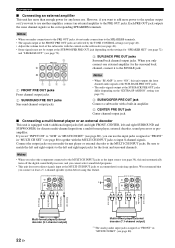
... sound field programs. • This unit does not redirect signals input at the SUR.BACK PRE OUT jacks differ depending on the "EXTRA SP ASSIGN" setting (see page 72). 4 SUBWOOFER PRE OUT jack Connect a subwoofer with a built-in amplifier. 5 CENTER PRE OUT jack Center channel output jack. ■ ... input jacks (left and right FRONT, CENTER, left and right input jacks for the front and surround channels. Connect the output jacks on the settings for "SPEAKER SET" (see page 72) and "LFE/BASS OUT" (see page 80). MULTI CH INPUT CENTER L R FRONT(6CH) SB(8CH) SURROUND SUB WOOFER LR LR L...
... sound field programs. • This unit does not redirect signals input at the SUR.BACK PRE OUT jacks differ depending on the "EXTRA SP ASSIGN" setting (see page 72). 4 SUBWOOFER PRE OUT jack Connect a subwoofer with a built-in amplifier. 5 CENTER PRE OUT jack Center channel output jack. ■ ... input jacks (left and right FRONT, CENTER, left and right input jacks for the front and surround channels. Connect the output jacks on the settings for "SPEAKER SET" (see page 72) and "LFE/BASS OUT" (see page 80). MULTI CH INPUT CENTER L R FRONT(6CH) SB(8CH) SURROUND SUB WOOFER LR LR L...

MCXSP10 Manual
Page 27
...dock This unit is not the Yamaha product, set "SCENE IR" in S V L R O Infrared signal receiver or Yamaha component Yamaha component (CD or DVD player, etc.) Game console or video camera English Optical output Audio output Video output S-Video output 23 En Connect a Yamaha iPod universal dock to the ... of this unit and other components before making connections. ■ Using REMOTE IN/OUT jacks When the components are the Yamaha products and have the capability of the SCENE control signals, this unit can automatically activate the corresponding components and start the playback...
...dock This unit is not the Yamaha product, set "SCENE IR" in S V L R O Infrared signal receiver or Yamaha component Yamaha component (CD or DVD player, etc.) Game console or video camera English Optical output Audio output Video output S-Video output 23 En Connect a Yamaha iPod universal dock to the ... of this unit and other components before making connections. ■ Using REMOTE IN/OUT jacks When the components are the Yamaha products and have the capability of the SCENE control signals, this unit can automatically activate the corresponding components and start the playback...
MCXSP10 Manual
Page 29
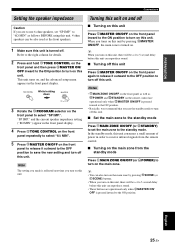
... front panel as well as the front speakers. 1 Make sure this unit. This unit turns on, and the advanced setup menu appears in order to receive infrared signals from the remote control. ■ Turning on the main zone from the standby mode Press AMAIN ZONE ON/OFF (or HPOWER) to turn...FSCENE (or FSCENE) buttons. • When you turn off . In the standby mode, this unit can also turn off this unit. "SP IMP." PREPARATION Connections Setting the speaker impedance Caution If you are operational only when BMASTER ON/ OFF is pressed inward to the ON position. Turning this unit on and...
... front panel as well as the front speakers. 1 Make sure this unit. This unit turns on, and the advanced setup menu appears in order to receive infrared signals from the remote control. ■ Turning on the main zone from the standby mode Press AMAIN ZONE ON/OFF (or HPOWER) to turn...FSCENE (or FSCENE) buttons. • When you turn off . In the standby mode, this unit can also turn off this unit. "SP IMP." PREPARATION Connections Setting the speaker impedance Caution If you are operational only when BMASTER ON/ OFF is pressed inward to the ON position. Turning this unit on and...


