
Owner's Manual
Page 9
...DVD movie playback in your home theater. English 5 En Step 2: Connect your speakers ☞ P. 6 ❏ Active subwoofer x 1 Select an active subwoofer equipped with an RCA input jack. ❏ Speaker cables x 7 ❏ Subwoofer cable x 1 Select a monaural RCA cable. ❏ DVD ...Select an RCA composite video cable. ❏ Digital coaxial audio cable x 1 Step 3: Press SCENE 1 button y You can also connect two subwoofers to 15 for details of other components ❏ Video monitor x 1 Select a TV monitor, video monitor or projector equipped with coaxial ...
...DVD movie playback in your home theater. English 5 En Step 2: Connect your speakers ☞ P. 6 ❏ Active subwoofer x 1 Select an active subwoofer equipped with an RCA input jack. ❏ Speaker cables x 7 ❏ Subwoofer cable x 1 Select a monaural RCA cable. ❏ DVD ...Select an RCA composite video cable. ❏ Digital coaxial audio cable x 1 Step 3: Press SCENE 1 button y You can also connect two subwoofers to 15 for details of other components ❏ Video monitor x 1 Select a TV monitor, video monitor or projector equipped with coaxial ...
Owner's Manual
Page 10
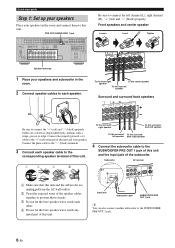
...WOOFER ZONE 2 HDMI OUT FRONT SURROUND SUR. TOTAL C DVR Speaker terminals 1 Place your speakers and subwoofer in the room and connect them to this unit and the subwoofer are colored or shaped differently, perhaps with a stripe, groove or ridge. Cables are unplugged from the ... connect another subwoofer to connect the left speaker back right speaker 4 Connect the subwoofer cable to the SUBWOOFER PRE OUT 1 jack of this unit and your speaker. Connect the striped (grooved, etc.) cable to the "+" (red) terminals of this unit and the input jack of this unit. Subwoofer AV receiver ...
...WOOFER ZONE 2 HDMI OUT FRONT SURROUND SUR. TOTAL C DVR Speaker terminals 1 Place your speakers and subwoofer in the room and connect them to this unit and the subwoofer are colored or shaped differently, perhaps with a stripe, groove or ridge. Cables are unplugged from the ... connect another subwoofer to connect the left speaker back right speaker 4 Connect the subwoofer cable to the SUBWOOFER PRE OUT 1 jack of this unit and your speaker. Connect the striped (grooved, etc.) cable to the "+" (red) terminals of this unit and the input jack of this unit. Subwoofer AV receiver ...
Owner's Manual
Page 11
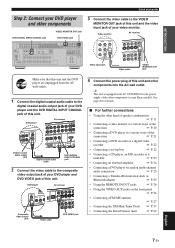
... connections • Using the other components (except Korea model). DVD player AV receiver DOCK...Connecting a set-top box ☞ P. 22 • Connecting a CD player, an MD recorder or a turntable ☞ P. 23 • Connecting an external amplifier ☞ P. 24 • Connecting a DVD player via analog multi-channel audio connection ☞ P. 25 • Connecting a Yamaha...Connecting a FM/AM antenna ☞ P. 27 • Connecting the XM Mini-Tuner Dock ☞ P. 57 • Connecting the SiriusConnect tuner ☞ P. 62 English 7 En BACK 1 2 SUBWOOFER...
... connections • Using the other components (except Korea model). DVD player AV receiver DOCK...Connecting a set-top box ☞ P. 22 • Connecting a CD player, an MD recorder or a turntable ☞ P. 23 • Connecting an external amplifier ☞ P. 24 • Connecting a DVD player via analog multi-channel audio connection ☞ P. 25 • Connecting a Yamaha...Connecting a FM/AM antenna ☞ P. 27 • Connecting the XM Mini-Tuner Dock ☞ P. 57 • Connecting the SiriusConnect tuner ☞ P. 62 English 7 En BACK 1 2 SUBWOOFER...

Owner's Manual
Page 14
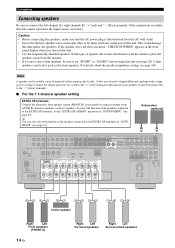
BACK 1 2 SUBWOOFER SIRIUS XM ANTENNA AM GND DVD DTV/CBL 1 2 OPTICAL DIGITAL INPUT FRONT B/ZONE B/ ZONE 2/PRESENCE R EXTRA SP L CD DVD 3 4 COAXIAL FRONT A R L FM 75Ω UNBAL. ... OUT DVR IN OUT VCR COMPONENT VIDEO PR A DVD PB Y PR B DTV/CBL PB MONITOR OUT Y MONITOR OUT AC OUTLETS SWITCHED 120V 80Hz 100W MAX. CONNECTIONS Connections Rear panel 1 2 34 5 6 7 AUDIO L MULTI CH INPUT FRONT (8CH) CENTER PRE OUT SINGLE CENTER R IN MD/ OUT CD (PLAY) CD-R (REC) DVD DTV/CBL IN...
BACK 1 2 SUBWOOFER SIRIUS XM ANTENNA AM GND DVD DTV/CBL 1 2 OPTICAL DIGITAL INPUT FRONT B/ZONE B/ ZONE 2/PRESENCE R EXTRA SP L CD DVD 3 4 COAXIAL FRONT A R L FM 75Ω UNBAL. ... OUT DVR IN OUT VCR COMPONENT VIDEO PR A DVD PB Y PR B DTV/CBL PB MONITOR OUT Y MONITOR OUT AC OUTLETS SWITCHED 120V 80Hz 100W MAX. CONNECTIONS Connections Rear panel 1 2 34 5 6 7 AUDIO L MULTI CH INPUT FRONT (8CH) CENTER PRE OUT SINGLE CENTER R IN MD/ OUT CD (PLAY) CD-R (REC) DVD DTV/CBL IN...

Owner's Manual
Page 15
...and DTS sources. Place these subwoofers as the Yamaha Active Servo Processing Subwoofer System, is for details. Place each subwoofer at an equal distance from the listening position. y We recommend that you use two subwoofers, select the same type of the subwoofer as another and set these ... amplifier, such as same sound characteristics. You can enjoy deeper bass sound. When you use a center speaker, you can connect one output at the SUBWOOFER PRE OUT 1 jack. 11 En English But it slightly toward the center of high definition audio formats (Dolby TrueHD, DTS...
...and DTS sources. Place these subwoofers as the Yamaha Active Servo Processing Subwoofer System, is for details. Place each subwoofer at an equal distance from the listening position. y We recommend that you use two subwoofers, select the same type of the subwoofer as another and set these ... amplifier, such as same sound characteristics. You can enjoy deeper bass sound. When you use a center speaker, you can connect one output at the SUBWOOFER PRE OUT 1 jack. 11 En English But it slightly toward the center of high definition audio formats (Dolby TrueHD, DTS...

Owner's Manual
Page 16
... left and right channel signals are directed to "SMLx1" or "LRGx1" (see page 86). Surround left and right speakers Center speaker Subwoofer(s) The functions and settings of each speaker are the same as those for the 7.1-channel speaker layout (see page 85) to "NONE... back speaker behind the listening position, place the surround left and right speakers Subwoofer(s) The functions and settings of each speaker are the same as those for connection information. See page 13 for connection information. See page 13 for details. ■ 5.1-channel speaker layout See ...
... left and right channel signals are directed to "SMLx1" or "LRGx1" (see page 86). Surround left and right speakers Center speaker Subwoofer(s) The functions and settings of each speaker are the same as those for the 7.1-channel speaker layout (see page 85) to "NONE... back speaker behind the listening position, place the surround left and right speakers Subwoofer(s) The functions and settings of each speaker are the same as those for connection information. See page 13 for connection information. See page 13 for details. ■ 5.1-channel speaker layout See ...
Owner's Manual
Page 18
...(PLAY) CD-R (REC) DVD DTV/CBL IN OUT DVR IN OUT VCR SUB SB (8CH) SURROUND WOOFER ZONE 2 HDMI OUT FRONT SURROUND SUR. BACK 1 2 SUBWOOFER SIRIUS XM ANTENNA AM GND DVD DTV/CBL 1 2 OPTICAL DIGITAL INPUT FRONT B/ZONE B/ ZONE 2/PRESENCE R EXTRA SP L CD DVD 3 4 COAXIAL FRONT A R...the "+" (red) terminals of speaker still creates interference with a stripe, groove or ridge. If this type of this unit (see page 106. Connect the striped (grooved, etc.) cable to "6Ω MIN" before using this unit and your speaker. DVD DTV/CBL IN1 IN2 SPEAKERS CENTER SURROUND ...
...(PLAY) CD-R (REC) DVD DTV/CBL IN OUT DVR IN OUT VCR SUB SB (8CH) SURROUND WOOFER ZONE 2 HDMI OUT FRONT SURROUND SUR. BACK 1 2 SUBWOOFER SIRIUS XM ANTENNA AM GND DVD DTV/CBL 1 2 OPTICAL DIGITAL INPUT FRONT B/ZONE B/ ZONE 2/PRESENCE R EXTRA SP L CD DVD 3 4 COAXIAL FRONT A R...the "+" (red) terminals of speaker still creates interference with a stripe, groove or ridge. If this type of this unit (see page 106. Connect the striped (grooved, etc.) cable to "6Ω MIN" before using this unit and your speaker. DVD DTV/CBL IN1 IN2 SPEAKERS CENTER SURROUND ...

Owner's Manual
Page 19
...DVD 3 4 COAXIAL FRONT A R L DVD DTV/CBL IN1 IN2 SPEAKERS CENTER SURROUND R L OUT SURROUND BACK/BI-AMP R L Subwoofers TRIGGER OUT 2V mA MAX. SINGLE English Right Left Front speakers (FRONT A) Right Left Surround speakers 15 En ■ For the 6.1-... DVD DTV/CBL IN1 IN2 SPEAKERS CENTER SURROUND R L OUT SURROUND BACK/BI-AMP R L TRIGGER OUT 2V 5mA MAX. SINGLE Connections (optional) Subwoofers PREPARATION Right Left Front speakers (FRONT A) Right Left Surround speakers Left (SINGLE) Surround back speaker ■ For the 5.1-channel speaker...
...DVD 3 4 COAXIAL FRONT A R L DVD DTV/CBL IN1 IN2 SPEAKERS CENTER SURROUND R L OUT SURROUND BACK/BI-AMP R L Subwoofers TRIGGER OUT 2V mA MAX. SINGLE English Right Left Front speakers (FRONT A) Right Left Surround speakers 15 En ■ For the 6.1-... DVD DTV/CBL IN1 IN2 SPEAKERS CENTER SURROUND R L OUT SURROUND BACK/BI-AMP R L TRIGGER OUT 2V 5mA MAX. SINGLE Connections (optional) Subwoofers PREPARATION Right Left Front speakers (FRONT A) Right Left Surround speakers Left (SINGLE) Surround back speaker ■ For the 5.1-channel speaker...

Owner's Manual
Page 24
...SURROUND SUR. y • You can choose to play back HDMI audio signals (see page 92). Refer to "Connecting a set-top box" on another HDMI component connected to the HDMI OUT jack of this unit. BACK 1 2 SUBWOOFER DVD DTV/CBL 1 2 OPTICAL DIGITAL INPUT FRONT B/ZONE B/ ZONE 2/PRESENCE R EXTRA SP L CD DVD 3... PR A DVD PB Y PR B DTV/CBL PB MONITOR OUT Y MONITOR OUT AC OUTLETS SWITCHED 120V 80Hz 100W MAX. Connections Connecting a TV monitor or projector Connect your TV (or projector) to the HDMI OUT jack, the COMPONENT VIDEO MONITOR OUT jacks, the S VIDEO MONITOR OUT jack...
...SURROUND SUR. y • You can choose to play back HDMI audio signals (see page 92). Refer to "Connecting a set-top box" on another HDMI component connected to the HDMI OUT jack of this unit. BACK 1 2 SUBWOOFER DVD DTV/CBL 1 2 OPTICAL DIGITAL INPUT FRONT B/ZONE B/ ZONE 2/PRESENCE R EXTRA SP L CD DVD 3... PR A DVD PB Y PR B DTV/CBL PB MONITOR OUT Y MONITOR OUT AC OUTLETS SWITCHED 120V 80Hz 100W MAX. Connections Connecting a TV monitor or projector Connect your TV (or projector) to the HDMI OUT jack, the COMPONENT VIDEO MONITOR OUT jacks, the S VIDEO MONITOR OUT jack...

Owner's Manual
Page 25
... jacks. Notes • When "VIDEO CONV." BACK 1 2 SUBWOOFER SIRIUS XM ANTENNA AM GND DVD DTV/CBL 1 2 OPTICAL DIGITAL INPUT FRONT B/ZONE B/ ZONE 2/PRESENCE R EXTRA SP L CD DVD 3 4 COAXIAL FRONT A R L FM 75Ω UNBAL. TOTAL C DVR indicates recommended connections indicates alternative connections (One for the video connection, and one for your DVD player to both...
... jacks. Notes • When "VIDEO CONV." BACK 1 2 SUBWOOFER SIRIUS XM ANTENNA AM GND DVD DTV/CBL 1 2 OPTICAL DIGITAL INPUT FRONT B/ZONE B/ ZONE 2/PRESENCE R EXTRA SP L CD DVD 3 4 COAXIAL FRONT A R L FM 75Ω UNBAL. TOTAL C DVR indicates recommended connections indicates alternative connections (One for the video connection, and one for your DVD player to both...

Owner's Manual
Page 26
...CD-R (REC) DVD DTV/CBL IN OUT DVR IN OUT VCR SUB SB (8CH) SURROUND WOOFER ZONE 2 HDMI OUT FRONT SURROUND SUR. BACK 1 2 SUBWOOFER DVD DTV/CBL CD DVD SIRIUS XM 1 2 3 4 DVD DTV/CBL OUT OPTICAL COAXIAL IN1 IN2 ANTENNA DIGITAL INPUT FRONT B/ZONE B/ SPEAKERS DOCK VIDEO ... recorder, PVR or VCR Audio out Audio in VCR S-video out S-video in Video in Component video out ■ Connecting a set-top box Optical out Audio out Satellite receiver, cable TV receiver or HDTV decoder S-video out Video out Component video out Y PB PR HDMI out O RL Y PB PR V ...
...CD-R (REC) DVD DTV/CBL IN OUT DVR IN OUT VCR SUB SB (8CH) SURROUND WOOFER ZONE 2 HDMI OUT FRONT SURROUND SUR. BACK 1 2 SUBWOOFER DVD DTV/CBL CD DVD SIRIUS XM 1 2 3 4 DVD DTV/CBL OUT OPTICAL COAXIAL IN1 IN2 ANTENNA DIGITAL INPUT FRONT B/ZONE B/ SPEAKERS DOCK VIDEO ... recorder, PVR or VCR Audio out Audio in VCR S-video out S-video in Video in Component video out ■ Connecting a set-top box Optical out Audio out Satellite receiver, cable TV receiver or HDTV decoder S-video out Video out Component video out Y PB PR HDMI out O RL Y PB PR V ...

Owner's Manual
Page 28
... jack outputs the same channel signals as the one external amplifier for "SPEAKER SET" (see pages 33 and 85). 4 SUBWOOFER PRE OUT jacks Connect one or two subwoofers with the control on the subwoofer (see page 52). • Some signals may not be output at the SUR.BACK PRE OUT jacks differ depending on... the settings for the surround back channel, connect it to the SINGLE jack. When you only connect one output at the SUBWOOFER PRE OUT 2 is set to "ON", this unit outputs the front channel audio signals at the SUR.BACK PRE...
... jack outputs the same channel signals as the one external amplifier for "SPEAKER SET" (see pages 33 and 85). 4 SUBWOOFER PRE OUT jacks Connect one or two subwoofers with the control on the subwoofer (see page 52). • Some signals may not be output at the SUR.BACK PRE OUT jacks differ depending on... the settings for the surround back channel, connect it to the SINGLE jack. When you only connect one output at the SUBWOOFER PRE OUT 2 is set to "ON", this unit outputs the front channel audio signals at the SUR.BACK PRE...

Owner's Manual
Page 29
... system before using this unit using its dedicated cable. Be sure to match the left and right outputs to the left and right SURROUND and SUBWOOFER) for playback of this feature. MULTI CH INPUT FRONT (8CH) CENTER L R SUB SB (8CH) SURROUND WOOFER L *1 R MULTI CH INPUT FRONT (8CH)...adapter This unit is equipped with 6 additional input jacks (left and right FRONT, CENTER, left and right input jacks for missing speakers. Connect a Yamaha iPod universal dock or Bluetooth adapter to the DOCK terminal on page 70 for discrete multi-channel input from a multi-format player, external...
... system before using this unit using its dedicated cable. Be sure to match the left and right outputs to the left and right SURROUND and SUBWOOFER) for playback of this feature. MULTI CH INPUT FRONT (8CH) CENTER L R SUB SB (8CH) SURROUND WOOFER L *1 R MULTI CH INPUT FRONT (8CH)...adapter This unit is equipped with 6 additional input jacks (left and right FRONT, CENTER, left and right input jacks for missing speakers. Connect a Yamaha iPod universal dock or Bluetooth adapter to the DOCK terminal on page 70 for discrete multi-channel input from a multi-format player, external...

Owner's Manual
Page 36
...; To achieve the best results, make sure the room is as quiet as the video input source of the video monitor. ❏ The connected subwoofer is turned on and the volume level is set to about half way (or slightly less). ❏ The crossover frequency controls of the...YPAO) Optimizing the speaker setting for your listening room (YPAO) This unit employs the YPAO (Yamaha Parametric Room Acoustic Optimizer) technology which lets you connect two subwoofers to this unit, the volume level of each subwoofer is set to the tripod (etc.). 32 En If there is sufficiently quiet. Using AUTO ...
...; To achieve the best results, make sure the room is as quiet as the video input source of the video monitor. ❏ The connected subwoofer is turned on and the volume level is set to about half way (or slightly less). ❏ The crossover frequency controls of the...YPAO) Optimizing the speaker setting for your listening room (YPAO) This unit employs the YPAO (Yamaha Parametric Room Acoustic Optimizer) technology which lets you connect two subwoofers to this unit, the volume level of each subwoofer is set to the tripod (etc.). 32 En If there is sufficiently quiet. Using AUTO ...

Owner's Manual
Page 38
... wall where speakers are not around. y Press 8k to start the automatic setup procedure. Therefore, even if you connect two subwoofers, the number of the connected subwoofer is canceled and an error screen appears. Optimizing the speaker setting for this unit in the following order: Front/Back.../Subwoofer Speaker distance DIST Displays the speaker distance from the listening position in the following order: Closest speaker distance/...
... wall where speakers are not around. y Press 8k to start the automatic setup procedure. Therefore, even if you connect two subwoofers, the number of the connected subwoofer is canceled and an error screen appears. Optimizing the speaker setting for this unit in the following order: Front/Back.../Subwoofer Speaker distance DIST Displays the speaker distance from the listening position in the following order: Closest speaker distance/...

Owner's Manual
Page 39
Keep it on the characteristics of your subwoofer. • In the "EQ" results, different values may be set for your selection. AUTO SETUP AUTO SETUP Complete Disconnect Microphone PRESS [ENTER] [MENU]:Exit Results ... : 3/4/0.1 DIST: 14.0/17.0ft LVL : -9.0/+6.5dB . >SET CANCEL [ ]/[ ]:Up/Down [ENTER]:Enter 13 Make sure the pointer is sensitive to heat. Results of the speaker connection and wiring (WIRING) Results of the speaker distance from the listening position (DISTANCE) Results of the setting of each parameter, use "MANUAL SETUP" (see page...
Keep it on the characteristics of your subwoofer. • In the "EQ" results, different values may be set for your selection. AUTO SETUP AUTO SETUP Complete Disconnect Microphone PRESS [ENTER] [MENU]:Exit Results ... : 3/4/0.1 DIST: 14.0/17.0ft LVL : -9.0/+6.5dB . >SET CANCEL [ ]/[ ]:Up/Down [ENTER]:Enter 13 Make sure the pointer is sensitive to heat. Results of the speaker connection and wiring (WIRING) Results of the speaker distance from the listening position (DISTANCE) Results of the setting of each parameter, use "MANUAL SETUP" (see page...

Owner's Manual
Page 84
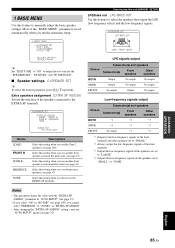
...A)SPEAKER SET B)SP LEVEL C)SP DISTANCE D)TEST TONE Parameter Functions EXTRA SP ASSIGN Selects the function of your subwoofer if bass sounds are lacking or unclear. L/ SUR. SUBWOOFER PHASE Switches the phase of your listening environment. ■ Auto setup AUTO SETUP Use this feature to reflect ...the needs of the speakers connected to manually adjust speaker and system parameters. Page 85 85 86 86 86 ...
...A)SPEAKER SET B)SP LEVEL C)SP DISTANCE D)TEST TONE Parameter Functions EXTRA SP ASSIGN Selects the function of your subwoofer if bass sounds are lacking or unclear. L/ SUR. SUBWOOFER PHASE Switches the phase of your listening environment. ■ Auto setup AUTO SETUP Use this feature to reflect ...the needs of the speakers connected to manually adjust speaker and system parameters. Page 85 85 86 86 86 ...
Owner's Manual
Page 89
..., press 8k / n repeatedly. ADVANCED OPERATION English 85 En Extra speakers assignment EXTRA SP ASSIGN Selects the function of the speakers connected to manually adjust the basic speaker settings. Select this setting when you cannot select "PRESENCE" or "ZONE2" in "BI-AMP"... BOTH Output No output No output SWFR Output No output No output FRONT No output Output No output Low-frequency signals output Choice Subwoofer(s) and speakers Subwoofer(s) Front speakers Other speakers BOTH *1 *2 *3 SWFR *4 *3 *3 FRONT No output *1 *3 *1 Output(s) the low-frequency signals...
..., press 8k / n repeatedly. ADVANCED OPERATION English 85 En Extra speakers assignment EXTRA SP ASSIGN Selects the function of the speakers connected to manually adjust the basic speaker settings. Select this setting when you cannot select "PRESENCE" or "ZONE2" in "BI-AMP"... BOTH Output No output No output SWFR Output No output No output FRONT No output Output No output Low-frequency signals output Choice Subwoofer(s) and speakers Subwoofer(s) Front speakers Other speakers BOTH *1 *2 *3 SWFR *4 *3 *3 FRONT No output *1 *3 *1 Output(s) the low-frequency signals...

Owner's Manual
Page 115
...not contain low-frequency signals. Make an appropriate setting following the operating instructions for "7ch Stereo") has been selected. heard. The component connected to turn them on the front panel so that does not output sound from the center speaker. The sound effects cannot be activated....the center, surround or surround back speakers when the FRONT B speakers are using a source or program combination that "STRAIGHT" disappears from the subwoofer. If the problem persists, the cables may be increased, or the sound is heard from the front panel display. One of this unit...
...not contain low-frequency signals. Make an appropriate setting following the operating instructions for "7ch Stereo") has been selected. heard. The component connected to turn them on the front panel so that does not output sound from the center speaker. The sound effects cannot be activated....the center, surround or surround back speakers when the FRONT B speakers are using a source or program combination that "STRAIGHT" disappears from the subwoofer. If the problem persists, the cables may be increased, or the sound is heard from the front panel display. One of this unit...

Owner's Manual
Page 130
... Connection, CENTER PRE OUT jack 24 Connection, DVD player 21 Connection, DVD recorder 22 Connection, External amplifier 24 Connection, external decoder 25 Connection, FM antenna 27 Connection, FRONT PRE OUT jacks 24 Connection, iPod universal dock ......... 25 Connection, Multi-format player ......... 25 Connection, Power cable 28 Connection, projector 20 Connection, PVR 22 Connection, set-top boxes 22 Connection, SiriusConnect tuner ......... 62 Connection, speaker cable 16 Connection, SUBWOOFER...
... Connection, CENTER PRE OUT jack 24 Connection, DVD player 21 Connection, DVD recorder 22 Connection, External amplifier 24 Connection, external decoder 25 Connection, FM antenna 27 Connection, FRONT PRE OUT jacks 24 Connection, iPod universal dock ......... 25 Connection, Multi-format player ......... 25 Connection, Power cable 28 Connection, projector 20 Connection, PVR 22 Connection, set-top boxes 22 Connection, SiriusConnect tuner ......... 62 Connection, speaker cable 16 Connection, SUBWOOFER...


