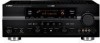
Owner's Manual
Page 3
..., stoves, or other hazards. 21 Safety Check - Article 810 of interference, which can not locate the appropriate retailer, please contact Yamaha Electronics Corp., U.S.A. 6660 Orangethorpe Ave., Buena Park, CA 90620. EXAMPLE OF ANTENNA GROUNDING MAST GROUND CLAMP ELECTRIC SERVICE EQUIPMENT NEC -...GROUND CLAMPS POWER SERVICE GROUNDING ELECTRODE SYSTEM (NEC ART 250. Follow all installations. Compliance with this product MUST be determined by turning the unit "OFF" and "ON", please try to provide some protection against voltage surges and built-up static charges. ...
..., stoves, or other hazards. 21 Safety Check - Article 810 of interference, which can not locate the appropriate retailer, please contact Yamaha Electronics Corp., U.S.A. 6660 Orangethorpe Ave., Buena Park, CA 90620. EXAMPLE OF ANTENNA GROUNDING MAST GROUND CLAMP ELECTRIC SERVICE EQUIPMENT NEC -...GROUND CLAMPS POWER SERVICE GROUNDING ELECTRODE SYSTEM (NEC ART 250. Follow all installations. Compliance with this product MUST be determined by turning the unit "OFF" and "ON", please try to provide some protection against voltage surges and built-up static charges. ...

Owner's Manual
Page 4
..., dry cloth. 12 Only voltage specified on the rear of this sound system in order not to this unit with a newspaper, tablecloth, curtain, etc. Yamaha will not be set this unit with chemical solvents; containers with liquid in an environment with Canadian ICES-003. If the temperature inside this unit... this unit, do not locate this unit by lightning, keep the power cord and outdoor antennas disconnected from the AC power source even if you turn off this unit in them, as this unit is not disconnected from a wall outlet or the unit during a lightning storm. 14 Do not...
..., dry cloth. 12 Only voltage specified on the rear of this sound system in order not to this unit with a newspaper, tablecloth, curtain, etc. Yamaha will not be set this unit with chemical solvents; containers with liquid in an environment with Canadian ICES-003. If the temperature inside this unit... this unit, do not locate this unit by lightning, keep the power cord and outdoor antennas disconnected from the AC power source even if you turn off this unit in them, as this unit is not disconnected from a wall outlet or the unit during a lightning storm. 14 Do not...
Owner's Manual
Page 12
... set "SP IMP." Quick start playback. to watch a TV program. Refer to the instruction manual of the SCENE control signals, this unit can turn on your favorite input source and sound field program according to this room. "DVD Viewing" appears in the SCENE mode. 3 Start playback of the...template and its description DVD Viewing - Note When you want to listen to 56 for details. sound field program: Straight For when you connect a Yamaha product that has been assigned to adjust the volume. input source: DTV/CBL - See page 27 for details. *2 You need to connect the supplied...
... set "SP IMP." Quick start playback. to watch a TV program. Refer to the instruction manual of the SCENE control signals, this unit can turn on your favorite input source and sound field program according to this room. "DVD Viewing" appears in the SCENE mode. 3 Start playback of the...template and its description DVD Viewing - Note When you want to listen to 56 for details. sound field program: Straight For when you connect a Yamaha product that has been assigned to adjust the volume. input source: DTV/CBL - See page 27 for details. *2 You need to connect the supplied...

Owner's Manual
Page 13
... 80 • Setting the remote control ☞ P. 100 • Adjusting the advanced parameters ☞ P. 106 ■ Additional feature • Automatically turning off this unit ☞ P. 47 English 9 En Quick start guide What do you want to do with this unit ☞ P. 68 • ... programs ☞ P. 48 ☞ P. 52 ☞ P. 72 ■ Adjusting the parameters of this unit from the remote control. To turn on this unit • Automatically optimizing the speaker parameters for your original SCENE templates ☞ P. 40 This unit is set this unit... Press...
... 80 • Setting the remote control ☞ P. 100 • Adjusting the advanced parameters ☞ P. 106 ■ Additional feature • Automatically turning off this unit ☞ P. 47 English 9 En Quick start guide What do you want to do with this unit ☞ P. 68 • ... programs ☞ P. 48 ☞ P. 52 ☞ P. 72 ■ Adjusting the parameters of this unit from the remote control. To turn on this unit • Automatically optimizing the speaker parameters for your original SCENE templates ☞ P. 40 This unit is set this unit... Press...

Owner's Manual
Page 15
... is highly recommended for playback the sound of high definition audio formats (Dolby TrueHD, DTS-HD Master Audio, etc.) as well as the Yamaha Active Servo Processing Subwoofer System, is better to this unit. Place these subwoofers as the one or two subwoofer(s) to place the subwoofer near...sound of the video monitor should be the same. y When you can connect one output at the same distance from the ideal listening position. Turn it to -back transitions. Center speaker The center speaker is not so critical, because low bass sounds are used for connection information. The ...
... is highly recommended for playback the sound of high definition audio formats (Dolby TrueHD, DTS-HD Master Audio, etc.) as well as the Yamaha Active Servo Processing Subwoofer System, is better to this unit. Place these subwoofers as the one or two subwoofer(s) to place the subwoofer near...sound of the video monitor should be the same. y When you can connect one output at the same distance from the ideal listening position. Turn it to -back transitions. Center speaker The center speaker is not so critical, because low bass sounds are used for connection information. The ...
Owner's Manual
Page 18
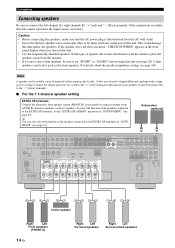
...; For the 7.1-channel speaker setting EXTRA SP terminals Connect the alternative front speaker system (FRONT B), front speaker systems in the front panel display when you turn on this unit and your speaker. Connect the plain cable to the EXTRA SP terminals, set "SP IMP." DVD DTV/CBL IN1 IN2 SPEAKERS CENTER...
...; For the 7.1-channel speaker setting EXTRA SP terminals Connect the alternative front speaker system (FRONT B), front speaker systems in the front panel display when you turn on this unit and your speaker. Connect the plain cable to the EXTRA SP terminals, set "SP IMP." DVD DTV/CBL IN1 IN2 SPEAKERS CENTER...
Owner's Manual
Page 22
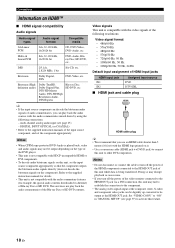
... cable (HDMI jack ↔ DVI-D jack) to connect this unit to other DVI components. Notes • Do not disconnect or connect the cable or turn off the power of this unit, set the component appropriately. to "ON" in "MANUAL SETUP" (see page 25) - Bitstream Dolby Digital, DTS DVD... be digitally up-converted to the supplied instruction manuals of the input source component, and set the input source component appropriately so that you turn off the power of the DVD player. • This unit is being transferred. Bitstream (High definition audio) Dolby TrueHD, Dolby Digital Plus...
... cable (HDMI jack ↔ DVI-D jack) to connect this unit to other DVI components. Notes • Do not disconnect or connect the cable or turn off the power of this unit, set the component appropriately. to "ON" in "MANUAL SETUP" (see page 25) - Bitstream Dolby Digital, DTS DVD... be digitally up-converted to the supplied instruction manuals of the input source component, and set the input source component appropriately so that you turn off the power of the DVD player. • This unit is being transferred. Bitstream (High definition audio) Dolby TrueHD, Dolby Digital Plus...

Owner's Manual
Page 29
...analog audio input jacks assigned as "FRONT" in "MULTI CH" (see page 95), you to connect a Yamaha iPod universal dock (such as YDS-10, sold separately) or Bluetooth adapter (such as YBA-10 sold ...PR B DTV/CBL PB MONITOR OUT Y MONITOR OUT C DVR English Yamaha iPod universal dock or Bluetooth adapter 25 En Connect a Yamaha iPod universal dock or Bluetooth adapter to the MULTI CH INPUT jacks. ... CH INPUT jacks as "FRONT" in "MULTI CH" (see page 95). ■ Connecting a Yamaha iPod universal dock or Bluetooth adapter This unit is equipped with the MULTI CH INPUT jacks to "8CH...
...analog audio input jacks assigned as "FRONT" in "MULTI CH" (see page 95), you to connect a Yamaha iPod universal dock (such as YDS-10, sold separately) or Bluetooth adapter (such as YBA-10 sold ...PR B DTV/CBL PB MONITOR OUT Y MONITOR OUT C DVR English Yamaha iPod universal dock or Bluetooth adapter 25 En Connect a Yamaha iPod universal dock or Bluetooth adapter to the MULTI CH INPUT jacks. ... CH INPUT jacks as "FRONT" in "MULTI CH" (see page 95). ■ Connecting a Yamaha iPod universal dock or Bluetooth adapter This unit is equipped with the MULTI CH INPUT jacks to "8CH...
Owner's Manual
Page 30
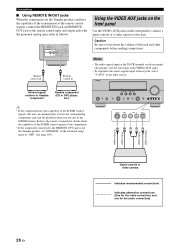
...owner's manuals for the audio connection) 26 En Remote control out Remote control in the advanced setup menu to this unit. Infrared signal receiver or Yamaha component Yamaha component (CD or DVD player, etc.) VOLUME SPEAKERS EDIT SEARCH MODE BAND CATEGORY A/B/C/D/E PRESET/TUNING/CH MEMORY INFO ZONE 2 ON/... components have the capability of the transmission of the remote control signals, connect the REMOTE IN jack and REMOTE OUT jack to turn down the volume of this unit and other components before making connections. Connections ■ Using REMOTE IN/OUT jacks When the components are...
...owner's manuals for the audio connection) 26 En Remote control out Remote control in the advanced setup menu to this unit. Infrared signal receiver or Yamaha component Yamaha component (CD or DVD player, etc.) VOLUME SPEAKERS EDIT SEARCH MODE BAND CATEGORY A/B/C/D/E PRESET/TUNING/CH MEMORY INFO ZONE 2 ON/... components have the capability of the transmission of the remote control signals, connect the REMOTE IN jack and REMOTE OUT jack to turn down the volume of this unit and other components before making connections. Connections ■ Using REMOTE IN/OUT jacks When the components are...

Owner's Manual
Page 32
...unit. Connections Connecting the power cable Setting the speaker impedance MONITOR OUT AC OUTLETS SWITCHED 120V 80Hz 100W MAX. TOTAL 0.8A MAX. This unit turns on . and Australia models 1 outlet Korea model None Other models 2 outlets Use these outlet(s). See page 29 for more than one week.... ("8Ω MIN") appear in the front panel display. 4 Press MTONE CONTROL repeatedly to select "6Ω MIN". 5 Press LSYSTEM OFF to turn off automatically when this unit. When this unit completes charging or the iPod is disconnected, the power is cut off or when LSYSTEM OFF on...
...unit. Connections Connecting the power cable Setting the speaker impedance MONITOR OUT AC OUTLETS SWITCHED 120V 80Hz 100W MAX. TOTAL 0.8A MAX. This unit turns on . and Australia models 1 outlet Korea model None Other models 2 outlets Use these outlet(s). See page 29 for more than one week.... ("8Ω MIN") appear in the front panel display. 4 Press MTONE CONTROL repeatedly to select "6Ω MIN". 5 Press LSYSTEM OFF to turn off automatically when this unit. When this unit completes charging or the iPod is disconnected, the power is cut off or when LSYSTEM OFF on...

Owner's Manual
Page 33
... this unit, there will be delay for a few seconds before this unit can reproduce sound. • You can also turn on the main zone by pressing SSCENE (or 6SCENE) buttons. ■ Set the main zone to the standby mode Press KMAIN ZONE ON/OFF (or ...ISTANDBY) to set the main zone and Zone 2 (see page 104) to turn on this unit. y Press LSYSTEM OFF to set the main zone to receive infrared signals from the remote control. Turning this unit on and off ■ Turning on this unit Press KMAIN ZONE ON/OFF (or HPOWER) to the standby...
... this unit, there will be delay for a few seconds before this unit can reproduce sound. • You can also turn on the main zone by pressing SSCENE (or 6SCENE) buttons. ■ Set the main zone to the standby mode Press KMAIN ZONE ON/OFF (or ...ISTANDBY) to set the main zone and Zone 2 (see page 104) to turn on this unit. y Press LSYSTEM OFF to set the main zone to receive infrared signals from the remote control. Turning this unit on and off ■ Turning on this unit Press KMAIN ZONE ON/OFF (or HPOWER) to the standby...

Owner's Manual
Page 34
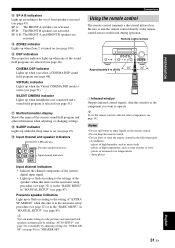
...(see page 18). 2 ADAPTIVE DRC indicator Lights up when the adaptive dynamic range control feature is turned on (see page 89). 3 DOCK indicator • Lights up when you station your iPod in a Yamaha iPod universal dock (such as YDS-10, sold separately) and the Bluetooth component is in the FM... this unit is in the paring or the Bluetooth adapter is searching the Bluetooth component (see page 70). • Light up while the Yamaha Bluetooth adapter is connected to the Bluetooth component (see page 50). 5 Input source indicators The corresponding cursor lights up when the Compressed Music ...
...(see page 18). 2 ADAPTIVE DRC indicator Lights up when the adaptive dynamic range control feature is turned on (see page 89). 3 DOCK indicator • Lights up when you station your iPod in a Yamaha iPod universal dock (such as YDS-10, sold separately) and the Bluetooth component is in the FM... this unit is in the paring or the Bluetooth adapter is searching the Bluetooth component (see page 70). • Light up while the Yamaha Bluetooth adapter is connected to the Bluetooth component (see page 50). 5 Input source indicators The corresponding cursor lights up when the Compressed Music ...
Owner's Manual
Page 35
... are connected and a sound field program is active (see page 51). G Multi-information display Shows the name of "EXTRA SP ASSIGN" when this unit is turned on (see page 85). Presence speaker indicators Light up or flash according to the setting of the current sound field program and other components, see...
... are connected and a sound field program is active (see page 51). G Multi-information display Shows the name of "EXTRA SP ASSIGN" when this unit is turned on (see page 85). Presence speaker indicators Light up or flash according to the setting of the current sound field program and other components, see...

Owner's Manual
Page 36
... ❏ Speakers are connected appropriately. ❏ Headphones are seated in your listening room (YPAO) This unit employs the YPAO (Yamaha Parametric Room Acoustic Optimizer) technology which lets you are disconnected from this unit, the volume level of each subwoofer is set to ...]/[[]:Select 3 Place the optimizer microphone at the same height as the video input source of the video monitor. ❏ The connected subwoofer is turned on and the volume level is set to affix the optimizer microphone at your ears would be satisfactory. VOLUME CROSSOVER HIGH CUT [ [ [ ...
... ❏ Speakers are connected appropriately. ❏ Headphones are seated in your listening room (YPAO) This unit employs the YPAO (Yamaha Parametric Room Acoustic Optimizer) technology which lets you are disconnected from this unit, the volume level of each subwoofer is set to ...]/[[]:Select 3 Place the optimizer microphone at the same height as the video input source of the video monitor. ❏ The connected subwoofer is turned on and the volume level is set to affix the optimizer microphone at your ears would be satisfactory. VOLUME CROSSOVER HIGH CUT [ [ [ ...
Owner's Manual
Page 44
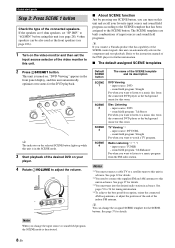
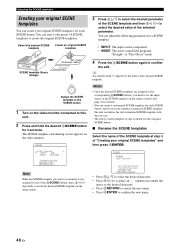
... the following parameters for 3 seconds. SCENE : DVD Viewing INPUT : DVD SCENE : DVD Viewing [ p [ SCENE template library (Image) 1 Assign the SCENE template to the SCENE button 1 Turn on the menu screen. 4 Press the 6SCENE button again to create the original SCENE templates. Notes • Once the desired SCENE templates are assigned to...
... the following parameters for 3 seconds. SCENE : DVD Viewing INPUT : DVD SCENE : DVD Viewing [ p [ SCENE template library (Image) 1 Assign the SCENE template to the SCENE button 1 Turn on the menu screen. 4 Press the 6SCENE button again to create the original SCENE templates. Notes • Once the desired SCENE templates are assigned to...
Owner's Manual
Page 46
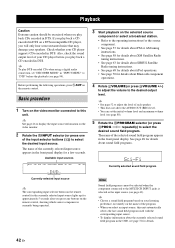
... performing the following operations, press 5AMP on a DTS-incompatible CD player, you will only hear some unwanted noise that may damage your speakers. Basic procedure 1 Turn on the video monitor connected to select the desired input source. y • Choose a sound field program based on your listening preference, not merely on the...
... performing the following operations, press 5AMP on a DTS-incompatible CD player, you will only hear some unwanted noise that may damage your speakers. Basic procedure 1 Turn on the video monitor connected to select the desired input source. y • Choose a sound field program based on your listening preference, not merely on the...

Owner's Manual
Page 47
... when you switch the front speaker setting. ■ Using the Zone B feature When you set Use this feature to select the component connected to turn on the remote control. Selecting the MULTI CH INPUT component Use this feature to the MULTI CH INPUT jacks (see page 51). "MULTI CH"...as the input source. Playback Before performing the following operations, press 5AMP on or off . Selecting the front speaker set "EXTRA SP ASSIGN" to turn the front speaker system (FRONT A and/or FRONT B) on or off the Zone B speakers. Press ASPEAKERS on the front panel repeatedly to...
... when you switch the front speaker setting. ■ Using the Zone B feature When you set Use this feature to select the component connected to turn on the remote control. Selecting the MULTI CH INPUT component Use this feature to the MULTI CH INPUT jacks (see page 51). "MULTI CH"...as the input source. Playback Before performing the following operations, press 5AMP on or off . Selecting the front speaker set "EXTRA SP ASSIGN" to turn the front speaker system (FRONT A and/or FRONT B) on or off the Zone B speakers. Press ASPEAKERS on the front panel repeatedly to...
Owner's Manual
Page 48
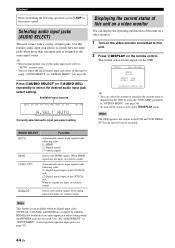
...video monitor connected to select the desired audio input jack select setting. Press QAUDIO SELECT (or FAUDIO SEL) repeatedly to this unit on a video monitor. 1 Turn on the remote control. STATUS VOL:-40.0dB MOVIE Sci-Fi INPUT: DVD A.SEL: HDMI [DISPLAY]:STATUS OFF y • You can select the amount...OSD-AMP" parameter in the OSD. Note This feature is output. The current status screen appears in "OPTION MENU" (see page 96). • To turn off the status screen, press ODISPLAY again. Available input sources MULTI CH VCR DVR V-AUX DTV/CBL DVD MD/CD-R CD TUNER A.SEL: AUTO XM...
...video monitor connected to select the desired audio input jack select setting. Press QAUDIO SELECT (or FAUDIO SEL) repeatedly to this unit on a video monitor. 1 Turn on the remote control. STATUS VOL:-40.0dB MOVIE Sci-Fi INPUT: DVD A.SEL: HDMI [DISPLAY]:STATUS OFF y • You can select the amount...OSD-AMP" parameter in the OSD. Note This feature is output. The current status screen appears in "OPTION MENU" (see page 96). • To turn off the status screen, press ODISPLAY again. Available input sources MULTI CH VCR DVR V-AUX DTV/CBL DVD MD/CD-R CD TUNER A.SEL: AUTO XM...

Owner's Manual
Page 51
... until "SLEEP OFF" appears in the front panel display, and the display returns to the selected sound field program. Disappears SLEEP OFF The SLEEP indicator turns off, and "SLEEP OFF" disappears from the front panel display after a certain amount of time for the sleep timer. The sleep timer also automatically...
... until "SLEEP OFF" appears in the front panel display, and the display returns to the selected sound field program. Disappears SLEEP OFF The SLEEP indicator turns off, and "SLEEP OFF" disappears from the front panel display after a certain amount of time for the sleep timer. The sleep timer also automatically...

Owner's Manual
Page 55
... activated, the SILENT CINEMA indicator lights up in the following operation, press 5AMP on . Enjoying unprocessed input sources (Straight decoding mode) When this unit is turned back on the remote control. BASIC OPERATION English 51 En Press OSTRAIGHT (or CSTRAIGHT) to select "Straight". ■ Deactivating the "Straight" mode Press OSTRAIGHT (or...
... activated, the SILENT CINEMA indicator lights up in the following operation, press 5AMP on . Enjoying unprocessed input sources (Straight decoding mode) When this unit is turned back on the remote control. BASIC OPERATION English 51 En Press OSTRAIGHT (or CSTRAIGHT) to select "Straight". ■ Deactivating the "Straight" mode Press OSTRAIGHT (or...

