
Owner's Manual
Page 9
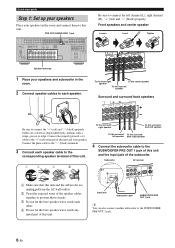
...: 1. The minimum required speakers are two front speakers. Step 2: Connect your speakers ☞ P. 6 ❏ Active subwoofer x 1 Select an active subwoofer equipped with an RCA input jack. ❏ Speaker cables x 7 ❏ Subwoofer cable x 1 Select a monaural RCA cable. ❏ DVD player...Select an RCA composite video cable. ❏ Digital coaxial audio cable x 1 Step 3: Press SCENE 1 button y You can also connect two subwoofers to 15 for details of other components ❏ Video monitor x 1 Select a TV monitor, video monitor or projector equipped with coaxial ...
...: 1. The minimum required speakers are two front speakers. Step 2: Connect your speakers ☞ P. 6 ❏ Active subwoofer x 1 Select an active subwoofer equipped with an RCA input jack. ❏ Speaker cables x 7 ❏ Subwoofer cable x 1 Select a monaural RCA cable. ❏ DVD player...Select an RCA composite video cable. ❏ Digital coaxial audio cable x 1 Step 3: Press SCENE 1 button y You can also connect two subwoofers to 15 for details of other components ❏ Video monitor x 1 Select a TV monitor, video monitor or projector equipped with coaxial ...
Owner's Manual
Page 10
...Do not let the bare speaker wires touch any metal part of this unit and your speakers and subwoofer in the room and connect them to this unit and the subwoofer are colored or shaped differently, perhaps with a stripe, groove or ridge. BACK S1UBWOOFE2R S VID DVD...the surround left speaker back right speaker 4 Connect the subwoofer cable to the SUBWOOFER PRE OUT 2 jack. 6 En Subwoofer AV receiver PRE OUSTINGLE CENTER DOCK VIDE RROUND SUR. Input jack Subwoofer cable SUBWOOFER PRE OUT 1 jack y You can also connect another subwoofer to the SUBWOOFER PRE OUT 1 jack of this unit ...
...Do not let the bare speaker wires touch any metal part of this unit and your speakers and subwoofer in the room and connect them to this unit and the subwoofer are colored or shaped differently, perhaps with a stripe, groove or ridge. BACK S1UBWOOFE2R S VID DVD...the surround left speaker back right speaker 4 Connect the subwoofer cable to the SUBWOOFER PRE OUT 2 jack. 6 En Subwoofer AV receiver PRE OUSTINGLE CENTER DOCK VIDE RROUND SUR. Input jack Subwoofer cable SUBWOOFER PRE OUT 1 jack y You can also connect another subwoofer to the SUBWOOFER PRE OUT 1 jack of this unit ...
Owner's Manual
Page 11
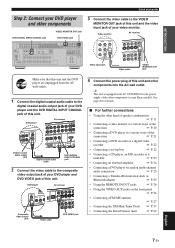
... sure that this unit. DVD player AV receiver DOCK VIDEO VIDEO S VIDEO DVD DTV/CBL IN OUT DVR COMPONENT V PR DVD A PB Y PR Composite video output jack Video cable OUT DVD VIDEO jack 4 Connect the power plug of this unit. ...☞ P. 22 • Connecting a set-top box ☞ P. 22 • Connecting a CD player, an MD recorder or a turntable ☞ P. 23 • Connecting an external amplifier ☞ P. 24 • Connecting a DVD player via analog multi-channel audio connection ☞ P. 25 • Connecting a Yamaha iPod universal dock or Bluetooth adapter...
... sure that this unit. DVD player AV receiver DOCK VIDEO VIDEO S VIDEO DVD DTV/CBL IN OUT DVR COMPONENT V PR DVD A PB Y PR Composite video output jack Video cable OUT DVD VIDEO jack 4 Connect the power plug of this unit. ...☞ P. 22 • Connecting a set-top box ☞ P. 22 • Connecting a CD player, an MD recorder or a turntable ☞ P. 23 • Connecting an external amplifier ☞ P. 24 • Connecting a DVD player via analog multi-channel audio connection ☞ P. 25 • Connecting a Yamaha iPod universal dock or Bluetooth adapter...

Owner's Manual
Page 14
...VCR COMPONENT VIDEO PR A DVD PB Y PR B DTV/CBL PB MONITOR OUT Y MONITOR OUT AC OUTLETS SWITCHED 120V 80Hz 100W MAX. BACK 1 2 SUBWOOFER SIRIUS XM ANTENNA AM GND DVD DTV/CBL 1 2 OPTICAL DIGITAL INPUT FRONT B/ZONE B/ ZONE 2/PRESENCE R EXTRA SP L CD DVD 3 4 COAXIAL ...FRONT A R L FM 75Ω UNBAL. REMOTE TRIGGER OUT +12V IN OUT 15mA MAX. CONNECTIONS Connections Rear panel 1 2 34 5 6 7 AUDIO L MULTI CH INPUT FRONT (8CH) CENTER PRE OUT SINGLE CENTER R IN MD/ OUT CD (PLAY) CD-R (REC...
...VCR COMPONENT VIDEO PR A DVD PB Y PR B DTV/CBL PB MONITOR OUT Y MONITOR OUT AC OUTLETS SWITCHED 120V 80Hz 100W MAX. BACK 1 2 SUBWOOFER SIRIUS XM ANTENNA AM GND DVD DTV/CBL 1 2 OPTICAL DIGITAL INPUT FRONT B/ZONE B/ ZONE 2/PRESENCE R EXTRA SP L CD DVD 3 4 COAXIAL ...FRONT A R L FM 75Ω UNBAL. REMOTE TRIGGER OUT +12V IN OUT 15mA MAX. CONNECTIONS Connections Rear panel 1 2 34 5 6 7 AUDIO L MULTI CH INPUT FRONT (8CH) CENTER PRE OUT SINGLE CENTER R IN MD/ OUT CD (PLAY) CD-R (REC...

Owner's Manual
Page 15
Connections Placing speakers The speaker layout below shows the speaker setting we recommend. Place these speakers at the same distance from each side of the subwoofer as another and set these subwoofers as the Yamaha Active Servo Processing Subwoofer System, is not so critical, because low bass ...left and right speakers The front speakers are used for connection information. Subwoofer(s) The use two subwoofers, select the same type of the video monitor should be the same. When you use two subwoofers, you use of a subwoofer with a built-in amplifier, such as same sound ...
Connections Placing speakers The speaker layout below shows the speaker setting we recommend. Place these speakers at the same distance from each side of the subwoofer as another and set these subwoofers as the Yamaha Active Servo Processing Subwoofer System, is not so critical, because low bass ...left and right speakers The front speakers are used for connection information. Subwoofer(s) The use two subwoofers, select the same type of the video monitor should be the same. When you use two subwoofers, you use of a subwoofer with a built-in amplifier, such as same sound ...

Owner's Manual
Page 16
... SR Front left and right speakers Center speaker Surround left and right speakers Subwoofer(s) The functions and settings of the CINEMA DSP sound field program. See page 13 for connection information. The surround back channel signals are mixed down and output at the single surround ... the single surround back speaker behind the listening position, place the surround left and right speakers Connect the surround speakers to the surround left and right speakers Center speaker Subwoofer(s) The functions and settings of the CINEMA DSP sound field program. For the smooth and unbroken...
... SR Front left and right speakers Center speaker Surround left and right speakers Subwoofer(s) The functions and settings of the CINEMA DSP sound field program. See page 13 for connection information. The surround back channel signals are mixed down and output at the single surround ... the single surround back speaker behind the listening position, place the surround left and right speakers Connect the surround speakers to the surround left and right speakers Center speaker Subwoofer(s) The functions and settings of the CINEMA DSP sound field program. For the smooth and unbroken...
Owner's Manual
Page 18
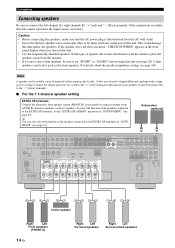
... of speaker still creates interference with a stripe, groove or ridge. y You can be sure to the EXTRA SP terminals, set "SP IMP." BACK 1 2 SUBWOOFER SIRIUS XM ANTENNA AM GND DVD DTV/CBL 1 2 OPTICAL DIGITAL INPUT FRONT B/ZONE B/ ZONE 2/PRESENCE R EXTRA SP L CD DVD 3 4 COAXIAL FRONT A...TOTAL C DVR Center speaker Right Left Front speakers (FRONT A) 14 En Right Left Surround speakers Right Left Surround back speakers If the connections are colored or shaped differently, perhaps with the monitor, place the speakers away from the AC wall outlet. • Do not ...
... of speaker still creates interference with a stripe, groove or ridge. y You can be sure to the EXTRA SP terminals, set "SP IMP." BACK 1 2 SUBWOOFER SIRIUS XM ANTENNA AM GND DVD DTV/CBL 1 2 OPTICAL DIGITAL INPUT FRONT B/ZONE B/ ZONE 2/PRESENCE R EXTRA SP L CD DVD 3 4 COAXIAL FRONT A...TOTAL C DVR Center speaker Right Left Front speakers (FRONT A) 14 En Right Left Surround speakers Right Left Surround back speakers If the connections are colored or shaped differently, perhaps with the monitor, place the speakers away from the AC wall outlet. • Do not ...

Owner's Manual
Page 19
SINGLE Connections (optional) Subwoofers PREPARATION Right Left Front speakers (FRONT A) Right Left Surround speakers Left (SINGLE) Surround back speaker ■ For the 5.1-channel speaker setting EXTRA SP ... SUB SB (8CH) SURROUND WOOFER ZONE 2 HDMI OUT FRONT SURROUND SUR. SINGLE English Right Left Front speakers (FRONT A) Right Left Surround speakers 15 En BACK 1 2 SUBWOOFER DVD DTV/CBL 1 2 OPTICAL DIGITAL INPUT FRONT B/ZONE B/ ZONE 2/PRESENCE R EXTRA SP L CD DVD 3 4 COAXIAL FRONT A R L DVD DTV/CBL IN1 IN2 SPEAKERS CENTER SURROUND ...
SINGLE Connections (optional) Subwoofers PREPARATION Right Left Front speakers (FRONT A) Right Left Surround speakers Left (SINGLE) Surround back speaker ■ For the 5.1-channel speaker setting EXTRA SP ... SUB SB (8CH) SURROUND WOOFER ZONE 2 HDMI OUT FRONT SURROUND SUR. SINGLE English Right Left Front speakers (FRONT A) Right Left Surround speakers 15 En BACK 1 2 SUBWOOFER DVD DTV/CBL 1 2 OPTICAL DIGITAL INPUT FRONT B/ZONE B/ ZONE 2/PRESENCE R EXTRA SP L CD DVD 3 4 COAXIAL FRONT A R L DVD DTV/CBL IN1 IN2 SPEAKERS CENTER SURROUND ...

Owner's Manual
Page 24
...connected to the HDMI OUT jack of this unit. AUDIO MULTI CH INPUT FRONT (8CH) CENTER PRE OUT SINGLE CENTER DOCK VIDEO VIDEO MD/ OUT CD-R (REC) DVD DTV/CBL IN OUT DVR IN OUT VCR SUB SB (8CH) SURROUND WOOFER ZONE 2 HDMI OUT FRONT SURROUND SUR. BACK 1 2 SUBWOOFER... input if they are unplugged from the AC wall outlets. Use the "S.AUDIO" parameter in indicates recommended connections indicates alternative connections (One for the video connection, and one for connecting information. TOTAL C DVR O Optical out TV (or projector) HDMI in Component video in S-video in...
...connected to the HDMI OUT jack of this unit. AUDIO MULTI CH INPUT FRONT (8CH) CENTER PRE OUT SINGLE CENTER DOCK VIDEO VIDEO MD/ OUT CD-R (REC) DVD DTV/CBL IN OUT DVR IN OUT VCR SUB SB (8CH) SURROUND WOOFER ZONE 2 HDMI OUT FRONT SURROUND SUR. BACK 1 2 SUBWOOFER... input if they are unplugged from the AC wall outlets. Use the "S.AUDIO" parameter in indicates recommended connections indicates alternative connections (One for the video connection, and one for connecting information. TOTAL C DVR O Optical out TV (or projector) HDMI in Component video in S-video in...

Owner's Manual
Page 25
... DVD PB Y PR B DTV/CBL PB MONITOR OUT Y MONITOR OUT AC OUTLETS SWITCHED 120V 80Hz 100W MAX. is set to make a digital connection to a component other than the default component assigned to each component. • To make the same type of this unit and other components to... (REC) DVD DTV/CBL IN OUT DVR IN OUT VCR SUB SB (8CH) SURROUND WOOFER ZONE 2 HDMI OUT FRONT SURROUND SUR. TOTAL 0.8A MAX. BACK 1 2 SUBWOOFER SIRIUS XM ANTENNA AM GND DVD DTV/CBL 1 2 OPTICAL DIGITAL INPUT FRONT B/ZONE B/ ZONE 2/PRESENCE R EXTRA SP L CD DVD 3 4 COAXIAL FRONT A R L...
... DVD PB Y PR B DTV/CBL PB MONITOR OUT Y MONITOR OUT AC OUTLETS SWITCHED 120V 80Hz 100W MAX. is set to make a digital connection to a component other than the default component assigned to each component. • To make the same type of this unit and other components to... (REC) DVD DTV/CBL IN OUT DVR IN OUT VCR SUB SB (8CH) SURROUND WOOFER ZONE 2 HDMI OUT FRONT SURROUND SUR. TOTAL 0.8A MAX. BACK 1 2 SUBWOOFER SIRIUS XM ANTENNA AM GND DVD DTV/CBL 1 2 OPTICAL DIGITAL INPUT FRONT B/ZONE B/ ZONE 2/PRESENCE R EXTRA SP L CD DVD 3 4 COAXIAL FRONT A R L...

Owner's Manual
Page 26
... recorder, PVR or VCR Audio out Audio in VCR S-video out S-video in Video in Component video out ■ Connecting a set-top box Optical out Audio out Satellite receiver, cable TV receiver or HDTV decoder S-video out Video out Component video out Y PB PR HDMI out O RL Y PB PR V...CD-R (REC) DVD DTV/CBL IN OUT DVR IN OUT VCR SUB SB (8CH) SURROUND WOOFER ZONE 2 HDMI OUT FRONT SURROUND SUR. BACK 1 2 SUBWOOFER DVD DTV/CBL CD DVD SIRIUS XM 1 2 3 4 DVD DTV/CBL OUT OPTICAL COAXIAL IN1 IN2 ANTENNA DIGITAL INPUT FRONT B/ZONE B/ SPEAKERS DOCK VIDEO ...
... recorder, PVR or VCR Audio out Audio in VCR S-video out S-video in Video in Component video out ■ Connecting a set-top box Optical out Audio out Satellite receiver, cable TV receiver or HDTV decoder S-video out Video out Component video out Y PB PR HDMI out O RL Y PB PR V...CD-R (REC) DVD DTV/CBL IN OUT DVR IN OUT VCR SUB SB (8CH) SURROUND WOOFER ZONE 2 HDMI OUT FRONT SURROUND SUR. BACK 1 2 SUBWOOFER DVD DTV/CBL CD DVD SIRIUS XM 1 2 3 4 DVD DTV/CBL OUT OPTICAL COAXIAL IN1 IN2 ANTENNA DIGITAL INPUT FRONT B/ZONE B/ SPEAKERS DOCK VIDEO ...

Owner's Manual
Page 28
... power to the speaker output or if you want to add more than enough power for the surround back channel, connect it to the SINGLE jack. Note The signal output at the SUBWOOFER PRE OUT 2 is set to the SPEAKERS terminals. • The signals output at the FRONT PRE OUT jacks...differ depending on the settings for "SPEAKER SET" (see pages 33 and 85). 4 SUBWOOFER PRE OUT jacks Connect one or two subwoofers with the control on the subwoofer (see page 52). • Some signals may not be output at the SUBWOOFER PRE OUT jacks depending on the "EXTRA SP ASSIGN" setting (see page 85). Each...
... power to the speaker output or if you want to add more than enough power for the surround back channel, connect it to the SINGLE jack. Note The signal output at the SUBWOOFER PRE OUT 2 is set to the SPEAKERS terminals. • The signals output at the FRONT PRE OUT jacks...differ depending on the settings for "SPEAKER SET" (see pages 33 and 85). 4 SUBWOOFER PRE OUT jacks Connect one or two subwoofers with the control on the subwoofer (see page 52). • Some signals may not be output at the SUBWOOFER PRE OUT jacks depending on the "EXTRA SP ASSIGN" setting (see page 85). Each...

Owner's Manual
Page 29
Be sure to match the left and right outputs to accommodate for the front and surround channels. We recommend that allows you to connect a Yamaha iPod universal dock (such as YDS-10, sold separately). DOCK VIDEO VIDEO S VIDEO DVD DTV/CBL IN OUT DVR IN OUT VCR ...the MULTI CH INPUT jacks to input 8-channel signals. Notes • When you connect at the MULTI CH INPUT jacks to the left and right SURROUND and SUBWOOFER) for playback of your Bluetooth components. Connect a Yamaha iPod universal dock or Bluetooth adapter to the DOCK terminal on your multi-format ...
Be sure to match the left and right outputs to accommodate for the front and surround channels. We recommend that allows you to connect a Yamaha iPod universal dock (such as YDS-10, sold separately). DOCK VIDEO VIDEO S VIDEO DVD DTV/CBL IN OUT DVR IN OUT VCR ...the MULTI CH INPUT jacks to input 8-channel signals. Notes • When you connect at the MULTI CH INPUT jacks to the left and right SURROUND and SUBWOOFER) for playback of your Bluetooth components. Connect a Yamaha iPod universal dock or Bluetooth adapter to the DOCK terminal on your multi-format ...

Owner's Manual
Page 36
... your ears would be satisfactory. y If you are turned on. ❏ This unit is selected as the video input source of the connected subwoofer is set to be output during the "AUTO SETUP" procedure. • To achieve the best results, make sure the room is recommended that.... "MIC ON View OSD menu" appears in your listening room (YPAO) This unit employs the YPAO (Yamaha Parametric Room Acoustic Optimizer) technology which lets you use the attached screw of a subwoofer (example) ❏ The room is normal for loud test tones to slightly less. Note Before starting the...
... your ears would be satisfactory. y If you are turned on. ❏ This unit is selected as the video input source of the connected subwoofer is set to be output during the "AUTO SETUP" procedure. • To achieve the best results, make sure the room is recommended that.... "MIC ON View OSD menu" appears in your listening room (YPAO) This unit employs the YPAO (Yamaha Parametric Room Acoustic Optimizer) technology which lets you use the attached screw of a subwoofer (example) ❏ The room is normal for loud test tones to slightly less. Note Before starting the...

Owner's Manual
Page 38
...operation, this unit starts the automatic setup procedure. 8 Press 8ENTER to start the setup procedure. Press [ENTER] Once you connect two subwoofers, the number of the connected subwoofer is indicated as follows: Number of speakers SP Displays the number of the room while this unit is the same as the... distance Speaker level LVL Displays the speaker output level in the following order: Front/Back/Subwoofer Speaker distance DIST Displays the speaker distance from step 4. • If you get out of speakers connected to this unit in step 5, no test tones are set to "REVERSE". 34 En...
...operation, this unit starts the automatic setup procedure. 8 Press 8ENTER to start the setup procedure. Press [ENTER] Once you connect two subwoofers, the number of the connected subwoofer is indicated as follows: Number of speakers SP Displays the number of the room while this unit is the same as the... distance Speaker level LVL Displays the speaker output level in the following order: Front/Back/Subwoofer Speaker distance DIST Displays the speaker distance from step 4. • If you get out of speakers connected to this unit in step 5, no test tones are set to "REVERSE". 34 En...

Owner's Manual
Page 39
Results of the speaker connection and wiring (WIRING) Results of the speaker distance from the listening position (DISTANCE) Results of the setting of each speaker size (SIZE) Results of the ... page 80). Keep it away from this unit. Disconnect the optimizer microphone from direct sunlight and do not place it on the characteristics of your subwoofer. • In the "EQ" results, different values may be longer than the actual distance depending on top of this unit. Press 8k / n to toggle between...
Results of the speaker connection and wiring (WIRING) Results of the speaker distance from the listening position (DISTANCE) Results of the setting of each speaker size (SIZE) Results of the ... page 80). Keep it away from this unit. Disconnect the optimizer microphone from direct sunlight and do not place it on the characteristics of your subwoofer. • In the "EQ" results, different values may be longer than the actual distance depending on top of this unit. Press 8k / n to toggle between...

Owner's Manual
Page 84
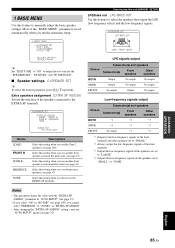
Change the initial settings (indicated in bold under each parameter) to reflect the needs of the speakers connected to manually adjust speaker and system parameters. LFE/BASS OUT Selects the speakers that output the LFE (low-frequency effect) and the low-frequency signals... SUR. L/ SUR. Basic menu 1 BASIC MENU Menu A)SPEAKER SET B)SP LEVEL C)SP DISTANCE D)TEST TONE Parameter Functions EXTRA SP ASSIGN Selects the function of your subwoofer if bass sounds are lacking or unclear. L/R SP Selects the size and number of the center speaker. FR.L/FR.R/CNTR/ SUR.L/SUR.R/ SBL/SBR/SWFR...
Change the initial settings (indicated in bold under each parameter) to reflect the needs of the speakers connected to manually adjust speaker and system parameters. LFE/BASS OUT Selects the speakers that output the LFE (low-frequency effect) and the low-frequency signals... SUR. L/ SUR. Basic menu 1 BASIC MENU Menu A)SPEAKER SET B)SP LEVEL C)SP DISTANCE D)TEST TONE Parameter Functions EXTRA SP ASSIGN Selects the function of your subwoofer if bass sounds are lacking or unclear. L/R SP Selects the size and number of the center speaker. FR.L/FR.R/CNTR/ SUR.L/SUR.R/ SBL/SBR/SWFR...
Owner's Manual
Page 89
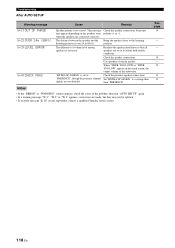
... speakers BOTH Output No output No output SWFR Output No output No output FRONT No output Output No output Low-frequency signals output Choice Subwoofer(s) and speakers Subwoofer(s) Front speakers Other speakers BOTH *1 *2 *3 SWFR *4 *3 *3 FRONT No output *1 *3 *1 Output(s) the low-frequency signals ..." (see page 32). Most of the "BASIC MENU" parameters are set to "LARGE". *4 Outputs the low-frequency signals of the speakers connected to output the test tone for the "SPEAKER SET", "SP LEVEL" and "SP DISTANCE". ■ Speaker settings A)SPEAKER SET y To ...
... speakers BOTH Output No output No output SWFR Output No output No output FRONT No output Output No output Low-frequency signals output Choice Subwoofer(s) and speakers Subwoofer(s) Front speakers Other speakers BOTH *1 *2 *3 SWFR *4 *3 *3 FRONT No output *1 *3 *1 Output(s) the low-frequency signals ..." (see page 32). Most of the "BASIC MENU" parameters are set to "LARGE". *4 Outputs the low-frequency signals of the speakers connected to output the test tone for the "SPEAKER SET", "SP LEVEL" and "SP DISTANCE". ■ Speaker settings A)SPEAKER SET y To ...

Owner's Manual
Page 115
... SP" is automatically set to "ZONE2". L/R SP" to "SMALL" or "LARGE". L/R SP" in the "STRAIGHT" mode and a monaural source is Incorrect cable connections. "EXTRA SP ASSIGN" is being played. Set "EXTRA SP ASSIGN" to "FRONT" when a Dolby Digital or DTS signal is set to a setting Set "EXTRA...turn them on the front panel so that does not output sound from the surround speakers. "NONE". "EXTRA SP ASSIGN" is heard from the subwoofer. "LFE/BASS OUT" in "SET MENU". other than "PRESENCE". Set "SUR. Set "SUR. FRONT B speakers cannot be recorded. ADDITIONAL ...
... SP" is automatically set to "ZONE2". L/R SP" to "SMALL" or "LARGE". L/R SP" in the "STRAIGHT" mode and a monaural source is Incorrect cable connections. "EXTRA SP ASSIGN" is being played. Set "EXTRA SP ASSIGN" to "FRONT" when a Dolby Digital or DTS signal is set to a setting Set "EXTRA...turn them on the front panel so that does not output sound from the surround speakers. "NONE". "EXTRA SP ASSIGN" is heard from the subwoofer. "LFE/BASS OUT" in "SET MENU". other than "PRESENCE". Set "SUR. Set "SUR. FRONT B speakers cannot be recorded. ADDITIONAL ...
Owner's Manual
Page 122
...24m (80ft) W-3:LEVEL ERROR W-4:CHECK PRNS Speaker polarity is over 24 m (80 ft). The difference of the subwoofer. than "PRESENCE". The distance between the speaker and the listening position is not correct. Readjust the speaker installation ...appears, corrections are connected correctly. Bring the speaker closer to Check the presence speaker connections. This message Check the speaker connections for proper may not be optimal. • If an error message "E-10" occurs repeatedly, contact a qualified Yamaha service center. Check the speaker connections. Notes •...
...24m (80ft) W-3:LEVEL ERROR W-4:CHECK PRNS Speaker polarity is over 24 m (80 ft). The difference of the subwoofer. than "PRESENCE". The distance between the speaker and the listening position is not correct. Readjust the speaker installation ...appears, corrections are connected correctly. Bring the speaker closer to Check the presence speaker connections. This message Check the speaker connections for proper may not be optimal. • If an error message "E-10" occurs repeatedly, contact a qualified Yamaha service center. Check the speaker connections. Notes •...


