Owner's Manual
Page 5
...70 Recording 71 ADVANCED OPERATION Advanced sound configurations 72 Changing sound field parameter settings 72 Selecting decoders 78 Customizing this unit (MANUAL SETUP).........80 Using SET MENU 84 1 BASIC MENU 85 2 VOLUME MENU 89 3 SOUND MENU 90 4 INPUT MENU 93 5 ... 100 Setting remote control codes 102 Using multi-zone configuration 103 Connecting Zone 2 103 Controlling Zone 2 104 Advanced setup 106 Using the advanced setup 106 ADDITIONAL INFORMATION Troubleshooting 110 Resetting the system 119 Glossary 120 Sound field program information 123 Specifications 124 Index 126...
...70 Recording 71 ADVANCED OPERATION Advanced sound configurations 72 Changing sound field parameter settings 72 Selecting decoders 78 Customizing this unit (MANUAL SETUP).........80 Using SET MENU 84 1 BASIC MENU 85 2 VOLUME MENU 89 3 SOUND MENU 90 4 INPUT MENU 93 5 ... 100 Setting remote control codes 102 Using multi-zone configuration 103 Connecting Zone 2 103 Controlling Zone 2 104 Advanced setup 106 Using the advanced setup 106 ADDITIONAL INFORMATION Troubleshooting 110 Resetting the system 119 Glossary 120 Sound field program information 123 Specifications 124 Index 126...

Owner's Manual
Page 6
...capability ◆ Zone 2 custom installation facility ◆ Bi-amplification connection capability ◆ Sleep timer Supplied accessories Check that allow you received all of sound fields ◆ Compressed Music Enhancer mode ◆ Virtual CINEMA DSP ◆ SILENT CINEMA Digital audio decoders ◆ ... YDS-10, sold separately) or Bluetooth adapter (such as YBA-10, sold separately) Other features ◆ YPAO (Yamaha Parametric Room Acoustic Optimizer) for automatic speaker setup ◆ 192-kHz/24-bit D/A converter ◆ OSD (on-screen display) menus that you to optimize this ...
...capability ◆ Zone 2 custom installation facility ◆ Bi-amplification connection capability ◆ Sleep timer Supplied accessories Check that allow you received all of sound fields ◆ Compressed Music Enhancer mode ◆ Virtual CINEMA DSP ◆ SILENT CINEMA Digital audio decoders ◆ ... YDS-10, sold separately) or Bluetooth adapter (such as YBA-10, sold separately) Other features ◆ YPAO (Yamaha Parametric Room Acoustic Optimizer) for automatic speaker setup ◆ 192-kHz/24-bit D/A converter ◆ OSD (on-screen display) menus that you to optimize this ...

Owner's Manual
Page 13
... unit? ■ Customizing the SCENE templates • Using various SCENE templates ☞ P. 37 • Creating your listening room (AUTO SETUP) ☞ P. 32 • Manually adjusting various parameters of power in order to the standby mode. Press KMAIN ZONE ON/OFF to ...control ☞ P. 100 • Adjusting the advanced parameters ☞ P. 106 ■ Additional feature • Automatically turning off this unit to receive infrared signals from the standby mode, press the desired SSCENE buttons (or 6SCENE) or KMAIN ZONE ON/OFF (or HPOWER). INTRODUCTION ■ After...
... unit? ■ Customizing the SCENE templates • Using various SCENE templates ☞ P. 37 • Creating your listening room (AUTO SETUP) ☞ P. 32 • Manually adjusting various parameters of power in order to the standby mode. Press KMAIN ZONE ON/OFF to ...control ☞ P. 100 • Adjusting the advanced parameters ☞ P. 106 ■ Additional feature • Automatically turning off this unit to receive infrared signals from the standby mode, press the desired SSCENE buttons (or 6SCENE) or KMAIN ZONE ON/OFF (or HPOWER). INTRODUCTION ■ After...

Owner's Manual
Page 16
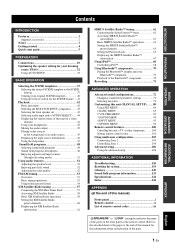
... the listening position, place the surround left and right speakers Subwoofer(s) The functions and settings of the CINEMA DSP sound field program. Use the automatic setup feature (see page 86). FR SW FL SR C SW SL SB FR SW FL C SR SW SL C FL 30˚ SL 60˚ SL 80... farther back compared with sound field programs by using a speaker combination other speaker combinations You can enjoy multi-channel sources with the placement in "MANUAL SETUP" (see page 86).
... the listening position, place the surround left and right speakers Subwoofer(s) The functions and settings of the CINEMA DSP sound field program. Use the automatic setup feature (see page 86). FR SW FL SR C SW SL SB FR SW FL C SR SW SL C FL 30˚ SL 60˚ SL 80... farther back compared with sound field programs by using a speaker combination other speaker combinations You can enjoy multi-channel sources with the placement in "MANUAL SETUP" (see page 86).
Owner's Manual
Page 18
... of the speakers connected to the EXTRA SP terminals in the front panel display when you are short-circuited, "CHECK SP WIRES" appears in "AUTO SETUP" (see page 106. Connect the striped (grooved, etc.) cable to set the "EXTRA SP ASSIGN" parameter in another room (ZONE B), presence speakers, or Zone 2 speakers...
... of the speakers connected to the EXTRA SP terminals in the front panel display when you are short-circuited, "CHECK SP WIRES" appears in "AUTO SETUP" (see page 106. Connect the striped (grooved, etc.) cable to set the "EXTRA SP ASSIGN" parameter in another room (ZONE B), presence speakers, or Zone 2 speakers...

Owner's Manual
Page 20
... on the side of each speaker cable and then twist the exposed wires of the cable together to prevent short circuits. 10 mm (0.4 in "ADVANCED SETUP" (see page 109). Red: positive (+) Black: negative (-) Red: positive (+) Black: negative (-) 3 Insert one speaker system. To make sure that the shorting bars are put into...
... on the side of each speaker cable and then twist the exposed wires of the cable together to prevent short circuits. 10 mm (0.4 in "ADVANCED SETUP" (see page 109). Red: positive (+) Black: negative (-) Red: positive (+) Black: negative (-) 3 Insert one speaker system. To make sure that the shorting bars are put into...
Owner's Manual
Page 22
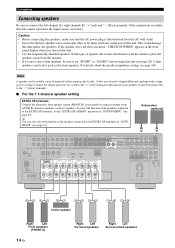
DSD 2/5.1ch, 2.8224 MHz, 1 bit SA-CD, etc. multi-channel analog audio input (see page 97) to "ON" in "MANUAL SETUP" (see page 25) - to activate this unit while data is not compatible with the HDMI logo printed on the component). Bitstream (High definition audio) Dolby ...
DSD 2/5.1ch, 2.8224 MHz, 1 bit SA-CD, etc. multi-channel analog audio input (see page 97) to "ON" in "MANUAL SETUP" (see page 25) - to activate this unit while data is not compatible with the HDMI logo printed on the component). Bitstream (High definition audio) Dolby ...
Owner's Manual
Page 30
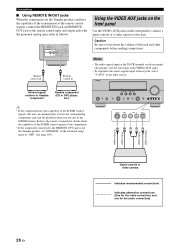
Infrared signal receiver or Yamaha component Yamaha component (CD or DVD player, etc.) VOLUME SPEAKERS EDIT SEARCH MODE BAND ...camera to "OFF" (see page 109). FM 75Ω UNBAL. Remote control out Remote control in the advanced setup menu to this unit and other components before making connections. REMOTE TRIGGER OUT +12V IN OUT 15mA MAX. Connections... ■ Using REMOTE IN/OUT jacks When the components are the Yamaha products and have the capability of the SCENE control signals, this unit can automatically activate the corresponding components...
Infrared signal receiver or Yamaha component Yamaha component (CD or DVD player, etc.) VOLUME SPEAKERS EDIT SEARCH MODE BAND ...camera to "OFF" (see page 109). FM 75Ω UNBAL. Remote control out Remote control in the advanced setup menu to this unit and other components before making connections. REMOTE TRIGGER OUT +12V IN OUT 15mA MAX. Connections... ■ Using REMOTE IN/OUT jacks When the components are the Yamaha products and have the capability of the SCENE control signals, this unit can automatically activate the corresponding components...

Owner's Manual
Page 32
... use 6 ohm speakers, set "SP IMP." TONE CONTROL While holding down MAIN ZONE ON/OFF 3 Rotate the NPROGRAM selector to turn on , and the advanced setup menu appears in case the power cable is disconnected from the AC wall outlet or if the power supply is reflected next time you are...
... use 6 ohm speakers, set "SP IMP." TONE CONTROL While holding down MAIN ZONE ON/OFF 3 Rotate the NPROGRAM selector to turn on , and the advanced setup menu appears in case the power cable is disconnected from the AC wall outlet or if the power supply is reflected next time you are...

Owner's Manual
Page 34
... set in "AUTO SETUP" are used without any of the decoders of this unit is charging the battery of the stationed iPod in the standby mode. • Flashes while the connected Yamaha Bluetooth adapter (such as YBA-10, sold separately) and the Bluetooth component is in a Yamaha iPod universal dock (...up when the Compressed Music Enhancer mode is only applicable to indicate the active sound fields (see page 70). • Light up while the Yamaha Bluetooth adapter is connected to the DOCK terminal of the XM indicator or SIRIUS indicator lights up only when "XM" or "SIRIUS" is selected...
... set in "AUTO SETUP" are used without any of the decoders of this unit is charging the battery of the stationed iPod in the standby mode. • Flashes while the connected Yamaha Bluetooth adapter (such as YBA-10, sold separately) and the Bluetooth component is in a Yamaha iPod universal dock (...up when the Compressed Music Enhancer mode is only applicable to indicate the active sound fields (see page 70). • Light up while the Yamaha Bluetooth adapter is connected to the DOCK terminal of the XM indicator or SIRIUS indicator lights up only when "XM" or "SIRIUS" is selected...
Owner's Manual
Page 35
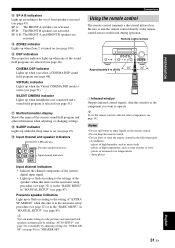
...program and other components, see page 87). E ZONE2 indicator Lights up when Zone 2 is in the automatic setup procedure (see page 32) or in the "BASIC MENU" in "MANUAL SETUP" (see page 102. CINEMA DSP indicator Lights up when headphones are connected and a sound field program is active...at the remote control sensor on (see page 51). y You can make settings for the presence and surround back speakers automatically by running "AUTO SETUP" (see page 48). places of high temperature, such as near a heater or stove - dusty places English 31 En places of extremely low ...
...program and other components, see page 87). E ZONE2 indicator Lights up when Zone 2 is in the automatic setup procedure (see page 32) or in the "BASIC MENU" in "MANUAL SETUP" (see page 102. CINEMA DSP indicator Lights up when headphones are connected and a sound field program is active...at the remote control sensor on (see page 51). y You can make settings for the presence and surround back speakers automatically by running "AUTO SETUP" (see page 48). places of high temperature, such as near a heater or stove - dusty places English 31 En places of extremely low ...

Owner's Manual
Page 36
... video monitor are seated in bold. • You can use a tripod (etc.) to slightly less. Note Before starting the automatic setup, check the following menu screen appears on a flat level surface with the omni-directional microphone heading upward. Optimizer microphone MIN MAX MIN MAX... SPEAKER SETTING FOR YOUR LISTENING ROOM (YPAO) Optimizing the speaker setting for your listening room (YPAO) This unit employs the YPAO (Yamaha Parametric Room Acoustic Optimizer) technology which lets you use the attached screw of a tripod (etc.) to fix the optimizer microphone to ...
... video monitor are seated in bold. • You can use a tripod (etc.) to slightly less. Note Before starting the automatic setup, check the following menu screen appears on a flat level surface with the omni-directional microphone heading upward. Optimizer microphone MIN MAX MIN MAX... SPEAKER SETTING FOR YOUR LISTENING ROOM (YPAO) Optimizing the speaker setting for your listening room (YPAO) This unit employs the YPAO (Yamaha Parametric Room Acoustic Optimizer) technology which lets you use the attached screw of a tripod (etc.) to fix the optimizer microphone to ...

Owner's Manual
Page 37
... initial factory settings. You can select the type of the specified frequency bands. Choices: AUTO, RELOAD, UNDO, DEFAULT • Select "AUTO" to automatically run "AUTO SETUP" and confirmed the results. • "RELOAD" or "UNDO" is not available when you change the setting of "BI-AMP" in the advanced... setup (see page 109) or "EXTRA SP ASSIGN" in "BASIC MENU" (see page 85). 6 Press 8l / h to average the frequency response of all of your speakers ...
... initial factory settings. You can select the type of the specified frequency bands. Choices: AUTO, RELOAD, UNDO, DEFAULT • Select "AUTO" to automatically run "AUTO SETUP" and confirmed the results. • "RELOAD" or "UNDO" is not available when you change the setting of "BI-AMP" in the advanced... setup (see page 109) or "EXTRA SP ASSIGN" in "BASIC MENU" (see page 85). 6 Press 8l / h to average the frequency response of all of your speakers ...

Owner's Manual
Page 38
.... • We recommend that you get out of "RESULT" (see page 87) is automatically set , the "RESULT" display appears in the auto setup procedure. AUTO SETUP RESULT SP : 3/4/0.1 DIST: 14.0/17.0ft LVL : -9.0/+6.5dB . >SET CANCEL [ ]/[ ]:Up/Down [ENTER]:Enter The results displayed under "RESULT...this unit in the following order: Front/Back/Subwoofer Speaker distance DIST Displays the speaker distance from each speaker during the "AUTO SETUP" procedure, the setup procedure is the same as "0.1". • If "E-10:INTERNAL ERROR" appears during the testing procedure, restart from step 4. ...
.... • We recommend that you get out of "RESULT" (see page 87) is automatically set , the "RESULT" display appears in the auto setup procedure. AUTO SETUP RESULT SP : 3/4/0.1 DIST: 14.0/17.0ft LVL : -9.0/+6.5dB . >SET CANCEL [ ]/[ ]:Up/Down [ENTER]:Enter The results displayed under "RESULT...this unit in the following order: Front/Back/Subwoofer Speaker distance DIST Displays the speaker distance from each speaker during the "AUTO SETUP" procedure, the setup procedure is the same as "0.1". • If "E-10:INTERNAL ERROR" appears during the testing procedure, restart from step 4. ...

Owner's Manual
Page 39
... or "CANCEL". RESULT WIRING FRONT L;;;;;;;OK [ [ ]/[[]:Select [ENTER]:Return 11 Press 8l / h repeatedly to display the setup results in detail. AUTO SETUP . Press 8k / n to confirm your listening room (YPAO) 10 Press 8k and then 8ENTER to toggle between the parameters...17.0ft LVL : -9.0/+6.5dB >SET CANCEL [ ]/[ ]:Up/Down [ENTER]:Detail Notes • The distances displayed in a results. AUTO SETUP AUTO SETUP Complete Disconnect Microphone PRESS [ENTER] [MENU]:Exit Results of this unit. The following screen appears. Keep it on the characteristics of each parameter...
... or "CANCEL". RESULT WIRING FRONT L;;;;;;;OK [ [ ]/[[]:Select [ENTER]:Return 11 Press 8l / h repeatedly to display the setup results in detail. AUTO SETUP . Press 8k / n to confirm your listening room (YPAO) 10 Press 8k and then 8ENTER to toggle between the parameters...17.0ft LVL : -9.0/+6.5dB >SET CANCEL [ ]/[ ]:Up/Down [ENTER]:Detail Notes • The distances displayed in a results. AUTO SETUP AUTO SETUP Complete Disconnect Microphone PRESS [ENTER] [MENU]:Exit Results of this unit. The following screen appears. Keep it on the characteristics of each parameter...

Owner's Manual
Page 40
...USER CANCEL Don't operate any function >RETRY EXIT [ ]/[[]:Select [ENTER]:Enter Choices: RETRY, EXIT • Select "RETRY" to retry the "AUTO SETUP" procedure. • Select "EXIT" to a speaker, "--" is an example when "E-9:USER CANCEL" appears in "Troubleshooting" on the right of "WARNING..." indicates the number of your listening environment, run "AUTO SETUP" again to recalibrate your system. ■ If "WARNING" appears When this unit continues the measurements and settings, but the settings may not...
...USER CANCEL Don't operate any function >RETRY EXIT [ ]/[[]:Select [ENTER]:Enter Choices: RETRY, EXIT • Select "RETRY" to retry the "AUTO SETUP" procedure. • Select "EXIT" to a speaker, "--" is an example when "E-9:USER CANCEL" appears in "Troubleshooting" on the right of "WARNING..." indicates the number of your listening environment, run "AUTO SETUP" again to recalibrate your system. ■ If "WARNING" appears When this unit continues the measurements and settings, but the settings may not...

Owner's Manual
Page 50
... FORMAT SAMPLING CHANNEL BITRATE FLAG Descriptions Signal format. Resolution of resolution. When this unit to select "SIGNAL INFO" and then press 8ENTER. SET MENU . ;AUTO SETUP ;MANUAL SETUP .A;SIGNAL INFO [ ]/[ ]:Up/Down [ENTER]:Enter p p 2 Press 8n repeatedly to automatically switch decoders ("Surround EX", etc.). The number of samples per second. Resolution of...
... FORMAT SAMPLING CHANNEL BITRATE FLAG Descriptions Signal format. Resolution of resolution. When this unit to select "SIGNAL INFO" and then press 8ENTER. SET MENU . ;AUTO SETUP ;MANUAL SETUP .A;SIGNAL INFO [ ]/[ ]:Up/Down [ENTER]:Enter p p 2 Press 8n repeatedly to automatically switch decoders ("Surround EX", etc.). The number of samples per second. Resolution of...
Owner's Manual
Page 56
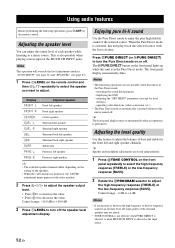
... activated, this unit plays back the selected source with the least circuitry. y Speaker and headphone adjustments are not possible when this unit is in "AUTO SETUP" (see page 32) and "SP LEVEL" (see page 87). 1 Press 7LEVEL on the remote control and then 8k / n repeatedly to select the speaker you increase...
... activated, this unit plays back the selected source with the least circuitry. y Speaker and headphone adjustments are not possible when this unit is in "AUTO SETUP" (see page 32) and "SP LEVEL" (see page 87). 1 Press 7LEVEL on the remote control and then 8k / n repeatedly to select the speaker you increase...

Owner's Manual
Page 69
... display. BASIC OPERATION Before performing the following operations, press KSIRIUS on the remote control and then press MMENU to display. 2 Press 8n to select "MANUAL SETUP" and then press 8ENTER. 3 Press 8n repeatedly to select "INPUT MENU" and then press 8ENTER. Setting the SIRIUS Satellite Radio™ preset channels You can...
... display. BASIC OPERATION Before performing the following operations, press KSIRIUS on the remote control and then press MMENU to display. 2 Press 8n to select "MANUAL SETUP" and then press 8ENTER. 3 Press 8n repeatedly to select "INPUT MENU" and then press 8ENTER. Setting the SIRIUS Satellite Radio™ preset channels You can...

Owner's Manual
Page 70
... step 8 and then proceed the operations. 6 Enter the desired 4-digit code number by using the numeric buttons (G) or press TENT to exit from the setup menu. This unit is tuned into the last channel you select in the list. 10 Press 8ENTER to this unit is locked, this unit, "Not... channel category and then press 8k / n repeatedly to select the channel you want to change the Parental lock code number, use "SR PIN" in "ADVANCED SETUP" to select "SIRIUS" and then press 8ENTER. y Press 9RETURN to return the previous menu level without setting the code number. 7 Press 8ENTER to select "...
... step 8 and then proceed the operations. 6 Enter the desired 4-digit code number by using the numeric buttons (G) or press TENT to exit from the setup menu. This unit is tuned into the last channel you select in the list. 10 Press 8ENTER to this unit is locked, this unit, "Not... channel category and then press 8k / n repeatedly to select the channel you want to change the Parental lock code number, use "SR PIN" in "ADVANCED SETUP" to select "SIRIUS" and then press 8ENTER. y Press 9RETURN to return the previous menu level without setting the code number. 7 Press 8ENTER to select "...


