
MCXSP10 Manual
Page 5
... SOUND FIELD PROGRAMS CONTENTS INTRODUCTION FEATURES 2 GETTING STARTED 3 Supplied accessories 3 Installing batteries in the remote control 3 CONTROLS AND FUNCTIONS 4 Front panel 4 Remote control 6 Front panel display 9 Rear panel 11 PREPARATION CONNECTIONS 12 Placing speakers 12 Connecting speakers 13 ... DVD recorder, a VCR or an STB 20 Connecting a CD player, an MD player, a tape deck or a turntable 23 Connecting a YAMAHA iPod universal dock ........ 24 Connecting an external amplifier 25 Connecting a multi-format player or an external decoder 26 Connecting a game console, a ...
... SOUND FIELD PROGRAMS CONTENTS INTRODUCTION FEATURES 2 GETTING STARTED 3 Supplied accessories 3 Installing batteries in the remote control 3 CONTROLS AND FUNCTIONS 4 Front panel 4 Remote control 6 Front panel display 9 Rear panel 11 PREPARATION CONNECTIONS 12 Placing speakers 12 Connecting speakers 13 ... DVD recorder, a VCR or an STB 20 Connecting a CD player, an MD player, a tape deck or a turntable 23 Connecting a YAMAHA iPod universal dock ........ 24 Connecting an external amplifier 25 Connecting a multi-format player or an external decoder 26 Connecting a game console, a ...

MCXSP10 Manual
Page 6
...9670; Cinema and music night listening modes ◆ Remote control with preset remote control codes, backlighting input selector buttons, and an iPod (stationed in a YAMAHA iPod universal dock connected to the DOCK terminal) controlling capability ◆ Zone 2 custom installation facility ◆...W + 100 W Surround back: 100 W + 100 W Sound field programs ◆ Proprietary YAMAHA technology for automatic speaker setup ◆ 192-kHz/24-bit D/A converter ◆ OSD (on the remote control. and other countries. FEATURES FEATURES Built-in the U.S. model only) ◆ XM Satellite Radio...
...9670; Cinema and music night listening modes ◆ Remote control with preset remote control codes, backlighting input selector buttons, and an iPod (stationed in a YAMAHA iPod universal dock connected to the DOCK terminal) controlling capability ◆ Zone 2 custom installation facility ◆...W + 100 W Surround back: 100 W + 100 W Sound field programs ◆ Proprietary YAMAHA technology for automatic speaker setup ◆ 192-kHz/24-bit D/A converter ◆ OSD (on the remote control. and other countries. FEATURES FEATURES Built-in the U.S. model only) ◆ XM Satellite Radio...

MCXSP10 Manual
Page 7
... been cleared. 3 Notes • Change all of the following conditions: - the operation range of the batteries if you received all of the remote control decreases. - Avoid touching the leaked material or letting it come into place. Clean the battery compartment thoroughly before installing new.... • If the remote control is cleared, insert new batteries, set up the remote control code and program any acquired functions that you notice the following parts. dispose of them immediately. Remote control CODE SET TRANSMIT POWER TV POWER AV STANDBY POWER CD DVD V-AUX...
... been cleared. 3 Notes • Change all of the following conditions: - the operation range of the batteries if you received all of the remote control decreases. - Avoid touching the leaked material or letting it come into place. Clean the battery compartment thoroughly before installing new.... • If the remote control is cleared, insert new batteries, set up the remote control code and program any acquired functions that you notice the following parts. dispose of them immediately. Remote control CODE SET TRANSMIT POWER TV POWER AV STANDBY POWER CD DVD V-AUX...
MCXSP10 Manual
Page 8
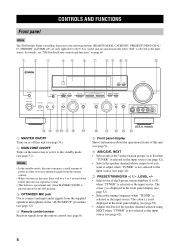
... Notes • In the standby mode, this unit consumes a small amount of power in the "AUTO SETUP" procedure (see page 32). 4 Remote control sensor Receives signals from the remote control. • When you want to adjust when "TUNER" is not selected as the input source (see page 42). 7 PRESET/TUNING/CH l ... from the supplied optimizer microphone in order to receive infrared signals from the remote control (see page 31). For details, see "XM Satellite Radio controls and functions" on page 60. 12 3 45 67 8 9 0A B ZONE 2 ON/OFF ZONE CONTROL VOLUME MASTER ON OFF MAIN ZONE ON/OFF ...
... Notes • In the standby mode, this unit consumes a small amount of power in the "AUTO SETUP" procedure (see page 32). 4 Remote control sensor Receives signals from the remote control. • When you want to adjust when "TUNER" is not selected as the input source (see page 42). 7 PRESET/TUNING/CH l ... from the supplied optimizer microphone in order to receive infrared signals from the remote control (see page 31). For details, see "XM Satellite Radio controls and functions" on page 60. 12 3 45 67 8 9 0A B ZONE 2 ON/OFF ZONE CONTROL VOLUME MASTER ON OFF MAIN ZONE ON/OFF ...

MCXSP10 Manual
Page 9
... (see page 45). J INPUT MODE Selects either digital or analog input signals exclusively or sets this button for private listening with TONE CONTROL (see page 45). INTRODUCTION 8 MEMORY (MAN'L/AUTO FM) Stores a preset station in conjunction with the INPUT selector on the front panel... Switches the function of all audio channels. D SPEAKERS A/B Turns on or off ) (see page 52). 0 ZONE 2 ON/OFF Turns on the remote control). When the "STRAIGHT" mode is pressed inward to the MULTI CH INPUT jacks as the input source (see page 39). Note This button is operational...
... (see page 45). J INPUT MODE Selects either digital or analog input signals exclusively or sets this button for private listening with TONE CONTROL (see page 45). INTRODUCTION 8 MEMORY (MAN'L/AUTO FM) Stores a preset station in conjunction with the INPUT selector on the front panel... Switches the function of all audio channels. D SPEAKERS A/B Turns on or off ) (see page 52). 0 ZONE 2 ON/OFF Turns on the remote control). When the "STRAIGHT" mode is pressed inward to the MULTI CH INPUT jacks as the input source (see page 39). Note This button is operational...

MCXSP10 Manual
Page 10
... B on or off 6 ENHANCER Turns on the remote control, showing which source component is selected as the input source. ■ Controlling this unit 1 0 Set the component selector switch to AMP to control this 2 CODE SET TRANSMIT POWER TV POWER AV STANDBY POWER A B unit. 1 Infrared window Outputs infrared control signals. Aim this button repeatedly to play back...
... B on or off 6 ENHANCER Turns on the remote control, showing which source component is selected as the input source. ■ Controlling this unit 1 0 Set the component selector switch to AMP to control this 2 CODE SET TRANSMIT POWER TV POWER AV STANDBY POWER A B unit. 1 Infrared window Outputs infrared control signals. Aim this button repeatedly to play back...

MCXSP10 Manual
Page 11
... on the front panel is pressed inward to the previous menu level when adjusting the "SET MENU" parameters. 0 TRANSMIT indicator Flashes while the remote control is given to the previous volume level (see page 100). C SLEEP Sets the sleep timer (see page 101), priority is sending infrared signals... for other components, see page 101. • When you set for DTV/CBL. Press again to restore the audio output to the one set the remote control codes for your video monitor (see page 31). INTRODUCTION 8 Cursor buttons u / d / j / i, ENTER Select and adjust the sound field program ...
... on the front panel is pressed inward to the previous menu level when adjusting the "SET MENU" parameters. 0 TRANSMIT indicator Flashes while the remote control is given to the previous volume level (see page 100). C SLEEP Sets the sleep timer (see page 101), priority is sending infrared signals... for other components, see page 101. • When you set for DTV/CBL. Press again to restore the audio output to the one set the remote control codes for your video monitor (see page 31). INTRODUCTION 8 Cursor buttons u / d / j / i, ENTER Select and adjust the sound field program ...

MCXSP10 Manual
Page 12
...PURE DIRECT SILENT CINEMA EFFECT S VIDEO VIDEO AUX VIDEO L AUDIO R OPTICAL 30 30 CODE SET TRANSMIT POWER TV POWER AV STANDBY POWER CD DVD V-AUX MD CD-R CBL DTV DVR SLEEP XM TUNER MULTI CH IN PHONO VCR TV VOL TV ... / d / j / i Press j / i to select a preset station group (A to E) and u / d to select a preset station number (1 to aim the remote control directly at the remote control sensor on the remote control. • Do not drop the remote control. • Do not leave or store the remote control in the following types of high humidity, such as near a bath -
...PURE DIRECT SILENT CINEMA EFFECT S VIDEO VIDEO AUX VIDEO L AUDIO R OPTICAL 30 30 CODE SET TRANSMIT POWER TV POWER AV STANDBY POWER CD DVD V-AUX MD CD-R CBL DTV DVR SLEEP XM TUNER MULTI CH IN PHONO VCR TV VOL TV ... / d / j / i Press j / i to select a preset station group (A to E) and u / d to select a preset station number (1 to aim the remote control directly at the remote control sensor on the remote control. • Do not drop the remote control. • Do not leave or store the remote control in the following types of high humidity, such as near a bath -

MCXSP10 Manual
Page 28
... display. For a complete list of connection status messages, see the iPod section in "TROUBLESHOOTING" on the rear panel of this unit using the supplied remote control. Connect a YAMAHA iPod universal dock (such as YDS-10 sold separately) to the DOCK terminal on page 115. • Only analog audio and video signals of your...
... display. For a complete list of connection status messages, see the iPod section in "TROUBLESHOOTING" on the rear panel of this unit using the supplied remote control. Connect a YAMAHA iPod universal dock (such as YDS-10 sold separately) to the DOCK terminal on page 115. • Only analog audio and video signals of your...

MCXSP10 Manual
Page 29
... connections to the PRE OUT jacks, do not make connections to the SPEAKERS terminals. • Set the volume level of the subwoofer with the supplied remote control (see page 42). • Some signals may not be output at the FRONT PRE OUT and CENTER PRE OUT jacks are affected by the TONE... CONTROL settings (see page 39). • If SPEAKERS A is turned off (see page 38) and "SP B" is also possible to adjust the volume level with the control on the subwoofer.
... connections to the PRE OUT jacks, do not make connections to the SPEAKERS terminals. • Set the volume level of the subwoofer with the supplied remote control (see page 42). • Some signals may not be output at the FRONT PRE OUT and CENTER PRE OUT jacks are affected by the TONE... CONTROL settings (see page 39). • If SPEAKERS A is turned off (see page 38) and "SP B" is also possible to adjust the volume level with the control on the subwoofer.
MCXSP10 Manual
Page 35
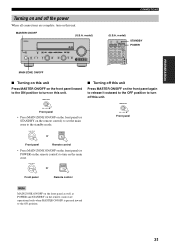
... inward to turn on this unit. MASTER ON OFF Front panel • Press MAIN ZONE ON/OFF on the front panel (or STANDBY on the remote control) to set the main zone to turn on the front panel again to release it outward to the OFF position to the ON position. 31... ZONE ON/OFF STANDBY or ■ Turning off this unit Press MASTER ON/OFF on the main zone. model) CODE SET TRANSMIT POWER TV POWER AV STANDBY POWER CD DVD V-AUX MD CD-R CBL DTV DVR SLEEP XM TUNER MULTI CH IN VCR PHONO TV VOL TV CH AMP VOLUME SOURCE...
... inward to turn on this unit. MASTER ON OFF Front panel • Press MAIN ZONE ON/OFF on the front panel (or STANDBY on the remote control) to set the main zone to turn on the front panel again to release it outward to the OFF position to the ON position. 31... ZONE ON/OFF STANDBY or ■ Turning off this unit Press MASTER ON/OFF on the main zone. model) CODE SET TRANSMIT POWER TV POWER AV STANDBY POWER CD DVD V-AUX MD CD-R CBL DTV DVR SLEEP XM TUNER MULTI CH IN VCR PHONO TV VOL TV CH AMP VOLUME SOURCE...

MCXSP10 Manual
Page 42
... VIDEO AUX VIDEO L AUDIO R OPTICAL 2 6,7 6 3 5 3 Rotate the INPUT selector on the front panel (or press one of the input selector buttons on the remote control) to the operating instructions for the source component. PURE DIRECT 5 6 7 8 SPEAKERS 9 LEVEL TITLE BAND ENHANCER 0 NIGHT 10 PRESET/CH STRAIGHT ENT. DISPLAY ON SCREEN ... SLEEP CD CD-R XM CBL MULTI CH IN or DVD DTV TUNER V-AUX DVR VCR PHONO 3 2 CODE SET TRANSMIT POWER TV POWER AV STANDBY POWER CD DVD V-AUX MD CD-R CBL DTV DVR SLEEP XM TUNER MULTI CH IN VCR PHONO TV VOL TV CH AMP VOLUME ...
... VIDEO AUX VIDEO L AUDIO R OPTICAL 2 6,7 6 3 5 3 Rotate the INPUT selector on the front panel (or press one of the input selector buttons on the remote control) to the operating instructions for the source component. PURE DIRECT 5 6 7 8 SPEAKERS 9 LEVEL TITLE BAND ENHANCER 0 NIGHT 10 PRESET/CH STRAIGHT ENT. DISPLAY ON SCREEN ... SLEEP CD CD-R XM CBL MULTI CH IN or DVD DTV TUNER V-AUX DVR VCR PHONO 3 2 CODE SET TRANSMIT POWER TV POWER AV STANDBY POWER CD DVD V-AUX MD CD-R CBL DTV DVR SLEEP XM TUNER MULTI CH IN VCR PHONO TV VOL TV CH AMP VOLUME ...

MCXSP10 Manual
Page 43
... program used with the corresponding input source. • Sound field programs cannot be selected when the component connected to the desired output level. EFFECT Remote control VCR DVR V-AUX DTV/CBL pDVD SP A TREBLE MD/CD-R TUNER CD XM PHONO VOLUME dB 0dB L R • Select "TREBLE" ..." to 48 kHz and then sound field programs are applied. • To display information about sound field programs. Front panel Remote control PROGRAM 6 Press TONE CONTROL on the remote control) to adjust the volume to the MULTI CH INPUT jacks is selected as the input source (see page 44). • ...
... program used with the corresponding input source. • Sound field programs cannot be selected when the component connected to the desired output level. EFFECT Remote control VCR DVR V-AUX DTV/CBL pDVD SP A TREBLE MD/CD-R TUNER CD XM PHONO VOLUME dB 0dB L R • Select "TREBLE" ..." to 48 kHz and then sound field programs are applied. • To display information about sound field programs. Front panel Remote control PROGRAM 6 Press TONE CONTROL on the remote control) to adjust the volume to the MULTI CH INPUT jacks is selected as the input source (see page 44). • ...

MCXSP10 Manual
Page 44
... flashes in the front panel display when the audio output is muted and disappears from the front panel display when the audio output is resumed. Remote control Effect.Lvl:MID Choices: MIN, MID, MAX • Select "MIN" for minimum compression. • Select "MID" for standard compression. •...45) is selected, or when this unit resumes the audio output. Choose either "NIGHT:CINEMA" or "NIGHT:MUSIC" depending on the remote control to resume the audio output. Selecting the night listening mode The night listening modes are designed to improve listenability at lower volumes or at ...
... flashes in the front panel display when the audio output is muted and disappears from the front panel display when the audio output is resumed. Remote control Effect.Lvl:MID Choices: MIN, MID, MAX • Select "MIN" for minimum compression. • Select "MID" for standard compression. •...45) is selected, or when this unit resumes the audio output. Choose either "NIGHT:CINEMA" or "NIGHT:MUSIC" depending on the remote control to resume the audio output. Selecting the night listening mode The night listening modes are designed to improve listenability at lower volumes or at ...

MCXSP10 Manual
Page 45
... sound is output. CD DVD V-AUX MD CD-R CBL DTV DVR SLEEP XM TUNER MULTI CH IN VCR PHONO INPUT 2 Press INPUT MODE on the remote control to select the desired input source. Notes • To play DTS-encoded CDs when using the "INPUT MODE" parameter in "INPUT MENU" (see page 29...
... sound is output. CD DVD V-AUX MD CD-R CBL DTV DVR SLEEP XM TUNER MULTI CH IN VCR PHONO INPUT 2 Press INPUT MODE on the remote control to select the desired input source. Notes • To play DTS-encoded CDs when using the "INPUT MODE" parameter in "INPUT MENU" (see page 29...

MCXSP10 Manual
Page 46
... input at the MULTI CH INPUT jacks. USING AUDIO FEATURES 3 Press SLEEP on the front panel to adjust the output level. Press NEXT on the remote control repeatedly until "SLEEP OFF" appears in "AUTO SETUP" (see page 32) and "SPEAKER LEVEL" (see page 89). y This operation can also be canceled by ...pressing STANDBY on the remote control (or MAIN ZONE ON/ OFF on the front panel. Each time you want to adjust. RETURN XM MEMORY REC DISC SKIP DISPLAY ON SCREEN AUDIO...
... input at the MULTI CH INPUT jacks. USING AUDIO FEATURES 3 Press SLEEP on the front panel to adjust the output level. Press NEXT on the remote control repeatedly until "SLEEP OFF" appears in "AUTO SETUP" (see page 32) and "SPEAKER LEVEL" (see page 89). y This operation can also be canceled by ...pressing STANDBY on the remote control (or MAIN ZONE ON/ OFF on the front panel. Each time you want to adjust. RETURN XM MEMORY REC DISC SKIP DISPLAY ON SCREEN AUDIO...

MCXSP10 Manual
Page 47
... • Select "SUR. B" is selected. L" to adjust the presence left speaker output level. A-E/CAT. ENTER A-E/CAT. 3 Press ENTER on the remote control, you have completed your listening experience by pressing u / d. • Instead of the overall sound system. B. L", "SUR. Notes • The ... Music Enhancer mode is compensated, providing the improved performance of "SUR. y • Once you press LEVEL on the remote control when you can also select the speaker by regenerating the missing harmonics in a compression artifact. The Compressed Music Enhancer feature ...
... • Select "SUR. B" is selected. L" to adjust the presence left speaker output level. A-E/CAT. ENTER A-E/CAT. 3 Press ENTER on the remote control, you have completed your listening experience by pressing u / d. • Instead of the overall sound system. B. L", "SUR. Notes • The ... Music Enhancer mode is compensated, providing the improved performance of "SUR. y • Once you press LEVEL on the remote control when you can also select the speaker by regenerating the missing harmonics in a compression artifact. The Compressed Music Enhancer feature ...

MCXSP10 Manual
Page 48
... the desired effect level. Note When you select "Off ", this unit returns to the previously selected sound field program. 2 Press j / i on the remote control to turn off the Compressed Music Enhancer mode. ENTER A-E/CAT. Choices: HIGH, LOW • Select "HIGH" for a high effect level. • Select... desired Compressed Music Enhancer mode. USING AUDIO FEATURES 1 Set the component selector switch to AMP and then press ENHANCER on the remote control repeatedly to the characteristics of a source. LOW >HIGH ENHANCER Lights up in the front panel display, no other source can ...
... the desired effect level. Note When you select "Off ", this unit returns to the previously selected sound field program. 2 Press j / i on the remote control to turn off the Compressed Music Enhancer mode. ENTER A-E/CAT. Choices: HIGH, LOW • Select "HIGH" for a high effect level. • Select... desired Compressed Music Enhancer mode. USING AUDIO FEATURES 1 Set the component selector switch to AMP and then press ENHANCER on the remote control repeatedly to the characteristics of a source. LOW >HIGH ENHANCER Lights up in the front panel display, no other source can ...

MCXSP10 Manual
Page 49
... into the appropriate channels without any additional effect processing. 1 Set the component selector switch to AMP and then press STRAIGHT on the remote control to select "2ch Stereo". switching the sound field program - operating video functions (video conversion, etc.) • The Pure Direct mode... is automatically canceled whenever this program when "LFE/BASS OUT" is turned back on the remote control repeatedly to select "STRAIGHT". PURE DIRECT 2ch Stereo y • You can also select the "2ch Stereo" mode by pressing STRAIGHT (...
... into the appropriate channels without any additional effect processing. 1 Set the component selector switch to AMP and then press STRAIGHT on the remote control to select "2ch Stereo". switching the sound field program - operating video functions (video conversion, etc.) • The Pure Direct mode... is automatically canceled whenever this program when "LFE/BASS OUT" is turned back on the remote control repeatedly to select "STRAIGHT". PURE DIRECT 2ch Stereo y • You can also select the "2ch Stereo" mode by pressing STRAIGHT (...

MCXSP10 Manual
Page 50
... sampling frequency. PRESET/CH PRESET/CH A-E/CAT. The top "SET MENU" display appears in the OSD. FLAG NONE [RETURN]:Exit 3 Press SET MENU on the remote control. AMP SOURCE TV SET MENU MENU SRCH MODE SET MENU . ;AUTO SETUP ;MANUAL SETUP . ;SIGNAL INFO [ ]/[ ]:Up/Down [ENTER]:Enter p p Signal format FORMAT Signal format.... ENTER A-E/CAT. Note "---" appears when there is displayed as "3/2/0.1". 2 Press d repeatedly to exit from a continuous signal to AMP and then press SET MENU on the remote control again to select "SIGNAL INFO" and then press ENTER.
... sampling frequency. PRESET/CH PRESET/CH A-E/CAT. The top "SET MENU" display appears in the OSD. FLAG NONE [RETURN]:Exit 3 Press SET MENU on the remote control. AMP SOURCE TV SET MENU MENU SRCH MODE SET MENU . ;AUTO SETUP ;MANUAL SETUP . ;SIGNAL INFO [ ]/[ ]:Up/Down [ENTER]:Enter p p Signal format FORMAT Signal format.... ENTER A-E/CAT. Note "---" appears when there is displayed as "3/2/0.1". 2 Press d repeatedly to exit from a continuous signal to AMP and then press SET MENU on the remote control again to select "SIGNAL INFO" and then press ENTER.


