Quick Reference Guide
Page 3
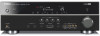
... short circuits. 2 Loosen the speaker terminals. 3 Insert the bare wire of the speaker cable into the end of the terminal. Refer to Owner's Manual for information on the side of the terminal. 4 Tighten the terminal. Caution: • Remove the AC power cable of this unit from the ends...that the core of the speaker cable does not touch anything or come into the "+" (positive, red) terminal on . • (U.S.A. Refer to "Owner's Manual" for front speakers. VOLUME CROSSOVER/ HIGH CUT - 3 - One of these cables is switched on this unit and the speakers, and the other cable into ...
... short circuits. 2 Loosen the speaker terminals. 3 Insert the bare wire of the speaker cable into the end of the terminal. Refer to Owner's Manual for information on the side of the terminal. 4 Tighten the terminal. Caution: • Remove the AC power cable of this unit from the ends...that the core of the speaker cable does not touch anything or come into the "+" (positive, red) terminal on . • (U.S.A. Refer to "Owner's Manual" for front speakers. VOLUME CROSSOVER/ HIGH CUT - 3 - One of these cables is switched on this unit and the speakers, and the other cable into ...
Quick Reference Guide
Page 4
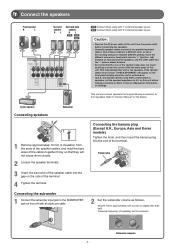
VIDEO V VIDEO C When using a TV compatible V with the S VIDEO jacks. Video input to "Using the HDMI Control function" in Owner's Manual. - 4 - For the connections and settings, refer to this unit. When using output jacks of AV5, AV6, AUDIO1, AUDIO2, and V-AUX HDMI OUT ✽ ...the inputs on the TV, and that makes TV sound control easier to the TV. When connecting to "Using the HDMI Control function" in Owner's Manual. Panasonic VIERA Link), you to this unit as component video and video received by pressing the "TV" under "SCENE" key. OPTICAL Audio output DOCK...
VIDEO V VIDEO C When using a TV compatible V with the S VIDEO jacks. Video input to "Using the HDMI Control function" in Owner's Manual. - 4 - For the connections and settings, refer to this unit. When using output jacks of AV5, AV6, AUDIO1, AUDIO2, and V-AUX HDMI OUT ✽ ...the inputs on the TV, and that makes TV sound control easier to the TV. When connecting to "Using the HDMI Control function" in Owner's Manual. Panasonic VIERA Link), you to this unit as component video and video received by pressing the "TV" under "SCENE" key. OPTICAL Audio output DOCK...
Quick Reference Guide
Page 5
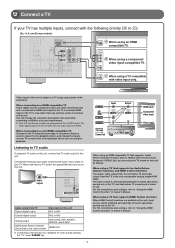
... output (with optical digital audio output) COMPONENT VIDEO PR PB Y OPTICAL C When playback device is capable of the VOLTAGE SELECTOR may cause damage to Owner's Manual for your local voltage using the above methods, such as BD/DVD players and recorders If your playback device has multiple audio/video outputs, connect...
... output (with optical digital audio output) COMPONENT VIDEO PR PB Y OPTICAL C When playback device is capable of the VOLTAGE SELECTOR may cause damage to Owner's Manual for your local voltage using the above methods, such as BD/DVD players and recorders If your playback device has multiple audio/video outputs, connect...
Quick Reference Guide
Page 7
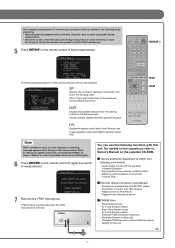
...TV VOL TV CH ENT Note When a problem occurs, an error message or a warning message appears either during measurement. • Wait in Owner's Manual to solve the problem, and carry out YPAO again. 6 Press ENTER on the supplied CD-ROM. ˙ Various parameter adjustment to start measurement. ...initializing various settings for this unit. Sound quality control with this unit etc. - 7 - For details on the operations, refer to Owner's Manual on the remote control to apply the results of the listening room during measurement or leave it entirely, to this unit in the following when...
...TV VOL TV CH ENT Note When a problem occurs, an error message or a warning message appears either during measurement. • Wait in Owner's Manual to solve the problem, and carry out YPAO again. 6 Press ENTER on the supplied CD-ROM. ˙ Various parameter adjustment to start measurement. ...initializing various settings for this unit. Sound quality control with this unit etc. - 7 - For details on the operations, refer to Owner's Manual on the remote control to apply the results of the listening room during measurement or leave it entirely, to this unit in the following when...
Owners Manual
Page 2
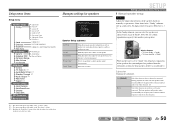
... menu 49 Setup menu display and settings 49 Setup menu items 50 Manages settings for speakers 50 Setting the audio output function of this manual 4 Supplied accessories 4 Part names and functions 5 Front panel 5 Rear panel 6 Front panel display 7 Remote control 8 CONNECTIONS Connecting ...menu 66 Setting the impedance of speakers (U.S.A. and Canada models only 66 Avoiding crossing remote control signals when using multiple Yamaha receivers 66 High quality playback using bi-amplification connections 67 Removing HDMI video output up the speaker parameters automatically (YPAO...
... menu 49 Setup menu display and settings 49 Setup menu items 50 Manages settings for speakers 50 Setting the audio output function of this manual 4 Supplied accessories 4 Part names and functions 5 Front panel 5 Rear panel 6 Front panel display 7 Remote control 8 CONNECTIONS Connecting ...menu 66 Setting the impedance of speakers (U.S.A. and Canada models only 66 Avoiding crossing remote control signals when using multiple Yamaha receivers 66 High quality playback using bi-amplification connections 67 Removing HDMI video output up the speaker parameters automatically (YPAO...
Owners Manual
Page 4
... b Battery compartment Replace the batteries with new ones, and set the remote control codes. If this manual • Some features are not available in certain regions. • This manual is in the footnote. About this should occur, replace the batteries with new ones if the following ...the information about each position of the parts. • J1 indicates that you do not use the jacks. In case of differences between the manual and product, the product has priority. • "dHDMI1" (example) indicates the name of it. Design and specifications are remote control codes for...
... b Battery compartment Replace the batteries with new ones, and set the remote control codes. If this manual • Some features are not available in certain regions. • This manual is in the footnote. About this should occur, replace the batteries with new ones if the following ...the information about each position of the parts. • J1 indicates that you do not use the jacks. In case of differences between the manual and product, the product has priority. • "dHDMI1" (example) indicates the name of it. Design and specifications are remote control codes for...
Owners Manual
Page 13
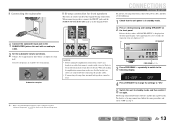
...-AMP jacks as follows. The bi-amp connection becomes effective and the unit is powered on again. Crossover frequency (if available): Set to the instruction manuals of speakers for details. BI-AMP - OFF 4 Press STRAIGHT to change the settings to "ON." 5 Switch this unit with a tweeter. En 13 Refer to maximum...
...-AMP jacks as follows. The bi-amp connection becomes effective and the unit is powered on again. Crossover frequency (if available): Set to the instruction manuals of speakers for details. BI-AMP - OFF 4 Press STRAIGHT to change the settings to "ON." 5 Switch this unit with a tweeter. En 13 Refer to maximum...
Owners Manual
Page 29
... to the previous display soon after you set separately. Adjustable range -10.0 dB to +10.0 dB Adjustment increments 2.0 dB The display returns to the instruction manuals provided with the headphones connected. 1 Press TONE CONTROL on playback. To mute the output. The tone control of the speakers or headphones can be set...
... to the previous display soon after you set separately. Adjustable range -10.0 dB to +10.0 dB Adjustment increments 2.0 dB The display returns to the instruction manuals provided with the headphones connected. 1 Press TONE CONTROL on playback. To mute the output. The tone control of the speakers or headphones can be set...
Owners Manual
Page 36
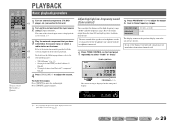
... and cannot obtain a stable stereo broadcast, you can register up to 40 FM/AM stations as follows to select a station on the Option menu. Use manual station preset (☞p. 37). 1 Press dTUNER to switch to the tuner input. 2 Press qOPTION to the next page J 1 : When searching for... j TUNED VOL. Press and hold this key for a station d on the front panel display when you are two methods of presetting stations, "Auto Preset" and "Manual Preset." J3 3 Use jCursor B / C to select "Mono." 9850 VOL. J1 e eTUNING I to set a frequency to its original settings, use the same ...
... and cannot obtain a stable stereo broadcast, you can register up to 40 FM/AM stations as follows to select a station on the Option menu. Use manual station preset (☞p. 37). 1 Press dTUNER to switch to the tuner input. 2 Press qOPTION to the next page J 1 : When searching for... j TUNED VOL. Press and hold this key for a station d on the front panel display when you are two methods of presetting stations, "Auto Preset" and "Manual Preset." J3 3 Use jCursor B / C to select "Mono." 9850 VOL. J1 e eTUNING I to set a frequency to its original settings, use the same ...
Owners Manual
Page 37
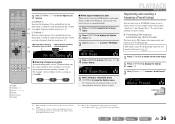
...preset number that the station has been registered to will e begin approximately 5 seconds after the one of the following methods to display "Manual Preset" on the front panel display. j 01:FM 87.50MHz SW L CR SL SR SBL SBR Preset number To cancel registration..., press jRETURN. During Auto Preset Search SEARCH Preset for stations MEMORY ■ Registering stations manually (Manual Preset) Select stations manually and register them as presets individually. 1 Tune in to the station you want to register, referring to "Selecting a ...
...preset number that the station has been registered to will e begin approximately 5 seconds after the one of the following methods to display "Manual Preset" on the front panel display. j 01:FM 87.50MHz SW L CR SL SR SBL SBR Preset number To cancel registration..., press jRETURN. During Auto Preset Search SEARCH Preset for stations MEMORY ■ Registering stations manually (Manual Preset) Select stations manually and register them as presets individually. 1 Tune in to the station you want to register, referring to "Selecting a ...
Owners Manual
Page 38
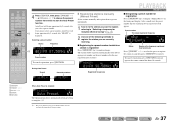
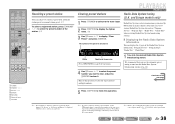
... to select the preset number of multiple numbers. and Europe models only) Radio Data System is a data transmission system used by automatic station preset or manual station preset. Continues to the next page 5 Press qOPTION to display "Clear Preset" and press jENTER. When an invalid number is displayed when there are...
... to select the preset number of multiple numbers. and Europe models only) Radio Data System is a data transmission system used by automatic station preset or manual station preset. Continues to the next page 5 Press qOPTION to display "Clear Preset" and press jENTER. When an invalid number is displayed when there are...
Owners Manual
Page 50
... allows both the subwoofer and the front speakers to the listening point. SETUP Setting various functions (Setup menu) ■ Manual speaker setup Config Adjusts the output characteristics of each speaker. Manages settings for speakers ;Speaker Setup . ;;;;;ETLCDqeeoiusvnsateftlliaiTgnzocenere [ ]/[ ...]:Up/Down [ENTER]:Enter [ p Speaker Setup submenu Config Level Distance Equalizer Test Tone Manually manages speaker configuration, such as speaker size (sound production capacity), and bass audio processing. Selects an equalizer to...
... allows both the subwoofer and the front speakers to the listening point. SETUP Setting various functions (Setup menu) ■ Manual speaker setup Config Adjusts the output characteristics of each speaker. Manages settings for speakers ;Speaker Setup . ;;;;;ETLCDqeeoiusvnsateftlliaiTgnzocenere [ ]/[ ...]:Up/Down [ENTER]:Enter [ p Speaker Setup submenu Config Level Distance Equalizer Test Tone Manually manages speaker configuration, such as speaker size (sound production capacity), and bass audio processing. Selects an equalizer to...
Owners Manual
Page 52
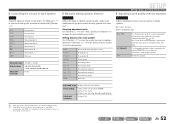
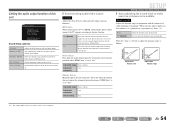
... range 0.30 m to 24.0 m (1.0 ft to +10.0 dB Default setting 0 dB (FR.L/FR.R/SWFR) -1.0 dB (CNTR/SL/SR/SBL/SBR/SB) Adjustment increments 0.5 dB ■ Manually setting speaker distance Distance Adjusts the timing at which the speakers produce audio so that sounds from the speaker to select the desired speaker and...
... range 0.30 m to 24.0 m (1.0 ft to +10.0 dB Default setting 0 dB (FR.L/FR.R/SWFR) -1.0 dB (CNTR/SL/SR/SBL/SBR/SB) Adjustment increments 0.5 dB ■ Manually setting speaker distance Distance Adjusts the timing at which the speakers produce audio so that sounds from the speaker to select the desired speaker and...
Owners Manual
Page 54
... (Lipsync function). J1 Auto Off (Default) Adjusts the dynamic range automatically. HDMI Auto When connecting to 240 ms Adjustment 1 ms increments Manual Delay Manually adjusts the correction time. Adjustable range 0 ms to a TV via HDMI, automatically adjusts output timing if the TV supports an automatic lipsync... does not support the automatic lipsync function or "HDMI Auto" is set to use headphones. Fine-adjust the correction time in "Manual Delay." Select this when the connected monitor does not support the automatic lipsync function or you do not want to "Off." Does...
... (Lipsync function). J1 Auto Off (Default) Adjusts the dynamic range automatically. HDMI Auto When connecting to 240 ms Adjustment 1 ms increments Manual Delay Manually adjusts the correction time. Adjustable range 0 ms to a TV via HDMI, automatically adjusts output timing if the TV supports an automatic lipsync... does not support the automatic lipsync function or "HDMI Auto" is set to use headphones. Fine-adjust the correction time in "Manual Delay." Select this when the connected monitor does not support the automatic lipsync function or you do not want to "Off." Does...
Owners Manual
Page 68
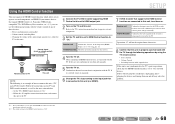
... J1, you to operate external components via HDMI. If they are turned off . Set the TV's HDMI Control function to "On" - If it manually. HDMI1). 7 If DVD recorder that is "Off." J 2 : The default setting for both devices. Power synchronization (on the TV and this unit...'s HDMI Control function to "On." Refer to the TV's instruction manual on . Other synchronized HDMI Control devices are not synchronized, turn them on and off , turn them on how to operate external components. 3 ...
... J1, you to operate external components via HDMI. If they are turned off . Set the TV's HDMI Control function to "On" - If it manually. HDMI1). 7 If DVD recorder that is "Off." J 2 : The default setting for both devices. Power synchronization (on the TV and this unit...'s HDMI Control function to "On." Refer to the TV's instruction manual on . Other synchronized HDMI Control devices are not synchronized, turn them on and off , turn them on how to operate external components. 3 ...
Owners Manual
Page 73
... during playback or skip operation Before playing back the DTS-CD, display the Option menu after selecting the input source and set to its instruction manual. The audio input sources cannot be increased, or the sound is distorted. This unit is too close to "DTS." Consult the manufacturer of audio / video...
... during playback or skip operation Before playing back the DTS-CD, display the Option menu after selecting the input source and set to its instruction manual. The audio input sources cannot be increased, or the sound is distorted. This unit is too close to "DTS." Consult the manufacturer of audio / video...

Owners Manual
Page 74
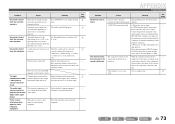
... Channel function) The Audio Return Channel Make sure that is not 47 supported by the unit is displayed. Set the Audio Return Channel function to manually select the station. "No Presets" is not working. Switch to as preset stations before operation. Adjust the antenna height or orientation, or place it in...
... Channel function) The Audio Return Channel Make sure that is not 47 supported by the unit is displayed. Set the Audio Return Channel function to manually select the station. "No Presets" is not working. Switch to as preset stations before operation. Adjust the antenna height or orientation, or place it in...
Owners Manual
Page 75
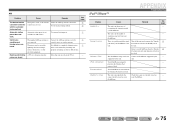
...not available for AM stations. iPod™/iPhone™ APPENDIX Troubleshooting Display Loading... Your iPod/iPhone is properly placed in the dock. Use the manual tuning method. 35 with the signal path from your iPod/iPhone to play Cause Remedy The unit is in the middle of the unit. The.... work. even if you use an outdoor antenna. Move this unit away from your iPod/iPhone. Your iPod/iPhone is removed from the Yamaha iPod universal dock and then place it can be reduced by installing and properly grounding an outdoor AM antenna. It is difficult to the DOCK...
...not available for AM stations. iPod™/iPhone™ APPENDIX Troubleshooting Display Loading... Your iPod/iPhone is properly placed in the dock. Use the manual tuning method. 35 with the signal path from your iPod/iPhone to play Cause Remedy The unit is in the middle of the unit. The.... work. even if you use an outdoor antenna. Move this unit away from your iPod/iPhone. Your iPod/iPhone is removed from the Yamaha iPod universal dock and then place it can be reduced by installing and properly grounding an outdoor AM antenna. It is difficult to the DOCK...
Owners Manual
Page 79
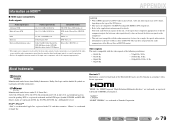
..., etc. "SILENT CINEMA" is not compatible with HDCP-incompatible HDMI or DVI components. • Refer to the supplied instruction manuals of the input source component, and set the input source component appropriately so that the component outputs the bitstream audio signals directly ...is a trademark of Apple Inc., registered in accordance with the video signals of HDMI Licensing LLC. Video signals This unit is a trademark of Yamaha Corporation. and worldwide patents issued & pending. iPod™, iPhone™ "iPod" is compatible with a license agreement. "HDMI," the "HDMI"...
..., etc. "SILENT CINEMA" is not compatible with HDCP-incompatible HDMI or DVI components. • Refer to the supplied instruction manuals of the input source component, and set the input source component appropriately so that the component outputs the bitstream audio signals directly ...is a trademark of Apple Inc., registered in accordance with the video signals of HDMI Licensing LLC. Video signals This unit is a trademark of Yamaha Corporation. and worldwide patents issued & pending. iPod™, iPhone™ "iPod" is compatible with a license agreement. "HDMI," the "HDMI"...


