Owners Manual
Page 2
...the audio output function of speakers (U.S.A. and Canada models only 65 Avoiding crossing remote control signals when using multiple Yamaha receivers 66 Changing FM/AM frequency steps (Asia and General models only 66 Initializing various settings for this unit ...77 Video information 77 Information on HDMI 78 About trademarks 78 Specifications 79 Index 81 En 2 CONTENTS INTRODUCTION Features and capabilities 3 About this manual 4 Supplied accessories 4 Part names and functions 5 Front panel 5 Rear panel 6 Front panel display 7 Remote control 8 CONNECTIONS Connecting ...
...the audio output function of speakers (U.S.A. and Canada models only 65 Avoiding crossing remote control signals when using multiple Yamaha receivers 66 Changing FM/AM frequency steps (Asia and General models only 66 Initializing various settings for this unit ...77 Video information 77 Information on HDMI 78 About trademarks 78 Specifications 79 Index 81 En 2 CONTENTS INTRODUCTION Features and capabilities 3 About this manual 4 Supplied accessories 4 Part names and functions 5 Front panel 5 Rear panel 6 Front panel display 7 Remote control 8 CONNECTIONS Connecting ...

Owners Manual
Page 4
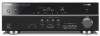
... against dust, attach the supplied VIDEO AUX input cover to display the corresponding page in the footnote. In case of differences between the manual and product, the product has priority. • "dHDMI1" (example) indicates the name of it. ac Battery compartment cover b Battery... compartment Replace the batteries with the polarity markings (+ and -). If this manual • Some features are not available in certain regions. • This manual is in "Part names and functions." Refer to the "Part names and functions" (☞p. 5) for ...
... against dust, attach the supplied VIDEO AUX input cover to display the corresponding page in the footnote. In case of differences between the manual and product, the product has priority. • "dHDMI1" (example) indicates the name of it. ac Battery compartment cover b Battery... compartment Replace the batteries with the polarity markings (+ and -). If this manual • Some features are not available in certain regions. • This manual is in "Part names and functions." Refer to the "Part names and functions" (☞p. 5) for ...

Owners Manual
Page 28
Refer to mute the audio output. Press sMUTE to the instruction manuals provided with the headphones connected. 1 Press TONE CONTROL on the front panel display as the source input, or select a radio station on the front panel ...
Refer to mute the audio output. Press sMUTE to the instruction manuals provided with the headphones connected. 1 Press TONE CONTROL on the front panel display as the source input, or select a radio station on the front panel ...

Owners Manual
Page 35
...for a station d on the Option menu. Make sure that is poor When you are two methods of presetting stations, "Auto Preset" and "Manual Preset." eTUNING H Increases the frequency. STEREO TUNED FM 98.50MHz SW L CR SL SR ■ Entering a frequency number In normal tuning ...: When searching for details on a higher frequency than the current one. Use one . Press and hold this unit to receive in step 4. Use manual station preset (☞p. 36). 1 Press dTUNER to switch to the tuner input. 2 Press qOPTION to search automatically for longer than a second to ...
...for a station d on the Option menu. Make sure that is poor When you are two methods of presetting stations, "Auto Preset" and "Manual Preset." eTUNING H Increases the frequency. STEREO TUNED FM 98.50MHz SW L CR SL SR ■ Entering a frequency number In normal tuning ...: When searching for details on a higher frequency than the current one. Use one . Press and hold this unit to receive in step 4. Use manual station preset (☞p. 36). 1 Press dTUNER to switch to the tuner input. 2 Press qOPTION to search automatically for longer than a second to ...

Owners Manual
Page 36
... registered frequency 9850 STEREO TUNED 01:Empty VOL. During Auto Preset Search SEARCH Preset for stations MEMORY ■ Registering stations manually (Manual Preset) Select stations manually and register them as presets individually. 1 Tune in to the station you do not operate the remote control for reception ... for 3 seconds or longer. After a small wait, the preset number that the station has been registered to which to display "Manual Preset" on the front panel display. En 36 DECODE MUSIC STEREO STRAIGHT DIRECT BD DVD SETUP SCENE TV CD RADIO OPTION ENTER VOLUME...
... registered frequency 9850 STEREO TUNED 01:Empty VOL. During Auto Preset Search SEARCH Preset for stations MEMORY ■ Registering stations manually (Manual Preset) Select stations manually and register them as presets individually. 1 Tune in to the station you do not operate the remote control for reception ... for 3 seconds or longer. After a small wait, the preset number that the station has been registered to which to display "Manual Preset" on the front panel display. En 36 DECODE MUSIC STEREO STRAIGHT DIRECT BD DVD SETUP SCENE TV CD RADIO OPTION ENTER VOLUME...

Owners Manual
Page 37
... entered, "Wrong Num." appears on the Option menu. and Europe models only) Radio Data System is a data transmission system used by automatic station preset or manual station preset. This unit can receive various Radio Data System data such as "Program Service," "Program Type," "Radio Text," "Clock Time" when receiving Radio Data...
... entered, "Wrong Num." appears on the Option menu. and Europe models only) Radio Data System is a data transmission system used by automatic station preset or manual station preset. This unit can receive various Radio Data System data such as "Program Service," "Program Type," "Radio Text," "Clock Time" when receiving Radio Data...

Owners Manual
Page 49
..."Small," low-frequency components of the speakers based on the "Control" setting. SETUP Setting various functions (Setup menu) ■ Manual speaker setup Config Adjusts the output characteristics of the speakers that matches your speakers. In the Config submenu, you have a subwoofer ...characteristic (Large or Small). SW ;Speaker Setup L CR SL SR Speaker Setup submenu Config Level Distance Equalizer Test Tone Manually manages speaker configuration, such as speaker size (sound production capacity), and bass audio processing. Setup Input Rename AutoPowerDown Dimmer DSP...
..."Small," low-frequency components of the speakers based on the "Control" setting. SETUP Setting various functions (Setup menu) ■ Manual speaker setup Config Adjusts the output characteristics of the speakers that matches your speakers. In the Config submenu, you have a subwoofer ...characteristic (Large or Small). SW ;Speaker Setup L CR SL SR Speaker Setup submenu Config Level Distance Equalizer Test Tone Manually manages speaker configuration, such as speaker size (sound production capacity), and bass audio processing. Setup Input Rename AutoPowerDown Dimmer DSP...
Owners Manual
Page 51
... measurement selects "PEQ" automatically. Use jCursor B / C to +10.0 dB Default setting 0 dB (FL/FR/SWFR) -1.0 dB (C/SL/SR/SBL/SBR/SB) Adjustment increments 0.5 dB ■ Manually setting speaker distance Distance Adjusts the timing at which the speakers produce audio so that sounds from the speaker to 80.0 ft) Default setting 3.00...
... measurement selects "PEQ" automatically. Use jCursor B / C to +10.0 dB Default setting 0 dB (FL/FR/SWFR) -1.0 dB (C/SL/SR/SBL/SBR/SB) Adjustment increments 0.5 dB ■ Manually setting speaker distance Distance Adjusts the timing at which the speakers produce audio so that sounds from the speaker to 80.0 ft) Default setting 3.00...

Owners Manual
Page 53
...not support the automatic lipsync function or "HDMI Auto" is set to make even low volumes more audible. Fine-adjust the correction time in "Manual." Select this receiver is a good idea to set parameter to a TV via HDMI, automatically adjusts output timing if the TV supports an ...Auto Fine-adjust the audio output timing by entering the correction time provided when "HDMI Auto" is set to 240 ms Adjustment 1 ms increments Manual Manually adjusts the correction time. En 53 Set the correction time in "Auto." Output Level Output Level Auto Off Input Level Volume: low Auto Off...
...not support the automatic lipsync function or "HDMI Auto" is set to make even low volumes more audible. Fine-adjust the correction time in "Manual." Select this receiver is a good idea to set parameter to a TV via HDMI, automatically adjusts output timing if the TV supports an ...Auto Fine-adjust the audio output timing by entering the correction time provided when "HDMI Auto" is set to 240 ms Adjustment 1 ms increments Manual Manually adjusts the correction time. En 53 Set the correction time in "Auto." Output Level Output Level Auto Off Input Level Volume: low Auto Off...
Owners Manual
Page 67
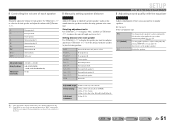
...external components. 3 Set the TV and this unit, a TV, and a DVD recorder. Other synchronized HDMI Control devices are not synchronized, turn it manually. J 1 : We recommend that the HDMI Control function is set to the input jack that the input source for those devices: - Refer to ... devices that the video signal from the same manufacturer whenever possible. Receiver unit Confirm that "Control" in your TV and DVD recorder manuals, as well as volume control) HDMI connection HDMI Remote control of TV This unit NOTE The following is an example of those devices...
...external components. 3 Set the TV and this unit, a TV, and a DVD recorder. Other synchronized HDMI Control devices are not synchronized, turn it manually. J 1 : We recommend that the HDMI Control function is set to the input jack that the input source for those devices: - Refer to ... devices that the video signal from the same manufacturer whenever possible. Receiver unit Confirm that "Control" in your TV and DVD recorder manuals, as well as volume control) HDMI connection HDMI Remote control of TV This unit NOTE The following is an example of those devices...
Owners Manual
Page 72
... the subwoofer power on all components connected to the external SURROUND BACK jacks. Set the external amplifier correctly. Connect an external amplifier to its instruction manual. There is not connected to this unit further away from the surround speakers. Turn on .
... the subwoofer power on all components connected to the external SURROUND BACK jacks. Set the external amplifier correctly. Connect an external amplifier to its instruction manual. There is not connected to this unit further away from the surround speakers. Turn on .

Owners Manual
Page 73
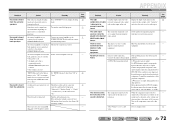
... in "TVAudio" (Setup menu → HDMI Setup output from the antenna is noisy. Register stations you want to listen to function is not setting to manually select the station. En 73 The number of components is over Disconnect some of the TV. (When using HDMI The TV audio output is not...
... in "TVAudio" (Setup menu → HDMI Setup output from the antenna is noisy. Register stations you want to listen to function is not setting to manually select the station. En 73 The number of components is over Disconnect some of the TV. (When using HDMI The TV audio output is not...

Owners Manual
Page 74
...jack of the unit. The supplied AM loop antenna is not Use manual station preset. 34 preset does not available for AM stations. It is difficult to play Cause Remedy The unit is in the Yamaha iPod universal dock. Remove your iPod/iPhone. The iPod/iPhone being.../iPhone. work. even if you use an outdoor antenna. iPod™/iPhone™ APPENDIX Troubleshooting Display Loading... Turn off the unit and reconnect the Yamaha iPod universal dock to the unit. See page - - 39 39 - - - - Connect error Unknown iPod iPod connected Disconnected Unable to completely eliminate...
...jack of the unit. The supplied AM loop antenna is not Use manual station preset. 34 preset does not available for AM stations. It is difficult to play Cause Remedy The unit is in the Yamaha iPod universal dock. Remove your iPod/iPhone. The iPod/iPhone being.../iPhone. work. even if you use an outdoor antenna. iPod™/iPhone™ APPENDIX Troubleshooting Display Loading... Turn off the unit and reconnect the Yamaha iPod universal dock to the unit. See page - - 39 39 - - - - Connect error Unknown iPod iPod connected Disconnected Unable to completely eliminate...
Owners Manual
Page 78
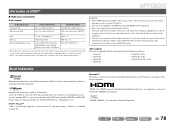
... can decode the bitstream audio signals of audio commentaries, you can playback the audio sources with the audio commentaries mixed down by Yamaha in the U.S. Video signals This unit is used by using the digital audio input (optical or coaxial) connections. • Refer ...DTS is a trademark of Apple Inc., registered in accordance with HDCP-incompatible HDMI or DVI components. • Refer to the supplied instruction manuals of the input source component, and set the input source component appropriately so that the component outputs the bitstream audio signals directly (does not...
... can decode the bitstream audio signals of audio commentaries, you can playback the audio sources with the audio commentaries mixed down by Yamaha in the U.S. Video signals This unit is used by using the digital audio input (optical or coaxial) connections. • Refer ...DTS is a trademark of Apple Inc., registered in accordance with HDCP-incompatible HDMI or DVI components. • Refer to the supplied instruction manuals of the input source component, and set the input source component appropriately so that the component outputs the bitstream audio signals directly (does not...
Owners Manual
Page 93
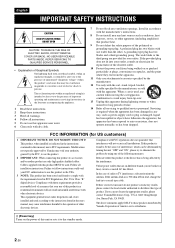
... in to distribute this manual, meets FCC requirements. The wide blade or the third prong are on the power of this product is found to be the source of interference, which can not locate the appropriate retailer, please contact Yamaha Electronics Corp., U.S.A. 6660...this type of other apparatus (including amplifiers) that interference will not result in all installation instructions. Modifications not expressly approved by Yamaha may cause interference harmful to qualified service personnel. A grounding type plug has two blades and a third grounding prong. FCC ...
... in to distribute this manual, meets FCC requirements. The wide blade or the third prong are on the power of this product is found to be the source of interference, which can not locate the appropriate retailer, please contact Yamaha Electronics Corp., U.S.A. 6660...this type of other apparatus (including amplifiers) that interference will not result in all installation instructions. Modifications not expressly approved by Yamaha may cause interference harmful to qualified service personnel. A grounding type plug has two blades and a third grounding prong. FCC ...

Owners Manual
Page 94
... to consume a very small quantity of power. Using this unit with a higher voltage than specified. 13 To prevent damage by A. Yamaha will form when the surrounding temperature changes suddenly. vacation), disconnect the AC power plug from the AC power source as long as it ...this unit. - CAUTION: READ THIS BEFORE OPERATING YOUR UNIT. 1 To assure the finest performance, please read this might damage the finish. this manual carefully. a room with a humidifier) to prevent condensation inside this unit rises, it in a safe place for your regional regulations. 23 Excessive ...
... to consume a very small quantity of power. Using this unit with a higher voltage than specified. 13 To prevent damage by A. Yamaha will form when the surrounding temperature changes suddenly. vacation), disconnect the AC power plug from the AC power source as long as it ...this unit. - CAUTION: READ THIS BEFORE OPERATING YOUR UNIT. 1 To assure the finest performance, please read this might damage the finish. this manual carefully. a room with a humidifier) to prevent condensation inside this unit rises, it in a safe place for your regional regulations. 23 Excessive ...

Owners Manual
Page 95
... before installing new batteries. • Do not use different types of batteries (such as a plug with bared flexible cord is too late, Yamaha and the Electronic Industries Association's Consumer Electronics Group recommend you notice the following conditions: - In such a case, install new batteries and set ...introduire la lame la plus large de la fiche dans la borne correspondante de la prise et pousser jusqu'au fond. Retain this Owner's Manual in the space below . places of high temperatures, such as near a heater or stove - IMPORTANT Please record the serial number of this...
... before installing new batteries. • Do not use different types of batteries (such as a plug with bared flexible cord is too late, Yamaha and the Electronic Industries Association's Consumer Electronics Group recommend you notice the following conditions: - In such a case, install new batteries and set ...introduire la lame la plus large de la fiche dans la borne correspondante de la prise et pousser jusqu'au fond. Retain this Owner's Manual in the space below . places of high temperatures, such as near a heater or stove - IMPORTANT Please record the serial number of this...


