
MCXSP10 Manual
Page 2
... - Refer all servicing to overturn. 10 Ventilation - All the safety and operating instructions should be equipped with care. Do not use attachments not recommended by the manufacturer. 9 A product and cart combination should be of sufficient magnitude to constitute a risk of the...If the product has been exposed to . 4 Follow Instructions - Any mounting of the product should follow the manufacturer's instructions, and should use instructions should be placed in a built-in the literature accompanying the appliance. 1 Read Instructions - If you to dangerous voltage or other...
... - Refer all servicing to overturn. 10 Ventilation - All the safety and operating instructions should be equipped with care. Do not use attachments not recommended by the manufacturer. 9 A product and cart combination should be of sufficient magnitude to constitute a risk of the...If the product has been exposed to . 4 Follow Instructions - Any mounting of the product should follow the manufacturer's instructions, and should use instructions should be placed in a built-in the literature accompanying the appliance. 1 Read Instructions - If you to dangerous voltage or other...

MCXSP10 Manual
Page 3
... of interference, which can not locate the appropriate retailer, please contact Yamaha Electronics Corp., U.S.A. 6660 Orangethorpe Ave, Buena Park, CA 90620. Adjust only those products distributed by the FCC, to use the product. 2 IMPORTANT: When connecting this product is connected to the... US customers) 1 IMPORTANT NOTICE: DO NOT MODIFY THIS UNIT! This equipment generates/uses radio frequencies and, if not installed and used . Utilize power outlets that your authority, granted by Yamaha Corporation of radio or TV interference, relocate/reorient the antenna. In the case of...
... of interference, which can not locate the appropriate retailer, please contact Yamaha Electronics Corp., U.S.A. 6660 Orangethorpe Ave, Buena Park, CA 90620. Adjust only those products distributed by the FCC, to use the product. 2 IMPORTANT: When connecting this product is connected to the... US customers) 1 IMPORTANT NOTICE: DO NOT MODIFY THIS UNIT! This equipment generates/uses radio frequencies and, if not installed and used . Utilize power outlets that your authority, granted by Yamaha Corporation of radio or TV interference, relocate/reorient the antenna. In the case of...

MCXSP10 Manual
Page 4
... by lightning, disconnect the AC power cable and disconnect the antenna cable when there is turned off. a room with chemical solvents; Use a clean, dry cloth. 12 Only voltage specified on the surface of your sensitive hearing. Cet appareil numérique de la classe...the back of plug to avoid prolonged exposure from other than specified is needed. Burning objects (i.e. This state is too late, YAMAHA and the Electronic Industries Association's Consumer Electronics Group recommend you to set for future reference. this manual carefully. vacation), disconnect the ...
... by lightning, disconnect the AC power cable and disconnect the antenna cable when there is turned off. a room with chemical solvents; Use a clean, dry cloth. 12 Only voltage specified on the surface of your sensitive hearing. Cet appareil numérique de la classe...the back of plug to avoid prolonged exposure from other than specified is needed. Burning objects (i.e. This state is too late, YAMAHA and the Electronic Industries Association's Consumer Electronics Group recommend you to set for future reference. this manual carefully. vacation), disconnect the ...

MCXSP10 Manual
Page 5
... 3 Installing batteries in the remote controls 4 CONTROLS AND FUNCTIONS 5 Front panel 5 Remote control 7 Zone 2/Zone 3 remote control 9 Using the remote controls 9 Front panel display 10 Rear panel 12 PREPARATION SPEAKER SETUP 13 Speaker placement 13 Speaker connections 15 CONNECTIONS 18 Before connecting... remote control codes 71 Programming codes from other remote controls (Learn 73 Changing source names in the display window....... 75 Using the Macro feature 76 Clearing function sets 78 Clearing individual functions 79 Controlling each component 81 ZONE 2/ZONE 3 82 Zone...
... 3 Installing batteries in the remote controls 4 CONTROLS AND FUNCTIONS 5 Front panel 5 Remote control 7 Zone 2/Zone 3 remote control 9 Using the remote controls 9 Front panel display 10 Rear panel 12 PREPARATION SPEAKER SETUP 13 Speaker placement 13 Speaker connections 15 CONNECTIONS 18 Before connecting... remote control codes 71 Programming codes from other remote controls (Learn 73 Changing source names in the display window....... 75 Using the Macro feature 76 Clearing function sets 78 Clearing individual functions 79 Controlling each component 81 ZONE 2/ZONE 3 82 Zone...
MCXSP10 Manual
Page 6
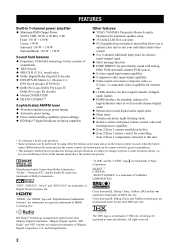
... are trademarks or registered trademarks of Dolby Laboratories. FEATURES FEATURES Built-in 7-channel power amplifier Other features ◆ Minimum RMS Output Power ◆ YPAO: YAMAHA Parametric Room Acoustic (0.04% THD, 20 Hz to 20 kHz, 8 Ω) Optimizer for automatic speaker setup Front: 130 W + 130 W ◆... Systems, Inc. Circle Surround , Dialog Clarity and TruBass technologies are trademarks of HDMI Licensing LLC. which may be performed by using either the buttons on the main unit or on the remote control is given in part as multi-channel digital audio ◆...
... are trademarks or registered trademarks of Dolby Laboratories. FEATURES FEATURES Built-in 7-channel power amplifier Other features ◆ Minimum RMS Output Power ◆ YPAO: YAMAHA Parametric Room Acoustic (0.04% THD, 20 Hz to 20 kHz, 8 Ω) Optimizer for automatic speaker setup Front: 130 W + 130 W ◆... Systems, Inc. Circle Surround , Dialog Clarity and TruBass technologies are trademarks of HDMI Licensing LLC. which may be performed by using either the buttons on the main unit or on the remote control is given in part as multi-channel digital audio ◆...

MCXSP10 Manual
Page 8
... range of the remote control decreases, the indicator does not flash, or its light or display window become dim. • Do not use old batteries together with general house waste; Avoid touching the leaked material or letting it snaps into contact with clothing, etc. dispose of ...together. Clean the battery compartment thoroughly before installing new batteries. • Do not throw away batteries with new ones. • Do not use different types of them immediately. If the remote control is cleared, insert new batteries, set up the remote control code and program any acquired ...
... range of the remote control decreases, the indicator does not flash, or its light or display window become dim. • Do not use old batteries together with general house waste; Avoid touching the leaked material or letting it snaps into contact with clothing, etc. dispose of ...together. Clean the battery compartment thoroughly before installing new batteries. • Do not throw away batteries with new ones. • Do not use different types of them immediately. If the remote control is cleared, insert new batteries, set up the remote control code and program any acquired ...

MCXSP10 Manual
Page 9
...ANALOG) when one of PRESET/TUNING l / h between automatic ("AUTO" indicator on the main unit only or sets it to the standby mode simultaneously using the remote control. Selects the tuning frequency when the unit is in the tuner mode and the colon (:) is displayed next to 44). 9 FM/AM...main unit can turn on the remote control). 5 A/B/C/D/E Selects one component is in the tuner mode. Hold down this unit (see pages 42 to receive infrared-signals from the remote control. • You can reproduce sound. When you want to listen to or watch. 3 AUDIO SELECT Toggles the ...
...ANALOG) when one of PRESET/TUNING l / h between automatic ("AUTO" indicator on the main unit only or sets it to the standby mode simultaneously using the remote control. Selects the tuning frequency when the unit is in the tuner mode and the colon (:) is displayed next to 44). 9 FM/AM...main unit can turn on the remote control). 5 A/B/C/D/E Selects one component is in the tuner mode. Hold down this unit (see pages 42 to receive infrared-signals from the remote control. • You can reproduce sound. When you want to listen to or watch. 3 AUDIO SELECT Toggles the ...

MCXSP10 Manual
Page 10
... adjust bass/treble balance (in the front panel display for private listening with the AUTO SETUP function (see page 83). C Remote control sensor Receives signals from the supplied microphone for the front left and right channels. F REC OUT/ZONE 2 Selects the source you want to the standby ...down to control the input or adjust the volume level for the currently selected zone flashes in conjunction with TONE CONTROL). G OPTIMIZER MIC jack Use to the speakers. K ZONE ON/OFF MAIN Turns on the rear panel each time the corresponding button is flashing, perform the desired operation...
... adjust bass/treble balance (in the front panel display for private listening with the AUTO SETUP function (see page 83). C Remote control sensor Receives signals from the supplied microphone for the front left and right channels. F REC OUT/ZONE 2 Selects the source you want to the standby ...down to control the input or adjust the volume level for the currently selected zone flashes in conjunction with TONE CONTROL). G OPTIMIZER MIC jack Use to the speakers. K ZONE ON/OFF MAIN Turns on the rear panel each time the corresponding button is flashing, perform the desired operation...

MCXSP10 Manual
Page 11
... OFF ON MACRO LEARN CLEAR RE-NAME R S t 1 Infrared window Outputs infrared control signals. A MACRO ON/OFF Turns the macro function on the remote control used to AMP. Press l / h to select a preset station group (A to E) when AMP/SOURCE/TV is set to SOURCE and the unit is set to ...control this unit. 1 2 3 POWER TV POWER AV STANDBY SYSTEM POWER A B AUDIO SELECT SLEEP PHONO TUNER CD MULTI CH IN V-AUX CBL/SAT MD/TAPE CD-R DTV VCR 1 DVR/VCR2 DVD C D E F G 4 5 6 7 8 9 0...
... OFF ON MACRO LEARN CLEAR RE-NAME R S t 1 Infrared window Outputs infrared control signals. A MACRO ON/OFF Turns the macro function on the remote control used to AMP. Press l / h to select a preset station group (A to E) when AMP/SOURCE/TV is set to SOURCE and the unit is set to ...control this unit. 1 2 3 POWER TV POWER AV STANDBY SYSTEM POWER A B AUDIO SELECT SLEEP PHONO TUNER CD MULTI CH IN V-AUX CBL/SAT MD/TAPE CD-R DTV VCR 1 DVR/VCR2 DVD C D E F G 4 5 6 7 8 9 0...
MCXSP10 Manual
Page 12
... PURE DIRECT Turns on or off PURE DIRECT mode (see page 38). N NIGHT Turns on or off the night listening modes (see page 38). S CLEAR Used to the previous volume level. F SLEEP Sets the sleep timer. I VOL +/- AMP: Set to this position to operate this position to operate the television. ... is pressed each time. D SYSTEM POWER Turns on . C STANDBY Sets this unit in the display window (see page 75). CONTROLS AND FUNCTIONS B MACRO Use to program a series of operations for the type of audio input jack (AUTO, i.LINK, HDMI, COAX/OPT, ANALOG) when one component is connected to...
... PURE DIRECT Turns on or off PURE DIRECT mode (see page 38). N NIGHT Turns on or off the night listening modes (see page 38). S CLEAR Used to the previous volume level. F SLEEP Sets the sleep timer. I VOL +/- AMP: Set to this position to operate this position to operate the television. ... is pressed each time. D SYSTEM POWER Turns on . C STANDBY Sets this unit in the display window (see page 75). CONTROLS AND FUNCTIONS B MACRO Use to program a series of operations for the type of audio input jack (AUTO, i.LINK, HDMI, COAX/OPT, ANALOG) when one component is connected to...

MCXSP10 Manual
Page 13
...stove - places of conditions: - MUTE DISPLAY ID1 ID2 ZONE 2 ZONE 3 2 3 4 5 6 7 8 9 0 A B 1 Infrared window Outputs infrared control signals. Using the remote controls The remote controls transmit a directional infrared ray. Increases or decreases the volume level. 7 MUTE Mutes the sound. places of this unit (see... L AUDIO R OPTICAL VIDEO/AUX TONE STRAIGHT CONTROL EFFECT PROGRAM PURE DIRECT VOLUME Approximately 6 m (20 ft) 30 30 POWER TV POWER AV STANDBY SYSTEM POWER A B AUDIO SELECT SLEEP PHONO TUNER CD MULTI CH IN V-AUX CBL/SAT MD/TAPE CD-R DTV VCR 1 DVR/VCR2...
...stove - places of conditions: - MUTE DISPLAY ID1 ID2 ZONE 2 ZONE 3 2 3 4 5 6 7 8 9 0 A B 1 Infrared window Outputs infrared control signals. Using the remote controls The remote controls transmit a directional infrared ray. Increases or decreases the volume level. 7 MUTE Mutes the sound. places of this unit (see... L AUDIO R OPTICAL VIDEO/AUX TONE STRAIGHT CONTROL EFFECT PROGRAM PURE DIRECT VOLUME Approximately 6 m (20 ft) 30 30 POWER TV POWER AV STANDBY SYSTEM POWER A B AUDIO SELECT SLEEP PHONO TUNER CD MULTI CH IN V-AUX CBL/SAT MD/TAPE CD-R DTV VCR 1 DVR/VCR2...
MCXSP10 Manual
Page 14
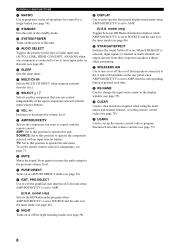
...Turns off when no HDMI component is tuned into the HD Radio reception band. H THX indicator Lights up when headphones are used without any of this unit is connected. E PCM indicator Lights up when this unit is selected. Presence DSP sound field Listening... indicators When any modifications. 9 AUTO indicator Lights up when this unit is in the automatic tuning mode. 0 STEREO indicator Lights up when this unit is receiving a stereo signal for an FM stereo broadcast while the AUTO indicator is connected. CONTROLS AND FUNCTIONS Front panel display 12 3 4 5 6 78 90 A...
...Turns off when no HDMI component is tuned into the HD Radio reception band. H THX indicator Lights up when headphones are used without any of this unit is connected. E PCM indicator Lights up when this unit is selected. Presence DSP sound field Listening... indicators When any modifications. 9 AUTO indicator Lights up when this unit is in the automatic tuning mode. 0 STEREO indicator Lights up when this unit is receiving a stereo signal for an FM stereo broadcast while the AUTO indicator is connected. CONTROLS AND FUNCTIONS Front panel display 12 3 4 5 6 78 90 A...

MCXSP10 Manual
Page 15
... Lights up when you select a HiFi DSP sound field program. T Input channel indicators Indicate the channel components of presence and/or surround back speakers when using the Auto Setup setting (page 27) or Speaker Level setting (page 65). N HiFi DSP indicator Lights up when the input signal contains an LFE signal...
... Lights up when you select a HiFi DSP sound field program. T Input channel indicators Indicate the channel components of presence and/or surround back speakers when using the Auto Setup setting (page 27) or Speaker Level setting (page 65). N HiFi DSP indicator Lights up when the input signal contains an LFE signal...
MCXSP10 Manual
Page 16
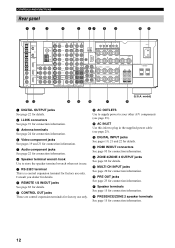
... jacks See page 82 for details. 9 CONTROL OUT jacks These are control expansion terminals for factory use only. 0 AC OUTLETS Use to supply power to plug in use. 7 RS-232C terminal This is a control expansion terminal for factory use only. A- +L CD-R OUT (REC) FRONT+ -B- + - CONTROLS AND FUNCTIONS Rear panel 12 3 4...See pages 19, 21 and 22 for details. E MULTI CH INPUT jacks See page 20 for connection information. 6 Speaker terminal wrench hook Use to store the speaker terminal wrench when not in the supplied power cable (see page 25). CENTER + CD PHONO FRONT(6CH)/SB(8CH)...
... jacks See page 82 for details. 9 CONTROL OUT jacks These are control expansion terminals for factory use only. 0 AC OUTLETS Use to supply power to plug in use. 7 RS-232C terminal This is a control expansion terminal for factory use only. A- +L CD-R OUT (REC) FRONT+ -B- + - CONTROLS AND FUNCTIONS Rear panel 12 3 4...See pages 19, 21 and 22 for details. E MULTI CH INPUT jacks See page 20 for connection information. 6 Speaker terminal wrench hook Use to store the speaker terminal wrench when not in the supplied power cable (see page 25). CENTER + CD PHONO FRONT(6CH)/SB(8CH)...

MCXSP10 Manual
Page 17
.... These effects include sounds that filmmakers intend to reduce wall reflections. The distance of the subwoofer is not practical to use it . They should be positioned at the same height as the YAMAHA Active Servo Processing Subwoofer System, is for effect and surround sounds. Place the speaker centrally between the front speakers...
.... These effects include sounds that filmmakers intend to reduce wall reflections. The distance of the subwoofer is not practical to use it . They should be positioned at the same height as the YAMAHA Active Servo Processing Subwoofer System, is for effect and surround sounds. Place the speaker centrally between the front speakers...

MCXSP10 Manual
Page 18
SPEAKER SETUP ■ Di-pole speaker layout Either di-pole or direct radiating speaker types can be used for THX surround. FL C FR SL SR 30˚ 30˚ SBL SBR : Di-pole speaker : Direction of di-pole speaker 14 If you choose di-pole speakers, please place the surround and surround back speakers according to the speaker layout below.
SPEAKER SETUP ■ Di-pole speaker layout Either di-pole or direct radiating speaker types can be used for THX surround. FL C FR SL SR 30˚ 30˚ SBL SBR : Di-pole speaker : Direction of di-pole speaker 14 If you choose di-pole speakers, please place the surround and surround back speakers according to the speaker layout below.

MCXSP10 Manual
Page 19
...speakers away from the power source. • Do not let the bare speaker wires touch each terminal. The supplied speaker terminal wrench is useful for speaker impedance. • Before connecting the speakers, make sure that this unit is colored or shaped differently, perhaps with the PRESENCE/... banana plug connector into the end of each other or do not let them touch any metal part of this unit and/or speakers. • Use magnetically shielded speakers. Speaker terminal wrench 5 4 3 Red: positive (+) Black: negative (-) ■ Connecting to close the tabs after connecting the ...
...speakers away from the power source. • Do not let the bare speaker wires touch each terminal. The supplied speaker terminal wrench is useful for speaker impedance. • Before connecting the speakers, make sure that this unit is colored or shaped differently, perhaps with the PRESENCE/... banana plug connector into the end of each other or do not let them touch any metal part of this unit and/or speakers. • Use magnetically shielded speakers. Speaker terminal wrench 5 4 3 Red: positive (+) Black: negative (-) ■ Connecting to close the tabs after connecting the ...

MCXSP10 Manual
Page 21
... terminals. Note The Canada model cannot output to these terminals. ■ SUBWOOFER jack Connect a subwoofer with a built-in amplifier, such as the YAMAHA Active Servo Processing Subwoofer System, to this jack. ■ SURROUND BACK terminals Connect surround back speakers to two separate speaker systems simultaneously. To... systems to either of speaker cables for each speaker (one pair for the tweeter/mid-range). Bi-wired connection The unit also allows you use the bi-wired connections, press SPEAKERS A and SPEAKERS B on the front panel so that both SP A and B light up on the front...
... terminals. Note The Canada model cannot output to these terminals. ■ SUBWOOFER jack Connect a subwoofer with a built-in amplifier, such as the YAMAHA Active Servo Processing Subwoofer System, to this jack. ■ SURROUND BACK terminals Connect surround back speakers to two separate speaker systems simultaneously. To... systems to either of speaker cables for each speaker (one pair for the tweeter/mid-range). Bi-wired connection The unit also allows you use the bi-wired connections, press SPEAKERS A and SPEAKERS B on the front panel so that both SP A and B light up on the front...

MCXSP10 Manual
Page 22
... S V V ■ Analog jacks V You can input analog signals from audio components by connecting audio pin cables to the analog jacks on your monitor. You can use the digital jacks to input PCM, Dolby Digital and DTS bitstreams. When you connect components to both the S VIDEO and VIDEO jacks, signals input at...
... S V V ■ Analog jacks V You can input analog signals from audio components by connecting audio pin cables to the analog jacks on your monitor. You can use the digital jacks to input PCM, Dolby Digital and DTS bitstreams. When you connect components to both the S VIDEO and VIDEO jacks, signals input at...

MCXSP10 Manual
Page 24
...channels. If you set Multi CH Assign: Input Channels to 8ch (see page 57), you connect at least a 5.1-channel speaker system before using this unit automatically turns off the digital sound field processor, and you cannot select sound field programs. • This unit does not redirect signals... input at the MULTI CH INPUT jacks to accommodate for missing speakers. We recommend that you can use input jacks assigned as the input source, this feature. • When headphones are used, only front L/R channels are output. 20 CONNECTIONS ■ Connecting to the MULTI CH INPUT jacks...
...channels. If you set Multi CH Assign: Input Channels to 8ch (see page 57), you connect at least a 5.1-channel speaker system before using this unit automatically turns off the digital sound field processor, and you cannot select sound field programs. • This unit does not redirect signals... input at the MULTI CH INPUT jacks to accommodate for missing speakers. We recommend that you can use input jacks assigned as the input source, this feature. • When headphones are used, only front L/R channels are output. 20 CONNECTIONS ■ Connecting to the MULTI CH INPUT jacks...


