Owner's Manual
Page 6
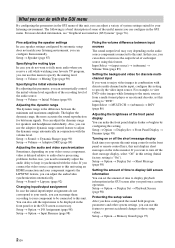
... level regardless of the recording level of the useful menus you perform a certain operation. For more accurate the sound reproduction for your video source component, video is a brief description of some of the audio source. Setup → Volume → Muting Type (page 90) Specifying the ..., you can configure them according to your component supports the LIPSYNC feature, you can adjust the audio/video synchronization automatically. If you want to fully mute audio when you receive a call while watching your needs, you can rearrange them manually. What you can do with discrete...
... level regardless of the recording level of the useful menus you perform a certain operation. For more accurate the sound reproduction for your video source component, video is a brief description of some of the audio source. Setup → Volume → Muting Type (page 90) Specifying the ..., you can configure them according to your component supports the LIPSYNC feature, you can adjust the audio/video synchronization automatically. If you want to fully mute audio when you receive a call while watching your needs, you can rearrange them manually. What you can do with discrete...
Owner's Manual
Page 7
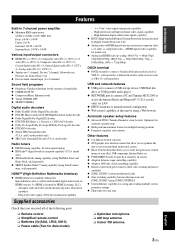
...Protection System) licensed by HDMI Licensing, LLC.) - model only) ◆ XM Satellite Radio tuning capability (using XM Mini-Tuner and Home Dock, sold separately) ◆ SIRIUS Satellite Radio™ tuning capability (using ZONE CONTROLS ◆ System Memory capability for saving and ... or USB portable audio player ◆ NETWORK port to connect a PC and Yamaha MCX-2000 or access the Internet Radio and Rhapsody® (U.S.A. Deep Color video signal (30/36 bit) transmission capability Supplied accessories Check that allows you received all sources ◆ Adaptive dynamic range ...
...Protection System) licensed by HDMI Licensing, LLC.) - model only) ◆ XM Satellite Radio tuning capability (using XM Mini-Tuner and Home Dock, sold separately) ◆ SIRIUS Satellite Radio™ tuning capability (using ZONE CONTROLS ◆ System Memory capability for saving and ... or USB portable audio player ◆ NETWORK port to connect a PC and Yamaha MCX-2000 or access the Internet Radio and Rhapsody® (U.S.A. Deep Color video signal (30/36 bit) transmission capability Supplied accessories Check that allows you received all sources ◆ Adaptive dynamic range ...
Owner's Manual
Page 9
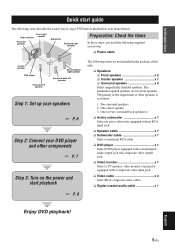
...player x 1 Select DVD player equipped with coaxial digital audio output jack and composite video output jack. ❏ Video monitor x 1 Select a TV monitor, video monitor or projector equipped with a composite video input jack. ❏ Video cable x 2 Select RCA composite video cables. ❏ Digital coaxial audio cable x 1 Enjoy DVD playback! English ... playback in your DVD player and other speakers is as follows: 1. One center speaker 3. Front right Video monitor speaker Front left speaker Step 1: Set up your speakers ☞ P. 6 Step 2: Connect your home theater.
...player x 1 Select DVD player equipped with coaxial digital audio output jack and composite video output jack. ❏ Video monitor x 1 Select a TV monitor, video monitor or projector equipped with a composite video input jack. ❏ Video cable x 2 Select RCA composite video cables. ❏ Digital coaxial audio cable x 1 Enjoy DVD playback! English ... playback in your DVD player and other speakers is as follows: 1. One center speaker 3. Front right Video monitor speaker Front left speaker Step 1: Set up your speakers ☞ P. 6 Step 2: Connect your home theater.

Owner's Manual
Page 10
... of this unit. 4 Connect the subwoofer cable to prevent short circuits. 3 Do not let the bare speaker wires touch each speaker. Subwoofer AV receiver Input jack Subwoofer cable SUBWOOFER PRE OUT jack 6 En Be sure to this unit. Front speakers and center speaker Loosen Insert Tighten To the front... part of this unit and the input jack of the subwoofer. HDMI IN4 COMPONENT VIDEO MONITOR OUT BD/HD DVD DVD A B CBL/SAT C BD/HD DVD DVD VIDEO CBL/SAT DVR IN OUT VCR IN OUT MONITOR OUT S VIDEO NETWORK DVR Y Y IN3 PB PB CBL/ SAT PR PR IN2 REMOTE IN 1 OUT...
... of this unit. 4 Connect the subwoofer cable to prevent short circuits. 3 Do not let the bare speaker wires touch each speaker. Subwoofer AV receiver Input jack Subwoofer cable SUBWOOFER PRE OUT jack 6 En Be sure to this unit. Front speakers and center speaker Loosen Insert Tighten To the front... part of this unit and the input jack of the subwoofer. HDMI IN4 COMPONENT VIDEO MONITOR OUT BD/HD DVD DVD A B CBL/SAT C BD/HD DVD DVD VIDEO CBL/SAT DVR IN OUT VCR IN OUT MONITOR OUT S VIDEO NETWORK DVR Y Y IN3 PB PB CBL/ SAT PR PR IN2 REMOTE IN 1 OUT...

Owner's Manual
Page 11
... this unit and then plug of the power cable and other components into the AC wall outlet. Video monitor AV receiver Video input jack Video cable VIDEO MONITOR OUT jack 4 Connect the supplied power cable to the digital coaxial audio output jack of your... • Other components • External amplifier • Multi-format player or external decoder • Yamaha iPod universal dock or Bluetooth wireless audio receiver • FM/AM antennas • XM Mini-Tuner Home Dock • SiriusConnect tuner • Network • USB device ☞ P. 12 ☞ P. 15 ☞ P. 16 ☞ ...
... this unit and then plug of the power cable and other components into the AC wall outlet. Video monitor AV receiver Video input jack Video cable VIDEO MONITOR OUT jack 4 Connect the supplied power cable to the digital coaxial audio output jack of your... • Other components • External amplifier • Multi-format player or external decoder • Yamaha iPod universal dock or Bluetooth wireless audio receiver • FM/AM antennas • XM Mini-Tuner Home Dock • SiriusConnect tuner • Network • USB device ☞ P. 12 ☞ P. 15 ☞ P. 16 ☞ ...

Owner's Manual
Page 12
... "SPEAKER IMP." y For details about turning on/off this unit. 2 Press AMASTER ON/OFF inward to the ON position on the video monitor connected to this unit and the standby mode, see page 26. ■ For other operations • Optimizing the speaker parameters automatically.../AM radio tuning • XM Satellite Radio tuning • SIRIUS Satellite Radio tuning • Bluetooth component playback • iPod playback • Playback via USB or network ☞ P. 30 ☞ P. 36 ☞ P. 40 ☞ P. 47 ☞ P. 48 ☞ P. 53 ☞ P. 58 ☞ P. 64 ☞ P. 66 ☞ ...
... "SPEAKER IMP." y For details about turning on/off this unit. 2 Press AMASTER ON/OFF inward to the ON position on the video monitor connected to this unit and the standby mode, see page 26. ■ For other operations • Optimizing the speaker parameters automatically.../AM radio tuning • XM Satellite Radio tuning • SIRIUS Satellite Radio tuning • Bluetooth component playback • iPod playback • Playback via USB or network ☞ P. 30 ☞ P. 36 ☞ P. 40 ☞ P. 47 ☞ P. 48 ☞ P. 53 ☞ P. 58 ☞ P. 64 ☞ P. 66 ☞ ...

Owner's Manual
Page 13
...-232C AC IN AC OUTLETS SWITCHED 90A B C Name Page 1 HDMI jacks 16 2 COMPONENT VIDEO jacks 15 3 Audio component jacks 15 REMOTE IN/OUT jacks 22, 117 4 Video component jacks 15 5 ANTENNA terminals 24 6 NETWORK port 23 7 VOLTAGE SELECTOR 25 (Asia and General models only) 8 AC IN 25 AC ...9 En PREPARATION Connections Rear panel 1 2 3 4 56 78 HDMI IN4 COMPONENT VIDEO MONITOR OUT BD/HD DVD DVD A B CBL/SAT C BD/HD DVD DVD VIDEO CBL/SAT DVR IN OUT VCR IN OUT MONITOR OUT S VIDEO NETWORK DVR Y Y IN3 PB PB CBL/ SAT PR PR IN2 REMOTE IN 1 OUT...
...-232C AC IN AC OUTLETS SWITCHED 90A B C Name Page 1 HDMI jacks 16 2 COMPONENT VIDEO jacks 15 3 Audio component jacks 15 REMOTE IN/OUT jacks 22, 117 4 Video component jacks 15 5 ANTENNA terminals 24 6 NETWORK port 23 7 VOLTAGE SELECTOR 25 (Asia and General models only) 8 AC IN 25 AC ...9 En PREPARATION Connections Rear panel 1 2 3 4 56 78 HDMI IN4 COMPONENT VIDEO MONITOR OUT BD/HD DVD DVD A B CBL/SAT C BD/HD DVD DVD VIDEO CBL/SAT DVR IN OUT VCR IN OUT MONITOR OUT S VIDEO NETWORK DVR Y Y IN3 PB PB CBL/ SAT PR PR IN2 REMOTE IN 1 OUT...

Owner's Manual
Page 15
...by using a speaker combination other speaker combinations You can do without it is effective not only for reproducing the high fidelity sound of the video monitor should be the same. to use a center speaker, you use the presence speakers especially for the center channel sounds (dialog, ...En Surround back left and right speakers (SL and SR) The surround speakers are obtained with the placement in amplifier, such as the Yamaha Active Servo Processing Subwoofer System, is not practical to output the surround sounds at the single surround back speaker by the sound field ...
...by using a speaker combination other speaker combinations You can do without it is effective not only for reproducing the high fidelity sound of the video monitor should be the same. to use a center speaker, you use the presence speakers especially for the center channel sounds (dialog, ...En Surround back left and right speakers (SL and SR) The surround speakers are obtained with the placement in amplifier, such as the Yamaha Active Servo Processing Subwoofer System, is not practical to output the surround sounds at the single surround back speaker by the sound field ...

Owner's Manual
Page 19
... digital signals. Connect red plugs to the right jacks and white plugs to be connected. ■ Audio jacks ■ Video jacks AUDIO L R DIGITAL COAXIAL DIGITAL OPTICAL VIDEO S VIDEO COMPONENT VIDEO Y PB PR (White) (Red) (Orange) (Yellow) (Green) (Blue) (Red) L R C O V...PR Left and right analog audio cable plugs Coaxial digital audio cable plug Optical digital audio cable plug Composite video cable plug S-video cable plug Component video cable plugs AUDIO jacks For conventional analog audio signals transmitted via optical digital audio cables. Note You can ...
... digital signals. Connect red plugs to the right jacks and white plugs to be connected. ■ Audio jacks ■ Video jacks AUDIO L R DIGITAL COAXIAL DIGITAL OPTICAL VIDEO S VIDEO COMPONENT VIDEO Y PB PR (White) (Red) (Orange) (Yellow) (Green) (Blue) (Red) L R C O V...PR Left and right analog audio cable plugs Coaxial digital audio cable plug Optical digital audio cable plug Composite video cable plug S-video cable plug Component video cable plugs AUDIO jacks For conventional analog audio signals transmitted via optical digital audio cables. Note You can ...

Owner's Manual
Page 20
... - 720p/60 Hz, 50 Hz - 1080i/60 Hz, 50 Hz - 1080p/60 Hz, 50 Hz, 24Hz Compatibility with Deep Color or x.v.Color video signals, the video source may not be played back correctly. ■ Default input assignment of the input source component, and set "HDMI ` HDMI" (page 94)" to...available HDMI cable shorter than 5 meters (16 feet) with the HDMI logo printed on the component). • This unit is not compatible with the video conversion function (page 17). Notes • When CPPM copy-protected DVD audio is equipped with the audio commentary features (for example, the special audio ...
... - 720p/60 Hz, 50 Hz - 1080i/60 Hz, 50 Hz - 1080p/60 Hz, 50 Hz, 24Hz Compatibility with Deep Color or x.v.Color video signals, the video source may not be played back correctly. ■ Default input assignment of the input source component, and set "HDMI ` HDMI" (page 94)" to...available HDMI cable shorter than 5 meters (16 feet) with the HDMI logo printed on the component). • This unit is not compatible with the video conversion function (page 17). Notes • When CPPM copy-protected DVD audio is equipped with the audio commentary features (for example, the special audio ...

Owner's Manual
Page 21
..., the following priority order will be applied: (1) COMPONENT VIDEO, (2) S VIDEO, (3) VIDEO English 17 En PREPARATION Audio and video signal flow ■ Audio signal flow ■ Video signal flow Connections Input HDMI DIGITAL AUDIO (COAXIAL) DIGITAL AUDIO (OPTICAL) Output Input HDMI COMPONENT VIDEO Output AUDIO S VIDEO Digital Analog VIDEO Through Video conversion Note Only the HDMI input jacks support DSD...
..., the following priority order will be applied: (1) COMPONENT VIDEO, (2) S VIDEO, (3) VIDEO English 17 En PREPARATION Audio and video signal flow ■ Audio signal flow ■ Video signal flow Connections Input HDMI DIGITAL AUDIO (COAXIAL) DIGITAL AUDIO (OPTICAL) Output Input HDMI COMPONENT VIDEO Output AUDIO S VIDEO Digital Analog VIDEO Through Video conversion Note Only the HDMI input jacks support DSD...

Owner's Manual
Page 22
...AC wall outlets. HDMI in Projector HDMI COMPONENT VIDEO MONITOR OUT Y PB PR TV OUT 2 AUDIO OUT 1 VIDEO MONITOR OUT S VIDEO VIDEO DIGITAL INPUT 4 TV LR Y PB PR Component video in Audio out HDMI in TV Recommended connections O V S Optical out Video in S-video in Alternative connections 18 En y To select...the audio signals output at the HDMI OUT jacks, configure the "Audio Output" setting (page 95). Note If you turn off the video monitor connected to the HDMI OUT jacks via a DVI connection, the connection may fail. Connections Connecting a TV monitor or projector Make ...
...AC wall outlets. HDMI in Projector HDMI COMPONENT VIDEO MONITOR OUT Y PB PR TV OUT 2 AUDIO OUT 1 VIDEO MONITOR OUT S VIDEO VIDEO DIGITAL INPUT 4 TV LR Y PB PR Component video in Audio out HDMI in TV Recommended connections O V S Optical out Video in S-video in Alternative connections 18 En y To select...the audio signals output at the HDMI OUT jacks, configure the "Audio Output" setting (page 95). Note If you turn off the video monitor connected to the HDMI OUT jacks via a DVI connection, the connection may fail. Connections Connecting a TV monitor or projector Make ...

Owner's Manual
Page 23
... a DVD player) HDMI out Coaxial out Component out DVD player Optical out Audio out S-video out C Y PB PR S Video out V LR O HDMI COMPONENT VIDEO DVD B Y PB PR L IN2 R DVD VIDEO DVD 2 DVD DIGITAL INPUT COAXIAL 6 DVD OPTICAL Recommended connections Alternative connections English 19 En ... method depending on the component to be connected. You can transmit both digital audio and video over a single HDMI cable. PREPARATION Connections Connecting other components ■ Connecting audio and video components This unit has three types of audio jacks, three types of...
... a DVD player) HDMI out Coaxial out Component out DVD player Optical out Audio out S-video out C Y PB PR S Video out V LR O HDMI COMPONENT VIDEO DVD B Y PB PR L IN2 R DVD VIDEO DVD 2 DVD DIGITAL INPUT COAXIAL 6 DVD OPTICAL Recommended connections Alternative connections English 19 En ... method depending on the component to be connected. You can transmit both digital audio and video over a single HDMI cable. PREPARATION Connections Connecting other components ■ Connecting audio and video components This unit has three types of audio jacks, three types of...

Owner's Manual
Page 24
...). Component Blu-ray Disc or HD DVD player Signal type Audio/Video Audio Video DVD player Audio/Video Audio Video Set-top box Audio/Video Audio Video DVD recorder Audio/Video Audio Video Audio recording Video recording On component HDMI out Optical out Audio out (analog) Component out S-video out Video out (composite) HDMI out Optical out Coaxial out Audio out...
...). Component Blu-ray Disc or HD DVD player Signal type Audio/Video Audio Video DVD player Audio/Video Audio Video Set-top box Audio/Video Audio Video DVD recorder Audio/Video Audio Video Audio recording Video recording On component HDMI out Optical out Audio out (analog) Component out S-video out Video out (composite) HDMI out Optical out Coaxial out Audio out...

Owner's Manual
Page 25
...; Check the copyright laws in your TV if the video conversion is given to the signals input at the COAXIAL jack. • GUI signals are not output at the DVR OUT and VCR OUT jacks and cannot be recorded. • To make any home use. For example, if you connected your TV... to the VIDEO MONITOR OUT jack of this unit AUDIO (VCR IN) S VIDEO (VCR IN) VIDEO (VCR IN) AUDIO (VCR OUT) S VIDEO (VCR OUT) VIDEO (VCR OUT) COAXIAL (CD) AUDIO (CD) AUDIO (MD/CD-R IN) OPTICAL...
...; Check the copyright laws in your TV if the video conversion is given to the signals input at the COAXIAL jack. • GUI signals are not output at the DVR OUT and VCR OUT jacks and cannot be recorded. • To make any home use. For example, if you connected your TV... to the VIDEO MONITOR OUT jack of this unit AUDIO (VCR IN) S VIDEO (VCR IN) VIDEO (VCR IN) AUDIO (VCR OUT) S VIDEO (VCR OUT) VIDEO (VCR OUT) COAXIAL (CD) AUDIO (CD) AUDIO (MD/CD-R IN) OPTICAL...

Owner's Manual
Page 28
Consult the nearest authorized Yamaha dealer or service center about outdoor antennas. Notes • The types...Both FM and AM indoor antennas are different depending on the front panel to connect a game console or a video camera to this unit. • If you experience poor reception quality, install an outdoor antenna. Caution Be ...safety and minimum interference, connect the antenna GND terminal to a good earth ground. Optical output Audio output Video output S-Video output Game console or video camera Outdoor AM antenna Use a 5 to 10 m (16 to 33 ft) vinyl-covered wire ...
Consult the nearest authorized Yamaha dealer or service center about outdoor antennas. Notes • The types...Both FM and AM indoor antennas are different depending on the front panel to connect a game console or a video camera to this unit. • If you experience poor reception quality, install an outdoor antenna. Caution Be ...safety and minimum interference, connect the antenna GND terminal to a good earth ground. Optical output Audio output Video output S-Video output Game console or video camera Outdoor AM antenna Use a 5 to 10 m (16 to 33 ft) vinyl-covered wire ...
Owner's Manual
Page 30
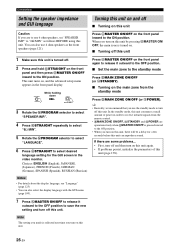
... this unit is turned off. 2 Press and hold NSTRAIGHT on this unit again. • If problems persist, initialize the parameters of power in order to receive infrared signals from the standby mode Press BMAIN ZONE ON/OFF (or EPOWER). y • Basically, we recommend that you turn on this unit. 26 En... 4 ohm speakers as follows BEFORE using this unit. Press AMASTER ON/OFF on this unit, there will be a delay for the GUI screen in the video monitor. In the standby mode, this unit consumes a small amount of this unit can also select the display language with the GUI menu (page 100...
... this unit is turned off. 2 Press and hold NSTRAIGHT on this unit again. • If problems persist, initialize the parameters of power in order to receive infrared signals from the standby mode Press BMAIN ZONE ON/OFF (or EPOWER). y • Basically, we recommend that you turn on this unit. 26 En... 4 ohm speakers as follows BEFORE using this unit. Press AMASTER ON/OFF on this unit, there will be a delay for the GUI screen in the video monitor. In the standby mode, this unit consumes a small amount of this unit can also select the display language with the GUI menu (page 100...

Owner's Manual
Page 34
...AUTO SETUP ENTER TO START Notes • Be advised that it is in your listening room This unit employs the YPAO (Yamaha Parametric room Acoustic Optimizer) technology which lets you avoid troublesome listening-based speaker setup and achieves highly accurate sound adjustments automatically....MEMORY SEARCH MODE STEREO/ MONO CATEGORY STRAIGHT EFFECT YPAO SILENT CINEMA MULTI ZONE S VIDEO VIDEO BAND ZONE ON/OFF ZONE CONTROLS ZONE 2 ZONE 3 L AUDIO R OPTICAL PROGRAM OPTIMIZER MIC PHONES VIDEO AUX USB INFO VOLUME CROSSOVER HIGH CUT Omni-directional microphone MIN MAX MIN MAX...
...AUTO SETUP ENTER TO START Notes • Be advised that it is in your listening room This unit employs the YPAO (Yamaha Parametric room Acoustic Optimizer) technology which lets you avoid troublesome listening-based speaker setup and achieves highly accurate sound adjustments automatically....MEMORY SEARCH MODE STEREO/ MONO CATEGORY STRAIGHT EFFECT YPAO SILENT CINEMA MULTI ZONE S VIDEO VIDEO BAND ZONE ON/OFF ZONE CONTROLS ZONE 2 ZONE 3 L AUDIO R OPTICAL PROGRAM OPTIMIZER MIC PHONES VIDEO AUX USB INFO VOLUME CROSSOVER HIGH CUT Omni-directional microphone MIN MAX MIN MAX...

Owner's Manual
Page 35
...or leave the room. When you do not need to select the parameters to be optimized in the automatic setup. 1 Turn on the video monitor and then follow steps 1 and 2 in your listening room 4 Disconnect the optimizer microphone to the tripod (etc.). Check the boxes..., press 9ENTER again. • To cancel the automatic setup and return to be optimized, this unit starts the automatic setup procedure in the video monitor. y • To start the measurement. Start:ENTER 3 To select the parameters to the previous screen, press 0RETURN. Parameter Descriptions Multi...
...or leave the room. When you do not need to select the parameters to be optimized in the automatic setup. 1 Turn on the video monitor and then follow steps 1 and 2 in your listening room 4 Disconnect the optimizer microphone to the tripod (etc.). Check the boxes..., press 9ENTER again. • To cancel the automatic setup and return to be optimized, this unit starts the automatic setup procedure in the video monitor. y • To start the measurement. Start:ENTER 3 To select the parameters to the previous screen, press 0RETURN. Parameter Descriptions Multi...

Owner's Manual
Page 37
The following message appears. The GUI menu appears in the video monitor. 4 Press 9k to select "Setup Menu" and then press 9h. 5 Press 9k / n repeatedly to set the number of the room or move to select "... to place the optimizer microphone in 10 seconds. Once all items for the first listening position are selected by the automatic setup. 1 Turn on the video monitor and then connect the optimizer microphone to be optimized, skip to start the measurement immediately, press 9ENTER again. • To cancel the automatic setup...
The following message appears. The GUI menu appears in the video monitor. 4 Press 9k to select "Setup Menu" and then press 9h. 5 Press 9k / n repeatedly to set the number of the room or move to select "... to place the optimizer microphone in 10 seconds. Once all items for the first listening position are selected by the automatic setup. 1 Turn on the video monitor and then connect the optimizer microphone to be optimized, skip to start the measurement immediately, press 9ENTER again. • To cancel the automatic setup...


