Owner's Manual
Page 5
...8482; information 63 Using Bluetooth™ components 64 Pairing the Bluetooth™ receiver and your headphones 38 Muting the audio output 38 Displaying the input source ... remote control 116 Using multi-zone configuration 117 Connecting the Zone 2 and Zone 3 components ... 117 Controlling Zone 2 or Zone 3 119 Advanced setup 121 Using the advanced setup menu 121 ADDITIONAL INFORMATION Troubleshooting ...network features 68 USB and network menu tree 68 Navigating USB and network menus 69 Using a USB storage device or a USB portable audio player 69 Using a PC server or Yamaha...
...8482; information 63 Using Bluetooth™ components 64 Pairing the Bluetooth™ receiver and your headphones 38 Muting the audio output 38 Displaying the input source ... remote control 116 Using multi-zone configuration 117 Connecting the Zone 2 and Zone 3 components ... 117 Controlling Zone 2 or Zone 3 119 Advanced setup 121 Using the advanced setup menu 121 ADDITIONAL INFORMATION Troubleshooting ...network features 68 USB and network menu tree 68 Navigating USB and network menus 69 Using a USB storage device or a USB portable audio player 69 Using a PC server or Yamaha...
Owner's Manual
Page 7
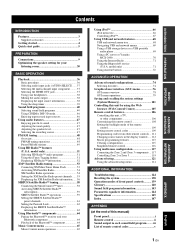
... terminal to connect a Yamaha iPod universal dock (such as YDS-11, sold separately) or Bluetooth wireless audio receiver (such as YBA-10, sold separately) USB and network features ◆ USB ...zone and ZONE 2/ZONE 3 using a Web browser Automatic speaker setup features ◆ Advanced YPAO (Yamaha Parametric room Acoustic Optimizer) for automatic speaker setup ◆ Multi-point measurement feature for multiple listening positions ◆ Parametric equalizer select feature Other features ◆ 192-kHz/24-bit D/A converter ◆ GUI (graphic user interface) menus that allow you received...
... terminal to connect a Yamaha iPod universal dock (such as YDS-11, sold separately) or Bluetooth wireless audio receiver (such as YBA-10, sold separately) USB and network features ◆ USB ...zone and ZONE 2/ZONE 3 using a Web browser Automatic speaker setup features ◆ Advanced YPAO (Yamaha Parametric room Acoustic Optimizer) for automatic speaker setup ◆ Multi-point measurement feature for multiple listening positions ◆ Parametric equalizer select feature Other features ◆ 192-kHz/24-bit D/A converter ◆ GUI (graphic user interface) menus that allow you received...
Owner's Manual
Page 30
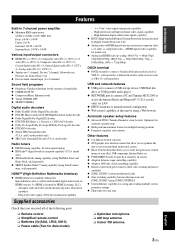
... "6Ω MIN" as the front speakers (page 121). y • Basically, we recommend that you turn on this unit by pressing AMASTER ON/ OFF, the main zone is turned on the front panel again to release it outward to the OFF position to turn off this unit 1 Make sure this unit. to... the GUI menu (page 100). 7 Press AMASTER ON/OFF to release it outward to the OFF position. ■ Set the main zone to the standby mode Press BMAIN ZONE ON/OFF (or DSTANDBY). ■ Turning on , and the advanced setup menu appears in order to receive infrared signals from the standby mode Press BMAIN...
... "6Ω MIN" as the front speakers (page 121). y • Basically, we recommend that you turn on this unit by pressing AMASTER ON/ OFF, the main zone is turned on the front panel again to release it outward to the OFF position to turn off this unit 1 Make sure this unit. to... the GUI menu (page 100). 7 Press AMASTER ON/OFF to release it outward to the OFF position. ■ Set the main zone to the standby mode Press BMAIN ZONE ON/OFF (or DSTANDBY). ■ Turning on , and the advanced setup menu appears in order to receive infrared signals from the standby mode Press BMAIN...
Owner's Manual
Page 32
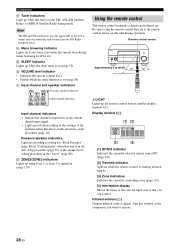
... item during operation. p SLEEP indicator Lights up while the sleep timer is in the auto setup procedure (page 30) or the speaker level setting procedure in the automatic setup procedure (page 30). q VOLUME level indicator • Indicates the current volume level. •...on (page 119). Using the remote control The remote control transmits a directional infrared ray. Display window (4) [1] [2] MAIN ID 1 ID 2 ZONE 2 ZONE 3 [3] [4] [1] ID1/ID2 indicator Indicates the currently selected remote control ID (page 121). [2] Transmit indicator Appears while the remote control is tuned...
... item during operation. p SLEEP indicator Lights up while the sleep timer is in the auto setup procedure (page 30) or the speaker level setting procedure in the automatic setup procedure (page 30). q VOLUME level indicator • Indicates the current volume level. •...on (page 119). Using the remote control The remote control transmits a directional infrared ray. Display window (4) [1] [2] MAIN ID 1 ID 2 ZONE 2 ZONE 3 [3] [4] [1] ID1/ID2 indicator Indicates the currently selected remote control ID (page 121). [2] Transmit indicator Appears while the remote control is tuned...

Owner's Manual
Page 34
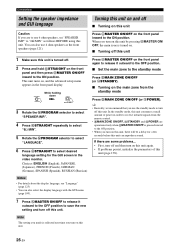
...screen or follow "Basic automatic setup" (page 31). 2 Place the optimizer microphone at your listening room This unit employs the YPAO (Yamaha Parametric room Acoustic Optimizer) technology which lets you avoid troublesome listening-based speaker setup and achieves highly accurate sound adjustments...TONE CONTROL ENTER PRESET/TUNING/CH MEMORY SEARCH MODE STEREO/ MONO CATEGORY STRAIGHT EFFECT YPAO SILENT CINEMA MULTI ZONE S VIDEO VIDEO BAND ZONE ON/OFF ZONE CONTROLS ZONE 2 ZONE 3 L AUDIO R OPTICAL PROGRAM OPTIMIZER MIC PHONES VIDEO AUX USB INFO VOLUME CROSSOVER HIGH CUT Omni...
...screen or follow "Basic automatic setup" (page 31). 2 Place the optimizer microphone at your listening room This unit employs the YPAO (Yamaha Parametric room Acoustic Optimizer) technology which lets you avoid troublesome listening-based speaker setup and achieves highly accurate sound adjustments...TONE CONTROL ENTER PRESET/TUNING/CH MEMORY SEARCH MODE STEREO/ MONO CATEGORY STRAIGHT EFFECT YPAO SILENT CINEMA MULTI ZONE S VIDEO VIDEO BAND ZONE ON/OFF ZONE CONTROLS ZONE 2 ZONE 3 L AUDIO R OPTICAL PROGRAM OPTIMIZER MIC PHONES VIDEO AUX USB INFO VOLUME CROSSOVER HIGH CUT Omni...

Owner's Manual
Page 82
... adjust speaker and system parameters. Sound (Sound menu) See page 90 for details. Network (Network menu) See page 95 for details. Speaker (Speaker menu) See page 87 for details. Multi Zone (Multi-zone menu) See page 96 for details. Auto Setup (Automatic setup menu) Use this feature to be adjusted (page 30). Volume (Volume menu) See...
... adjust speaker and system parameters. Sound (Sound menu) See page 90 for details. Network (Network menu) See page 95 for details. Speaker (Speaker menu) See page 87 for details. Multi Zone (Multi-zone menu) See page 96 for details. Auto Setup (Automatic setup menu) Use this feature to be adjusted (page 30). Volume (Volume menu) See...

Owner's Manual
Page 94
...headphones. Choices: Off, Mute, -80.0 dB to +16.5 dB Control step: 0.5 dB Notes • When this unit is in the main zone. Choice Functions Full Mutes all the audio output. -20dB Reduces the current volume by 20 dB. -40dB Reduces the current volume by mistake. This... Use this unit is applied to your subwoofer or headphones. Note Depending on . Front h Manual Manual Copies the result of the automatic setup that the "Front" type parametric equalizer is applied to select the amount of each parametric equalizer type. Choice MAX STD MIN/AUTO Functions Preserves...
...headphones. Choices: Off, Mute, -80.0 dB to +16.5 dB Control step: 0.5 dB Notes • When this unit is in the main zone. Choice Functions Full Mutes all the audio output. -20dB Reduces the current volume by 20 dB. -40dB Reduces the current volume by mistake. This... Use this unit is applied to your subwoofer or headphones. Note Depending on . Front h Manual Manual Copies the result of the automatic setup that the "Front" type parametric equalizer is applied to select the amount of each parametric equalizer type. Choice MAX STD MIN/AUTO Functions Preserves...

Owner's Manual
Page 100
... the system ID that is set the functions of the multi-zone configuration. ■ Zone SP Assign (Zone speaker assignment) Use this parameter to control the volume level of the network. You can adjust the ZONE OUT (ZONE 2 or ZONE 3) volume level simultaneously with JVOLUME +/- on the external amplifier...unit fixes the ZONE OUT (ZONE 2 or ZONE 3) volume level to confirm the setting. Note If you have two or more DNS addresses, enter one DNS address, enter the DNS address in the standby mode increases. ■ Information (Network information) Use this unit. Setup (Multi Zone) Use this...
... the system ID that is set the functions of the multi-zone configuration. ■ Zone SP Assign (Zone speaker assignment) Use this parameter to control the volume level of the network. You can adjust the ZONE OUT (ZONE 2 or ZONE 3) volume level simultaneously with JVOLUME +/- on the external amplifier...unit fixes the ZONE OUT (ZONE 2 or ZONE 3) volume level to confirm the setting. Note If you have two or more DNS addresses, enter one DNS address, enter the DNS address in the standby mode increases. ■ Information (Network information) Use this unit. Setup (Multi Zone) Use this...

Owner's Manual
Page 101
... -10.0 dB to +10.0 dB Initial setting: 0.0 dB Zone2 Muting Type/Zone3 Muting Type (Zone 2/Zone 3 muting type) Use this feature to set the maximum volume level in each zone is turned on. Setup (Option) This menu adjusts the optional system settings. ■ Memory Guard (Memory guard) Use this... feature to edit the name of Zone 2 only. GUI menu parameters - Control range: Off, Mute, -...
... -10.0 dB to +10.0 dB Initial setting: 0.0 dB Zone2 Muting Type/Zone3 Muting Type (Zone 2/Zone 3 muting type) Use this feature to set the maximum volume level in each zone is turned on. Setup (Option) This menu adjusts the optional system settings. ■ Memory Guard (Memory guard) Use this... feature to edit the name of Zone 2 only. GUI menu parameters - Control range: Off, Mute, -...
Owner's Manual
Page 104
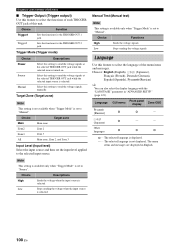
... feature to select the functions of each TRIGGER OUT jack of the menu items and messages. Choice Main Main zone Target zone Zone2 Zone3 All Zone 2 Zone 3 Main zone, Zone 2, and Zone 3 Input Level (Input level) Select the input source and then set to select the language of this unit...when "Trigger Mode" is selected. Low Stops sending the voltage signals. The menu items and messages are displayed in "ADVANCED SETUP" (page 123). Target Zone (Target zone) Note This setting is not available when "Trigger Mode" is set to "Source". Note This setting is available only when...
... feature to select the functions of each TRIGGER OUT jack of the menu items and messages. Choice Main Main zone Target zone Zone2 Zone3 All Zone 2 Zone 3 Main zone, Zone 2, and Zone 3 Input Level (Input level) Select the input source and then set to select the language of this unit...when "Trigger Mode" is selected. Low Stops sending the voltage signals. The menu items and messages are displayed in "ADVANCED SETUP" (page 123). Target Zone (Target zone) Note This setting is not available when "Trigger Mode" is set to "Source". Note This setting is available only when...

Owner's Manual
Page 105
... "Top Menu" (page 79) is displayed, press and hold one of the 7SYSTEM MEMORY buttons for 4 seconds. For details on the remote control to select "Setup" and then press 9h. Press and hold IMENU to display the top GUI menu. 2 Press 9k / n repeatedly to FAMP and then press I MENU. y ...ADVANCED OPERATION Saving and recalling the system settings (System Memory) Use this feature to save and recall up to four of your favorite setting for Zone 2 or Zone 3, press HZONE on the remote control repeatedly to be saved. You can save the current system settings stored in "Memory1" to "Memory6" ...
... "Top Menu" (page 79) is displayed, press and hold one of the 7SYSTEM MEMORY buttons for 4 seconds. For details on the remote control to select "Setup" and then press 9h. Press and hold IMENU to display the top GUI menu. 2 Press 9k / n repeatedly to FAMP and then press I MENU. y ...ADVANCED OPERATION Saving and recalling the system settings (System Memory) Use this feature to save and recall up to four of your favorite setting for Zone 2 or Zone 3, press HZONE on the remote control repeatedly to be saved. You can save the current system settings stored in "Memory1" to "Memory6" ...
Owner's Manual
Page 106
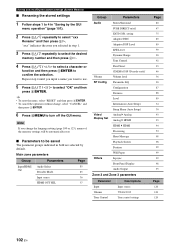
... Volume Volume level SP Config Parametric EQ Configuration Distance Level Information (Auto Setup) Video/ Display Set Setup Menu (Auto Setup) Analog ` Analog Analog ` HDMI HDMI ` HDMI Processing Short Message Playback Screen Position Wall Paper Others Lipsync Front Panel Display Audio Output Zone 2 and Zone 3 parameters Parameter Input Volume Tone Control Descriptions Input source Volume level...
... Volume Volume level SP Config Parametric EQ Configuration Distance Level Information (Auto Setup) Video/ Display Set Setup Menu (Auto Setup) Analog ` Analog Analog ` HDMI HDMI ` HDMI Processing Short Message Playback Screen Position Wall Paper Others Lipsync Front Panel Display Audio Output Zone 2 and Zone 3 parameters Parameter Input Volume Tone Control Descriptions Input source Volume level...

Owner's Manual
Page 107
...the previous menu level, press 9l. 5 Press IMENU to confirm the selection. Using examples ■ Example 1: Comparing the results of the automatic setup and manual setup This unit is empty, "Memory Empty" appears. 4 Press 9ENTER to select the desired memory number and then press 9h. SYSTEM MEMORY 1 ... also make your manual configuration, use the 7SYSTEM MEMORY buttons. "xxx" indicates the zone you do not want to select the desired memory number. To compare the results of the automatic setup or your customized configuration of the sound settings of this unit by using the System ...
...the previous menu level, press 9l. 5 Press IMENU to confirm the selection. Using examples ■ Example 1: Comparing the results of the automatic setup and manual setup This unit is empty, "Memory Empty" appears. 4 Press 9ENTER to select the desired memory number and then press 9h. SYSTEM MEMORY 1 ... also make your manual configuration, use the 7SYSTEM MEMORY buttons. "xxx" indicates the zone you do not want to select the desired memory number. To compare the results of the automatic setup or your customized configuration of the sound settings of this unit by using the System ...

Owner's Manual
Page 110
...TV CH SLEEP MUTE TV INPUT AUDIO SEL AUDIO 3D DSP Set to TV *2 Notes *1 2TV POWER can also operate other audiovisual components made by Yamaha and other components, you must set up the appropriate remote control code for the TV operation mode in advance (page 109). A-E SUBMENU RETURN MEMORY PLAY... to FAMP to control this unit. *2 POWER POWER STANDBY POWER TV AV MULTI V-AUX PHONO DOCK BD HD DVD CBL SAT TUNER DVD TV XM CD MD CD-R DVR VCR SIRIUS USB NET AMP TV SOURCE SELECT SETUP ID MACRO MODE ZONE SYSTEM MEMORY 1 2 3 4 STATUS TITLE BAND PRESET/CH VOLUME MENU SRCH ...
...TV CH SLEEP MUTE TV INPUT AUDIO SEL AUDIO 3D DSP Set to TV *2 Notes *1 2TV POWER can also operate other audiovisual components made by Yamaha and other components, you must set up the appropriate remote control code for the TV operation mode in advance (page 109). A-E SUBMENU RETURN MEMORY PLAY... to FAMP to control this unit. *2 POWER POWER STANDBY POWER TV AV MULTI V-AUX PHONO DOCK BD HD DVD CBL SAT TUNER DVD TV XM CD MD CD-R DVR VCR SIRIUS USB NET AMP TV SOURCE SELECT SETUP ID MACRO MODE ZONE SYSTEM MEMORY 1 2 3 4 STATUS TITLE BAND PRESET/CH VOLUME MENU SRCH ...
Owner's Manual
Page 111
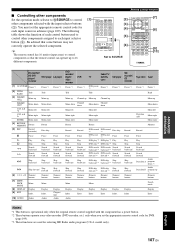
... V-AUX PHONO DOCK BD HD DVD CBL SAT TUNER DVD TV XM CD DVR SIRIUS MD CD-R VCR USB NET AMP TV SOURCE SELECT SETUP ID MACRO MODE ZONE SYSTEM MEMORY 1 2 3 4 STATUS TITLE PRESET/CH VOLUME MENU [2] [3] [4] [5] [6] Set to 16 different components. A-E l Menu left Menu right Menu enter... TV CH SLEEP MUTE TV INPUT AUDIO SEL AUDIO 3D DSP [7] [8] [9] [10] Blu-ray Disc/ HD DVD player/ DVD player LD player recorder [1] AV POWER Power *1 [2] TITLE, BAND [3] PRESET/ CH k Title Menu up *3 Numeric buttons Search mode Display Enter Notes *1 This button is operational only when ...
... V-AUX PHONO DOCK BD HD DVD CBL SAT TUNER DVD TV XM CD DVR SIRIUS MD CD-R VCR USB NET AMP TV SOURCE SELECT SETUP ID MACRO MODE ZONE SYSTEM MEMORY 1 2 3 4 STATUS TITLE PRESET/CH VOLUME MENU [2] [3] [4] [5] [6] Set to 16 different components. A-E l Menu left Menu right Menu enter... TV CH SLEEP MUTE TV INPUT AUDIO SEL AUDIO 3D DSP [7] [8] [9] [10] Blu-ray Disc/ HD DVD player/ DVD player LD player recorder [1] AV POWER Power *1 [2] TITLE, BAND [3] PRESET/ CH k Title Menu up *3 Numeric buttons Search mode Display Enter Notes *1 This button is operational only when ...

Owner's Manual
Page 115
... PRG SELECT CLASSICAL LIVE/CLUB ENTERTAIN MOVIE 1 2 3 4 STEREO ENHANCER SUR.DECODE STRAIGHT 5 6 7 8 HDMI OUT EXTD SUR. A-E 4 3 2 1 SYSTEM MEMORY SETUP ID MACRO MODE ZONE VOLUME MENU SRCH MODE SELECT AMP TV SOURCE 4 3 USB NET SIRIUS VCR DVR DVD TV XM BD HD DVD CBL SAT TUNER AMP TV...MEMORY PLAY INFO DISPLAY MUTE REC Set to FTV. TV POWER POWER STANDBY POWER AV MULTI V-AUX PHONO DOCK BD HD DVD CBL SAT TUNER SUBMENU RETURN SELECT DVD TV XM SIRIUS SETUP ID MACRO MODE ZONE SYSTEM MEMORY 2 PRESET/CH ENTER PLAY INFO DISPLAY Notes • The remote...
... PRG SELECT CLASSICAL LIVE/CLUB ENTERTAIN MOVIE 1 2 3 4 STEREO ENHANCER SUR.DECODE STRAIGHT 5 6 7 8 HDMI OUT EXTD SUR. A-E 4 3 2 1 SYSTEM MEMORY SETUP ID MACRO MODE ZONE VOLUME MENU SRCH MODE SELECT AMP TV SOURCE 4 3 USB NET SIRIUS VCR DVR DVD TV XM BD HD DVD CBL SAT TUNER AMP TV...MEMORY PLAY INFO DISPLAY MUTE REC Set to FTV. TV POWER POWER STANDBY POWER AV MULTI V-AUX PHONO DOCK BD HD DVD CBL SAT TUNER SUBMENU RETURN SELECT DVD TV XM SIRIUS SETUP ID MACRO MODE ZONE SYSTEM MEMORY 2 PRESET/CH ENTER PLAY INFO DISPLAY Notes • The remote...

Owner's Manual
Page 117
...the selected control area" (for TV in advance (page 109). *2 This unit plays the last received station or selected contents before the unit was set with the press of these signals in the ... program your own macros (page 114). ■ Recalling programmed macrooperations POWER POWER STANDBY POWER TV AV MULTI V-AUX PHONO DOCK BD HD DVD CBL SAT TUNER DVD TV XM CD DVR SIRIUS MD... CD-R VCR USB NET AMP TV SOURCE SELECT SETUP ID MACRO MODE ZONE SYSTEM MEMORY 1 2 3 4 Macro buttons MACRO Remote control features ■ Default macro functions...
...the selected control area" (for TV in advance (page 109). *2 This unit plays the last received station or selected contents before the unit was set with the press of these signals in the ... program your own macros (page 114). ■ Recalling programmed macrooperations POWER POWER STANDBY POWER TV AV MULTI V-AUX PHONO DOCK BD HD DVD CBL SAT TUNER DVD TV XM CD DVR SIRIUS MD... CD-R VCR USB NET AMP TV SOURCE SELECT SETUP ID MACRO MODE ZONE SYSTEM MEMORY 1 2 3 4 Macro buttons MACRO Remote control features ■ Default macro functions...
Owner's Manual
Page 127
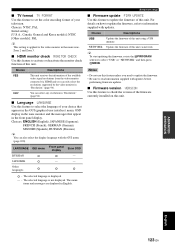
...The selected language is applied to the video monitor in the main zone, Zone 2 and Zone 3. ■ HDMI monitor check MONITOR CHECK Use this feature to select "USB" or "NETWORK" and then press D MENU. Advanced setup ■ Firmware update FIRM UPDATE Use this feature to information ... USB memory. ADVANCED OPERATION English 123 En Choice YES SKIP Descriptions This unit receives the information of the available video signal resolutions from the video monitor connected via network. You can also select the display language with updates before performing firmware updates....
...The selected language is applied to the video monitor in the main zone, Zone 2 and Zone 3. ■ HDMI monitor check MONITOR CHECK Use this feature to select "USB" or "NETWORK" and then press D MENU. Advanced setup ■ Firmware update FIRM UPDATE Use this feature to information ... USB memory. ADVANCED OPERATION English 123 En Choice YES SKIP Descriptions This unit receives the information of the available video signal resolutions from the video monitor connected via network. You can also select the display language with updates before performing firmware updates....

Owner's Manual
Page 151
...Bi-amplification connections 14 Bi-amplifier mode, advanced setup ....122 Bitrate, input audio information ...........38 Bluetooth component playback 64 Bluetooth connection, GUI menu ........87 Bluetooth pairing, GUI menu 86 Bluetooth wireless audio receiver connection 22 Bluetooth, troubleshooting 135 Blu-ray Disc ...95 Control, GUI menu 92 Controlling iPod 67 Controlling other components, remote control 107 Controlling TV, remote control ......... 106 Controlling Zone 2/3 119 Cross Over, GUI menu 88 CSII Cinema, decoder 74 CSII indicator 27 CSII Music, decoder 74 ■D Decoder ...
...Bi-amplification connections 14 Bi-amplifier mode, advanced setup ....122 Bitrate, input audio information ...........38 Bluetooth component playback 64 Bluetooth connection, GUI menu ........87 Bluetooth pairing, GUI menu 86 Bluetooth wireless audio receiver connection 22 Bluetooth, troubleshooting 135 Blu-ray Disc ...95 Control, GUI menu 92 Controlling iPod 67 Controlling other components, remote control 107 Controlling TV, remote control ......... 106 Controlling Zone 2/3 119 Cross Over, GUI menu 88 CSII Cinema, decoder 74 CSII indicator 27 CSII Music, decoder 74 ■D Decoder ...

Owner's Manual
Page 153
..., XM Radio ..... 55 Setting remote control ID, remote control ID setting 121 Set-top box connection 20 Setup, GUI menu 87 Short Message, GUI menu 98 Shortcut button, Network content playback 72 Shortcut button, USB content playback 72 Shuffle, iPod playback style 67 Signal flow 17 SIGNAL ... ■S S VIDEO jacks 15 Sampling, input audio information ...... 38 Saving system settings 101 SB. Multiple point measurement, automatic setup 31 Multi-zone configuration 117 Music Content menu 65 Music Content, GUI menu 87 Music Video, sound field program ...... 43 Muting audio output 38 ...
..., XM Radio ..... 55 Setting remote control ID, remote control ID setting 121 Set-top box connection 20 Setup, GUI menu 87 Short Message, GUI menu 98 Shortcut button, Network content playback 72 Shortcut button, USB content playback 72 Shuffle, iPod playback style 67 Signal flow 17 SIGNAL ... ■S S VIDEO jacks 15 Sampling, input audio information ...... 38 Saving system settings 101 SB. Multiple point measurement, automatic setup 31 Multi-zone configuration 117 Music Content menu 65 Music Content, GUI menu 87 Music Video, sound field program ...... 43 Muting audio output 38 ...


