

RX-V373 Owners Manual
Page 2
...functions 7 Front panel 7 Front display (indicators 8 Rear panel 9 Remote control 10 PREPARATIONS 11 General setup procedure 11 1 Placing speakers 12 2 Connecting speakers 15 Input/output jacks and cables 17 3 Connecting a TV 18 4 Connecting playback devices 23 Connecting video devices (such as ...6 Connecting recording devices 27 7 Connecting the power cable 27 8 Selecting an on-screen menu language 28 9 Optimizing the speaker settings automatically (YPAO 29 Error messages 31 Warning messages 32 PLAYBACK 33 Basic playback procedure 33 Switching information on the front ...
...functions 7 Front panel 7 Front display (indicators 8 Rear panel 9 Remote control 10 PREPARATIONS 11 General setup procedure 11 1 Placing speakers 12 2 Connecting speakers 15 Input/output jacks and cables 17 3 Connecting a TV 18 4 Connecting playback devices 23 Connecting video devices (such as ...6 Connecting recording devices 27 7 Connecting the power cable 27 8 Selecting an on-screen menu language 28 9 Optimizing the speaker settings automatically (YPAO 29 Error messages 31 Warning messages 32 PLAYBACK 33 Basic playback procedure 33 Switching information on the front ...
RX-V373 Owners Manual
Page 3
...59 Sound 61 ECO 62 Function 63 Language 64 Configuring the system settings (ADVANCED SETUP menu 65 ADVANCED SETUP menu items 65 Changing the speaker impedance setting (SP IMP 65 Selecting the remote control ID (REMOTE ID 65 Changing the FM/AM tuning frequency setting (TU 66 ... default settings (INIT 66 Updating the firmware (UPDATE 66 Checking the firmware version (VERSION 66 APPENDIX 67 HDMI and video information 74 Yamaha technologies 74 Video signal flow 75 Information on HDMI 75 HDMI Control 75 HDMI signal compatibility 76 Reference diagram (rear panel 77 Trademarks ...
...59 Sound 61 ECO 62 Function 63 Language 64 Configuring the system settings (ADVANCED SETUP menu 65 ADVANCED SETUP menu items 65 Changing the speaker impedance setting (SP IMP 65 Selecting the remote control ID (REMOTE ID 65 Changing the FM/AM tuning frequency setting (TU 66 ... default settings (INIT 66 Updating the firmware (UPDATE 66 Checking the firmware version (VERSION 66 APPENDIX 67 HDMI and video information 74 Yamaha technologies 74 Video signal flow 75 Information on HDMI 75 HDMI Control 75 HDMI signal compatibility 76 Reference diagram (rear panel 77 Trademarks ...

RX-V373 Owners Manual
Page 5
... movie theaters and concert halls (CINEMA DSP) . p.48 iPod USB device Audio BD/DVD player HDMI Control Audio/Video Speakers Audio The ECO mode (power saving function) allows you to suit your favorite acoustic spaces in various styles. • Automatically optimizing the... speaker settings to create an eco-friendly home theater system . to 5.1-channel speaker system. p.75 FEATURES ➤ What you can do with the unit En 5 p.44 . p.39 HDMI ...
... movie theaters and concert halls (CINEMA DSP) . p.48 iPod USB device Audio BD/DVD player HDMI Control Audio/Video Speakers Audio The ECO mode (power saving function) allows you to suit your favorite acoustic spaces in various styles. • Automatically optimizing the... speaker settings to create an eco-friendly home theater system . to 5.1-channel speaker system. p.75 FEATURES ➤ What you can do with the unit En 5 p.44 . p.39 HDMI ...
RX-V373 Owners Manual
Page 6
...input from English, French, German, Spanish, Russian and Chinese (p.28). Useful tips The combination of signals input into the unit (p.59). Your TV speakers may be selected as an output destination. Use "UPDATE" in the "Setup" menu to select the output destination of video/audio input jacks does...the "Option" menu to change the on-screen menu language... Use "Audio In" in FM/AM tuner. HDMI Control TV audio Video from the TV speakers... Use "Language" in surround sound with a single HDMI cable connection (Audio Return Channel: ARC) (p.18) When using an ARC -compatible TV, ...
...input from English, French, German, Spanish, Russian and Chinese (p.28). Useful tips The combination of signals input into the unit (p.59). Your TV speakers may be selected as an output destination. Use "UPDATE" in the "Setup" menu to select the output destination of video/audio input jacks does...the "Option" menu to change the on-screen menu language... Use "Audio In" in FM/AM tuner. HDMI Control TV audio Video from the TV speakers... Use "Language" in surround sound with a single HDMI cable connection (Audio Return Channel: ARC) (p.18) When using an ARC -compatible TV, ...

RX-V373 Owners Manual
Page 8
Front display (indicators) 1 OUT : 23 4 56 78 9 ENHANCER ADAPTIVE DRC iPod CHARGE SLEEP STEREO TUNED VOL. B Speaker indicators Indicate speaker terminals from which signals are being input or output. A Front speaker (L) S Front speaker (R) D Center speaker F Surround speaker (L) G Surround speaker (R) L Subwoofer FEATURES ➤ Part names and functions En 8 TUNED Lights up when the unit is receiving an FM/AM...
Front display (indicators) 1 OUT : 23 4 56 78 9 ENHANCER ADAPTIVE DRC iPod CHARGE SLEEP STEREO TUNED VOL. B Speaker indicators Indicate speaker terminals from which signals are being input or output. A Front speaker (L) S Front speaker (R) D Center speaker F Surround speaker (L) G Surround speaker (R) L Subwoofer FEATURES ➤ Part names and functions En 8 TUNED Lights up when the unit is receiving an FM/AM...

RX-V373 Owners Manual
Page 9
...composite video) jack For connecting to a TV that supports composite video and outputting video signals (p.22). 0 SUBWOOFER jack For connecting to speakers (p.15). When using ARC, TV audio signal can also be input through the HDMI OUT jack. 2 HDMI 1-4 jacks For connecting ...2 3 COMPONENT VIDEO PR ARC HDMI OUT PR (BD/DVD) HDMI 1 HDMI 2 PB PB Y MONITOR OUT Y COMPONENT VIDEO VIDEO HDMI 3 HDMI 4 MONITOR OUT ANTENNA AM FM SPEAKERS SURROUND CENTER FRONT 4 OPTICAL AV 1 COAXIAL AV 2 COAXIAL (CD) AV 3 OPTICAL ( TV ) AV 4 AV 5 AV OUT AUDIO 1 AUDIO 2 AUDIO OUT SUBWOOFER 5 ...
...composite video) jack For connecting to a TV that supports composite video and outputting video signals (p.22). 0 SUBWOOFER jack For connecting to speakers (p.15). When using ARC, TV audio signal can also be input through the HDMI OUT jack. 2 HDMI 1-4 jacks For connecting ...2 3 COMPONENT VIDEO PR ARC HDMI OUT PR (BD/DVD) HDMI 1 HDMI 2 PB PB Y MONITOR OUT Y COMPONENT VIDEO VIDEO HDMI 3 HDMI 4 MONITOR OUT ANTENNA AM FM SPEAKERS SURROUND CENTER FRONT 4 OPTICAL AV 1 COAXIAL AV 2 COAXIAL (CD) AV 3 OPTICAL ( TV ) AV 4 AV 5 AV OUT AUDIO 1 AUDIO 2 AUDIO OUT SUBWOOFER 5 ...

RX-V373 Owners Manual
Page 11
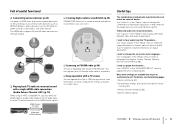
... with the unit! PREPARATIONS ➤ General setup procedure En 11 PREPARATIONS General setup procedure 1 Placing speakers (p.12) Select the speaker layout for the number of speakers that you are using and place them in the power cable. 8 Selecting an on-screen menu... desired on-screen menu language (default: English). 9 Optimizing the speaker settings automatically (YPAO) (p.29) Optimize the speaker settings, such as volume balance and acoustic parameters, to suit your room. 2 Connecting speakers (p.15) Connect the speakers to the unit. 3 Connecting a TV (p.18) Connect a TV...
... with the unit! PREPARATIONS ➤ General setup procedure En 11 PREPARATIONS General setup procedure 1 Placing speakers (p.12) Select the speaker layout for the number of speakers that you are using and place them in the power cable. 8 Selecting an on-screen menu... desired on-screen menu language (default: English). 9 Optimizing the speaker settings automatically (YPAO) (p.29) Optimize the speaker settings, such as volume balance and acoustic parameters, to suit your room. 2 Connecting speakers (p.15) Connect the speakers to the unit. 3 Connecting a TV (p.18) Connect a TV...

RX-V373 Owners Manual
Page 12
... counted as the front speakers. For details, see "Setting the speaker impedance" (p.14). • (Except for 8-ohm speakers. This section describes the representative speaker layout examples. and Canada models) Use speakers with an impedance of speakers that you can also use 4-ohm speakers as "0.1". This channel is configured for U.S.A. 1 Speaker placement 2 3 4 5 6 7 8 9 1 Placing speakers Select the speaker layout for the number...
... counted as the front speakers. For details, see "Setting the speaker impedance" (p.14). • (Except for 8-ohm speakers. This section describes the representative speaker layout examples. and Canada models) Use speakers with an impedance of speakers that you can also use 4-ohm speakers as "0.1". This channel is configured for U.S.A. 1 Speaker placement 2 3 4 5 6 7 8 9 1 Placing speakers Select the speaker layout for the number...

RX-V373 Owners Manual
Page 14
... to standby mode and remove the power cable from the AC wall outlet. PREPARATIONS ➤ Placing speakers En 14 z (power) STRAIGHT 3 Check that "SP IMP." 1 Speaker placement 2 3 4 5 6 7 8 9 ■ Setting the speaker impedance (U.S.A. and Canada models only) Under its default settings, the unit is displayed on the front panel, press ...). You are now ready to an AC wall outlet. 2 While holding down STRAIGHT on the front display. is configured for 8-ohm speakers. When connecting 6-ohm speakers, set the unit to "6 MIN". In this case, you can also use 4-ohm...
... to standby mode and remove the power cable from the AC wall outlet. PREPARATIONS ➤ Placing speakers En 14 z (power) STRAIGHT 3 Check that "SP IMP." 1 Speaker placement 2 3 4 5 6 7 8 9 ■ Setting the speaker impedance (U.S.A. and Canada models only) Under its default settings, the unit is displayed on the front panel, press ...). You are now ready to an AC wall outlet. 2 While holding down STRAIGHT on the front display. is configured for 8-ohm speakers. When connecting 6-ohm speakers, set the unit to "6 MIN". In this case, you can also use 4-ohm...

RX-V373 Owners Manual
Page 15
...the unit's metal parts. If the wires are colored to prevent confusion, connect the black wire to the negative and the other systems, connect speakers while referring to the connection diagram for a 5.1-channel system as an example. For other wire to the unit. Caution • Remove the... unit's power cable from the ends of the speaker cable and twist the bare wires of the cable firmly together. d Tighten the terminal. + (red) c b FRONT - (black) da Using a banana plug ...
...the unit's metal parts. If the wires are colored to prevent confusion, connect the black wire to the negative and the other systems, connect speakers while referring to the connection diagram for a 5.1-channel system as an example. For other wire to the unit. Caution • Remove the... unit's power cable from the ends of the speaker cable and twist the bare wires of the cable firmly together. d Tighten the terminal. + (red) c b FRONT - (black) da Using a banana plug ...

RX-V373 Owners Manual
Page 16
b Press down the tab. c Insert the bare wires of the cable firmly together. Audio pin cable PREPARATIONS ➤ Connecting speakers En 16 1 2 Speaker connections 3 4 5 6 7 8 9 (Connecting center/surround speakers) a Remove approximately 10 mm (3/8") of insulation from the ends of the speaker cable, and twist the bare wires of the cable into the hole in the terminal. d Release the tab. a ROUND CENTER d b + (red) c - (black) ■ Connecting the subwoofer Use an audio pin cable to connect the subwoofer.
b Press down the tab. c Insert the bare wires of the cable firmly together. Audio pin cable PREPARATIONS ➤ Connecting speakers En 16 1 2 Speaker connections 3 4 5 6 7 8 9 (Connecting center/surround speakers) a Remove approximately 10 mm (3/8") of insulation from the ends of the speaker cable, and twist the bare wires of the cable into the hole in the terminal. d Release the tab. a ROUND CENTER d b + (red) c - (black) ■ Connecting the subwoofer Use an audio pin cable to connect the subwoofer.

RX-V373 Owners Manual
Page 19
... and operating your TV, refer to the instruction manual for the TV. 1 After connecting external devices (such as TV audio input at the factory. Setup Speaker HDMI Sound ECO Function Language Configuration e Press ENTER again. a Enable HDMI Control on the TV • If the audio is interrupted while using ARC, set...
... and operating your TV, refer to the instruction manual for the TV. 1 After connecting external devices (such as TV audio input at the factory. Setup Speaker HDMI Sound ECO Function Language Configuration e Press ENTER again. a Enable HDMI Control on the TV • If the audio is interrupted while using ARC, set...

RX-V373 Owners Manual
Page 20
... to configure the following settings. For details on settings and operating your iPod or USB storage device, or configure the settings of the unit. Setup Speaker HDMI Sound ECO Function Language Configuration d Press ENTER again.
... to configure the following settings. For details on settings and operating your iPod or USB storage device, or configure the settings of the unit. Setup Speaker HDMI Sound ECO Function Language Configuration d Press ENTER again.

RX-V373 Owners Manual
Page 26
AM antenna FM antenna The unit (rear) HDMI 2 HDMI 3 HDMI 4 MONITOR OUT ANTENNA AM FM SPEAKERS SURROUND CENTER FRONT OPTICAL ( TV ) AV 4 AV 5 AV OUT AUDIO 1 AUDIO 2 AUDIO OUT SUBWOOFER Camcorder If you need to connect your TV to the MONITOR ...
AM antenna FM antenna The unit (rear) HDMI 2 HDMI 3 HDMI 4 MONITOR OUT ANTENNA AM FM SPEAKERS SURROUND CENTER FRONT OPTICAL ( TV ) AV 4 AV 5 AV OUT AUDIO 1 AUDIO 2 AUDIO OUT SUBWOOFER Camcorder If you need to connect your TV to the MONITOR ...

RX-V373 Owners Manual
Page 27
VOLTAGE SELECTOR The unit (rear) VOLTAGE SELECTOR ANTENNA AM FM SPEAKERS SURROUND CENTER FRONT 110V 120V 220V 240V After all the connections are AC 110-120/220-240 V, 50/60 Hz. • Make sure you set ... setting of VOLTAGE SELECTOR according to use the AV OUT and AUDIO OUT jacks only for connecting recording devices. The unit (rear) ANTENNA AM FM SPEAKERS SURROUND CENTER FRONT SUBWOOFER To an AC wall outlet PREPARATIONS ➤ Connecting recording devices En 27 1 2 3 4 5 6 Recording device connections 7 Power cable connection 8 9 6 Connecting recording devices...
VOLTAGE SELECTOR The unit (rear) VOLTAGE SELECTOR ANTENNA AM FM SPEAKERS SURROUND CENTER FRONT 110V 120V 220V 240V After all the connections are AC 110-120/220-240 V, 50/60 Hz. • Make sure you set ... setting of VOLTAGE SELECTOR according to use the AV OUT and AUDIO OUT jacks only for connecting recording devices. The unit (rear) ANTENNA AM FM SPEAKERS SURROUND CENTER FRONT SUBWOOFER To an AC wall outlet PREPARATIONS ➤ Connecting recording devices En 27 1 2 3 4 5 6 Recording device connections 7 Power cable connection 8 9 6 Connecting recording devices...

RX-V373 Owners Manual
Page 28
Setup Speaker HDMI Sound ECO Function Language English Français Deutsch Español 5 Use the cursor keys to select "Language" and press ENTER. If not, ..., Russian and Chinese. 1 Press RECEIVER z to turn on the unit. 2 Turn on the TV and switch the TV input to the unit via HDMI. Setup Speaker HDMI Sound ECO Function Language English Français Deutsch Español PREPARATIONS ➤ Selecting an on the front display is provided in English...
Setup Speaker HDMI Sound ECO Function Language English Français Deutsch Español 5 Use the cursor keys to select "Language" and press ENTER. If not, ..., Russian and Chinese. 1 Press RECEIVER z to turn on the unit. 2 Turn on the TV and switch the TV input to the unit via HDMI. Setup Speaker HDMI Sound ECO Function Language English Français Deutsch Español PREPARATIONS ➤ Selecting an on the front display is provided in English...
RX-V373 Owners Manual
Page 29
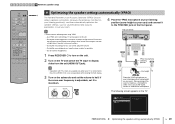
..., you cannot adjust the volume. - We recommend the use the tripod screws to the unit via HDMI. 1 2 3 4 5 6 7 8 9 Automatic speaker setup TRANSMIT SLEEP RECEIVER HDMI 1 2 3 4 AV 1 2 3 4 AUDIO 5 1 2 USB V-AUX MODE FM INFO TUNER AM MEMORY PRESET TUNING MOVIE ...ENHANCER BD DVD SETUP SCENE TV CD RADIO OPTION RECEIVER z ENTER RETURN VOLUME MUTE 9 Optimizing the speaker settings automatically (YPAO) The Yamaha Parametric room Acoustic Optimizer (YPAO) function detects speaker connections, measures the distances from the unit (HDMI OUT jack). 1 2 9 3 4 YPAO...
..., you cannot adjust the volume. - We recommend the use the tripod screws to the unit via HDMI. 1 2 3 4 5 6 7 8 9 Automatic speaker setup TRANSMIT SLEEP RECEIVER HDMI 1 2 3 4 AV 1 2 3 4 AUDIO 5 1 2 USB V-AUX MODE FM INFO TUNER AM MEMORY PRESET TUNING MOVIE ...ENHANCER BD DVD SETUP SCENE TV CD RADIO OPTION RECEIVER z ENTER RETURN VOLUME MUTE 9 Optimizing the speaker settings automatically (YPAO) The Yamaha Parametric room Acoustic Optimizer (YPAO) function detects speaker connections, measures the distances from the unit (HDMI OUT jack). 1 2 9 3 4 YPAO...

RX-V373 Owners Manual
Page 30
... Auto Setup Start Exit SAVE Measurement Finished Result 3 / 2 / 0.1 ch 3.0 / 10.5 m -3.0 / 10.0 dB The adjusted speaker settings are given (when operating with a problem is sensitive to heat, so should not be placed anywhere where it could be exposed to select... ch 3.0 / 10.5 m -3.0 / 10.0 dB 1 2 3 4 1 The number of speakers (front side/rear side/ subwoofer) 2 Speaker distance (nearest/farthest) 3 Adjustment range of speaker output level 4 Warning message (if available) • A speaker with the front display), use the cursor keys (q/w) to check the other warning messages. 6 To ...
... Auto Setup Start Exit SAVE Measurement Finished Result 3 / 2 / 0.1 ch 3.0 / 10.5 m -3.0 / 10.0 dB The adjusted speaker settings are given (when operating with a problem is sensitive to heat, so should not be placed anywhere where it could be exposed to select... ch 3.0 / 10.5 m -3.0 / 10.0 dB 1 2 3 4 1 The number of speakers (front side/rear side/ subwoofer) 2 Speaker distance (nearest/farthest) 3 Adjustment range of speaker output level 4 Warning message (if available) • A speaker with the front display), use the cursor keys (q/w) to check the other warning messages. 6 To ...

RX-V373 Owners Manual
Page 31
...CR SL SR Front display ■ Procedure to handle errors 1 Check the content of the surround speakers cannot be detected. If this error occurs repeatedly, contact the nearest authorized Yamaha dealer or service center. b Use the cursor keys (q/w) to select the desired operation. One of... the measurement, resolve the problem and perform YPAO again. Exit YPAO, and turn off and on the front display. PREPARATIONS ➤ Optimizing the speaker settings automatically (YPAO) En 31 SP (E-2:NO SUR SP) E-5:Noisy (E-5:NOISY) E-7:No MIC (E-7:NO MIC) E-8:No Signal (E-8:NO SIGNAL) E-9:...
...CR SL SR Front display ■ Procedure to handle errors 1 Check the content of the surround speakers cannot be detected. If this error occurs repeatedly, contact the nearest authorized Yamaha dealer or service center. b Use the cursor keys (q/w) to select the desired operation. One of... the measurement, resolve the problem and perform YPAO again. Exit YPAO, and turn off and on the front display. PREPARATIONS ➤ Optimizing the speaker settings automatically (YPAO) En 31 SP (E-2:NO SUR SP) E-5:Noisy (E-5:NOISY) E-7:No MIC (E-7:NO MIC) E-8:No Signal (E-8:NO SIGNAL) E-9:...

RX-V373 Owners Manual
Page 32
...En 32 SW L CR SL SR Front display ■ Procedure to use the unit with the optimal speaker settings. We recommend using the same speakers or speakers with the reverse polarity (+/-). Depending on the front display. To discard the measurement result: Select "CANCEL" ... W-1:Out of Phase (W-1:PHASE) W-2:Over Distance (W-2:DISTANCE) W-3:Level Error (W-3:LEVEL) Cause Remedy A speaker cable may appear even if the speakers are significant volume differences between the speakers. Check the cable connections (+/-) of the listening position. If there is any problem, exit YPAO,...
...En 32 SW L CR SL SR Front display ■ Procedure to use the unit with the optimal speaker settings. We recommend using the same speakers or speakers with the reverse polarity (+/-). Depending on the front display. To discard the measurement result: Select "CANCEL" ... W-1:Out of Phase (W-1:PHASE) W-2:Over Distance (W-2:DISTANCE) W-3:Level Error (W-3:LEVEL) Cause Remedy A speaker cable may appear even if the speakers are significant volume differences between the speakers. Check the cable connections (+/-) of the listening position. If there is any problem, exit YPAO,...


