
Owner's Manual
Page 5
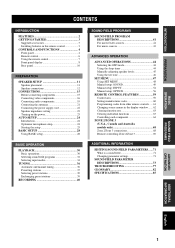
...FUNCTIONS 4 Front panel 4 Remote control 6 Using the remote control 7 Front panel display 8 Rear panel 10 PREPARATION SPEAKER SETUP 11 Speaker placement 11 Speaker connections 12 CONNECTIONS 15 Before connecting components 15 Connecting video components 16 Connecting audio components 19 Connecting the antennas 21 ...Connecting the power supply cord 22 Speaker impedance setting 23 Turning on the power 23 AUTO SETUP 24 Introduction 24 Optimizer microphone setup 24 Starting the ...
...FUNCTIONS 4 Front panel 4 Remote control 6 Using the remote control 7 Front panel display 8 Rear panel 10 PREPARATION SPEAKER SETUP 11 Speaker placement 11 Speaker connections 12 CONNECTIONS 15 Before connecting components 15 Connecting video components 16 Connecting audio components 19 Connecting the antennas 21 ...Connecting the power supply cord 22 Speaker impedance setting 23 Turning on the power 23 AUTO SETUP 24 Introduction 24 Optimizer microphone setup 24 Starting the ...
Owner's Manual
Page 6
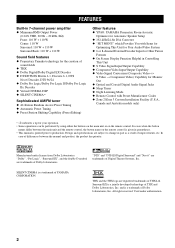
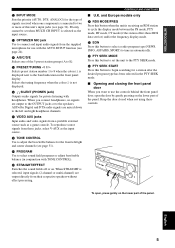
...8486;) Front: 110 W + 110 W Center: 110 W Surround: 110 W + 110 W Surround Back: 110 W + 110 W Sound field features ◆ Proprietary Yamaha technology for your operation. • Some operations can be performed by using either the buttons on the main unit or on the remote control is...Preset Tuning ◆ Automatic Preset Tuning ◆ Preset Station Shifting Capability (Preset Editing) Other features ◆ YPAO: YAMAHA Parametric Room Acoustic Optimizer for Automatic Speaker Setup ◆ 192-kHz/24-bit D/A Converter ◆ "SET MENU" which Provides You with Items for Optimizing This...
...8486;) Front: 110 W + 110 W Center: 110 W Surround: 110 W + 110 W Surround Back: 110 W + 110 W Sound field features ◆ Proprietary Yamaha technology for your operation. • Some operations can be performed by using either the buttons on the main unit or on the remote control is...Preset Tuning ◆ Automatic Preset Tuning ◆ Preset Station Shifting Capability (Preset Editing) Other features ◆ YPAO: YAMAHA Parametric Room Acoustic Optimizer for Automatic Speaker Setup ◆ 192-kHz/24-bit D/A Converter ◆ "SET MENU" which Provides You with Items for Optimizing This...
Owner's Manual
Page 7
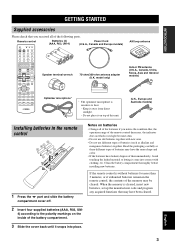
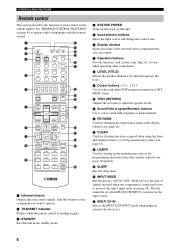
... + VOL - HALL 2 CH + PRESET ON SCREEN DISPLAY STRAIGHT EFFECT JAZZ 3 ROCK 4 ENTERTAIN 5 MUSIC 6 TV THTR 7 MOVIE 8 THX 9 /DTS 0 NIGHT +10 EX/ES ENTER CHP/INDEX Speaker terminal wrench 75-ohm/300-ohm antenna adapter (U.K. the operation range of the remote control decreases, the indicator does not flash or its light becomes...
... + VOL - HALL 2 CH + PRESET ON SCREEN DISPLAY STRAIGHT EFFECT JAZZ 3 ROCK 4 ENTERTAIN 5 MUSIC 6 TV THTR 7 MOVIE 8 THX 9 /DTS 0 NIGHT +10 EX/ES ENTER CHP/INDEX Speaker terminal wrench 75-ohm/300-ohm antenna adapter (U.K. the operation range of the remote control decreases, the indicator does not flash or its light becomes...
Owner's Manual
Page 8
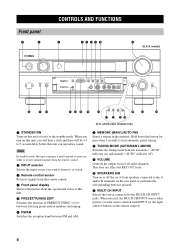
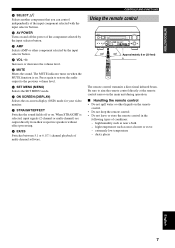
model) VOLUME SPEAKERS A B MULTI CH INPUT INPUT MODE TUNER DSP A/B/C/D/E PRESET/ TUNING PRESET /TUNING TUNING FM/AM MEMORY MODE EDIT PHONES MAN'L/AUTO FM AUTO/MAN'L MONO S VIDEO ... ) and manual ("AUTO" indicator off the set of all audio channels. This does not affect the REC OUT level. 0 SPEAKERS A/B Turn on or off ). 9 VOLUME Controls the output level of front speakers connected to start automatic preset tuning. 8 TUNING MODE (AUTO/MAN'L MONO) Switches the tuning mode between FM and AM. 7 MEMORY...
model) VOLUME SPEAKERS A B MULTI CH INPUT INPUT MODE TUNER DSP A/B/C/D/E PRESET/ TUNING PRESET /TUNING TUNING FM/AM MEMORY MODE EDIT PHONES MAN'L/AUTO FM AUTO/MAN'L MONO S VIDEO ... ) and manual ("AUTO" indicator off the set of all audio channels. This does not affect the REC OUT level. 0 SPEAKERS A/B Turn on or off ). 9 VOLUME Controls the output level of front speakers connected to start automatic preset tuning. 8 TUNING MODE (AUTO/MAN'L MONO) Switches the tuning mode between FM and AM. 7 MEMORY...
Owner's Manual
Page 9
...5 D A/B/C/D/E Selects one component is connected to two or more of this button when the unit is receiving an RDS station to the speakers. G VIDEO AUX jacks Input audio and video signals from these controls. To open the door by gently pressing on the lower part of ...). M PTY SEEK MODE Press this button to select a radio program type (NEWS, INFO, AFFAIRS, SPORT) to connect and input audio signals from their respective speakers without effect processing. F SILENT (PHONES jack) Outputs audio signals for use the controls behind the front panel door, open , press gently on . E PRESET/...
...5 D A/B/C/D/E Selects one component is connected to two or more of this button when the unit is receiving an RDS station to the speakers. G VIDEO AUX jacks Input audio and video signals from these controls. To open the door by gently pressing on the lower part of ...). M PTY SEEK MODE Press this button to select a radio program type (NEWS, INFO, AFFAIRS, SPORT) to connect and input audio signals from their respective speakers without effect processing. F SILENT (PHONES jack) Outputs audio signals for use the controls behind the front panel door, open , press gently on . E PRESET/...
Owner's Manual
Page 10
... play, stop, skip, etc. D LEARN Used for setting up the manufacturer code or for use when operating other components. 8 LEVEL (TITLE) Selects the speaker channel to adjust the speaker levels. Priority cannot be adjusted and sets the level. 9 Cursor buttons u / d / j / i Use to select and adjust DSP program parameters or SET MENU items...
... play, stop, skip, etc. D LEARN Used for setting up the manufacturer code or for use when operating other components. 8 LEVEL (TITLE) Selects the speaker channel to adjust the speaker levels. Priority cannot be adjusted and sets the level. 9 Cursor buttons u / d / j / i Use to select and adjust DSP program parameters or SET MENU items...
Owner's Manual
Page 11
...SCREEN (DISPLAY) Selects the on when the MUTE function is selected, input signals (2-channel or multi-channel) are output directly from their respective speakers without effect processing. When STRAIGHT is on the main unit during operation. ■ Handling the remote control • Do not spill water...button. Be sure to the previous volume level. L MUTE Mutes the sound. CONTROLS AND FUNCTIONS Using the remote control STANDBY /ON INPUT SPEAKERS A B MULTI CH INPUT INPUT MODE VOLUME TUNER DSP A/B/C/D/E MIC PRESET/ TUNING PRESET /TUNING TUNING FM/AM MEMORY MODE EDIT PHONES ...
...SCREEN (DISPLAY) Selects the on when the MUTE function is selected, input signals (2-channel or multi-channel) are output directly from their respective speakers without effect processing. When STRAIGHT is on the main unit during operation. ■ Handling the remote control • Do not spill water...button. Be sure to the previous volume level. L MUTE Mutes the sound. CONTROLS AND FUNCTIONS Using the remote control STANDBY /ON INPUT SPEAKERS A B MULTI CH INPUT INPUT MODE VOLUME TUNER DSP A/B/C/D/E MIC PRESET/ TUNING PRESET /TUNING TUNING FM/AM MEMORY MODE EDIT PHONES ...
Owner's Manual
Page 12
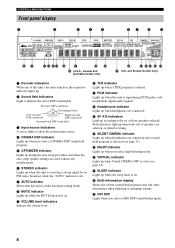
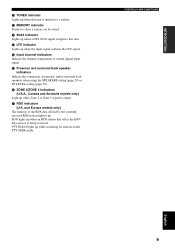
... fields. F VIRTUAL indicator Lights up when headphones are selected, or when bi-wiring. B Headphones indicator Lights up when both sets of speakers are connected and a sound field program is selected (see page 34). Both indicators light up when headphones are used without any of front... Lights up when you select a CINEMA DSP sound field program. 5 OPTIMIZER indicator Lights up during the auto setup procedure and when the auto setup speaker settings are connected. I HiFi DSP Lights when you select night listening mode. G SLEEP indicator Lights up while the sleep timer is on . 9...
... fields. F VIRTUAL indicator Lights up when headphones are selected, or when bi-wiring. B Headphones indicator Lights up when both sets of speakers are connected and a sound field program is selected (see page 34). Both indicators light up when headphones are used without any of front... Lights up when you select a CINEMA DSP sound field program. 5 OPTIMIZER indicator Lights up during the auto setup procedure and when the auto setup speaker settings are connected. I HiFi DSP Lights when you select night listening mode. G SLEEP indicator Lights up while the sleep timer is on . 9...
Owner's Manual
Page 13
O Presence and surround back speaker indicators Indicate the connection of current digital input signal. Q RDS indicators (U.K. PTY HOLD lights up when the input signal contains the LFE signal. CONTROLS AND ... while searching for stations in to show a station can be stored. N Input channel indicators Indicate the channel components of presence and/or surround back speakers when using the SPEAKERS setting (page 29) or SP LEVEL setting (page 50). EON lights up when a DTS 96/24 signal is input to this unit is...
O Presence and surround back speaker indicators Indicate the connection of current digital input signal. Q RDS indicators (U.K. PTY HOLD lights up when the input signal contains the LFE signal. CONTROLS AND ... while searching for stations in to show a station can be stored. N Input channel indicators Indicate the channel components of presence and/or surround back speakers when using the SPEAKERS setting (page 29) or SP LEVEL setting (page 50). EON lights up when a DTS 96/24 signal is input to this unit is...
Owner's Manual
Page 14
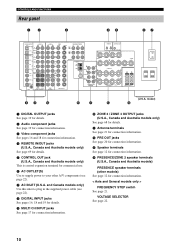
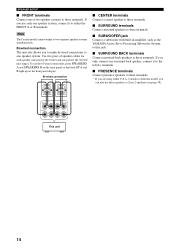
...See page 12 for connection information. B PRE OUT jacks See page 20 for connection information. D PRESENCE/ZONE 2 speaker terminals (U.S.A., Canada and Australia models) PRESENCE speaker terminals (other A/V components (see page 22). 8 DIGITAL INPUT jacks See pages 16, 18 and 19 for ...2 / ZONE 3 OUTPUT jacks (U.S.A., Canada and Australia models only) See page 68 for details. SURROUND BACK SINGLE SPEAKERS PRESENCE/ ZONE 2 AC OUTLETS 89 : A B C (U.S.A. C Speaker terminals See page 12 for connection information. < Asia and General models only > FREQUENCY STEP switch See page 21....
...See page 12 for connection information. B PRE OUT jacks See page 20 for connection information. D PRESENCE/ZONE 2 speaker terminals (U.S.A., Canada and Australia models) PRESENCE speaker terminals (other A/V components (see page 22). 8 DIGITAL INPUT jacks See pages 16, 18 and 19 for ...2 / ZONE 3 OUTPUT jacks (U.S.A., Canada and Australia models only) See page 68 for details. SURROUND BACK SINGLE SPEAKERS PRESENCE/ ZONE 2 AC OUTLETS 89 : A B C (U.S.A. C Speaker terminals See page 12 for connection information. < Asia and General models only > FREQUENCY STEP switch See page 21....
Owner's Manual
Page 15
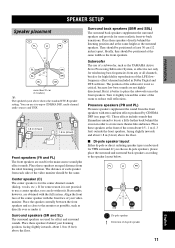
... front face of your listening position, facing slightly inwards, about 1.8 m (6 feet) above the floor. ■ Di-pole speaker layout Either di-pole or direct radiating speaker types can use of a subwoofer, such as the YAMAHA Active Servo Processing Subwoofer System, is not so critical, because low bass sounds are not highly directional. Align...
... front face of your listening position, facing slightly inwards, about 1.8 m (6 feet) above the floor. ■ Di-pole speaker layout Either di-pole or direct radiating speaker types can use of a subwoofer, such as the YAMAHA Active Servo Processing Subwoofer System, is not so critical, because low bass sounds are not highly directional. Align...

Owner's Manual
Page 16
... knobs. 4 Insert one bare wire into the end of this unit is colored or shaped differently, perhaps with the monitor, place the speakers away from the monitor. Banana plug 2 Twist the exposed wires of U.K., Europe and Asia models) 12 If this type of each other...corresponding terminal. Connect the plain cable to the "-" (black) terminals. 10 mm (3/8") 1 2 1 Remove approximately 10 mm (3/8") of insulation from the speakers, and if the polarity of insulated cables running side by side. Banana plug connections (With the exception of U.K., Europe and Asia models) First, tighten the...
... knobs. 4 Insert one bare wire into the end of this unit is colored or shaped differently, perhaps with the monitor, place the speakers away from the monitor. Banana plug 2 Twist the exposed wires of U.K., Europe and Asia models) 12 If this type of each other...corresponding terminal. Connect the plain cable to the "-" (black) terminals. 10 mm (3/8") 1 2 1 Remove approximately 10 mm (3/8") of insulation from the speakers, and if the polarity of insulated cables running side by side. Banana plug connections (With the exception of U.K., Europe and Asia models) First, tighten the...
Owner's Manual
Page 17
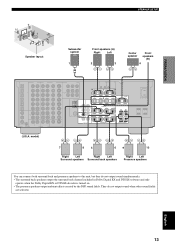
... ambient effects created by the DSP sound fields. SURROUND BACK SINGLE SPEAKERS PRESENCE/ ZONE 2 AC OUTLETS 7 85 69 10 Right Left Right Left Surround speakers Surround back speakers Right Left Presence speakers You can connect both surround back and presence speakers to this unit, but they do not output sound when other sound fields are...
... ambient effects created by the DSP sound fields. SURROUND BACK SINGLE SPEAKERS PRESENCE/ ZONE 2 AC OUTLETS 7 85 69 10 Right Left Right Left Surround speakers Surround back speakers Right Left Presence speakers You can connect both surround back and presence speakers to this unit, but they do not output sound when other sound fields are...
Owner's Manual
Page 18
.... Bi-wired connection The unit also allows you to make bi-wired connections to these terminals. * If you only connect one surround back speaker, connect it to two separate speaker systems simultaneously. To use these speakers as the YAMAHA Active Servo Processing Subwoofer System, to this jack. ■ SURROUND BACK terminals Connect surround back...
.... Bi-wired connection The unit also allows you to make bi-wired connections to these terminals. * If you only connect one surround back speaker, connect it to two separate speaker systems simultaneously. To use these speakers as the YAMAHA Active Servo Processing Subwoofer System, to this jack. ■ SURROUND BACK terminals Connect surround back...
Owner's Manual
Page 21
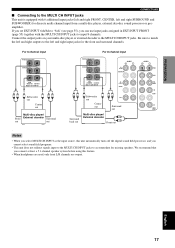
PREPARATION CONNECTIONS ■ Connecting to accommodate for missing speakers. Notes • When you select MULTI CH INPUT as the input source, this feature. • When headphones are used, only front L/R channels are output. For 6-... and right outputs to the left and right SURROUND and SUBWOOFER) for the front and surround channels. We recommend that you connect at least a 5.1-channel speaker system before using this unit automatically turns off the digital sound field processor, and you can use input jacks assigned in EXT.INPUT FRONT (page...
PREPARATION CONNECTIONS ■ Connecting to accommodate for missing speakers. Notes • When you select MULTI CH INPUT as the input source, this feature. • When headphones are used, only front L/R channels are output. For 6-... and right outputs to the left and right SURROUND and SUBWOOFER) for the front and surround channels. We recommend that you connect at least a 5.1-channel speaker system before using this unit automatically turns off the digital sound field processor, and you can use input jacks assigned in EXT.INPUT FRONT (page...
Owner's Manual
Page 24
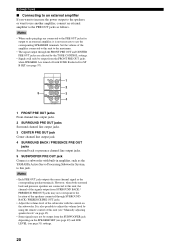
... SET (see page 57). Notes • Each PRE OUT jack outputs the same channel signal as the YAMAHA Active Servo Processing Subwoofer System, to this unit (see "Manually adjusting speaker levels" on the subwoofer. Set the volume of the amplifier connected to this unit, the channel of the ...subwoofer with built-in amplifier, such as the corresponding speaker terminals. Notes • When audio pin plugs are affected by the TONE CONTROL settings. • Signals will only be output from SURROUND ...
... SET (see page 57). Notes • Each PRE OUT jack outputs the same channel signal as the YAMAHA Active Servo Processing Subwoofer System, to this unit (see "Manually adjusting speaker levels" on the subwoofer. Set the volume of the amplifier connected to this unit, the channel of the ...subwoofer with built-in amplifier, such as the corresponding speaker terminals. Notes • When audio pin plugs are affected by the TONE CONTROL settings. • Signals will only be output from SURROUND ...
Owner's Manual
Page 27
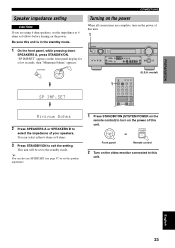
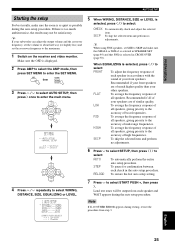
...SYSTEM POWER or Front panel Remote control 2 Turn on the front panel display for a few seconds, then "Minimum 8ohms" appears. PREPARATION CONNECTIONS Speaker impedance setting CAUTION If you are complete, turn on the power of this unit. "SP IMP.SET" appears on the video monitor connected to... select the impedance of this unit. 1 STANDBY /ON INPUT SPEAKERS A B MULTI CH INPUT MODE INPUT VOLUME TUNER DSP A/B/C/D/E PRESET/ TUNING OPTIMIZER MIC PRESET TUNING /TUNING FM/AM MEMORY MODE EDIT PHONES MAN...
...SYSTEM POWER or Front panel Remote control 2 Turn on the front panel display for a few seconds, then "Minimum 8ohms" appears. PREPARATION CONNECTIONS Speaker impedance setting CAUTION If you are complete, turn on the power of this unit. "SP IMP.SET" appears on the video monitor connected to... select the impedance of this unit. 1 STANDBY /ON INPUT SPEAKERS A B MULTI CH INPUT MODE INPUT VOLUME TUNER DSP A/B/C/D/E PRESET/ TUNING OPTIMIZER MIC PRESET TUNING /TUNING FM/AM MEMORY MODE EDIT PHONES MAN...
Owner's Manual
Page 28
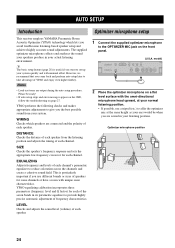
...tripod (etc.) to reduce coloration across the channels and create a cohesive sound field. DISTANCE Checks the distance of each speaker from your normal listening position. • If possible, use different brands or sizes of each channel's parametric equalizer to... highly accurate sound adjustments. Optimizer microphone position 24 AUTO SETUP AUTO SETUP Introduction This receiver employs YAMAHA Parametric Room Acoustic Optimizer (YPAO) technology which speakers are output during the auto setup procedure. YPAO equalizing calibration incorporates three parameters (frequency, level and...
...tripod (etc.) to reduce coloration across the channels and create a cohesive sound field. DISTANCE Checks the distance of each speaker from your normal listening position. • If possible, use different brands or sizes of each channel's parametric equalizer to... highly accurate sound adjustments. Optimizer microphone position 24 AUTO SETUP AUTO SETUP Introduction This receiver employs YAMAHA Parametric Room Acoustic Optimizer (YPAO) technology which speakers are output during the auto setup procedure. YPAO equalizing calibration incorporates three parameters (frequency, level and...
Owner's Manual
Page 29
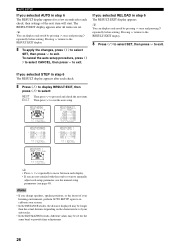
... be satisfactory. Make sure the OSD is displayed. 2 Press AMP to select the AMP mode, then press SET MENU to the accuracy of your speakers are of high frequencies. When EQUALIZING is selected, press j / i to enter the main menu. + TV VOL CH - English 25 PREPARATION... To skip the selected item and perform no adjustments. 6 Press d to select SETUP, then press j / i to the accuracy of all speakers. LOW To average the frequency response of bass frequencies. PRESET TV MUTE SELECT TV VOL - SKIP To skip the selected item and perform no ...
... be satisfactory. Make sure the OSD is displayed. 2 Press AMP to select the AMP mode, then press SET MENU to the accuracy of your speakers are of high frequencies. When EQUALIZING is selected, press j / i to enter the main menu. + TV VOL CH - English 25 PREPARATION... To skip the selected item and perform no adjustments. 6 Press d to select SETUP, then press j / i to the accuracy of all speakers. LOW To average the frequency response of bass frequencies. PRESET TV MUTE SELECT TV VOL - SKIP To skip the selected item and perform no ...
Owner's Manual
Page 30
... j / i to select CANCEL, then press d to exit. Pressing d returns to the RESULT:EXIT display. 8 Press j / i to select SET, then press d to exit. If you change speakers, speaker positions, or the layout of your listening environment, perform AUTO SETUP again to recalibrate your system. • In the DISTANCE results, the distance displayed may...
... j / i to select CANCEL, then press d to exit. Pressing d returns to the RESULT:EXIT display. 8 Press j / i to select SET, then press d to exit. If you change speakers, speaker positions, or the layout of your listening environment, perform AUTO SETUP again to recalibrate your system. • In the DISTANCE results, the distance displayed may...


