
Setup Guide
Page 1
...■ Audio pin cable (x 1) ■ Digital optical cable or stereo pin cable (x 1) (unnecessary if your TV supports ARC) http://download.yamaha.com/ Cables necessary for U.S.A. ■ YPAO microphone Insert into the remote control in the correct polarity (+/-). ■ Power cable ■ AM antenna... ■ Safety Brochure *The figure of a BD/DVD on the supplied CD-ROM. For more information, refer to "Owner 's Manual" on this unit. AV Receiver 1 Preparations Accessories Check that the following accessories are supplied with this product. ■ Remote control ■...
...■ Audio pin cable (x 1) ■ Digital optical cable or stereo pin cable (x 1) (unnecessary if your TV supports ARC) http://download.yamaha.com/ Cables necessary for U.S.A. ■ YPAO microphone Insert into the remote control in the correct polarity (+/-). ■ Power cable ■ AM antenna... ■ Safety Brochure *The figure of a BD/DVD on the supplied CD-ROM. For more information, refer to "Owner 's Manual" on this unit. AV Receiver 1 Preparations Accessories Check that the following accessories are supplied with this product. ■ Remote control ■...

Setup Guide
Page 2
2 Placing the speakers Set up the speakers in the room by using the following diagram as a reference. For information on other speaker systems, refer to "Owner's Manual". 5.1-channel system 10°~30° 10°~30° 2 En 7.1-channel system 10°~30° 10°~30° 30 cm (1 ft) or more Front speaker (L) Front speaker (R) Center speaker Surround speaker (L) Surround speaker (R) Surround back speaker (L) Surround back speaker (R) Subwoofer
2 Placing the speakers Set up the speakers in the room by using the following diagram as a reference. For information on other speaker systems, refer to "Owner's Manual". 5.1-channel system 10°~30° 10°~30° 2 En 7.1-channel system 10°~30° 10°~30° 30 cm (1 ft) or more Front speaker (L) Front speaker (R) Center speaker Surround speaker (L) Surround speaker (R) Surround back speaker (L) Surround back speaker (R) Subwoofer

Setup Guide
Page 3
... connecting the speakers. • Be careful that the core of the speaker cable does not touch anything or come into contact with built-in "Owner's Manual". • Use a subwoofer equipped with the metal areas of this unit or the speakers. c Insert the bare wires of the cable into Banana plug the...
... connecting the speakers. • Be careful that the core of the speaker cable does not touch anything or come into contact with built-in "Owner's Manual". • Use a subwoofer equipped with the metal areas of this unit or the speakers. c Insert the bare wires of the cable into Banana plug the...
Setup Guide
Page 5
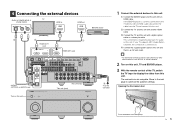
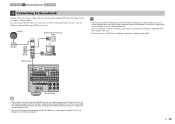
... HD Radio (4 RADIO) 75Ω FM GND AM 5 OPTICAL SINGLE O AUDIO1 (OPTICAL or AUDIO) jack This unit (rear) This unit (front) NATURAL SOUND AV RECEIVER RX-A1010 Turn on this unit with another HDMI cable. d Connect the supplied power cable to this unit and then to an AC wall outlet. • For... player. 3 With the remote control of the door gently. 4 Connecting the external devices Audio out (digital optical or TV analog stereo) OPTICAL R L HDMI in "Owner's Manual". 2 Turn on this connection is required to optimize the speaker settings.
... HD Radio (4 RADIO) 75Ω FM GND AM 5 OPTICAL SINGLE O AUDIO1 (OPTICAL or AUDIO) jack This unit (rear) This unit (front) NATURAL SOUND AV RECEIVER RX-A1010 Turn on this unit with another HDMI cable. d Connect the supplied power cable to this unit and then to an AC wall outlet. • For... player. 3 With the remote control of the door gently. 4 Connecting the external devices Audio out (digital optical or TV analog stereo) OPTICAL R L HDMI in "Owner's Manual". 2 Turn on this connection is required to optimize the speaker settings.
Setup Guide
Page 6
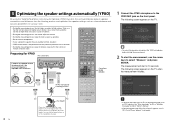
...from the listening position, and optimizes the speaker settings such as W-2) appears, see "Error messages" (p.45) or "Warning messages" (p.46) in "Owner's Manual". • If the warning message "W-1:Out of Phase" appears, see "If 'W-1:Out of Phase' appears" (next page). VOLUME CROSSOVER/ HIGH CUT MIN...the YPAO MIC jack on the subwoofer and set it from the room. 5 Optimizing the speaker settings automatically (YPAO) By using the Yamaha Parametric room Acoustic Optimizer (YPAO) function, this function at ear height in your subwoofer supports the auto-standby function, disable it. •...
...from the listening position, and optimizes the speaker settings such as W-2) appears, see "Error messages" (p.45) or "Warning messages" (p.46) in "Owner's Manual". • If the warning message "W-1:Out of Phase" appears, see "If 'W-1:Out of Phase' appears" (next page). VOLUME CROSSOVER/ HIGH CUT MIN...the YPAO MIC jack on the subwoofer and set it from the room. 5 Optimizing the speaker settings automatically (YPAO) By using the Yamaha Parametric room Acoustic Optimizer (YPAO) function, this function at ear height in your subwoofer supports the auto-standby function, disable it. •...

Setup Guide
Page 8
...10 TV ENT TV VOL TV CH HDMI OUT AV1 STRAIGHT VOLUME 1 Press AV1 to feel surround sound produced by this unit" (p.6). © 2011 Yamaha Corporation YD503B0/ESEN1 DOCK TAG HD STEREO TUNED PRE AMP PARTY ZONE ZONE ZONE IN OUT 1 OUT 2 2 3 4 ENHANCER SLEEP HD 3 Main:Volume... produces each channel audio signal directly (without sound field processing). Playing back from a specific speaker See "Troubleshooting" (p.126) in "Owner's Manual". If you cannot have surround sound Only the front speakers work on multichannel audio Check the digital audio output setting on the BD/DVD player...
...10 TV ENT TV VOL TV CH HDMI OUT AV1 STRAIGHT VOLUME 1 Press AV1 to feel surround sound produced by this unit" (p.6). © 2011 Yamaha Corporation YD503B0/ESEN1 DOCK TAG HD STEREO TUNED PRE AMP PARTY ZONE ZONE ZONE IN OUT 1 OUT 2 2 3 4 ENHANCER SLEEP HD 3 Main:Volume... produces each channel audio signal directly (without sound field processing). Playing back from a specific speaker See "Troubleshooting" (p.126) in "Owner's Manual". If you cannot have surround sound Only the front speakers work on multichannel audio Check the digital audio output setting on the BD/DVD player...

Owners Manual
Page 1
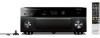
AV Receiver Owner's Manual Be sure to read "Safety Brochure" (supplied booklet) before using this unit. English for Canada, Europe, Asia, Africa, Oceania and Latin America En 1
AV Receiver Owner's Manual Be sure to read "Safety Brochure" (supplied booklet) before using this unit. English for Canada, Europe, Asia, Africa, Oceania and Latin America En 1
Owners Manual
Page 3
... Configuring sound programs/surround decoders (Sound Program menu) . . . . 98 Sound Program menu items 99 Configuring various functions (Setup menu 101 Setup menu items 102 Speaker (Manual Setup 104 Sound 108 Video 109 HDMI 111 Network 112 Multi Zone 113 Function 115 Language 117 Viewing information about this unit (Information menu 118...
... Configuring sound programs/surround decoders (Sound Program menu) . . . . 98 Sound Program menu items 99 Configuring various functions (Setup menu 101 Setup menu items 102 Speaker (Manual Setup 104 Sound 108 Video 109 HDMI 111 Network 112 Multi Zone 113 Function 115 Language 117 Viewing information about this unit (Information menu 118...

Owners Manual
Page 5
In case of differences between the manual and product, the product has priority. • This manual mainly explains operations using the supplied remote control. • This manual describes both "iPod" and "iPhone" unless the explanation describes exceptions. •" " indicates the cautions concerning ...Easy Setup Guide * The figure of the supplied FM antenna differs depending on regions. ■ Safety Brochure ■ CD-ROM (Owner's Manual) • Some features are not available in certain regions. • Design and specifications are subject to change in part as the "...
In case of differences between the manual and product, the product has priority. • This manual mainly explains operations using the supplied remote control. • This manual describes both "iPod" and "iPhone" unless the explanation describes exceptions. •" " indicates the cautions concerning ...Easy Setup Guide * The figure of the supplied FM antenna differs depending on regions. ■ Safety Brochure ■ CD-ROM (Owner's Manual) • Some features are not available in certain regions. • Design and specifications are subject to change in part as the "...
Owners Manual
Page 26
.... To enable the bi-amp function, configure the "Power Amp Assign" setting (p.104) in the "Setup" menu after connecting the power cable to the instruction manual of the speakers for Zone2/3 speakers, configure the "Power Amp Assign" setting (p.104) in the "Setup" menu after connecting the power cable to the EXTRA...
.... To enable the bi-amp function, configure the "Power Amp Assign" setting (p.104) in the "Setup" menu after connecting the power cable to the instruction manual of the speakers for Zone2/3 speakers, configure the "Power Amp Assign" setting (p.104) in the "Setup" menu after connecting the power cable to the EXTRA...
Owners Manual
Page 29
...; HDMI input (ARC-compatible) HDMI HDMI TV • If you to this unit. About Audio Return Channel (ARC) ARC allows audio signals to the instruction manual of TV audio on your TV support HDMI Control? You can also enjoy playback of the TV and choose a connection method. En 29
...; HDMI input (ARC-compatible) HDMI HDMI TV • If you to this unit. About Audio Return Channel (ARC) ARC allows audio signals to the instruction manual of TV audio on your TV support HDMI Control? You can also enjoy playback of the TV and choose a connection method. En 29

Owners Manual
Page 30
...select "HDMI". • If HDMI Control does not work properly, try turning off this unit is set to "On". If not, select the input source manually. If you select a TV program with the TV remote control. g Use the cursor keys to select "HDMI Control" and press ENTER. h Press ON ...need to change the TV audio input assignment. For details on the TV. a Check that "ARC" (p.111) in the "Setup" menu to the instruction manual of the TV. 1 After connecting external devices (TV, playback devices, etc.) and power cable of this unit. b Turn off the main power of the...
...select "HDMI". • If HDMI Control does not work properly, try turning off this unit is set to "On". If not, select the input source manually. If you select a TV program with the TV remote control. g Use the cursor keys to select "HDMI Control" and press ENTER. h Press ON ...need to change the TV audio input assignment. For details on the TV. a Check that "ARC" (p.111) in the "Setup" menu to the instruction manual of the TV. 1 After connecting external devices (TV, playback devices, etc.) and power cable of this unit. b Turn off the main power of the...
Owners Manual
Page 31
... devices to this unit. d Use the cursor keys ( / ) to select "HDMI". • If you make an HDMI connection between your TV, refer to the instruction manual of the TV. 1 After connecting external devices (TV, playback devices, etc.) and power cable of your TV and this unit, any videos input to this...
... devices to this unit. d Use the cursor keys ( / ) to select "HDMI". • If you make an HDMI connection between your TV, refer to the instruction manual of the TV. 1 After connecting external devices (TV, playback devices, etc.) and power cable of your TV and this unit, any videos input to this...
Owners Manual
Page 32
... using the HDMI OUT 2 jack (p.34). • If you also need to change the input assignment for SCENE(TV). If not, select the input source manually. This unit (rear) HDMI OUT 1 jack HDMI OUT 1 2 ARC HDMI DOCK NETWORK HDMI OUT 1 ARC 2 AV 1 (1 AV 1 (1 BD/DVD) AV 2 PHONO GND L R AV 3 AV 4 AV...
... using the HDMI OUT 2 jack (p.34). • If you also need to change the input assignment for SCENE(TV). If not, select the input source manually. This unit (rear) HDMI OUT 1 jack HDMI OUT 1 2 ARC HDMI DOCK NETWORK HDMI OUT 1 ARC 2 AV 1 (1 AV 1 (1 BD/DVD) AV 2 PHONO GND L R AV 3 AV 4 AV...
Owners Manual
Page 40
... of your network devices (such as this unit to your router does not support the DHCP function or you want to configure the network parameters manually, configure the network settings (p.112). • You can connect this unit to up to 16 music servers (PC, etc.), and each server must be automatically...
... of your network devices (such as this unit to your router does not support the DHCP function or you want to configure the network parameters manually, configure the network settings (p.112). • You can connect this unit to up to 16 music servers (PC, etc.), and each server must be automatically...

Owners Manual
Page 49
... not place the microphone in the "Setup" menu. In this case, the previous measurement results are not suitable, follow the procedure below to discard the manual settings and reload the previous YPAO results. 1 In the "Setup" menu, select "Speaker", "Auto Setup" and then "Result" (p.101). 2 Use the cursor keys to the... "Setup Reload" and press ENTER. 3 To exit from the menu, press ON SCREEN. Reloading the previous YPAO results When the speaker settings you have configured manually are displayed.
... not place the microphone in the "Setup" menu. In this case, the previous measurement results are not suitable, follow the procedure below to discard the manual settings and reload the previous YPAO results. 1 In the "Setup" menu, select "Speaker", "Auto Setup" and then "Result" (p.101). 2 Use the cursor keys to the... "Setup Reload" and press ENTER. 3 To exit from the menu, press ON SCREEN. Reloading the previous YPAO results When the speaker settings you have configured manually are displayed.

Owners Manual
Page 52
Refer to the instruction manual of sound, use the "Option" menu or TONE/ BALANCE on PCs (p.75) - Playing back music via Bluetooth (p.70) - Playing back music stored on the front ...
Refer to the instruction manual of sound, use the "Option" menu or TONE/ BALANCE on PCs (p.75) - Playing back music via Bluetooth (p.70) - Playing back music stored on the front ...

Owners Manual
Page 61
... SBL SB SBR PR ■ Selecting a preset station Tune into a registered radio station by using "Auto Preset" (p.64). ■ Registering a radio station Select a radio station manually and register it will be registered to an empty preset number (next to the lastly-registered preset number). appears when an invalid number is entered...
... SBL SB SBR PR ■ Selecting a preset station Tune into a registered radio station by using "Auto Preset" (p.64). ■ Registering a radio station Select a radio station manually and register it will be registered to an empty preset number (next to the lastly-registered preset number). appears when an invalid number is entered...

Owners Manual
Page 63
To close the submenu, press RETURN. Menu Manual Tuning Browse Screen Off Submenu FM AM Tuning (+/-) Auto (+/-) Memory Direct Function (U.K. Selects a radio station automatically. Closes the screen display and shows the background. Press ...
To close the submenu, press RETURN. Menu Manual Tuning Browse Screen Off Submenu FM AM Tuning (+/-) Auto (+/-) Memory Direct Function (U.K. Selects a radio station automatically. Closes the screen display and shows the background. Press ...

Owners Manual
Page 65
...) jack of ✓ the unit Operation with iPod ✓ Operation on this unit using a USB cable supplied with iPod, an optional Yamaha iPod dock (such as YDS-12) ✓ ✓ Yamaha iPod wireless system (YID-W10) ✓ - ✓ - ✓ ✓ ✓ - ✓ ✓ ✓...PR En 65 to 6 gen.) iPod classic iPhone 4 iPhone 3GS iPhone 3G iPhone Yamaha iPod universal dock (such as YDS-12) or an optional Yamaha iPod wireless system (YID-W10). • This manual describes both "iPod" and "iPhone" unless the explanation describes exceptions. • ...
...) jack of ✓ the unit Operation with iPod ✓ Operation on this unit using a USB cable supplied with iPod, an optional Yamaha iPod dock (such as YDS-12) ✓ ✓ Yamaha iPod wireless system (YID-W10) ✓ - ✓ - ✓ ✓ ✓ - ✓ ✓ ✓...PR En 65 to 6 gen.) iPod classic iPhone 4 iPhone 3GS iPhone 3G iPhone Yamaha iPod universal dock (such as YDS-12) or an optional Yamaha iPod wireless system (YID-W10). • This manual describes both "iPod" and "iPhone" unless the explanation describes exceptions. • ...


