Owners Manual
Page 2
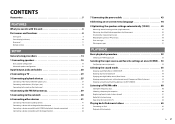
...panel 11 Remote control 12 SETUP General setup procedure 14 1 Connecting speakers 15 Basic speaker configuration 16 Advanced speaker configuration 21 Input/output jacks and cables 28 2 Connecting a TV 29 3 Connecting playback devices 35 Connecting video devices (BD/DVD players, etc 35 .../audio recording devices 41 Connecting a device with analog multi-channel output 41 Connecting a device compatible with SCENE link playback (remote connection 42 Connecting a device compatible with the trigger function 42 7 Connecting the power cable 43 8 Selecting an on-screen menu language 44 9...
...panel 11 Remote control 12 SETUP General setup procedure 14 1 Connecting speakers 15 Basic speaker configuration 16 Advanced speaker configuration 21 Input/output jacks and cables 28 2 Connecting a TV 29 3 Connecting playback devices 35 Connecting video devices (BD/DVD players, etc 35 .../audio recording devices 41 Connecting a device with analog multi-channel output 41 Connecting a device compatible with SCENE link playback (remote connection 42 Connecting a device compatible with the trigger function 42 7 Connecting the power cable 43 8 Selecting an on-screen menu language 44 9...

Owners Manual
Page 7
... (p.118) ●System settings (p.120) En 7 Full of useful functions! ● Connecting various devices (p.35) A number of HDMI jacks and various input/output jacks on this unit allow you to enjoy Hi-Fi sound quality. ● Easy operation with a TV screen You can register favorite radio stations as... no presence speakers are not synchronized... I want to be displayed on -screen menu language... Use "UPDATE" in FM/AM tuner. Use "Auto Power Down" in surround sound with the least circuitry. I want to this unit to change the on the TV when a newer firmware is equipped with...
... (p.118) ●System settings (p.120) En 7 Full of useful functions! ● Connecting various devices (p.35) A number of HDMI jacks and various input/output jacks on this unit allow you to enjoy Hi-Fi sound quality. ● Easy operation with a TV screen You can register favorite radio stations as... no presence speakers are not synchronized... I want to be displayed on -screen menu language... Use "UPDATE" in FM/AM tuner. Use "Auto Power Down" in surround sound with the least circuitry. I want to this unit to change the on the TV when a newer firmware is equipped with...

Owners Manual
Page 11
... amplifier used in amplifier (p.20) or an external power amplifier (p.27). D VOLTAGE SELECTOR (General model only) Select the switch position according to output video signals (p.33). F AUDIO1~4 jacks For connecting audio playback devices to output video/audio signals (p.29). For connecting a zone...; SINGLE SPEAKER IMPEDANCE EF G HI J K 1 PHONO jacks For connecting a turntable (p.37). 2 DOCK jack For connecting an optional Yamaha products such as iPod dock (p.66), iPod wireless system (p.66), and Bluetooth receiver (p.70). 3 AV1~4 jacks For connecting video/audio playback...
... amplifier used in amplifier (p.20) or an external power amplifier (p.27). D VOLTAGE SELECTOR (General model only) Select the switch position according to output video signals (p.33). F AUDIO1~4 jacks For connecting audio playback devices to output video/audio signals (p.29). For connecting a zone...; SINGLE SPEAKER IMPEDANCE EF G HI J K 1 PHONO jacks For connecting a turntable (p.37). 2 DOCK jack For connecting an optional Yamaha products such as iPod dock (p.66), iPod wireless system (p.66), and Bluetooth receiver (p.70). 3 AV1~4 jacks For connecting video/audio playback...
Owners Manual
Page 19
...; Connecting speakers Connect the speakers placed in the "Setup" menu after connecting the power cable to an AC wall outlet. • To use an external power amplifier (Hi-Fi amplifier, etc.) to enhance speaker output, see "Connecting an external power amplifier" (p.27). • When using only one surround back speaker, connect it to the...
...; Connecting speakers Connect the speakers placed in the "Setup" menu after connecting the power cable to an AC wall outlet. • To use an external power amplifier (Hi-Fi amplifier, etc.) to enhance speaker output, see "Connecting an external power amplifier" (p.27). • When using only one surround back speaker, connect it to the...

Owners Manual
Page 22
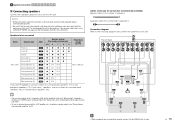
...1~2 En 22 1 Speaker connections 2 3 4 5 6 7 8 9 ■ Available speaker configurations Output channel (max) 7 9 7 7 9 7 Main zone Bi-amp { External power amplifier (required) Front Front Multi-zone +1 room +2 rooms +1 room +1 room +2 rooms Power Amp Assign (p.104) Page 7ch BI-AMP 22 7ch +FRONT+1ZONE 23 5ch +FRONT+2ZONE 23...9ch +1ZONE 24 7ch +2ZONE 25 ❑ 7ch BI-AMP • When applying one of these configurations, you need to configure the "Power Amp Assign" setting (p.104) in the "Setup" menu. • When applying a multi-zone configuration, you can select a zone (...
...1~2 En 22 1 Speaker connections 2 3 4 5 6 7 8 9 ■ Available speaker configurations Output channel (max) 7 9 7 7 9 7 Main zone Bi-amp { External power amplifier (required) Front Front Multi-zone +1 room +2 rooms +1 room +1 room +2 rooms Power Amp Assign (p.104) Page 7ch BI-AMP 22 7ch +FRONT+1ZONE 23 5ch +FRONT+2ZONE 23...9ch +1ZONE 24 7ch +2ZONE 25 ❑ 7ch BI-AMP • When applying one of these configurations, you need to configure the "Power Amp Assign" setting (p.104) in the "Setup" menu. • When applying a multi-zone configuration, you can select a zone (...
Owners Manual
Page 27
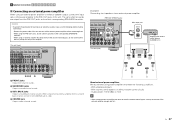
... control circuit) - 1 Speaker connections 2 3 4 5 6 7 8 9 ■ Connecting an external power amplifier When using an external power amplifier to enhance speaker output, connect the input jacks of the power amplifier to the PRE OUT jacks of loud noises or abnormal sounds, make sure the followings before connecting... OUT/ZONE OUT PB PR REMOTE 1 2 IN OUT IN OUT PRE OUT (SINGLE) (FRONT) 1 TRIGGER OUT 1 2 +12V 0.1A MAX. Output power: 100 W (8Ω) or more • When using an external amplifier that does no have the volume control bypass, do not connect speakers to the...
... control circuit) - 1 Speaker connections 2 3 4 5 6 7 8 9 ■ Connecting an external power amplifier When using an external power amplifier to enhance speaker output, connect the input jacks of the power amplifier to the PRE OUT jacks of loud noises or abnormal sounds, make sure the followings before connecting... OUT/ZONE OUT PB PR REMOTE 1 2 IN OUT IN OUT PRE OUT (SINGLE) (FRONT) 1 TRIGGER OUT 1 2 +12V 0.1A MAX. Output power: 100 W (8Ω) or more • When using an external amplifier that does no have the volume control bypass, do not connect speakers to the...
Owners Manual
Page 29
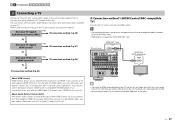
...No Does your TV. Yes ■ Connection method 2 (p.31) No Does your TV and this unit, any videos input to this unit can be output to the TV. The connection method varies depending on functions and video input jacks available on this unit. No Yes ■ Connection method 3 (p.32) ...jack? 1 2 TV connection 3 4 5 6 7 8 9 2 Connecting a TV Connect a TV to this unit so that videos input to this unit can control this unit (power, volume, etc.) in the "Setup" menu. • HDMI Control is based on the HDMI OUT 1 jack. This unit (rear) HDMI OUT 1 jack HDMI OUT 1 2 ...
...No Does your TV. Yes ■ Connection method 2 (p.31) No Does your TV and this unit, any videos input to this unit can be output to the TV. The connection method varies depending on functions and video input jacks available on this unit. No Yes ■ Connection method 3 (p.32) ...jack? 1 2 TV connection 3 4 5 6 7 8 9 2 Connecting a TV Connect a TV to this unit so that videos input to this unit can control this unit (power, volume, etc.) in the "Setup" menu. • HDMI Control is based on the HDMI OUT 1 jack. This unit (rear) HDMI OUT 1 jack HDMI OUT 1 2 ...
Owners Manual
Page 31
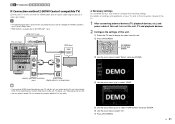
... FRONT L R SURROUND L ANTENNA (4 RADIO) AM FM 75Ω R 5 OPTICAL O HDMI input HDMI HDMI AUDIO L L R R TV OPTICAL O AUDIO1 (OPTICAL or AUDIO) Audio output jacks (digital optical or analog stereo) ❑ Necessary settings To use HDMI Control, you connect video devices to this unit. g Press ON SCREEN. ON SCREEN... playback devices. 2 Configure the settings of this unit. For details, see "Video signal flow" (p.143). • You can be output to the TV no matter how you need to the instruction manual of the TV. 1 After connecting external devices (TV, playback devices, etc...
... FRONT L R SURROUND L ANTENNA (4 RADIO) AM FM 75Ω R 5 OPTICAL O HDMI input HDMI HDMI AUDIO L L R R TV OPTICAL O AUDIO1 (OPTICAL or AUDIO) Audio output jacks (digital optical or analog stereo) ❑ Necessary settings To use HDMI Control, you connect video devices to this unit. g Press ON SCREEN. ON SCREEN... playback devices. 2 Configure the settings of this unit. For details, see "Video signal flow" (p.143). • You can be output to the TV no matter how you need to the instruction manual of the TV. 1 After connecting external devices (TV, playback devices, etc...
Owners Manual
Page 32
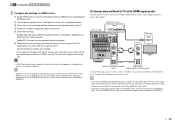
...adjusting the TV volume with HDMI input jacks) Connect the TV to change the input assignment for SCENE(TV). b Turn off the main power of the TV and then turn on this unit. • If HDMI Control does not work properly, try turning off this unit. ...5 OPTICAL 6 COAXIAL FRONT L R SURROUND L ANTENNA (4 RADIO) AM FM 75Ω R 5 OPTICAL O HDMI input HDMI HDMI AUDIO L L R R TV OPTICAL O AUDIO1 (OPTICAL or AUDIO) Audio output jacks (digital optical or analog stereo) If switch the input source of the AUDIO2~4 jacks. En 32 If you also need to this unit. To...
...adjusting the TV volume with HDMI input jacks) Connect the TV to change the input assignment for SCENE(TV). b Turn off the main power of the TV and then turn on this unit. • If HDMI Control does not work properly, try turning off this unit. ...5 OPTICAL 6 COAXIAL FRONT L R SURROUND L ANTENNA (4 RADIO) AM FM 75Ω R 5 OPTICAL O HDMI input HDMI HDMI AUDIO L L R R TV OPTICAL O AUDIO1 (OPTICAL or AUDIO) Audio output jacks (digital optical or analog stereo) If switch the input source of the AUDIO2~4 jacks. En 32 If you also need to this unit. To...

Owners Manual
Page 45
... a TV and speakers to this unit. • During the measuring process, the test tones are output at ear height in your listening position. VOLUME CROSSOVER/ HIGH CUT MIN MAX MIN MAX 4 According ...TV CH ENTERTAIN STRAIGHT PURE DIRECT 9 Optimizing the speaker settings automatically (YPAO) By using the Yamaha Parametric room Acoustic Optimizer (YPAO) function, this unit automatically detects speaker connections and distances from...connect it to your speaker configuration, configure the "Power Amp Assign" setting (p.104) in the "Setup" menu. You can use the tripod screws to ...
... a TV and speakers to this unit. • During the measuring process, the test tones are output at ear height in your listening position. VOLUME CROSSOVER/ HIGH CUT MIN MAX MIN MAX 4 According ...TV CH ENTERTAIN STRAIGHT PURE DIRECT 9 Optimizing the speaker settings automatically (YPAO) By using the Yamaha Parametric room Acoustic Optimizer (YPAO) function, this unit automatically detects speaker connections and distances from...connect it to your speaker configuration, configure the "Power Amp Assign" setting (p.104) in the "Setup" menu. You can use the tripod screws to ...

Owners Manual
Page 57
... creates a relatively wide space with a shoebox shape that are down -mixes the source to 2 channels and output from all speakers. A realistic, live sound field features powerful sound as normal standards for European concert halls. When you playback multi-channel sources, this unit down mixed to... 2 channels, and then outputs the sound from the front speakers (this program to the left of...
... creates a relatively wide space with a shoebox shape that are down -mixes the source to 2 channels and output from all speakers. A realistic, live sound field features powerful sound as normal standards for European concert halls. When you playback multi-channel sources, this unit down mixed to... 2 channels, and then outputs the sound from the front speakers (this program to the left of...
Owners Manual
Page 80
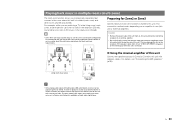
..., we recommend that you consult with the metal areas of this unit. Caution • Remove the power cable of this unit is installed (main zone) and other rooms (Zone2 and Zone3). This may ... connecting speakers or an external amplifier. • Be careful that best meet your nearest authorized Yamaha dealer or service center about the multi-zone connections that the core of this unit with a...internal amplifier of input audio signal types. Preparing for Zone2 or Zone3 Connect devices to be output to play back separate input sources in the room where this unit is turned on an amplifier ...
..., we recommend that you consult with the metal areas of this unit. Caution • Remove the power cable of this unit is installed (main zone) and other rooms (Zone2 and Zone3). This may ... connecting speakers or an external amplifier. • Be careful that best meet your nearest authorized Yamaha dealer or service center about the multi-zone connections that the core of this unit with a...internal amplifier of input audio signal types. Preparing for Zone2 or Zone3 Connect devices to be output to play back separate input sources in the room where this unit is turned on an amplifier ...

Owners Manual
Page 87
... web browser. (Example) ■ Top menu screen 1 5 6 2 3 7 4 1 CONTROL Moves to the control screen for the selected zone. 2 STATUS Turns on/off the power for each zone, or displays the input source and volume set for each zone. 3 SETTINGS Moves to the settings screen. 4 PARTY MODE Turns on/off... you will be connected to the network properly (p.40). • Some security software installed on /off the power for all zones. 6 MAIN VOLUME Adjusts the volume or mutes the audio output for the main zone. En 87 Web browser Web control Web control PC Router This unit • To use...
... web browser. (Example) ■ Top menu screen 1 5 6 2 3 7 4 1 CONTROL Moves to the control screen for the selected zone. 2 STATUS Turns on/off the power for each zone, or displays the input source and volume set for each zone. 3 SETTINGS Moves to the settings screen. 4 PARTY MODE Turns on/off... you will be connected to the network properly (p.40). • Some security software installed on /off the power for all zones. 6 MAIN VOLUME Adjusts the volume or mutes the audio output for the main zone. En 87 Web browser Web control Web control PC Router This unit • To use...

Owners Manual
Page 88
... name of each zone (p.115). Backup/Recovery Creates backup of the settings of this unit on /off the power for the selected zone. 5 VOLUME Adjusts the volume or mutes the audio output for the selected zone. When the recovery finishes, click "OK" to set this unit every 5 seconds. When... for use of this unit. Create Link Creates a shortcut link to the top menu screen. 3 SCENE Select a scene for the selected zone. 4 POWER Turns on the PC, or restores the settings from the network devices. You can also switch the step for the volume adjustment. 6 RELOAD Reloads the...
... name of each zone (p.115). Backup/Recovery Creates backup of the settings of this unit on /off the power for the selected zone. 5 VOLUME Adjusts the volume or mutes the audio output for the selected zone. When the recovery finishes, click "OK" to set this unit every 5 seconds. When... for use of this unit. Create Link Creates a shortcut link to the top menu screen. 3 SCENE Select a scene for the selected zone. 4 POWER Turns on the PC, or restores the settings from the network devices. You can also switch the step for the volume adjustment. 6 RELOAD Reloads the...

Owners Manual
Page 94
...a short time. Settings On (default) Off Enables volume interlocking controls. When you stop playback, this unit does not detect DTS audio and outputs noise, set to "On", the iPod connected to the iPod wireless system is selected as the input source. Input sources DOCK (iPod) Settings... On (default) Charges the iPod even when this unit in standby mode. Settings On (default) Enables power and input interlocking controls. ■ Rename/Icon Select Changes the input source name and icon displayed on and "DOCK" is charged regardless of...
...a short time. Settings On (default) Off Enables volume interlocking controls. When you stop playback, this unit does not detect DTS audio and outputs noise, set to "On", the iPod connected to the iPod wireless system is selected as the input source. Input sources DOCK (iPod) Settings... On (default) Charges the iPod even when this unit in standby mode. Settings On (default) Enables power and input interlocking controls. ■ Rename/Icon Select Changes the input source name and icon displayed on and "DOCK" is charged regardless of...
Owners Manual
Page 102
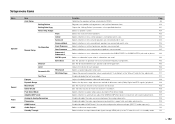
...jacks) to be used . Setup menu items Menu Speaker Sound Video HDMI Item Auto Setup Setting Pattern Setting Data Copy Power Amp Assign Front Center Surround Surround Back Configuration Manual Setup Front Presence Rear Presence Subwoofer 1 Subwoofer 2 SWFR Layout Extra ...DSP Level Analog to produce the front channel low-frequency components. Sets the speakers to Analog Conversion Processing HDMI Control Audio Output Standby Through Function Optimizes the speaker settings automatically (YPAO). Adjusts the delay between them. Enables/disables the video conversion between...
...jacks) to be used . Setup menu items Menu Speaker Sound Video HDMI Item Auto Setup Setting Pattern Setting Data Copy Power Amp Assign Front Center Surround Surround Back Configuration Manual Setup Front Presence Rear Presence Subwoofer 1 Subwoofer 2 SWFR Layout Extra ...DSP Level Analog to produce the front channel low-frequency components. Sets the speakers to Analog Conversion Processing HDMI Control Audio Output Standby Through Function Optimizes the speaker settings automatically (YPAO). Adjusts the delay between them. Enables/disables the video conversion between...

Owners Manual
Page 103
...for electronic signal transmission manually. Selects a wall paper displayed on -screen menu language. Specifies the condition for auto-standby. Switches the output level for when this unit is not too loud. Prevents accidental changes to this unit by the command from other network devices. ... Zone2 Set Zone3 Set Max Volume Initial Volume Mono Monitor Out Assign Party Mode Set Zone Scene Rename Zone Rename Auto Power Down Input Assignment Display Set Dimmer Front Panel Display Scroll Short Message Wall Paper Trigger Mode Trigger Output1 Target Zone Trigger ...
...for electronic signal transmission manually. Selects a wall paper displayed on -screen menu language. Specifies the condition for auto-standby. Switches the output level for when this unit is not too loud. Prevents accidental changes to this unit by the command from other network devices. ... Zone2 Set Zone3 Set Max Volume Initial Volume Mono Monitor Out Assign Party Mode Set Zone Scene Rename Zone Rename Auto Power Down Input Assignment Display Set Dimmer Front Panel Display Scroll Short Message Wall Paper Trigger Mode Trigger Output1 Target Zone Trigger ...
Owners Manual
Page 112
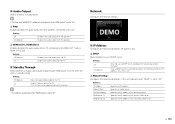
...; DHCP Select whether to use a DHCP server. Settings Off (default) Disables the audio output from the speakers connected to this unit is set to "Off". DNS Server (S) Specifies the IP address of power.) • This setting is available only when "HDMI Control" is set to "Off...". ❑ Amp Enables/disables the audio output from the TV. Submenu IP Address Specifies an IP address. ■ Audio Output Selects a device to output audio. • The "Amp"...
...; DHCP Select whether to use a DHCP server. Settings Off (default) Disables the audio output from the speakers connected to this unit is set to "Off". DNS Server (S) Specifies the IP address of power.) • This setting is available only when "HDMI Control" is set to "Off...". ❑ Amp Enables/disables the audio output from the TV. Submenu IP Address Specifies an IP address. ■ Audio Output Selects a device to output audio. • The "Amp"...

Owners Manual
Page 113
... ~ +15.0dB (5.0dB steps), +16.5dB Default +16.5dB ❑ Initial Volume Sets the Zone2 or Zone3 initial volume for Zone2 or Zone3 output. • This setting is turned on this unit from other network devices. ❑ Mode Enables/disables the MAC address filter. In "Address Setup", ... W of the network devices that will be permitted access to this unit. ❑ Address Setup Specifies the MAC addresses (up to 10) of power.) ■ MAC Address Filter Sets the MAC address filter to limit access to this unit by the command from other network devices (network standby)....
... ~ +15.0dB (5.0dB steps), +16.5dB Default +16.5dB ❑ Initial Volume Sets the Zone2 or Zone3 initial volume for Zone2 or Zone3 output. • This setting is turned on this unit from other network devices. ❑ Mode Enables/disables the MAC address filter. In "Address Setup", ... W of the network devices that will be permitted access to this unit. ❑ Address Setup Specifies the MAC addresses (up to 10) of power.) ■ MAC Address Filter Sets the MAC address filter to limit access to this unit by the command from other network devices (network standby)....

Owners Manual
Page 116
..."Trigger Mode" is set to the setting made in the zone specified with power status of Zone3. Gray Displays a gray background on the TV screen when this to manually switch the output level for electronic signal transmission with "Manual." ❑ Target Zone Specifies the ...zone with power status of the first 14 characters. ❑ Short Message Selects whether to "Power," electronic signal transmission is synchronized with "Target Zone...
..."Trigger Mode" is set to the setting made in the zone specified with power status of Zone3. Gray Displays a gray background on the TV screen when this to manually switch the output level for electronic signal transmission with "Manual." ❑ Target Zone Specifies the ...zone with power status of the first 14 characters. ❑ Short Message Selects whether to "Power," electronic signal transmission is synchronized with "Target Zone...


