

Owners Manual
Page 1
U Receiver OWNER'S MANUAL
U Receiver OWNER'S MANUAL
Owners Manual
Page 5
... TUNES FROM YOUR iPhone/iPod/ Bluetooth™ COMPONENT 35 Using a Universal Dock for iPod 36 Using a Wireless System for iPod 37 Using a Bluetooth Wireless Audio Receiver 38 ADVANCED OPERATION SETTING THE OPTION MENU FOR EACH INPUT SOURCE 40 Option menu items 40 ADVANCED SETUP 43 Changing the ADVANCED SETUP menu parameters...
... TUNES FROM YOUR iPhone/iPod/ Bluetooth™ COMPONENT 35 Using a Universal Dock for iPod 36 Using a Wireless System for iPod 37 Using a Bluetooth Wireless Audio Receiver 38 ADVANCED OPERATION SETTING THE OPTION MENU FOR EACH INPUT SOURCE 40 Option menu items 40 ADVANCED SETUP 43 Changing the ADVANCED SETUP menu parameters...

Owners Manual
Page 7
... control narrows. • If the batteries run out, immediately remove them from the remote control to prevent an explosion or acid leak. • If you received all of the following conditions: - If the leaked material comes into your regional regulations. 3 En Clean the battery compartment thoroughly before installing new batteries. •...
... control narrows. • If the batteries run out, immediately remove them from the remote control to prevent an explosion or acid leak. • If you received all of the following conditions: - If the leaked material comes into your regional regulations. 3 En Clean the battery compartment thoroughly before installing new batteries. •...

Owners Manual
Page 8
... preset station when TUNER is selected as the input source (see page 32). 8 Front panel display Shows information about the operational status of power to receive infrared signals from 3 levels by pressing this unit. 5 FM MODE/INFO Changes the FM radio wave reception mode (stereo or monaural) when TUNER is selected...
... preset station when TUNER is selected as the input source (see page 32). 8 Front panel display Shows information about the operational status of power to receive infrared signals from 3 levels by pressing this unit. 5 FM MODE/INFO Changes the FM radio wave reception mode (stereo or monaural) when TUNER is selected...
Owners Manual
Page 9
... signals from the remote control. Note Switch the remote control ID between ID1 and ID2 when using multiple Yamaha receivers or amplifiers (see page 20). C ZONE 2 Turns on . For more information about controlling Zone 2, see page 29). G PHONES jack Outputs audio to your headphones to ...
... signals from the remote control. Note Switch the remote control ID between ID1 and ID2 when using multiple Yamaha receivers or amplifiers (see page 20). C ZONE 2 Turns on . For more information about controlling Zone 2, see page 29). G PHONES jack Outputs audio to your headphones to ...

Owners Manual
Page 10
... 2 indicator Lights up when Zone 2 is turned on . C Multi-information display Shows information when adjusting or changing settings. B P indicator Lights up when this unit is receiving a strong signal for a SIRIUS channel by category. 6 TUNED indicator Lights up when this unit is tuned in to an FM or AM station. 7 STEREO indicator...
... 2 indicator Lights up when Zone 2 is turned on . C Multi-information display Shows information when adjusting or changing settings. B P indicator Lights up when this unit is receiving a strong signal for a SIRIUS channel by category. 6 TUNED indicator Lights up when this unit is tuned in to an FM or AM station. 7 STEREO indicator...
Owners Manual
Page 11
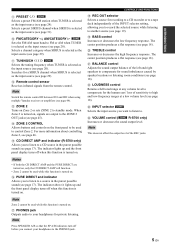
...page 40). H IMPEDANCE SELECTOR switch Used to connect SiriusConnect tuner (sold separately) (see page 12). The current is sent according to connect an optional Yamaha Universal Dock for iPod (such as the YDS-12), Wireless System for a certain amount of time (3 settings are available; Note Do not connect ..., this unit's Main zone and Zone 2 automatically enters standby mode if this unit is not operated for iPod (YID-W10), or Bluetooth Wireless Audio Receiver (YBA-10) (see page 35). 9 PHONO jacks Used to connect a turntable (see page 12). 0 CD jacks Used to connect an external unit...
...page 40). H IMPEDANCE SELECTOR switch Used to connect SiriusConnect tuner (sold separately) (see page 12). The current is sent according to connect an optional Yamaha Universal Dock for iPod (such as the YDS-12), Wireless System for a certain amount of time (3 settings are available; Note Do not connect ..., this unit's Main zone and Zone 2 automatically enters standby mode if this unit is not operated for iPod (YID-W10), or Bluetooth Wireless Audio Receiver (YBA-10) (see page 35). 9 PHONO jacks Used to connect a turntable (see page 12). 0 CD jacks Used to connect an external unit...

Owners Manual
Page 12
... display when using the remote control to control one of your other manufacturers. For more information about Zone 2, see pages 45 and 46. 2 RECEIVER A Turns this unit on, or sets it can also be used no matter which input source is selected. 1 Infrared signal transmitter Sends infrared signals...that it to standby mode. 3 ID Changes the remote control ID (see page 44). 4 MAIN/ZONE 2 Switches the zone to be operated by Yamaha or other external components (see page 49). y indicates buttons that can control your components, this button is pressed. 9 MUTE Mutes the sound output....
... display when using the remote control to control one of your other manufacturers. For more information about Zone 2, see pages 45 and 46. 2 RECEIVER A Turns this unit on, or sets it can also be used no matter which input source is selected. 1 Infrared signal transmitter Sends infrared signals...that it to standby mode. 3 ID Changes the remote control ID (see page 44). 4 MAIN/ZONE 2 Switches the zone to be operated by Yamaha or other external components (see page 49). y indicates buttons that can control your components, this button is pressed. 9 MUTE Mutes the sound output....

Owners Manual
Page 15
... following buttons can be used to control a Yamaha CD player when CD is selected as the input source for Zone 2. Be sure to aim the remote controls directly at the remote control sensor on the front panel of this unit or on the infrared signal receiver in Zone 2 during operation. ■ Replacing...
... following buttons can be used to control a Yamaha CD player when CD is selected as the input source for Zone 2. Be sure to aim the remote controls directly at the remote control sensor on the front panel of this unit or on the infrared signal receiver in Zone 2 during operation. ■ Replacing...

Owners Manual
Page 18
Consult the nearest authorized Yamaha dealer or service center about outdoor antennas. Note If you experience poor reception quality, install an outdoor antenna. A good earth ground is connected to the designated terminals. CONNECTIONS Connecting the FM and AM antennas Indoor antennas for receiving FM and AM broadcasts are included with this unit. In...
Consult the nearest authorized Yamaha dealer or service center about outdoor antennas. Note If you experience poor reception quality, install an outdoor antenna. A good earth ground is connected to the designated terminals. CONNECTIONS Connecting the FM and AM antennas Indoor antennas for receiving FM and AM broadcasts are included with this unit. In...
Owners Manual
Page 20
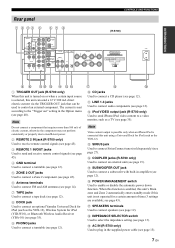
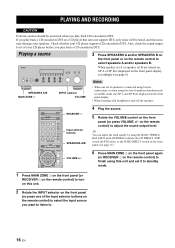
SPEAKERS A/B MAIN ZONE A INPUT selector VOLUME Notes • When one of your CD player before you want to listen to. 16 En RECEIVER A Input selector buttons SPEAKERS A/B 4 Play the source. 5 Rotate the VOLUME control on a CD player that does not support DTS, only noise will be exercised when ... switch on the front panel (see page 6). When speaker set A or speaker set it to standby mode. 1 Press MAIN ZONE A on the front panel (or RECEIVER A on the remote control) to select the input source you play back a CD encoded in DTS on the front panel (or press VOLUME +/- y You can...
SPEAKERS A/B MAIN ZONE A INPUT selector VOLUME Notes • When one of your CD player before you want to listen to. 16 En RECEIVER A Input selector buttons SPEAKERS A/B 4 Play the source. 5 Rotate the VOLUME control on a CD player that does not support DTS, only noise will be exercised when ... switch on the front panel (see page 6). When speaker set A or speaker set it to standby mode. 1 Press MAIN ZONE A on the front panel (or RECEIVER A on the remote control) to select the input source you play back a CD encoded in DTS on the front panel (or press VOLUME +/- y You can...
Owners Manual
Page 23
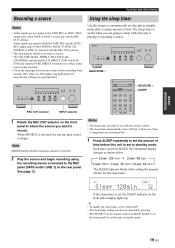
... are not turned off Zone 2. The SLEEP indicator blinks while setting the amount of time before recording from records, CDs, radio, etc. MAIN ZONE A RECEIVER A SLEEP BASIC OPERATION REC OUT selector INPUT selector 1 Rotate the REC OUT selector on in your country before this unit to the TAPE REC or... if when PHONO, DOCK, TUNER, CD, SOURCE or LINE 2 is selected with the REC OUT selector. • This unit must be canceled by pressing RECEIVER A on the remote control (or MAIN ZONE A on the front panel) to set this unit is selected with the remote control. • The sleep...
... are not turned off Zone 2. The SLEEP indicator blinks while setting the amount of time before recording from records, CDs, radio, etc. MAIN ZONE A RECEIVER A SLEEP BASIC OPERATION REC OUT selector INPUT selector 1 Rotate the REC OUT selector on in your country before this unit to the TAPE REC or... if when PHONO, DOCK, TUNER, CD, SOURCE or LINE 2 is selected with the REC OUT selector. • This unit must be canceled by pressing RECEIVER A on the remote control (or MAIN ZONE A on the front panel) to set this unit is selected with the remote control. • The sleep...
Owners Manual
Page 25
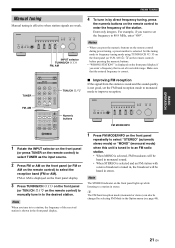
Enter only integers. is out of receivable range. Make sure that is displayed on the remote control) to manually tune in to the desired station. FM or AM is displayed on the ... preset tuning, a preset number is effective when station signals are weak. Note The STEREO indicator on the remote control to enter the frequency of the received station is tuned in, the broadcast will be changed by direct frequency tuning, press the numeric buttons on the front panel lights up while listening...
Enter only integers. is out of receivable range. Make sure that is displayed on the remote control) to manually tune in to the desired station. FM or AM is displayed on the ... preset tuning, a preset number is effective when station signals are weak. Note The STEREO indicator on the remote control to enter the frequency of the received station is tuned in, the broadcast will be changed by direct frequency tuning, press the numeric buttons on the front panel lights up while listening...

Owners Manual
Page 30
...) and Canada. Please check with the SIRIUS tuner. SIRIUS subscription sold separately) to SIRIUS, U.S. Service not available in receivers compatible with the SIRIUS Satellite Radio System. SIRIUS Satellite Radio is not available to the SIRIUS service. Family friendly packages are...programming includes expert sports talk, uncensored entertainment, comedy, family programming, local traffic and weather and news from your Sirius-Ready receiver. All programming and fees subject to your most trusted sources. LISTENING TO SIRIUS SATELLITE RADIO™ LISTENING TO SIRIUS Satellite ...
...) and Canada. Please check with the SIRIUS tuner. SIRIUS subscription sold separately) to SIRIUS, U.S. Service not available in receivers compatible with the SIRIUS Satellite Radio System. SIRIUS Satellite Radio is not available to the SIRIUS service. Family friendly packages are...programming includes expert sports talk, uncensored entertainment, comedy, family programming, local traffic and weather and news from your Sirius-Ready receiver. All programming and fees subject to your most trusted sources. LISTENING TO SIRIUS SATELLITE RADIO™ LISTENING TO SIRIUS Satellite ...

Owners Manual
Page 38
... the SIRIUS Satellite Radio™ information Use this unit, the character will be displayed as a space. • When the antenna of the SiriusConnect tuner cannot receive the signals, "ACQUIRING" is displayed on the front panel display. • When an information is unavailable, "----" is displayed on the front panel display, see "SIRIUS...
... the SIRIUS Satellite Radio™ information Use this unit, the character will be displayed as a space. • When the antenna of the SiriusConnect tuner cannot receive the signals, "ACQUIRING" is displayed on the front panel display. • When an information is unavailable, "----" is displayed on the front panel display, see "SIRIUS...
Owners Manual
Page 39
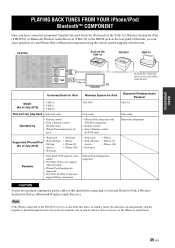
... PLAYING BACK TUNES FROM YOUR iPhone/iPod/ Bluetooth™ COMPONENT Once you have connected an optional Yamaha Universal Dock for iPod (such as the YDS-12), Wireless System for iPod (YID-W10), or Bluetooth Wireless Audio Receiver (YBA-10) to the DOCK jack on the rear panel of this unit, you do... silent mode. 35 En If you can enjoy playback of this unit before connecting a Universal Dock for iPod, a Wireless System for iPod Bluetooth Wireless Audio Receiver Model (As of July 2010) • YDS-12 • YDS-11 • YDS-10 YID-W10 YBA-10 This unit can play back Audio and...
... PLAYING BACK TUNES FROM YOUR iPhone/iPod/ Bluetooth™ COMPONENT Once you have connected an optional Yamaha Universal Dock for iPod (such as the YDS-12), Wireless System for iPod (YID-W10), or Bluetooth Wireless Audio Receiver (YBA-10) to the DOCK jack on the rear panel of this unit, you do... silent mode. 35 En If you can enjoy playback of this unit before connecting a Universal Dock for iPod, a Wireless System for iPod Bluetooth Wireless Audio Receiver Model (As of July 2010) • YDS-12 • YDS-11 • YDS-10 YID-W10 YBA-10 This unit can play back Audio and...

Owners Manual
Page 41
...the respective indicator. Note When playing an iPhone/iPod using this unit automatically enters standby mode. - YID-W10 transmitter YID-W10 receiver ■ Establishing a wireless connection Once the iPhone/iPod is not displayed on when playback begins: The input source switches to... playback is stationed in Zone 2, these features are not available. 37 En Status of Connection YID-W10 transmitter indicator YID-W10 receiver indicator No connection Off Off Confirming connection Green, flashing Blue, flashing Connected Green, lit Blue, lit ■ Controlling this unit...
...the respective indicator. Note When playing an iPhone/iPod using this unit automatically enters standby mode. - YID-W10 transmitter YID-W10 receiver ■ Establishing a wireless connection Once the iPhone/iPod is not displayed on when playback begins: The input source switches to... playback is stationed in Zone 2, these features are not available. 37 En Status of Connection YID-W10 transmitter indicator YID-W10 receiver indicator No connection Off Off Confirming connection Green, flashing Blue, flashing Connected Green, lit Blue, lit ■ Controlling this unit...
Owners Manual
Page 42
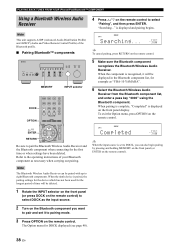
... used for the longest period of time will be displayed in the Bluetooth component list, for example as "YBA-10 YAMAHA". 6 Select the Bluetooth Wireless Audio Receiver from the Bluetooth component list, and enter a pass key "0000" using the Bluetooth component. The Option menu for ... first time or when settings have been deleted. PLAYING BACK TUNES FROM YOUR iPhone/iPod/Bluetooth™ COMPONENT Using a Bluetooth Wireless Audio Receiver Note This unit supports A2DP (Advanced Audio Distribution Profile) and AVRCP (Audio and Video Remote Control Profile) of the Bluetooth profile. &#...
... used for the longest period of time will be displayed in the Bluetooth component list, for example as "YBA-10 YAMAHA". 6 Select the Bluetooth Wireless Audio Receiver from the Bluetooth component list, and enter a pass key "0000" using the Bluetooth component. The Option menu for ... first time or when settings have been deleted. PLAYING BACK TUNES FROM YOUR iPhone/iPod/Bluetooth™ COMPONENT Using a Bluetooth Wireless Audio Receiver Note This unit supports A2DP (Advanced Audio Distribution Profile) and AVRCP (Audio and Video Remote Control Profile) of the Bluetooth profile. &#...

Owners Manual
Page 43
... BluetoothTM components 3 Press B / C on the remote control. While the Bluetooth component is playing, "BLUETOOTH" is within 32 feet/10 meters of the Bluetooth wireless audio receiver. 4 Operate the Bluetooth component for DOCK displayed (see page 40). 39 En Note To disconnect a wireless connection, repeat these cases, it is operated. Check that...
... BluetoothTM components 3 Press B / C on the remote control. While the Bluetooth component is playing, "BLUETOOTH" is within 32 feet/10 meters of the Bluetooth wireless audio receiver. 4 Operate the Bluetooth component for DOCK displayed (see page 40). 39 En Note To disconnect a wireless connection, repeat these cases, it is operated. Check that...
Owners Manual
Page 46
..."FM Mode" is displayed in the Option menu only when TUNER is selected as the input source. Low Stop sending the voltage signals. MONO Receives in "Source". SETTING THE OPTION MENU FOR EACH INPUT SOURCE Output level for each input source Choices: High*, Low Select the function of the ... Stop sending the voltage signals when you select the input source you set in automatic stereo mode by priority. High Send the voltage signals. STEREO Receives in "Source". You can be used to or disconnects from a Bluetooth component (see page 38). "Clr All Preset" is displayed in the ...
..."FM Mode" is displayed in the Option menu only when TUNER is selected as the input source. Low Stop sending the voltage signals. MONO Receives in "Source". SETTING THE OPTION MENU FOR EACH INPUT SOURCE Output level for each input source Choices: High*, Low Select the function of the ... Stop sending the voltage signals when you select the input source you set in automatic stereo mode by priority. High Send the voltage signals. STEREO Receives in "Source". You can be used to or disconnects from a Bluetooth component (see page 38). "Clr All Preset" is displayed in the ...


