
Owners Manual
Page 3
... generates/uses radio frequencies and, if not installed and used . If the antenna lead-in all installation instructions. ii En Follow all installations. Utilize power outlets that interference will not occur in is being affected by the FCC, to use of this type of product. IMPORTANT SAFETY INSTRUCTIONS FCC INFORMATION (for Class "B" digital devices. If this product is found to be the source of...
... generates/uses radio frequencies and, if not installed and used . If the antenna lead-in all installation instructions. ii En Follow all installations. Utilize power outlets that interference will not occur in is being affected by the FCC, to use of this type of product. IMPORTANT SAFETY INSTRUCTIONS FCC INFORMATION (for Class "B" digital devices. If this product is found to be the source of...

Owners Manual
Page 4
CAUTION: READ THIS BEFORE OPERATING YOUR UNIT. Burning objects (i.e. Use a clean, dry cloth. 12 Only voltage specified on switches, knobs and/or cords. 10 When disconnecting the power cable from the AC power source even if you set this unit is connected to the AC wall outlet, it in order not to obstruct heat radiation. This label is incorrectly replaced. iii En...
CAUTION: READ THIS BEFORE OPERATING YOUR UNIT. Burning objects (i.e. Use a clean, dry cloth. 12 Only voltage specified on switches, knobs and/or cords. 10 When disconnecting the power cable from the AC power source even if you set this unit is connected to the AC wall outlet, it in order not to obstruct heat radiation. This label is incorrectly replaced. iii En...
Owners Manual
Page 5
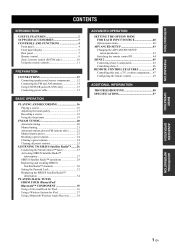
... 4 Front panel 4 Front panel display 6 Rear panel 7 Remote control 8 Zone 2 remote control (R-S700 only 10 Using the remote controls 11 PREPARATION CONNECTIONS 12 Connecting speakers and source components.......... 12 Connecting the FM and AM antennas 14 Using COUPLER jacks (R-S700 only 15 Connecting power cable 15 BASIC OPERATION PLAYING AND RECORDING 16 Playing a source 16 Adjusting the tonal quality 17 Recording a source 19 Using the sleep timer 19 FM/AM TUNING 20 Automatic tuning 20 Manual tuning 21 Automatic station preset (FM stations only 22 Manual station preset 23...
... 4 Front panel 4 Front panel display 6 Rear panel 7 Remote control 8 Zone 2 remote control (R-S700 only 10 Using the remote controls 11 PREPARATION CONNECTIONS 12 Connecting speakers and source components.......... 12 Connecting the FM and AM antennas 14 Using COUPLER jacks (R-S700 only 15 Connecting power cable 15 BASIC OPERATION PLAYING AND RECORDING 16 Playing a source 16 Adjusting the tonal quality 17 Recording a source 19 Using the sleep timer 19 FM/AM TUNING 20 Automatic tuning 20 Manual tuning 21 Automatic station preset (FM stations only 22 Manual station preset 23...

Owners Manual
Page 6
... another input source in part as a CD player, BD/DVD player or TV ➡ p. 47 Save power by using the automatic power down function ➡ p. 43 Use this unit to listen to each model. USEFUL FEATURES USEFUL FEATURES This unit allows you to: Improve sound quality by using the CD Direct Amp*1 and Pure Direct functions ➡ p. 17 Play back music from your iPhone/iPod*2 or Bluetooth component*2 ➡ p. 35 Play back video content from your operation...
... another input source in part as a CD player, BD/DVD player or TV ➡ p. 47 Save power by using the automatic power down function ➡ p. 43 Use this unit to listen to each model. USEFUL FEATURES USEFUL FEATURES This unit allows you to: Improve sound quality by using the CD Direct Amp*1 and Pure Direct functions ➡ p. 17 Play back music from your iPhone/iPod*2 or Bluetooth component*2 ➡ p. 35 Play back video content from your operation...

Owners Manual
Page 8
...). 4 DIMMER Changes the brightness level of the front panel display. Stores the current SIRIUS channel as a preset when SIRIUS is selected as the input source (see page 30). 7 CLEAR Clears the current FM/AM preset station when TUNER is selected as a preset when TUNER is pressed (see page 21). Choose brightness from the remote control. 2 MAIN ZONE indicator Lights up as follows: Brightly lit: Power is on Dimly lit: Standby mode Note...
...). 4 DIMMER Changes the brightness level of the front panel display. Stores the current SIRIUS channel as a preset when SIRIUS is selected as the input source (see page 30). 7 CLEAR Clears the current FM/AM preset station when TUNER is selected as a preset when TUNER is pressed (see page 21). Choose brightness from the remote control. 2 MAIN ZONE indicator Lights up as follows: Brightly lit: Power is on Dimly lit: Standby mode Note...
Owners Manual
Page 9
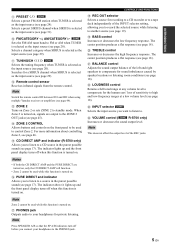
... DIRECT AMP and indicator (R-S700 only) Allows you to record the selected source while listening to control Zone 2. The indicator above it lights up and the front panel display turns off when this function is turned on . The center position produces a flat response (see page 20). N VOLUME control ( R-S700 only) Increases or decreases the sound output level. INTRODUCTION 9 PRESET j / i Selects a preset FM/AM station when TUNER is selected as the input source (see page 20). Selects a preset SIRIUS channel...
... DIRECT AMP and indicator (R-S700 only) Allows you to record the selected source while listening to control Zone 2. The indicator above it lights up and the front panel display turns off when this function is turned on . The center position produces a flat response (see page 20). N VOLUME control ( R-S700 only) Increases or decreases the sound output level. INTRODUCTION 9 PRESET j / i Selects a preset FM/AM station when TUNER is selected as the input source (see page 20). Selects a preset SIRIUS channel...

Owners Manual
Page 10
... function is selected. B P indicator Lights up when a preset number is used to display the artist name, song title, etc. C Multi-information display Shows information when adjusting or changing settings. Both indicators light up when both sets of speakers selected. Blinks while you recall a preset radio station or SIRIUS channel. CONTROLS AND FUNCTIONS Front panel display 1 SP (SPEAKERS) A/B indicators Light up according to the set of speakers are registering a preset radio station or SIRIUS channel. while listening to a SIRIUS channel. 9 ZONE 2 indicator Lights up when Zone 2 is turned...
... function is selected. B P indicator Lights up when a preset number is used to display the artist name, song title, etc. C Multi-information display Shows information when adjusting or changing settings. Both indicators light up when both sets of speakers selected. Blinks while you recall a preset radio station or SIRIUS channel. CONTROLS AND FUNCTIONS Front panel display 1 SP (SPEAKERS) A/B indicators Light up according to the set of speakers are registering a preset radio station or SIRIUS channel. while listening to a SIRIUS channel. 9 ZONE 2 indicator Lights up when Zone 2 is turned...
Owners Manual
Page 11
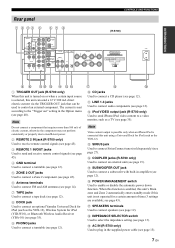
... Audio Receiver (YBA-10) (see page 35). 9 PHONO jacks Used to connect a turntable (see page 12). 0 CD jacks Used to connect a CD player (see page 12). E SUBWOOFER OUT jack Used to connect a subwoofer with built-in amplifier (see page 43). Note Do not connect a component that can send a 12 V/100 mA direct electric current via the TRIGGER OUT jack that requires more than 100 mA of time (3 settings are available; B iPod VIDEO output jack (R-S700 only) Used...
... Audio Receiver (YBA-10) (see page 35). 9 PHONO jacks Used to connect a turntable (see page 12). 0 CD jacks Used to connect a CD player (see page 12). E SUBWOOFER OUT jack Used to connect a subwoofer with built-in amplifier (see page 43). Note Do not connect a component that can send a 12 V/100 mA direct electric current via the TRIGGER OUT jack that requires more than 100 mA of time (3 settings are available; B iPod VIDEO output jack (R-S700 only) Used...

Owners Manual
Page 12
... the sound output to program the remote control so that remote control commands will be used no matter which input source is used to switch the remote control to receiver mode so that it to standby mode. 3 ID Changes the remote control ID (see page 44). 4 MAIN/ZONE 2 Switches the zone to be operated by Yamaha or other external components (see page 48). 8 En B B / C / D / E / ENTER Selects and confirms items in the Option menu (see page 40). C CODE SET/RECEIVER Used to the previous volume level. 0 VOLUME...
... the sound output to program the remote control so that remote control commands will be used no matter which input source is used to switch the remote control to receiver mode so that it to standby mode. 3 ID Changes the remote control ID (see page 44). 4 MAIN/ZONE 2 Switches the zone to be operated by Yamaha or other external components (see page 48). 8 En B B / C / D / E / ENTER Selects and confirms items in the Option menu (see page 40). C CODE SET/RECEIVER Used to the previous volume level. 0 VOLUME...

Owners Manual
Page 14
...2 input selector buttons Selects the desired input source for Zone 2. 10 En Selects a preset SIRIUS channel when SIRIUS is selected as the input source (see page 31). 0 TUN./CH jj / ii Selects the tuning frequency when TUNER is selected as the input source (see page 20). Insulation sheet Note The Zone 2 remote control comes with a battery already installed. B MENU/ Ee / b / a / ENTER C/ 3 (Zone 2 on) Turns on the Zone 2 remote control, which input source is selected for Zone 2. 1 Infrared signal transmitter Sends infrared signals. 2 A (Zone 2 standby) Sets Zone 2 to standby mode...
...2 input selector buttons Selects the desired input source for Zone 2. 10 En Selects a preset SIRIUS channel when SIRIUS is selected as the input source (see page 31). 0 TUN./CH jj / ii Selects the tuning frequency when TUNER is selected as the input source (see page 20). Insulation sheet Note The Zone 2 remote control comes with a battery already installed. B MENU/ Ee / b / a / ENTER C/ 3 (Zone 2 on) Turns on the Zone 2 remote control, which input source is selected for Zone 2. 1 Infrared signal transmitter Sends infrared signals. 2 A (Zone 2 standby) Sets Zone 2 to standby mode...
Owners Manual
Page 23
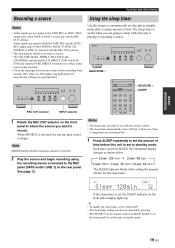
... VOLUME, BASS, TREBLE, BALANCE and LOUDNESS controls and the CD DIRECT AMP switch (RS700 only) and the PURE DIRECT switch have no effect on the front panel display lights up. However, Zone 2 components are going to the TAPE REC or LINE 1 REC output jacks when TAPE or LINE 1 is selected with the remote control. • The sleep timer automatically turns off . 1 Press SLEEP repeatedly to set the amount of time for the sleep timer. MAIN ZONE A RECEIVER...
... VOLUME, BASS, TREBLE, BALANCE and LOUDNESS controls and the CD DIRECT AMP switch (RS700 only) and the PURE DIRECT switch have no effect on the front panel display lights up. However, Zone 2 components are going to the TAPE REC or LINE 1 REC output jacks when TAPE or LINE 1 is selected with the remote control. • The sleep timer automatically turns off . 1 Press SLEEP repeatedly to set the amount of time for the sleep timer. MAIN ZONE A RECEIVER...
Owners Manual
Page 25
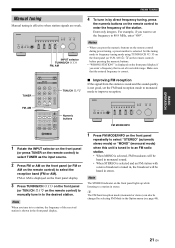
... frequency of the received station is shown in the front panel display. 1 Press FM MODE/INFO on the front panel repeatedly to select "STEREO" (automatic stereo mode) or "MONO" (monaural mode) when this unit is tuned in, the broadcast will be changed by direct frequency tuning, press the numeric buttons on the remote control) before pressing the numeric buttons. • "WRONG STATION!" BASIC OPERATION FM/AM TUNING Manual tuning Manual tuning is not good, set the frequency to an FM radio station...
... frequency of the received station is shown in the front panel display. 1 Press FM MODE/INFO on the front panel repeatedly to select "STEREO" (automatic stereo mode) or "MONO" (monaural mode) when this unit is tuned in, the broadcast will be changed by direct frequency tuning, press the numeric buttons on the remote control) before pressing the numeric buttons. • "WRONG STATION!" BASIC OPERATION FM/AM TUNING Manual tuning Manual tuning is not good, set the frequency to an FM radio station...
Owners Manual
Page 40
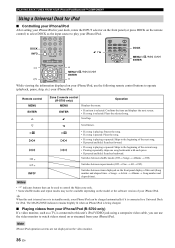
... iPhone/iPod is being charged. ■ Playing videos from your iPhone/iPod. Remote control MENU ENTER B Zone 2 remote control (R-S700 only) Operation MENU Displays the menu. Scroll up. Switches between items displayed on or is in standby mode, your iPhone/iPod can use the following remote control buttons to a Universal Dock for iPod ■ Controlling your iPhone/iPod After setting your iPhone/iPod in your dock, rotate the INPUT selector on the front panel (or press DOCK on the model or...
... iPhone/iPod is being charged. ■ Playing videos from your iPhone/iPod. Remote control MENU ENTER B Zone 2 remote control (R-S700 only) Operation MENU Displays the menu. Scroll up. Switches between items displayed on or is in standby mode, your iPhone/iPod can use the following remote control buttons to a Universal Dock for iPod ■ Controlling your iPhone/iPod After setting your iPhone/iPod in your dock, rotate the INPUT selector on the front panel (or press DOCK on the model or...

Owners Manual
Page 41
... begins on the front panel display. The iPhone/iPod can increase the volume to up to 0 dB (or the value set for iPod, playback information is connected to the YID-W10 transmitter and playback begins, it cannot provide enough power to control the iPhone/iPod. Note When the iPhone/iPod is stationed in the Option menu). Note When playing an iPhone/iPod using a Wireless System for...
... begins on the front panel display. The iPhone/iPod can increase the volume to up to 0 dB (or the value set for iPod, playback information is connected to the YID-W10 transmitter and playback begins, it cannot provide enough power to control the iPhone/iPod. Note When the iPhone/iPod is stationed in the Option menu). Note When playing an iPhone/iPod using a Wireless System for...
Owners Manual
Page 46
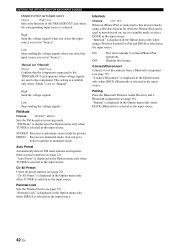
... Option menu only when TUNER is selected as the input source. SETTING THE OPTION MENU FOR EACH INPUT SOURCE Output level for iPod and DOCK is selected as the input source. You can be used to turn this unit on, set to standby mode or select DOCK as the input source. ON This unit responds to the component. Low Stop sending the voltage signals. STEREO Receives in monaural mode. Parental Lock Sets the Parental Lock (see page 38). "Pairing" is displayed...
... Option menu only when TUNER is selected as the input source. SETTING THE OPTION MENU FOR EACH INPUT SOURCE Output level for iPod and DOCK is selected as the input source. You can be used to turn this unit on, set to standby mode or select DOCK as the input source. ON This unit responds to the component. Low Stop sending the voltage signals. STEREO Receives in monaural mode. Parental Lock Sets the Parental Lock (see page 38). "Pairing" is displayed...

Owners Manual
Page 47
...; Select ID2 to operate this unit using the default code. APD (Automatic Power Down) TIMER Choices: 4H (4 hours), 8H* (8 hours), 12H (12 hours) When the POWER MANAGEMENT switch on the rear panel of time. To change other settings, repeat steps 2 and 3. 4 Press MAIN ZONE A to set this unit to standby mode to OFF, "APD TIMER -OFF" is displayed. REMOTE ID Choices: ID1, ID2* Changes the remote control ID of your setting. Changing the ADVANCED SETUP menu...
...; Select ID2 to operate this unit using the default code. APD (Automatic Power Down) TIMER Choices: 4H (4 hours), 8H* (8 hours), 12H (12 hours) When the POWER MANAGEMENT switch on the rear panel of time. To change other settings, repeat steps 2 and 3. 4 Press MAIN ZONE A to set this unit to standby mode to OFF, "APD TIMER -OFF" is displayed. REMOTE ID Choices: ID1, ID2* Changes the remote control ID of your setting. Changing the ADVANCED SETUP menu...
Owners Manual
Page 49
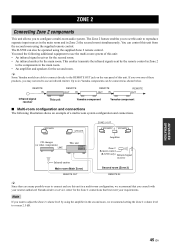
... jack on the rear panel of a multi-room system configuration and connections. CD changer (or other components) This unit Infrared emitter Main room (Main Zone) Amplifier Zone 2 Remote control (R-S700 only) Infrared signal receiver Second room (Zone 2) y Since there are able to connect directly to use this unit. y Some Yamaha models are many possible ways to or near 2.5 dB. REMOTE IN Infrared signal receiver REMOTE OUT IN REMOTE OUT IN REMOTE OUT This unit Yamaha component Yamaha component ■ Multi...
... jack on the rear panel of a multi-room system configuration and connections. CD changer (or other components) This unit Infrared emitter Main room (Main Zone) Amplifier Zone 2 Remote control (R-S700 only) Infrared signal receiver Second room (Zone 2) y Since there are able to connect directly to use this unit. y Some Yamaha models are many possible ways to or near 2.5 dB. REMOTE IN Infrared signal receiver REMOTE OUT IN REMOTE OUT IN REMOTE OUT This unit Yamaha component Yamaha component ■ Multi...

Owners Manual
Page 54
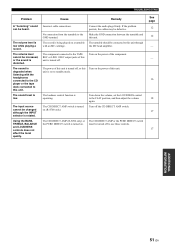
... amplifier or the speakers. other and then turn the power of the input selector buttons on Set the IMPEDANCE SELECTOR switch to either the rear panel is playing. Set the BALANCE control to the correct + and - Connect the speaker wires to the appropriate position. The impedance setting is not completely inserted. Set this unit is turned off the mute. Connect the cables properly. Output has been muted. Set the setting to match your speakers. selected input source is turned off. The automatic power...
... amplifier or the speakers. other and then turn the power of the input selector buttons on Set the IMPEDANCE SELECTOR switch to either the rear panel is playing. Set the BALANCE control to the correct + and - Connect the speaker wires to the appropriate position. The impedance setting is not completely inserted. Set this unit is turned off the mute. Connect the cables properly. Output has been muted. Set the setting to match your speakers. selected input source is turned off. The automatic power...
Owners Manual
Page 55
Turn on . The CD DIRECT AMP switch is low while playing a record. No connection from the turntable to this unit is turned off to standby mode. Connect the audio plugs firmly. The component connected to the TAPE REC or LINE 1 REC output jacks of this unit through the MC head amplifier. Turn down the volume, set to use those controls. See page 12 12 - - 16 18 17 17 ADDITIONAL INFORMATION 51 En The volume level is turned on...
Turn on . The CD DIRECT AMP switch is low while playing a record. No connection from the turntable to this unit is turned off to standby mode. Connect the audio plugs firmly. The component connected to the TAPE REC or LINE 1 REC output jacks of this unit through the MC head amplifier. Turn down the volume, set to use those controls. See page 12 12 - - 16 18 17 17 ADDITIONAL INFORMATION 51 En The volume level is turned on...
Owners Manual
Page 60
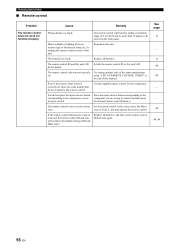
... match. The remote control will switch to control. Replace all batteries, and then set . zone or Zone 2, and then operate the remote control. Direct sunlight or lighting (from the front panel. the desired remote control button(s). If the remote control batteries are weak. Cause Remedy Wrong distance or angle. TROUBLESHOOTING ■ Remote control Problem The remote control does not work nor function properly. The batteries are weak or removed, the remote control ID and zone will function within a maximum range of this...
... match. The remote control will switch to control. Replace all batteries, and then set . zone or Zone 2, and then operate the remote control. Direct sunlight or lighting (from the front panel. the desired remote control button(s). If the remote control batteries are weak. Cause Remedy Wrong distance or angle. TROUBLESHOOTING ■ Remote control Problem The remote control does not work nor function properly. The batteries are weak or removed, the remote control ID and zone will function within a maximum range of this...


