
Owners Manual
Page 5
... Volume 47 Initial Volume 47 AutoPowerStdby (Auto Power Standby 47 ECO Mode 47 Configuring the system settings (ADVANCED SETUP menu 48 ADVANCED SETUP menu items 48 Changing the speaker impedance setting (SP IMP.) ... 48 Selecting the remote control ID (REMOTE ID).......... 48 Restoring the default settings (INIT 48 Updating the firmware (UPDATE 49 Checking the firmware version (VERSION 49 Updating the unit's firmware via the network .......50 ADDITIONAL INFORMATION Troubleshooting 51 Error indications on the front display 57 Trademarks 58 Specifications...
... Volume 47 Initial Volume 47 AutoPowerStdby (Auto Power Standby 47 ECO Mode 47 Configuring the system settings (ADVANCED SETUP menu 48 ADVANCED SETUP menu items 48 Changing the speaker impedance setting (SP IMP.) ... 48 Selecting the remote control ID (REMOTE ID).......... 48 Restoring the default settings (INIT 48 Updating the firmware (UPDATE 49 Checking the firmware version (VERSION 49 Updating the unit's firmware via the network .......50 ADDITIONAL INFORMATION Troubleshooting 51 Error indications on the front display 57 Trademarks 58 Specifications...

Owners Manual
Page 9
... remote control. 4 DIMMER Changes the brightness level of this function is selected as the input source (p. 26). 9 BAND Switches between FM and AM (p. 24). 0 Front display Shows information about the operational status of the front display. Switches the iPod operation modes (p. 40). 7 MEMORY Registers the current FM/AM station as the input source (p. 25). A PRESET j / i Recalls a preset FM/AM station (p. 26) or song/streaming station (p. 42). ENTER L R RETURN CONNECT PURE DIRECT VOLUME 1 A (power) Turns on the front display (p. 41). 6 MODE Sets...
... remote control. 4 DIMMER Changes the brightness level of this function is selected as the input source (p. 26). 9 BAND Switches between FM and AM (p. 24). 0 Front display Shows information about the operational status of the front display. Switches the iPod operation modes (p. 40). 7 MEMORY Registers the current FM/AM station as the input source (p. 25). A PRESET j / i Recalls a preset FM/AM station (p. 26) or song/streaming station (p. 42). ENTER L R RETURN CONNECT PURE DIRECT VOLUME 1 A (power) Turns on the front display (p. 41). 6 MODE Sets...
Owners Manual
Page 10
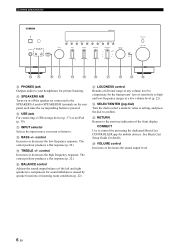
... decreases the low frequency response. I TREBLE +/- Controls and functions PHONES SPEAKERS A B 5V 1A DIMMER DISPLAY MODE MEMORY CLEAR BAND PRESET TUNING INPUT BASS TREBLE BALANCE LOUDNESS FLAT -30dB SELECT PUSH - L SELECT/ENTER (jog dial) Turn the dial to select a numeric value or setting, and press the dial to compensate for mobile devices. The center position produces a flat response (p. 22). E SPEAKERS A/B Turns on the rear panel each time the corresponding button is pressed. ENTER L R RETURN CONNECT PURE DIRECT VOLUME DE...
... decreases the low frequency response. I TREBLE +/- Controls and functions PHONES SPEAKERS A B 5V 1A DIMMER DISPLAY MODE MEMORY CLEAR BAND PRESET TUNING INPUT BASS TREBLE BALANCE LOUDNESS FLAT -30dB SELECT PUSH - L SELECT/ENTER (jog dial) Turn the dial to select a numeric value or setting, and press the dial to compensate for mobile devices. The center position produces a flat response (p. 22). E SPEAKERS A/B Turns on the rear panel each time the corresponding button is pressed. ENTER L R RETURN CONNECT PURE DIRECT VOLUME DE...

Owners Manual
Page 13
... front panel) 4 Radio keys Operate the FM/AM radio (p. 24). Remote control 1 2 3 4 5 SPEAKERS A B PHONO SLEEP COAX 1 COAX 2 BLUETOOTH OPT 1 OPT 2 CD LINE 1 LINE 2 LINE 3 TUNER NET USB BAND MEMORY TUNING PRESET 6 ENTER 7 8 9 0 A HOME RETURN SETUP VOLUME OPTION NOW PLAYING MUTE REPEAT SHUFFLE Controls and functions 1 Infrared signal transmitter Sends infrared signals. 2 SPEAKERS A/B Turns on and off the set of this unit when the corresponding key is selected as the input source (p. 42). Adjust the volume. PHONO PHONO jacks COAX 1/2 COAXIAL1/2 jacks...
... front panel) 4 Radio keys Operate the FM/AM radio (p. 24). Remote control 1 2 3 4 5 SPEAKERS A B PHONO SLEEP COAX 1 COAX 2 BLUETOOTH OPT 1 OPT 2 CD LINE 1 LINE 2 LINE 3 TUNER NET USB BAND MEMORY TUNING PRESET 6 ENTER 7 8 9 0 A HOME RETURN SETUP VOLUME OPTION NOW PLAYING MUTE REPEAT SHUFFLE Controls and functions 1 Infrared signal transmitter Sends infrared signals. 2 SPEAKERS A/B Turns on and off the set of this unit when the corresponding key is selected as the input source (p. 42). Adjust the volume. PHONO PHONO jacks COAX 1/2 COAXIAL1/2 jacks...

Owners Manual
Page 21
... Protected Setup) is WEP. This unit (front) PHONES SPEAKERS A B 5V 1A DIMMER DISPLAY MODE MEMORY CLEAR INPUT BASS TREBLE Connecting to network 1 Press A to turn on the iOS device. Using the WPS push button configuration You can easily set up a wireless connection with the unit. 1 Connect the iOS device to the USB jack, and disable the screen lock on the front display. MEMORY PRESET Cursor keys B / C ENTER SETUP ENTER HOME RETURN SETUP VOLUME...
... Protected Setup) is WEP. This unit (front) PHONES SPEAKERS A B 5V 1A DIMMER DISPLAY MODE MEMORY CLEAR INPUT BASS TREBLE Connecting to network 1 Press A to turn on the iOS device. Using the WPS push button configuration You can easily set up a wireless connection with the unit. 1 Connect the iOS device to the USB jack, and disable the screen lock on the front display. MEMORY PRESET Cursor keys B / C ENTER SETUP ENTER HOME RETURN SETUP VOLUME...
Owners Manual
Page 25
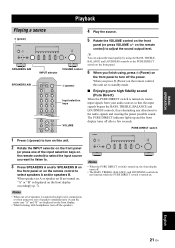
... PLAYING MUTE A (power) Input selection keys VOLUME 5 Rotate the VOLUME control on . ENTER L R RETURN CONNECT PURE DIRECT VOLUME Notes • When the PURE DIRECT switch is displayed on the remote control) to the audio signals and creating the purest possible sound. The PURE DIRECT indicator lights up and the front display turns off the speakers. When speaker set A or speaker set B are displayed on the remote control to select speakers A and/or speakers B. PHONES SPEAKERS A B 5V 1A DIMMER DISPLAY MODE MEMORY CLEAR BAND PRESET TUNING INPUT BASS TREBLE BALANCE...
... PLAYING MUTE A (power) Input selection keys VOLUME 5 Rotate the VOLUME control on . ENTER L R RETURN CONNECT PURE DIRECT VOLUME Notes • When the PURE DIRECT switch is displayed on the remote control) to the audio signals and creating the purest possible sound. The PURE DIRECT indicator lights up and the front display turns off the speakers. When speaker set A or speaker set B are displayed on the remote control to select speakers A and/or speakers B. PHONES SPEAKERS A B 5V 1A DIMMER DISPLAY MODE MEMORY CLEAR BAND PRESET TUNING INPUT BASS TREBLE BALANCE...

Owners Manual
Page 28
... an FM radio station. Press jj to tune in monaural sound. When Mono is tuned in stereo. • (U.K. Note The STEREO indicator on the front display will also lit. PHONES SPEAKERS A B 5V 1A DIMMER DISPLAY MODE MEMORY CLEAR BAND PRESET TUNING INPUT BASS TREBLE BALANCE LOUDNESS FLAT -30dB SELECT PUSH - Automatic preset tuning (FM stations only) You can then easily recall any preset station by the Auto Preset function. 24 En You can use the automatic preset tuning function to...
... an FM radio station. Press jj to tune in monaural sound. When Mono is tuned in stereo. • (U.K. Note The STEREO indicator on the front display will also lit. PHONES SPEAKERS A B 5V 1A DIMMER DISPLAY MODE MEMORY CLEAR BAND PRESET TUNING INPUT BASS TREBLE BALANCE LOUDNESS FLAT -30dB SELECT PUSH - Automatic preset tuning (FM stations only) You can then easily recall any preset station by the Auto Preset function. 24 En You can use the automatic preset tuning function to...

Owners Manual
Page 30
... Presets" is displayed. 1 Press TUNER to select "TUNER" as the input source. 2 Press OPTION. 26 En TUNER SPEAKERS A B PHONO SLEEP COAX 1 COAX 2 BLUETOOTH OPT 1 OPT 2 CD LINE 1 LINE 2 LINE 3 TUNER NET USB BAND MEMORY TUNING PRESET PRESET j / i 3 Use the cursor keys to the preset numbers. Cursor keys B / C ENTER ENTER HOME RETURN SETUP VOLUME OPTION NOW PLAYING MUTE OPTION 1 Press TUNER to select "TUNER" as the input source. Listening to FM/AM radio Recalling a preset station You can clear a preset station from...
... Presets" is displayed. 1 Press TUNER to select "TUNER" as the input source. 2 Press OPTION. 26 En TUNER SPEAKERS A B PHONO SLEEP COAX 1 COAX 2 BLUETOOTH OPT 1 OPT 2 CD LINE 1 LINE 2 LINE 3 TUNER NET USB BAND MEMORY TUNING PRESET PRESET j / i 3 Use the cursor keys to the preset numbers. Cursor keys B / C ENTER ENTER HOME RETURN SETUP VOLUME OPTION NOW PLAYING MUTE OPTION 1 Press TUNER to select "TUNER" as the input source. Listening to FM/AM radio Recalling a preset station You can clear a preset station from...

Owners Manual
Page 31
... STEREO TUNED A VOL. BASIC OPERATION Radio Data System tuning (U.K. To enable this function, follow the procedure below to tune into the Radio Data System broadcasting stations (p. 24). 2 Press DISPLAY. ENTER L R RETURN CONNECT PURE DIRECT VOLUME DISPLAY Cursor keys B / C ENTER ENTER HOME RETURN SETUP VOLUME OPTION NOW PLAYING MUTE RETURN OPTION 1 Tune into a Radio Data System broadcasting station. ■ Displaying the Radio Data System information Listening to select "TrafficProgram" and press ENTER. y We recommend using "Auto Preset" to set...
... STEREO TUNED A VOL. BASIC OPERATION Radio Data System tuning (U.K. To enable this function, follow the procedure below to tune into the Radio Data System broadcasting stations (p. 24). 2 Press DISPLAY. ENTER L R RETURN CONNECT PURE DIRECT VOLUME DISPLAY Cursor keys B / C ENTER ENTER HOME RETURN SETUP VOLUME OPTION NOW PLAYING MUTE RETURN OPTION 1 Tune into a Radio Data System broadcasting station. ■ Displaying the Radio Data System information Listening to select "TrafficProgram" and press ENTER. y We recommend using "Auto Preset" to set...
Owners Manual
Page 32
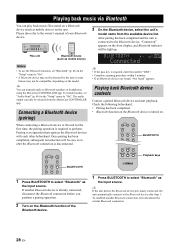
.... • Bluetooth function on the Bluetooth device is connected to select "Bluetooth" as the input source. To transmit audio, set "Bluetooth" (p. 46) in the "Setup" menu to select "Bluetooth" as the input source. After pairing has been completed and the unit is turned on the front display, and Bluetooth indicator will be selected from the available device list. Please also refer to the owner's manual of the...
.... • Bluetooth function on the Bluetooth device is connected to select "Bluetooth" as the input source. To transmit audio, set "Bluetooth" (p. 46) in the "Setup" menu to select "Bluetooth" as the input source. After pairing has been completed and the unit is turned on the front display, and Bluetooth indicator will be selected from the available device list. Please also refer to the owner's manual of the...

Owners Manual
Page 36
..., see "DMC Control" (p.45). ■ Repeat/shuffle settings You can also use a DLNA-compatible Digital Media Controller (DMC) to control playback. All Plays back all songs in random order. 32 En Moves down ) Searches f / a forward/backward. p/ e Stops/resumes playback. HOME Displays the root directory of PC music content. 1 When the input source is selected. Keys Function Cursor keys Select a music file or folder. Playing back music stored on...
..., see "DMC Control" (p.45). ■ Repeat/shuffle settings You can also use a DLNA-compatible Digital Media Controller (DMC) to control playback. All Plays back all songs in random order. 32 En Moves down ) Searches f / a forward/backward. p/ e Stops/resumes playback. HOME Displays the root directory of PC music content. 1 When the input source is selected. Keys Function Cursor keys Select a music file or folder. Playing back music stored on...
Owners Manual
Page 47
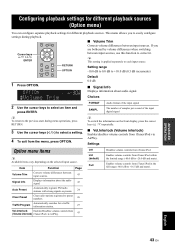
... the input signal The number of samples per second of the input digital signal y To return to each input source. Item Function Page Volume Trim Corrects volume differences between input sources. 43 Signal Info Displays information about audio signal. This menu allows you are bothered by volume differences when switching between input sources. y This setting is applied separately to the previous state during playback. MEMORY PRESET Cursor keys B / C / D / E ENTER ENTER HOME RETURN SETUP VOLUME OPTION NOW PLAYING MUTE...
... the input signal The number of samples per second of the input digital signal y To return to each input source. Item Function Page Volume Trim Corrects volume differences between input sources. 43 Signal Info Displays information about audio signal. This menu allows you are bothered by volume differences when switching between input sources. y This setting is applied separately to the previous state during playback. MEMORY PRESET Cursor keys B / C / D / E ENTER ENTER HOME RETURN SETUP VOLUME OPTION NOW PLAYING MUTE...
Owners Manual
Page 50
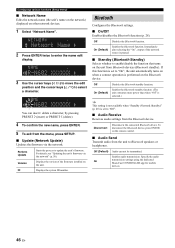
.... Disconnect Disconnects the connected Bluetooth device. Displays the system ID number. Immediately after selecting the "On", output of the firmware installed on the Bluetooth device. Enables the Bluetooth standby function. (The unit consumes more power than when "Off" is selected.) y This setting is not available when "Standby (Network Standby)" (p. 45) is paused. ■ Standby (Bluetooth Standby) Selects whether to "Off". ■ Audio Receive Receives audio settings from Bluetooth devices (Bluetooth standby). NETWORK A Network...
.... Disconnect Disconnects the connected Bluetooth device. Displays the system ID number. Immediately after selecting the "On", output of the firmware installed on the Bluetooth device. Enables the Bluetooth standby function. (The unit consumes more power than when "Off" is selected.) y This setting is not available when "Standby (Network Standby)" (p. 45) is paused. ■ Standby (Bluetooth Standby) Selects whether to "Off". ■ Audio Receive Receives audio settings from Bluetooth devices (Bluetooth standby). NETWORK A Network...
Owners Manual
Page 53
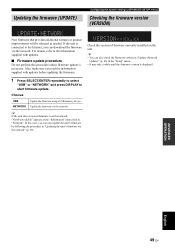
... unless firmware update is connected to the Internet, you can also check the firmware version in "Update (Network Update)" (p. 46) in the "Setup" menu. • It may take a while until the firmware version is displayed. 1 Press SELECT/ENTER repeatedly to select "USB" or "NETWORK" and press DISPLAY to the information supplied with updates before updating the firmware. ADVANCED OPERATION English 49 En Updating the firmware (UPDATE) Configuring the system settings (ADVANCED SETUP menu...
... unless firmware update is connected to the Internet, you can also check the firmware version in "Update (Network Update)" (p. 46) in the "Setup" menu. • It may take a while until the firmware version is displayed. 1 Press SELECT/ENTER repeatedly to select "USB" or "NETWORK" and press DISPLAY to the information supplied with updates before updating the firmware. ADVANCED OPERATION English 49 En Updating the firmware (UPDATE) Configuring the system settings (ADVANCED SETUP menu...
Owners Manual
Page 54
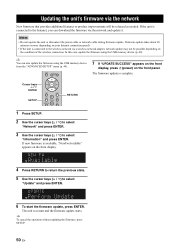
... connected to select "Information" and press ENTER. MEMORY PRESET 7 If "UPDATE SUCCESS" appears on the front display, press A (power) on the front panel. If the unit is complete. Notes • Do not operate the unit or disconnect the power cable or network cable during firmware update. In this case, update the firmware using the USB memory device from the "ADVANCED SETUP" menu (p. 49). y To cancel the operation without updating the firmware...
... connected to select "Information" and press ENTER. MEMORY PRESET 7 If "UPDATE SUCCESS" appears on the front display, press A (power) on the front panel. If the unit is complete. Notes • Do not operate the unit or disconnect the power cable or network cable during firmware update. In this case, update the firmware using the USB memory device from the "ADVANCED SETUP" menu (p. 49). y To cancel the operation without updating the firmware...
Owners Manual
Page 55
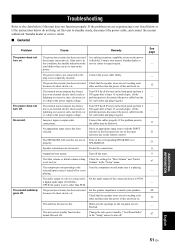
... sound. The sound suddenly goes off . Turn OFF the A (Power) on the front panel and turn off . The SPEAKERS A/B switches are not blocked. The Max volume or Initial volume setting Check the settings for "Max Volume" and "Initial is not playing. Volume" in this unit back on the remote control). The component corresponding to the selected input source is turned off . The protection circuitry has been activated because of the connected device to PCM. The auto power standby function...
... sound. The sound suddenly goes off . Turn OFF the A (Power) on the front panel and turn off . The SPEAKERS A/B switches are not blocked. The Max volume or Initial volume setting Check the settings for "Max Volume" and "Initial is not playing. Volume" in this unit back on the remote control). The component corresponding to the selected input source is turned off . The protection circuitry has been activated because of the connected device to PCM. The auto power standby function...

Owners Manual
Page 56
The sound level is operating. Set the BALANCE control to the FLAT position, and then adjust the volume again. Turn down the volume, set to the correct + and - The loudness control function is low. Connect the audio plugs firmly. Make the GND connection between the turntable and this unit. Turn on one side can be connected to the GND terminal. There is low while playing a record. Incorrect setting for the speaker balance. The power of this unit...
The sound level is operating. Set the BALANCE control to the FLAT position, and then adjust the volume again. Turn down the volume, set to the correct + and - The loudness control function is low. Connect the audio plugs firmly. Make the GND connection between the turntable and this unit. Turn on one side can be connected to the GND terminal. There is low while playing a record. Incorrect setting for the speaker balance. The power of this unit...

Owners Manual
Page 63
... • Tone control characteristics BASS Boost/cut (20 Hz 10 dB Turnover frequency 350 Hz TREBLE Boost/cut (20 kHz 10 dB Turnover frequency 3.5 kHz • Continuous loudness control Attenuation 1 kHz 30 dB • Gain tracking error (+16.5 to -80 dB 0.5 dB or less • Digital input (OPTICAL/COAXIAL) Support audio sample rate ...........32/44.1/48/88.2/96/176.4/192 kHz FM • Tuning range [U.S.A. ADDITIONAL...
... • Tone control characteristics BASS Boost/cut (20 Hz 10 dB Turnover frequency 350 Hz TREBLE Boost/cut (20 kHz 10 dB Turnover frequency 3.5 kHz • Continuous loudness control Attenuation 1 kHz 30 dB • Gain tracking error (+16.5 to -80 dB 0.5 dB or less • Digital input (OPTICAL/COAXIAL) Support audio sample rate ...........32/44.1/48/88.2/96/176.4/192 kHz FM • Tuning range [U.S.A. ADDITIONAL...
Owners Manual
Page 64
... Mode (Setup menu 47 Error indication 57 F Firmware update 46, 49, 50 Firmware version 46, 49 FM antenna connection 13 FM mode 24 FM radio listening 24 Front display (Controls and functions 7 Front panel (Controls and functions 5 H headphone 6 I Information (Network, Setup menu 45 Information switching (Front display 41 INIT (ADVANCED SETUP menu 48 Initial Volume (Setup menu 47 Initial volume setting 47 Initialize 48 Input selection keys 21 INPUT selector 21 Internet radio (vTuner 33 IP Address (Network, Setup menu 45 IP address setting 45 iPod...
... Mode (Setup menu 47 Error indication 57 F Firmware update 46, 49, 50 Firmware version 46, 49 FM antenna connection 13 FM mode 24 FM radio listening 24 Front display (Controls and functions 7 Front panel (Controls and functions 5 H headphone 6 I Information (Network, Setup menu 45 Information switching (Front display 41 INIT (ADVANCED SETUP menu 48 Initial Volume (Setup menu 47 Initial volume setting 47 Initialize 48 Input selection keys 21 INPUT selector 21 Internet radio (vTuner 33 IP Address (Network, Setup menu 45 IP address setting 45 iPod...

Owners Manual
Page 65
... timer 23 SP IMP. (ADVANCED SETUP menu 48 Speaker balance 22 Speaker cable connection 12 Speaker connection 12 Speaker impedance 48 Speaker indicators 7 Speaker selection 21 SPEAKERS A/B 21 SSID (Wireless Direct, Setup menu 19 SSID (Wireless, Setup menu 18 Standby (Bluetooth, Setup menu 46 Standby (Network, Setup menu 45 STATUS (Information, Setup menu 20 Stereo (FM radio 24 SUBWOOFER PRE OUT jacks 8, 11 System ID 46 T Tone control 22 TREBLE control 22 U UPDATE (ADVANCED SETUP menu 49 Update (Network, Setup menu 46 USB 37 USB (iPod 39 USB contents playback 37 V VERSION...
... timer 23 SP IMP. (ADVANCED SETUP menu 48 Speaker balance 22 Speaker cable connection 12 Speaker connection 12 Speaker impedance 48 Speaker indicators 7 Speaker selection 21 SPEAKERS A/B 21 SSID (Wireless Direct, Setup menu 19 SSID (Wireless, Setup menu 18 Standby (Bluetooth, Setup menu 46 Standby (Network, Setup menu 45 STATUS (Information, Setup menu 20 Stereo (FM radio 24 SUBWOOFER PRE OUT jacks 8, 11 System ID 46 T Tone control 22 TREBLE control 22 U UPDATE (ADVANCED SETUP menu 49 Update (Network, Setup menu 46 USB 37 USB (iPod 39 USB contents playback 37 V VERSION...


