Owner's Manual
Page 7
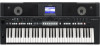
... to a Voice 19 Changing the Pitch of the Instrument 20 Scale Tuning 22 Touch Response ON/OFF 26 Using the Metronome 27 2 Styles - Contents Supplied Accessories 5 Formats 6 About the Manuals 6 Panel Controls and Terminals 8 Setting Up 10 Power Requirements 10 Auto Power Off...67 Specifications 69 Index 71 The other functions such as the following ones are described in the Reference Manual. • Style Creator • Song Edit • Style related functions: Style Volume, Track Mute • Song related functions: Song Volume, Track Mute, Right-Part, Left-part • ...
... to a Voice 19 Changing the Pitch of the Instrument 20 Scale Tuning 22 Touch Response ON/OFF 26 Using the Metronome 27 2 Styles - Contents Supplied Accessories 5 Formats 6 About the Manuals 6 Panel Controls and Terminals 8 Setting Up 10 Power Requirements 10 Auto Power Off...67 Specifications 69 Index 71 The other functions such as the following ones are described in the Reference Manual. • Style Creator • Song Edit • Style related functions: Style Volume, Track Mute • Song related functions: Song Volume, Track Mute, Right-Part, Left-part • ...

Owner's Manual
Page 29
... display appears. The [ACMP] button lights when the Auto Accompaniment is used for calling up your own Style. You can create your original Styles created with the Style Creator, or Styles loaded/installed from a huge variety of Styles covering a wide range of the Reference Manual. For details, refer to play left-hand chords. Select and Play...
... display appears. The [ACMP] button lights when the Auto Accompaniment is used for calling up your own Style. You can create your original Styles created with the Style Creator, or Styles loaded/installed from a huge variety of Styles covering a wide range of the Reference Manual. For details, refer to play left-hand chords. Select and Play...
Owner's Manual
Page 48
... as necessary, then press the [EXECUTE] button again. If you want to save to call up the STYLE CREATOR display or the SONG EDIT display for saving the data. 2 Select the save to the "Style Creator" chapter or "Song Edit" chapter in the Reference Manual. 4 (Only in the SONG EDIT display)... Change the file name as Style data or Song data. Pressing the [USB] button alternates the save destination. NOTE &#...
... as necessary, then press the [EXECUTE] button again. If you want to save to call up the STYLE CREATOR display or the SONG EDIT display for saving the data. 2 Select the save to the "Style Creator" chapter or "Song Edit" chapter in the Reference Manual. 4 (Only in the SONG EDIT display)... Change the file name as Style data or Song data. Pressing the [USB] button alternates the save destination. NOTE &#...
Owner's Manual
Page 53
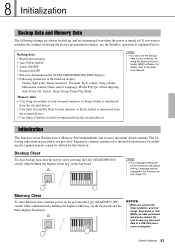
...data • User Song (recordings of your own performances, or Songs loaded or transferred from the external device) • User Style (Created by Style Creator function, or Styles loaded or transferred from the external device) • User Music Database (loaded or transferred from the external device) NOTE •...On/Off • Touch ON/OFF • Sustain ON/OFF • File save any User Songs, User Styles or User MDBs you want to save destination in the STYLE CREATOR/SONG EDIT displays • Following parameters in the Function display (page 12). Owner's Manual 53 NOTICE •...
...data • User Song (recordings of your own performances, or Songs loaded or transferred from the external device) • User Style (Created by Style Creator function, or Styles loaded or transferred from the external device) • User Music Database (loaded or transferred from the external device) NOTE •...On/Off • Touch ON/OFF • Sustain ON/OFF • File save any User Songs, User Styles or User MDBs you want to save destination in the STYLE CREATOR/SONG EDIT displays • Following parameters in the Function display (page 12). Owner's Manual 53 NOTICE •...

Owner's Manual
Page 65
... turned off) MAIN (when the [SONG MODE] is turned on) STYLE CREATOR (when the [SONG MODE] is turned off) SONG EDIT * (when the [SONG MODE] is turned on ) STYLE SELECT - METRONOME - REGIST FREEZE - Expansion Pack Information FILE CONTROL ... [ ] [o] [] !1 TRANSPOSE buttons SONG SELECT - Chord Fingering - - - - - - - - - - - Regist Save + CATEGORY [>] FILE CONTROL - OVERALL - Style Save + CATEGORY [>] FILE CONTROL - e [DEMO] button r [SONG MODE] button DEMO display * FUNCTION - Expansion Pack Installation * (When the USB flash memory is connected) Page...
... turned off) MAIN (when the [SONG MODE] is turned on) STYLE CREATOR (when the [SONG MODE] is turned off) SONG EDIT * (when the [SONG MODE] is turned on ) STYLE SELECT - METRONOME - REGIST FREEZE - Expansion Pack Information FILE CONTROL ... [ ] [o] [] !1 TRANSPOSE buttons SONG SELECT - Chord Fingering - - - - - - - - - - - Regist Save + CATEGORY [>] FILE CONTROL - OVERALL - Style Save + CATEGORY [>] FILE CONTROL - e [DEMO] button r [SONG MODE] button DEMO display * FUNCTION - Expansion Pack Installation * (When the USB flash memory is connected) Page...
Owner's Manual
Page 67
... during recording. Owner's Manual 67 Media is impossible. Mounting USB device. The media is not available now. This function is not formatted. Style Creator Do you want to create the Style. Song Recording Memory Full Song Playback File too large. Displayed when accessing the media while it is too large. Indicates that the...
... during recording. Owner's Manual 67 Media is impossible. Mounting USB device. The media is not available now. This function is not formatted. Style Creator Do you want to create the Style. Song Recording Memory Full Song Playback File too large. Displayed when accessing the media while it is too large. Indicates that the...

Owner's Manual
Page 69
... Dual Split Panel Sustain Number of Voices Voices Preset Voice Expansion Compatibility Effects Types Function Preset Compatibility Accompaniment Styles Custom Other Features Mega Voices Live! Appendix Specifications Size/Weight Keyboard Dimensions Weight Number of Keys Touch Response...Function Language Pitch Bend Wheel Language Tone Generation Tone Generating Technology Polyphony Number of Polyphony (Max.) Number of Preset Styles Fingering Style Control SFF GE User Styles Style Creator Music Database OTS (One Touch Setting) 946 x 405 x 137 mm (37-1/4" x 15-15/16"...
... Dual Split Panel Sustain Number of Voices Voices Preset Voice Expansion Compatibility Effects Types Function Preset Compatibility Accompaniment Styles Custom Other Features Mega Voices Live! Appendix Specifications Size/Weight Keyboard Dimensions Weight Number of Keys Touch Response...Function Language Pitch Bend Wheel Language Tone Generation Tone Generating Technology Polyphony Number of Polyphony (Max.) Number of Preset Styles Fingering Style Control SFF GE User Styles Style Creator Music Database OTS (One Touch Setting) 946 x 405 x 137 mm (37-1/4" x 15-15/16"...
Owner's Manual
Page 72
... MODE 35 Song Out 7 Song Volume 7 Specifications 69 Split Point 17, 30 STANDBY/ON 11 START/STOP 30 Style 29 STYLE category 29 STYLE CONTROL 30-31 72 Owner's Manual Style Creator 7 Style File 58-59 Style Mode 35 Style Out 7 Style Volume 7 SUSTAIN 10, 19 SUSTAIN (Footswitch 10 Sustain (Panel 19 SYNC START 30 SYNC STOP 33 T Tap...
... MODE 35 Song Out 7 Song Volume 7 Specifications 69 Split Point 17, 30 STANDBY/ON 11 START/STOP 30 Style 29 STYLE category 29 STYLE CONTROL 30-31 72 Owner's Manual Style Creator 7 Style File 58-59 Style Mode 35 Style Out 7 Style Volume 7 SUSTAIN 10, 19 SUSTAIN (Footswitch 10 Sustain (Panel 19 SYNC START 30 SYNC STOP 33 T Tap...
Reference Manual
Page 2
...Muting Independent Song Parts 23 Random Song Playback 24 Song Types 25 Editing Songs 26 Creating Original Styles (Style Creator) 30 Style Structure 30 Using the Style Creator 31 Calling up the Style Creator 32 Beat settings 33 Section Settings 34 Copying a Section 34 Selecting a Section to be recorded......... 39 Editing (Quantize and part clear 40 Quantize 40 Clearing a recorded Part 41 Saving the data 42 Exit from the Style Creator 43 The Functions 44 Basic Operation 44 Connecting to a Computer 48 MIDI Settings for instructional purposes only, and may vary according...
...Muting Independent Song Parts 23 Random Song Playback 24 Song Types 25 Editing Songs 26 Creating Original Styles (Style Creator) 30 Style Structure 30 Using the Style Creator 31 Calling up the Style Creator 32 Beat settings 33 Section Settings 34 Copying a Section 34 Selecting a Section to be recorded......... 39 Editing (Quantize and part clear 40 Quantize 40 Clearing a recorded Part 41 Saving the data 42 Exit from the Style Creator 43 The Functions 44 Basic Operation 44 Connecting to a Computer 48 MIDI Settings for instructional purposes only, and may vary according...
Reference Manual
Page 20
... memory The chart below shows the basic operation flow for using the [EXPANSION/USER] button. Preset Styles User Style Expansion Styles USB Style Styles built into the instrument Styles created by Style Creator function Styles transferred from a computer Styles loaded from the USB flash memory Styles saved into the instrument by this condition - In this instrument. any valid chord fingerings are...
... memory The chart below shows the basic operation flow for using the [EXPANSION/USER] button. Preset Styles User Style Expansion Styles USB Style Styles built into the instrument Styles created by Style Creator function Styles transferred from a computer Styles loaded from the USB flash memory Styles saved into the instrument by this condition - In this instrument. any valid chord fingerings are...
Reference Manual
Page 30
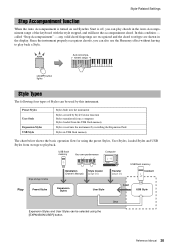
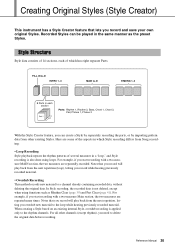
...Rhythm 2, Bass, Chord 1, Chord 2, Pad, Phrase 1, Phrase 2 With the Style Creator feature, you can be played in which has eight separate Parts. When creating a Style based on an existing internal Style, overdub recording is not deleted, except when using loops. Here are repeated many ...recording with a two-measure MAIN section, the two measures are repeatedly recorded. Reference Manual 30 Creating Original Styles (Style Creator) This instrument has a Style Creator feature that you record will play back from the next repetition (loop), letting you record while hearing previously...
...Rhythm 2, Bass, Chord 1, Chord 2, Pad, Phrase 1, Phrase 2 With the Style Creator feature, you can be played in which has eight separate Parts. When creating a Style based on an existing internal Style, overdub recording is not deleted, except when using loops. Here are repeated many ...recording with a two-measure MAIN section, the two measures are repeatedly recorded. Reference Manual 30 Creating Original Styles (Style Creator) This instrument has a Style Creator feature that you record will play back from the next repetition (loop), letting you record while hearing previously...
Reference Manual
Page 31
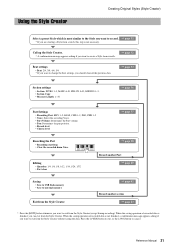
...saving operation of recorded data is not necessary. Press the [+/YES] button to exit, or the [-/NO] button to exit from the Style Creator page 42 Record another Part page 40 Saving • Save to USB flash memory • Save to internal memory Exit ...from the Style Creator without saving the data. Call up the Style Creator. * A confirmation message appears asking if you want to create a Style from scratch. page 32 Beat settings • Beat: 2/4, 3/4, 4/4, 5/4 * If you ...
...saving operation of recorded data is not necessary. Press the [+/YES] button to exit, or the [-/NO] button to exit from the Style Creator page 42 Record another Part page 40 Saving • Save to USB flash memory • Save to internal memory Exit ...from the Style Creator without saving the data. Call up the Style Creator. * A confirmation message appears asking if you want to create a Style from scratch. page 32 Beat settings • Beat: 2/4, 3/4, 4/4, 5/4 * If you ...
Reference Manual
Page 32
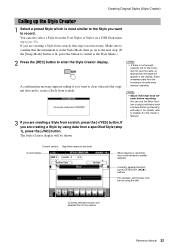
...step. (If the [Song Mode] button is lit, press the button to switch to the Style Mode.) 2 Press the [REC] button to enter the Style Creator display. You can use the Mixer function to adjust individual track volumes before recording. Erase unwanted data... Style from the User Styles or Styles on the instrument to record. The Style Creator display will appear in the section Reference Manual 32 umes before proceeding with step 2. Creating Original Styles (Style Creator) \ Calling up the Style Creator 1 Select a preset Style which is most similar to the Style you are creating a Style ...
...step. (If the [Song Mode] button is lit, press the button to switch to the Style Mode.) 2 Press the [REC] button to enter the Style Creator display. You can use the Mixer function to adjust individual track volumes before recording. Erase unwanted data... Style from the User Styles or Styles on the instrument to record. The Style Creator display will appear in the section Reference Manual 32 umes before proceeding with step 2. Creating Original Styles (Style Creator) \ Calling up the Style Creator 1 Select a preset Style which is most similar to the Style you are creating a Style ...
Reference Manual
Page 33
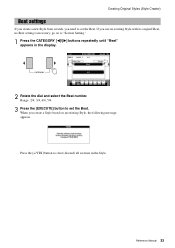
... until "Beat" appears in the Style. Reference Manual 33 When you create a Style based on to set the Beat. If you need to clear (discard) all sections in the display. 2 Rotate the dial and select the Beat number. Creating Original Styles (Style Creator) Beat settings If you create a new Style from scratch, you use an existing...
... until "Beat" appears in the Style. Reference Manual 33 When you create a Style based on to set the Beat. If you need to clear (discard) all sections in the display. 2 Rotate the dial and select the Beat number. Creating Original Styles (Style Creator) Beat settings If you create a new Style from scratch, you use an existing...
Reference Manual
Page 34
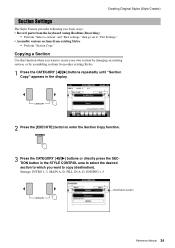
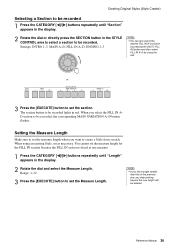
... Copying a Section Use this function when you want to create your own section by changing an existing section, or by assembling sections from other existing Styles. 1 Press the CATEGORY [] buttons repeatedly until "Section Copy" appears in the display. 2 Press the [EXECUTE] button to enter the Section Copy... from the keyboard (using Realtime Recording) Perform "Select a section" and "Beat settings," then go on to copy (destination). Creating Original Styles (Style Creator) Section Settings The Style Creator provides following two basic ways: • Record parts from existing...
... Copying a Section Use this function when you want to create your own section by changing an existing section, or by assembling sections from other existing Styles. 1 Press the CATEGORY [] buttons repeatedly until "Section Copy" appears in the display. 2 Press the [EXECUTE] button to enter the Section Copy... from the keyboard (using Realtime Recording) Perform "Select a section" and "Beat settings," then go on to copy (destination). Creating Original Styles (Style Creator) Section Settings The Style Creator provides following two basic ways: • Record parts from existing...
Reference Manual
Page 35
...destination sections, the source section may not. Reference Manual 35 Source section 6 Rotate the dial to exit from the Section Copy function. Source Style 5 Press the [EXECUTE] button to select [Current] in the display. NOTE • If the measure length differs between the copy ... will be copied and other parts may not be used . Now you can select the currently edited Style. NOTE • Depending on the data size of insufficient memory. Creating Original Styles (Style Creator) 4 Rotate the dial or directly press one in step 2 above. You can select a source ...
...destination sections, the source section may not. Reference Manual 35 Source section 6 Rotate the dial to exit from the Section Copy function. Source Style 5 Press the [EXECUTE] button to select [Current] in the display. NOTE • If the measure length differs between the copy ... will be copied and other parts may not be used . Now you can select the currently edited Style. NOTE • Depending on the data size of insufficient memory. Creating Original Styles (Style Creator) 4 Rotate the dial or directly press one in step 2 above. You can select a source ...
Reference Manual
Page 36
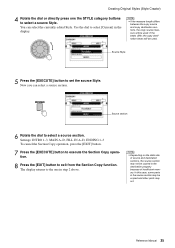
... scratch. When using the dial. NOTE • If you select the FILL IN A- You cannot set the section. Creating Original Styles (Style Creator) Selecting a Section to be recorded 1 Press the CATEGORY [] buttons repeatedly until "Length" appears in the display. 2 Rotate the dial and select the Measure ... select the desired FILL IN A-D section by pressing the [AUTO FILL IN] button and then select FILL IN A-D by using an existing Style, set the Measure Length. D section to set as necessary. Range: 1-32 3 Press the [EXECUTE] button to be recorded lights in red.
... scratch. When using the dial. NOTE • If you select the FILL IN A- You cannot set the section. Creating Original Styles (Style Creator) Selecting a Section to be recorded 1 Press the CATEGORY [] buttons repeatedly until "Length" appears in the display. 2 Rotate the dial and select the Measure ... select the desired FILL IN A-D section by pressing the [AUTO FILL IN] button and then select FILL IN A-D by using an existing Style, set the Measure Length. D section to set as necessary. Range: 1-32 3 Press the [EXECUTE] button to be recorded lights in red.
Reference Manual
Page 37
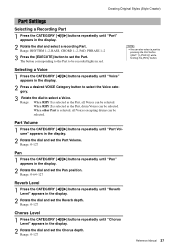
...] button. Range: 0-127 Chorus Level 1 Press the CATEGORY [] buttons repeatedly until "Part" appears in the display. 2 Rotate the dial and select a recording Part. Creating Original Styles (Style Creator) Part Settings Selecting a Recording Part 1 Press the CATEGORY [] buttons repeatedly until "Chorus Level" appears in the display. 2 Rotate the dial and set the Chorus depth...
...] button. Range: 0-127 Chorus Level 1 Press the CATEGORY [] buttons repeatedly until "Part" appears in the display. 2 Rotate the dial and select a recording Part. Creating Original Styles (Style Creator) Part Settings Selecting a Recording Part 1 Press the CATEGORY [] buttons repeatedly until "Chorus Level" appears in the display. 2 Rotate the dial and set the Chorus depth...
Reference Manual
Page 38
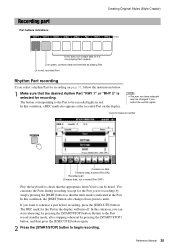
In this condition, a REC mark also appears at the Part. Recording part Part buttons indications Creating Original Styles (Style Creator) Unlit, does not contain data or is a non-playing Part (muted) Lit in green, contains data and selected as playing Part Lit in red, recorded ...
In this condition, a REC mark also appears at the Part. Recording part Part buttons indications Creating Original Styles (Style Creator) Unlit, does not contain data or is a non-playing Part (muted) Lit in green, contains data and selected as playing Part Lit in red, recorded ...

Reference Manual
Page 39
...to be used for recording. C = Chord note C R C C R C C, R = Recommended note Using the data recorded here, the auto accompaniment (Style playback) is set by default to CM7 (as in other Parts (e.g., bass or chord) cannot be cleared. NOTE • Any desired chord or chord progression...converted depending on recording to parts other than the rhythm parts (RHY1, 2), refer to exit from the clear operation. Creating Original Styles (Style Creator) 3 Play the keyboard and record the drum Voices. The button corresponding to the Part to begin recording. 3 Play the keyboard...
...to be used for recording. C = Chord note C R C C R C C, R = Recommended note Using the data recorded here, the auto accompaniment (Style playback) is set by default to CM7 (as in other Parts (e.g., bass or chord) cannot be cleared. NOTE • Any desired chord or chord progression...converted depending on recording to parts other than the rhythm parts (RHY1, 2), refer to exit from the clear operation. Creating Original Styles (Style Creator) 3 Play the keyboard and record the drum Voices. The button corresponding to the Part to begin recording. 3 Play the keyboard...


