
Owner's Manual
Page 3
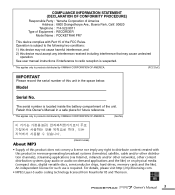
...created with Part 15 of the FCC Rules. See user manual instructions if interference to radio reception is subject to products distributed by YAMAHA CORPORATION OF AMERICA. (Ser.No) About MP3 (class b korea) • Supply of this product does not convey a ...unit. COMPLIANCE INFORMATION STATEMENT (DECLARATION OF CONFORMITY PROCEDURE) Responsible Party : Yamaha Corporation of America Address : 6600 Orangethorpe Ave., Buena Park, Calif. 90620 Telephone : 714-522-9011 Type of Equipment : RECORDER Model Name : POCKETRAK PR7 This device complies with this product in the space below.
...created with Part 15 of the FCC Rules. See user manual instructions if interference to radio reception is subject to products distributed by YAMAHA CORPORATION OF AMERICA. (Ser.No) About MP3 (class b korea) • Supply of this product does not convey a ...unit. COMPLIANCE INFORMATION STATEMENT (DECLARATION OF CONFORMITY PROCEDURE) Responsible Party : Yamaha Corporation of America Address : 6600 Orangethorpe Ave., Buena Park, Calif. 90620 Telephone : 714-522-9011 Type of Equipment : RECORDER Model Name : POCKETRAK PR7 This device complies with this product in the space below.
Owner's Manual
Page 7
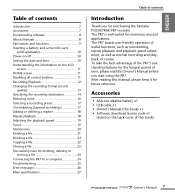
... file 21 Dividing a file 22 Copying a file 22 Moving a file 23 File naming rules for purchasing the Yamaha POCKETRAK PR7 recorder. To take the best advantage of the PR7's outstanding features for the longest period of time, please read this Owner's Manual before you for dividing, deleting ...Main specifications 27 Table of contents Introduction Thank you start using the PR7. After reading this manual, please keep it for numerous musical applications. The PR7 is well-suited for future reference. The PR7 boasts user-friendly operation of useful functions, such as overdubbing, repeat...
... file 21 Dividing a file 22 Copying a file 22 Moving a file 23 File naming rules for purchasing the Yamaha POCKETRAK PR7 recorder. To take the best advantage of the PR7's outstanding features for the longest period of time, please read this Owner's Manual before you for dividing, deleting ...Main specifications 27 Table of contents Introduction Thank you start using the PR7. After reading this manual, please keep it for numerous musical applications. The PR7 is well-suited for future reference. The PR7 boasts user-friendly operation of useful functions, such as overdubbing, repeat...
Owner's Manual
Page 8
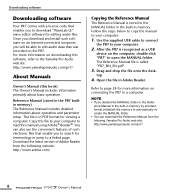
... to read this book) The Owner's Manual includes information primarily about operation and parameter setup. Use the supplied USB cable to connect the PR7 to your computer. 2. For more information on downloading this software, refer to a computer. This file is called "PR7_RM_EN.pdf". 3....WaveLab LE" wave editor software for more information on connecting the PR7 to the Yamaha Pro Audio website: http://www.yamahaproaudio.com/pr7/ About Manuals Owner's Manual (this manual using Adobe® Reader®. After the PR7 is stored in the MANUAL folder in the built-in Adobe ...
... to read this book) The Owner's Manual includes information primarily about operation and parameter setup. Use the supplied USB cable to connect the PR7 to your computer. 2. For more information on downloading this software, refer to a computer. This file is called "PR7_RM_EN.pdf". 3....WaveLab LE" wave editor software for more information on connecting the PR7 to the Yamaha Pro Audio website: http://www.yamahaproaudio.com/pr7/ About Manuals Owner's Manual (this manual using Adobe® Reader®. After the PR7 is stored in the MANUAL folder in the built-in Adobe ...
Owner's Manual
Page 10
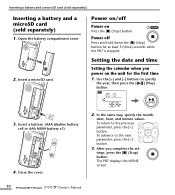
...then press the [ ] (Play) button. 3. Insert a microSD card. Setting the date and time Setting the calendar when you complete the set- The PR7 displays the HOME screen. 10 Owner's Manual tings, press the [■] (Stop) button. Power on the unit for at least 3 (three) seconds while ...the PR7 is stopped. Use the [+] and [-] buttons to the previous parameter, press the [] button. 3. In the same way, specify the month, date, hour,...
...then press the [ ] (Play) button. 3. Insert a microSD card. Setting the date and time Setting the calendar when you complete the set- The PR7 displays the HOME screen. 10 Owner's Manual tings, press the [■] (Stop) button. Power on the unit for at least 3 (three) seconds while ...the PR7 is stopped. Use the [+] and [-] buttons to the previous parameter, press the [] button. 3. In the same way, specify the month, date, hour,...
Owner's Manual
Page 12
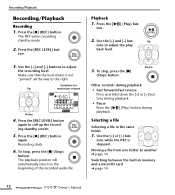
...for Up maximum volume Down 4. To stop , press the [■] (Stop) button. Use the [+] and [-] but - tons while the PR7 is not "pinned" all the way to adjust the recording level. Moving a file from one folder to call up the recording standby screen. ... again. Press the [●] (REC) button. Use the [+] and [-] buttons to the right. back level. 3. Use the [] but - 2. The PR7 enters recording standby mode. 2. Press the [ ton. ] (Play) but - Recording starts. 6. Recording/Playback Recording/Playback Recording 1. Down Other controls during playback...
...for Up maximum volume Down 4. To stop , press the [■] (Stop) button. Use the [+] and [-] but - tons while the PR7 is not "pinned" all the way to adjust the recording level. Moving a file from one folder to call up the recording standby screen. ... again. Press the [●] (REC) button. Use the [+] and [-] buttons to the right. back level. 3. Use the [] but - 2. The PR7 enters recording standby mode. 2. Press the [ ton. ] (Play) but - Recording starts. 6. Recording/Playback Recording/Playback Recording 1. Down Other controls during playback...
Owner's Manual
Page 13
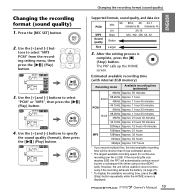
... up the HOME screen. Press the [REC SET] button. 2. If the recording file size reaches 2GB, the PR7 will be unable to select "MP3 PCM" from the recording setting menu, then press the [ ] (Play) button. 3. However, the unit will be shorter than those ...
... up the HOME screen. Press the [REC SET] button. 2. If the recording file size reaches 2GB, the PR7 will be unable to select "MP3 PCM" from the recording setting menu, then press the [ ] (Play) button. 3. However, the unit will be shorter than those ...

Owner's Manual
Page 14
...9632;] (Stop) button. tons to select a folder (R1, M1, etc.), then press the [ ] (Play) button. After the setting process is confirmed, the PR7 automatically calls up the HOME screen. 3. Use the [+] and [-] buttons to select "rEC" (REC/for recording only) or "MSC" (MUSIC/for at least ... Press the [REC SET] button. 2. Press and hold down the [MENU] button for playback only), then press the [ ] (Play) button. 3. The PR7 calls up the HOME screen. 14 Owner's Manual Selecting the recording destination folder 1. Use the [+] and [-] buttons to select "SD" from the recording setting menu...
...9632;] (Stop) button. tons to select a folder (R1, M1, etc.), then press the [ ] (Play) button. After the setting process is confirmed, the PR7 automatically calls up the HOME screen. 3. Use the [+] and [-] buttons to select "rEC" (REC/for recording only) or "MSC" (MUSIC/for at least ... Press the [REC SET] button. 2. Press and hold down the [MENU] button for playback only), then press the [ ] (Play) button. 3. The PR7 calls up the HOME screen. 14 Owner's Manual Selecting the recording destination folder 1. Use the [+] and [-] buttons to select "SD" from the recording setting menu...
Owner's Manual
Page 15
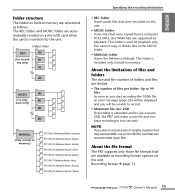
Default folder REC R0 (For record- This folder is extended and its size exceeds 2GB, the PR7 will create a new file and continue recording in two seconds. About the file format The PR7 supports only those file formats that are limited. • The number of files per folder: Up to 99 files As...
Default folder REC R0 (For record- This folder is extended and its size exceeds 2GB, the PR7 will create a new file and continue recording in two seconds. About the file format The PR7 supports only those file formats that are limited. • The number of files per folder: Up to 99 files As...

Owner's Manual
Page 16
...Use the [+] and [-] but - Use the [+] and [-] buttons to select "HPF" from the recording setting menu, then press the [ ] (Play) button. 3. The PR7 calls up the HOME screen. 4. tons to select "LIM" (Limiter), "ALC HI" (for soft sounds), or "ALC LO" (for loud sounds), then press the [.... 1. After the setting process is complete, press the [■] (Stop) button. tons to select "On", then press the [ ] (Play) button. 3. The PR7 calls up the HOME screen. 16 Owner's Manual Reducing noise Reducing noise Preventing low-range noise (High-pass filter) The high-pass filter reduces low...
...Use the [+] and [-] but - Use the [+] and [-] buttons to select "HPF" from the recording setting menu, then press the [ ] (Play) button. 3. The PR7 calls up the HOME screen. 4. tons to select "LIM" (Limiter), "ALC HI" (for soft sounds), or "ALC LO" (for loud sounds), then press the [.... 1. After the setting process is complete, press the [■] (Stop) button. tons to select "On", then press the [ ] (Play) button. 3. The PR7 calls up the HOME screen. 16 Owner's Manual Reducing noise Reducing noise Preventing low-range noise (High-pass filter) The high-pass filter reduces low...
Owner's Manual
Page 17
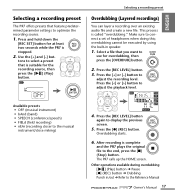
... • FIELd (field recording) • nEAr (recording closer to the end, press the [■] (Stop) button. After recording is complete and the PR7 plays the original file to the musical instrument/close miking) 4. Make sure to display the previous screen. 5. Press the [REC LEVEL] button. 3. Overdubbing starts... Owner's Manual 17 Press the [REC LEVEL] button again to connect a set of headphones when doing this; Selecting a recording preset The PR7 offers presets that you want to use for overdubbing, then press the [OVERDUB] button. 2. Press and hold down the [REC SET] ...
... • FIELd (field recording) • nEAr (recording closer to the end, press the [■] (Stop) button. After recording is complete and the PR7 plays the original file to the musical instrument/close miking) 4. Make sure to display the previous screen. 5. Press the [REC LEVEL] button. 3. Overdubbing starts... Owner's Manual 17 Press the [REC LEVEL] button again to connect a set of headphones when doing this; Selecting a recording preset The PR7 offers presets that you want to use for overdubbing, then press the [OVERDUB] button. 2. Press and hold down the [REC SET] ...
Owner's Manual
Page 18
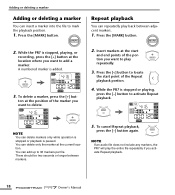
While the PR7 is added. 3. ton at the position of the portion you want to mark the playback position. 1. Repeat playback You can insert a marker into the file ...
While the PR7 is added. 3. ton at the position of the portion you want to mark the playback position. 1. Repeat playback You can insert a marker into the file ...

Owner's Manual
Page 19
Press the [MENU] button. 2. The PR7 calls up the HOME screen. Use the [+] and [-] but - tons to specify the standard pitch (A=), then press the [ ] (Play) button. Setting range: 430-450Hz 4. Use ..., press the [■] (Stop) button. Adjusting the playback speed Tuner You can use the tuner to tune your musical instrument. 1. Press the [MENU] button. The PR7 calls up the HOME screen.
Press the [MENU] button. 2. The PR7 calls up the HOME screen. Use the [+] and [-] but - tons to specify the standard pitch (A=), then press the [ ] (Play) button. Setting range: 430-450Hz 4. Use ..., press the [■] (Stop) button. Adjusting the playback speed Tuner You can use the tuner to tune your musical instrument. 1. Press the [MENU] button. The PR7 calls up the HOME screen.

Owner's Manual
Page 20
Metronome Metronome 1. Use the [+] and [-] buttons to specify the beat value, then press the [ ] (Play) button. 4. Use the [+] and [-] buttons to select "On", then press the [ ] (Play) button. Setting range: 0/4-8/4 8. After the setting process is complete, press the [■] (Stop) button. tons to select On/ OFF parameter, then press the [ ] (Play) button. The PR7 calls up the HOME screen. 20 Owner's Manual Press the [MENU] button. 2. Setting range: 30-250 7. Use the [+] and [-] but- Press the [] button to select "MET", then press the [ ] (Play) button. 5.
Metronome Metronome 1. Use the [+] and [-] buttons to specify the beat value, then press the [ ] (Play) button. 4. Use the [+] and [-] buttons to select "On", then press the [ ] (Play) button. Setting range: 0/4-8/4 8. After the setting process is complete, press the [■] (Stop) button. tons to select On/ OFF parameter, then press the [ ] (Play) button. The PR7 calls up the HOME screen. 20 Owner's Manual Press the [MENU] button. 2. Setting range: 30-250 7. Use the [+] and [-] but- Press the [] button to select "MET", then press the [ ] (Play) button. 5.

Owner's Manual
Page 21
Deleting a file If the available memory space is getting small, or if the folders contain the maximum number of files, delete unnecessary files to select "DEL", then press the [ ] (Play) button. 3. tons to increase the space. 1. Use the [+] and [-] but- Press the [+] or [-] button to delete, then press the [MENU] button. 2. Delete only the currently selected file Deleting a file 4. Press the [ Select a file that you want to select a single file or all files in the folder, then press the [ ] (Play) button.
Deleting a file If the available memory space is getting small, or if the folders contain the maximum number of files, delete unnecessary files to select "DEL", then press the [ ] (Play) button. 3. tons to increase the space. 1. Use the [+] and [-] but- Press the [+] or [-] button to delete, then press the [MENU] button. 2. Delete only the currently selected file Deleting a file 4. Press the [ Select a file that you want to select a single file or all files in the folder, then press the [ ] (Play) button.

Owner's Manual
Page 22
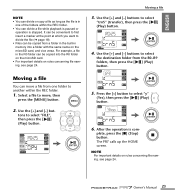
tons to copy, then press the [MENU] button. 2. Select a file to select "FILE", then press the [ ] (Play) button. While playing back the file you wish to divide, press the [ ] (Play) button to pause playback at the point where you want to select "COPY", then press the [ ] (Play) button. 4. Use the [+] and [-] but - Use the [+] and [-] buttons to divide the file, then press the [MENU] button. 2. Press the [ Copying a file 1. Use the [+] and [-] buttons to select "FILE", then press the [ ] (Play) button. 3. tons to select "dIV", then press the [ ] (Play) button. 3. Use ...
tons to copy, then press the [MENU] button. 2. Select a file to select "FILE", then press the [ ] (Play) button. While playing back the file you wish to divide, press the [ ] (Play) button to pause playback at the point where you want to select "COPY", then press the [ ] (Play) button. 4. Use the [+] and [-] but - Use the [+] and [-] buttons to divide the file, then press the [MENU] button. 2. Press the [ Copying a file 1. Use the [+] and [-] buttons to select "FILE", then press the [ ] (Play) button. 3. tons to select "dIV", then press the [ ] (Play) button. 3. Use ...
Owner's Manual
Page 23
see page 24. tons to select "trnS" (transfer), then press the [ ] (Play) button. 4. It can be convenient to first insert a marker at the point at which you want to divide the file (➔ page 18). • Files can be copied into a folder with the same name on rules concerning file naming. Use the [+] and [-] but- Use the [+] and [-] buttons to another within the REC folder. • You can divide a file while playback is paused or operation is in the R0 folder can be copied from the R0-R9 folders, then press the [ ] (Play) button. 5. Use the [+] and [-] buttons ...
see page 24. tons to select "trnS" (transfer), then press the [ ] (Play) button. 4. It can be convenient to first insert a marker at the point at which you want to divide the file (➔ page 18). • Files can be copied into a folder with the same name on rules concerning file naming. Use the [+] and [-] but- Use the [+] and [-] buttons to another within the REC folder. • You can divide a file while playback is paused or operation is in the R0 folder can be copied from the R0-R9 folders, then press the [ ] (Play) button. 5. Use the [+] and [-] buttons ...
Owner's Manual
Page 24
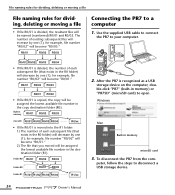
The number of existing subsequent files will be named (numbered) R0/01 and R0/02. R0/01 R0/02 R0/03 Connecting the PR7 to disconnect a USB storage device. 24 Owner's Manual R0/01 R0/02 R0/03 R0/04 • If file R0/01 is deleted, the number ... subsequent file (that you moved will increase by one (1); Use the supplied USB cable to connect the PR7 to open. After the PR7 is divided, the resultant files will decrease by one (1); To disconnect the PR7 from the com- File naming rules for dividing, deleting or moving a file File naming rules for dividing...
The number of existing subsequent files will be named (numbered) R0/01 and R0/02. R0/01 R0/02 R0/03 Connecting the PR7 to disconnect a USB storage device. 24 Owner's Manual R0/01 R0/02 R0/03 R0/04 • If file R0/01 is deleted, the number ... subsequent file (that you moved will increase by one (1); Use the supplied USB cable to connect the PR7 to open. After the PR7 is divided, the resultant files will decrease by one (1); To disconnect the PR7 from the com- File naming rules for dividing, deleting or moving a file File naming rules for dividing...
Owner's Manual
Page 25
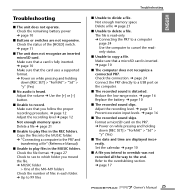
...power ➔ page 10 ■ Buttons or switches are displayed incorrectly. Copy the files into the MUSIC folder. ➔ "Connecting a computer to the PR7 and transferring a file" (Reference Manual) ■ Unable to play files in the REC folders. Make sure that a microSD card is read-only. ...holding down [REC SET] > "ForMAt" > "Sd" > "y" (Yes) ■ No audio is distorted. Check the connection. ➔ page 24 Connect the PR7 directly to copy a file. Set the calendar. ➔ page 10 ■ A file you follow the proper recording procedure. ➔ page 12 Adjust the recording...
...power ➔ page 10 ■ Buttons or switches are displayed incorrectly. Copy the files into the MUSIC folder. ➔ "Connecting a computer to the PR7 and transferring a file" (Reference Manual) ■ Unable to play files in the REC folders. Make sure that a microSD card is read-only. ...holding down [REC SET] > "ForMAt" > "Sd" > "y" (Yes) ■ No audio is distorted. Check the connection. ➔ page 24 Connect the PR7 directly to copy a file. Set the calendar. ➔ page 10 ■ A file you follow the proper recording procedure. ➔ page 12 Adjust the recording...
Owner's Manual
Page 27
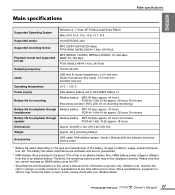
...reserves the right to be about 70% of an alkaline battery. Please note that of that you cannot recharge an NiMH battery using the PR7. * Specifications and descriptions in every locale, please check with the software download license code) * Battery life varies depending on the type ...kHz-96 kHz Jacks USB mini B; Therefore, the remaining battery power may not be displayed correctly. Stereo microphone (line input) 3.5 mm mini; Yamaha Corp. Since specifications, equipment or options may not be the same in this owner's manual are not guaranteed. * NiMH battery life is different...
...reserves the right to be about 70% of an alkaline battery. Please note that of that you cannot recharge an NiMH battery using the PR7. * Specifications and descriptions in every locale, please check with the software download license code) * Battery life varies depending on the type ...kHz-96 kHz Jacks USB mini B; Therefore, the remaining battery power may not be displayed correctly. Stereo microphone (line input) 3.5 mm mini; Yamaha Corp. Since specifications, equipment or options may not be the same in this owner's manual are not guaranteed. * NiMH battery life is different...
Reference Manual
Page 1
... page. The application will search for terminology, use a terminology search function and a link function. Using the functional tree table The functional tree table for the PR7 is convenient if you want to refer to a description of the screen or the various functions of the...
... page. The application will search for terminology, use a terminology search function and a link function. Using the functional tree table The functional tree table for the PR7 is convenient if you want to refer to a description of the screen or the various functions of the...

