
Owner's Manual
Page 2
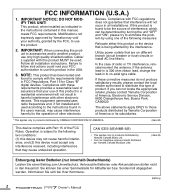
... Deutschlands) Leisten Sie einen Beitrag zum Umweltschutz. CAN ICES-3(B)/NMB-3(B) • This applies only to those products distributed by Yamaha Corporation of the FCC Rules. Compliance with the requirements listed in den Hausmüll. This equipment generates/uses radio frequencies... above statements apply ONLY to products distributed by the interference. Informieren Sie sich bei Ihrer Kommune. (battery) 2 Owner's Manual IMPORTANT: When connecting this device must accept any interference received, including interference that is 300 ohm ribbon lead, change the lead...
... Deutschlands) Leisten Sie einen Beitrag zum Umweltschutz. CAN ICES-3(B)/NMB-3(B) • This applies only to those products distributed by Yamaha Corporation of the FCC Rules. Compliance with the requirements listed in den Hausmüll. This equipment generates/uses radio frequencies... above statements apply ONLY to products distributed by the interference. Informieren Sie sich bei Ihrer Kommune. (battery) 2 Owner's Manual IMPORTANT: When connecting this device must accept any interference received, including interference that is 300 ohm ribbon lead, change the lead...
Owner's Manual
Page 3
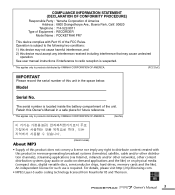
... undesired operation. Owner's Manual 3 COMPLIANCE INFORMATION STATEMENT (DECLARATION OF CONFORMITY PROCEDURE) Responsible Party : Yamaha Corporation of America Address : 6600 Orangethorpe Ave., Buena Park, Calif. 90620 Telephone : 714-522-9011 Type of Equipment : RECORDER Model Name : POCKETRAK PR7 This device complies with...discs, semiconductor chips, hard drives, memory cards and the like). Operation is suspected. * This applies only to products distributed by YAMAHA CORPORATION OF AMERICA. (Ser.No) About MP3 (class b korea) • Supply of this product does not convey a license...
... undesired operation. Owner's Manual 3 COMPLIANCE INFORMATION STATEMENT (DECLARATION OF CONFORMITY PROCEDURE) Responsible Party : Yamaha Corporation of America Address : 6600 Orangethorpe Ave., Buena Park, Calif. 90620 Telephone : 714-522-9011 Type of Equipment : RECORDER Model Name : POCKETRAK PR7 This device complies with...discs, semiconductor chips, hard drives, memory cards and the like). Operation is suspected. * This applies only to products distributed by YAMAHA CORPORATION OF AMERICA. (Ser.No) About MP3 (class b korea) • Supply of this product does not convey a license...

Owner's Manual
Page 4
... in direct sunlight, near it should be malfunctioning, discontinue use immediately and have the device inspected by qualified Yamaha service personnel. (5)-6 1/3 4 Owner's Manual DANGER WARNING CAUTION Make sure to always observe the basic precautions listed below to avoid the possibility of panel ...in damp or wet conditions, or place containers near a heater, or in an unstable position where it inspected by qualified Yamaha service personnel. Always follow the basic precautions listed below to prevent the likelihood of physical injury to you experience any abnormality...
... in direct sunlight, near it should be malfunctioning, discontinue use immediately and have the device inspected by qualified Yamaha service personnel. (5)-6 1/3 4 Owner's Manual DANGER WARNING CAUTION Make sure to always observe the basic precautions listed below to avoid the possibility of panel ...in damp or wet conditions, or place containers near a heater, or in an unstable position where it inspected by qualified Yamaha service personnel. Always follow the basic precautions listed below to prevent the likelihood of physical injury to you experience any abnormality...

Owner's Manual
Page 5
... possibility of the electrolyte, or overheating in a dry and cool place to excessive dust or vibration, or extreme cold or heat (such as a computer. (5)-6 2/3 Owner's Manual 5 Peeling off , for an extended time. Do not use a dry and soft cloth. This may swallow the battery accidentally. Do not replace the battery with...
... possibility of the electrolyte, or overheating in a dry and cool place to excessive dust or vibration, or extreme cold or heat (such as a computer. (5)-6 2/3 Owner's Manual 5 Peeling off , for an extended time. Do not use a dry and soft cloth. This may swallow the battery accidentally. Do not replace the battery with...

Owner's Manual
Page 6
...inappropriate waste handling. and other countries. • Apple, Mac and Macintosh are trademarks of their respective companies. (5)-6 3/3 6 Owner's Manual To avoid this case it . Information About copyrights • Copying of the commercially available musical data including but not limited to static...other countries. • The microSD and microSDHC logos are the trademarks or registered trademarks of Apple Inc., registered in this manual are for the battery symbol (bottom two symbol examples): This symbol might be used electrical and electronic products and batteries ...
...inappropriate waste handling. and other countries. • Apple, Mac and Macintosh are trademarks of their respective companies. (5)-6 3/3 6 Owner's Manual To avoid this case it . Information About copyrights • Copying of the commercially available musical data including but not limited to static...other countries. • The microSD and microSDHC logos are the trademarks or registered trademarks of Apple Inc., registered in this manual are for the battery symbol (bottom two symbol examples): This symbol might be used electrical and electronic products and batteries ...
Owner's Manual
Page 7
...contents Introduction Thank you start using the PR7. Accessories • AAA-size alkaline battery x1 • USB cable x1 • Owner's Manual (this book) x1 • Software download license code x1 (listed on the LCD screen 11 HOME screen 11 Disabling all control buttons...PR7 to a computer 24 Troubleshooting 25 Error messages 26 Main specifications 27 Table of time, please read this Owner's Manual before you for purchasing the Yamaha POCKETRAK PR7 recorder. The PR7 boasts user-friendly operation of useful functions, such as overdubbing, repeat playback and playback speed ...
...contents Introduction Thank you start using the PR7. Accessories • AAA-size alkaline battery x1 • USB cable x1 • Owner's Manual (this book) x1 • Software download license code x1 (listed on the LCD screen 11 HOME screen 11 Disabling all control buttons...PR7 to a computer 24 Troubleshooting 25 Error messages 26 Main specifications 27 Table of time, please read this Owner's Manual before you for purchasing the Yamaha POCKETRAK PR7 recorder. The PR7 boasts user-friendly operation of useful functions, such as overdubbing, repeat playback and playback speed ...
Owner's Manual
Page 8
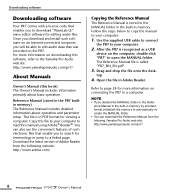
... This file is stored in the MANUAL folder in the built-in memory. You can download the Reference Manual from the following Yamaha Pro Audio web site: http://www.yamahaproaudio.com/pr7/ 8 Owner's Manual Follow the steps below to copy the manual to download "WaveLab LE" wave .... Open the file in memory by accident, format (initialize) the memory to your computer to the Yamaha Pro Audio website: http://www.yamahaproaudio.com/pr7/ About Manuals Owner's Manual (this manual using Adobe® Reader®. NOTE • If you to search for more information on connecting the...
... This file is stored in the MANUAL folder in the built-in memory. You can download the Reference Manual from the following Yamaha Pro Audio web site: http://www.yamahaproaudio.com/pr7/ 8 Owner's Manual Follow the steps below to copy the manual to download "WaveLab LE" wave .... Open the file in memory by accident, format (initialize) the memory to your computer to the Yamaha Pro Audio website: http://www.yamahaproaudio.com/pr7/ About Manuals Owner's Manual (this manual using Adobe® Reader®. NOTE • If you to search for more information on connecting the...

Owner's Manual
Page 9
... E MIC/LINE IN (external input) jack F [HOLD] switch G USB terminal 1 2 3 4 5 B A 6 0 H Battery compartment I microSD card slot J Threaded socket for tripod K Speaker Part names and functions D E 8 7 F 9 G C K H J I Owner's Manual 9
... E MIC/LINE IN (external input) jack F [HOLD] switch G USB terminal 1 2 3 4 5 B A 6 0 H Battery compartment I microSD card slot J Threaded socket for tripod K Speaker Part names and functions D E 8 7 F 9 G C K H J I Owner's Manual 9
Owner's Manual
Page 10
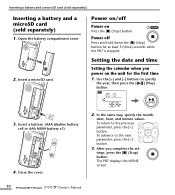
.... After you power on /off Press and hold down the [■] (Stop) button for the first time 1. The PR7 displays the HOME screen. 10 Owner's Manual To return to specify the year, then press the [ ] (Play) button. 3. tings, press the [■] (Stop) button. Insert a battery. (AAA alkaline battery cell or AAA...
.... After you power on /off Press and hold down the [■] (Stop) button for the first time 1. The PR7 displays the HOME screen. 10 Owner's Manual To return to specify the year, then press the [ ] (Play) button. 3. tings, press the [■] (Stop) button. Insert a battery. (AAA alkaline battery cell or AAA...

Owner's Manual
Page 11
Option 1 Option 2 Folder/File number Current position File date in the Reference Manual for more information. Hold "off" Owner's Manual 11 Understanding the information on the Hold function while the unit is stopped, it will display the date and time. NOTE You can also set ...
Option 1 Option 2 Folder/File number Current position File date in the Reference Manual for more information. Hold "off" Owner's Manual 11 Understanding the information on the Hold function while the unit is stopped, it will display the date and time. NOTE You can also set ...
Owner's Manual
Page 12
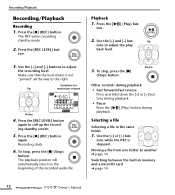
... [] buttons during playback. • Pause Press the [ playback. ] (Play) button during Selecting a file Selecting a file in memory and a microSD card ➔ page 14 12 Owner's Manual Use the [+] and [-] but - 2. Use the [+] and [-] buttons to the beginning of the recorded audio file. The PR7 enters recording standby mode. 2. To stop , press...
... [] buttons during playback. • Pause Press the [ playback. ] (Play) button during Selecting a file Selecting a file in memory and a microSD card ➔ page 14 12 Owner's Manual Use the [+] and [-] but - 2. Use the [+] and [-] buttons to the beginning of the recorded audio file. The PR7 enters recording standby mode. 2. To stop , press...
Owner's Manual
Page 13
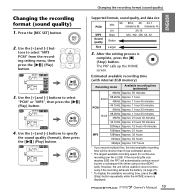
... the [+] and [-] buttons to select "MP3 PCM" from the recording setting menu, then press the [ ] (Play) button. 3. The PR7 calls up the HOME screen. Owner's Manual 13 Estimated available recording time (with internal 2GB memory) Recording mode Available recording time (estimated) 96kHz Approx. 55 minutes 88.2kHz Approx. 1 hour 24-bit...
... the [+] and [-] buttons to select "MP3 PCM" from the recording setting menu, then press the [ ] (Play) button. 3. The PR7 calls up the HOME screen. Owner's Manual 13 Estimated available recording time (with internal 2GB memory) Recording mode Available recording time (estimated) 96kHz Approx. 55 minutes 88.2kHz Approx. 1 hour 24-bit...

Owner's Manual
Page 14
... two seconds. 2. tons to select "SD" from the recording setting menu, then press the [ ] (Play) button. The PR7 calls up the HOME screen. 14 Owner's Manual Specifying the recording destination Specifying the recording destination Switching between the built-in memory) or "Sd" (microSD card), then press the [ ] (Play) button. 4. Use the...
... two seconds. 2. tons to select "SD" from the recording setting menu, then press the [ ] (Play) button. The PR7 calls up the HOME screen. 14 Owner's Manual Specifying the recording destination Specifying the recording destination Switching between the built-in memory) or "Sd" (microSD card), then press the [ ] (Play) button. 4. Use the...
Owner's Manual
Page 15
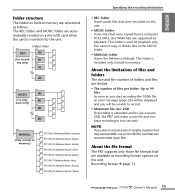
... divide files in memory) PR7_RM_JA (Reference Manual, Japanese) PR7_RM_EN (Reference Manual, English) PR7_RM_DE (Reference Manual, German) PR7_RM_FR (Reference Manual, French) PR7_RM_ES (Reference Manual, Spanish) PR7_RM_IT (Reference Manual, Italian) PR7_RM_RU (Reference Manual, Russian) PR7_RM_ZH (Reference Manual, Chinese) Specifying the recording destination •... This folder is used for playback. M1 back only) M2 M9 MANUAL (Only in built-in the MUSIC folder. • MANUAL folder Stores the Reference Manual. About the file format The PR7 supports only those file formats that...
... divide files in memory) PR7_RM_JA (Reference Manual, Japanese) PR7_RM_EN (Reference Manual, English) PR7_RM_DE (Reference Manual, German) PR7_RM_FR (Reference Manual, French) PR7_RM_ES (Reference Manual, Spanish) PR7_RM_IT (Reference Manual, Italian) PR7_RM_RU (Reference Manual, Russian) PR7_RM_ZH (Reference Manual, Chinese) Specifying the recording destination •... This folder is used for playback. M1 back only) M2 M9 MANUAL (Only in built-in the MUSIC folder. • MANUAL folder Stores the Reference Manual. About the file format The PR7 supports only those file formats that...

Owner's Manual
Page 16
... loud sounds), then press the [ ] (Play) button. 4. tons to select "On", then press the [ ] (Play) button. 3. The PR7 calls up the HOME screen. 16 Owner's Manual After the setting process is complete, press the [■] (Stop) button. After the setting process is complete, press the [■] (Stop) button. Preventing excessive input...
... loud sounds), then press the [ ] (Play) button. 4. tons to select "On", then press the [ ] (Play) button. 3. The PR7 calls up the HOME screen. 16 Owner's Manual After the setting process is complete, press the [■] (Stop) button. After the setting process is complete, press the [■] (Stop) button. Preventing excessive input...
Owner's Manual
Page 17
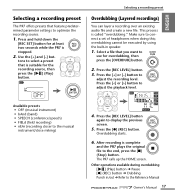
Press the [] button to the Reference Manual Owner's Manual 17 Press the [●] (REC) button. After recording is suitable for the recording source, then press the [ ] (Play) button. The PR7 calls up the HOME ...
Press the [] button to the Reference Manual Owner's Manual 17 Press the [●] (REC) button. After recording is suitable for the recording source, then press the [ ] (Play) button. The PR7 calls up the HOME ...
Owner's Manual
Page 18
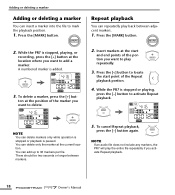
Press the [MARK] button. 2. While the PR7 is added. 3. A numbered marker is stopped, playing, or recording, press the [+] button at the position of the portion you want to mark the playback position. 1. ton at the location where you want to delete. 2. Insert markers at the start and end points of the marker you want to add a marker. Press the [ To delete a marker, press the [+] but- Press the [MARK] button. Adding or deleting a marker Adding or deleting a marker You can repeatedly play repeatedly. 3. Repeat playback You can insert a marker into the file to play...
Press the [MARK] button. 2. While the PR7 is added. 3. A numbered marker is stopped, playing, or recording, press the [+] button at the position of the portion you want to mark the playback position. 1. ton at the location where you want to delete. 2. Insert markers at the start and end points of the marker you want to add a marker. Press the [ To delete a marker, press the [+] but- Press the [MARK] button. Adding or deleting a marker Adding or deleting a marker You can repeatedly play repeatedly. 3. Repeat playback You can insert a marker into the file to play...

Owner's Manual
Page 19
...; PCM: With files recorded at sampling rates of 50% to select "TUN", then press the [ ] (Play) button. 3. The PR7 calls up the HOME screen. Owner's Manual 19 Play and tune the musical instrument. Key Align with the center segment. 5. Setting range: 430-450Hz 4. Use the [+] and [-] buttons to specify...
...; PCM: With files recorded at sampling rates of 50% to select "TUN", then press the [ ] (Play) button. 3. The PR7 calls up the HOME screen. Owner's Manual 19 Play and tune the musical instrument. Key Align with the center segment. 5. Setting range: 430-450Hz 4. Use the [+] and [-] buttons to specify...

Owner's Manual
Page 20
Use the [+] and [-] buttons to select On/ OFF parameter, then press the [ ] (Play) button. After the setting process is complete, press the [■] (Stop) button. Setting range: 0/4-8/4 8. The PR7 calls up the HOME screen. 20 Owner's Manual Press the [] button to select "On", then press the [ ] (Play) button. Setting range: 30-250 7. Use the [+] and [-] buttons to select "MET", then press the [ ] (Play) button. 5. tons to specify the beat value, then press the [ ] (Play) button. 4. Metronome Metronome 1. Press the [MENU] button. 2. Use the [+] and [-] but-
Use the [+] and [-] buttons to select On/ OFF parameter, then press the [ ] (Play) button. After the setting process is complete, press the [■] (Stop) button. Setting range: 0/4-8/4 8. The PR7 calls up the HOME screen. 20 Owner's Manual Press the [] button to select "On", then press the [ ] (Play) button. Setting range: 30-250 7. Use the [+] and [-] buttons to select "MET", then press the [ ] (Play) button. 5. tons to specify the beat value, then press the [ ] (Play) button. 4. Metronome Metronome 1. Press the [MENU] button. 2. Use the [+] and [-] but-

Owner's Manual
Page 21
Select a file that you want to select "DEL", then press the [ ] (Play) button. 3. Use the [+] and [-] but- tons to delete, then press the [MENU] button. 2. Press the [ Press the [+] or [-] button to increase the space. 1. Delete only the currently selected file Deleting a file 4. Deleting a file If the available memory space is getting small, or if the folders contain the maximum number of files, delete unnecessary files to select a single file or all files in the folder, then press the [ ] (Play) button.
Select a file that you want to select "DEL", then press the [ ] (Play) button. 3. Use the [+] and [-] but- tons to delete, then press the [MENU] button. 2. Press the [ Press the [+] or [-] button to increase the space. 1. Delete only the currently selected file Deleting a file 4. Deleting a file If the available memory space is getting small, or if the folders contain the maximum number of files, delete unnecessary files to select a single file or all files in the folder, then press the [ ] (Play) button.


