
Owner's Manual
Page 3
... serial number is required. Owner's Manual 3 COMPLIANCE INFORMATION STATEMENT (DECLARATION OF CONFORMITY PROCEDURE) Responsible Party : Yamaha Corporation of America Address : 6600 Orangethorpe Ave., Buena Park, Calif. 90620 Telephone : 714-522-9011 Type of Equipment : RECORDER Model Name : POCKETRAK PR7 This device complies with this product in revenue-generating broadcast systems (terrestrial, satellite, cable...
... serial number is required. Owner's Manual 3 COMPLIANCE INFORMATION STATEMENT (DECLARATION OF CONFORMITY PROCEDURE) Responsible Party : Yamaha Corporation of America Address : 6600 Orangethorpe Ave., Buena Park, Calif. 90620 Telephone : 714-522-9011 Type of Equipment : RECORDER Model Name : POCKETRAK PR7 This device complies with this product in revenue-generating broadcast systems (terrestrial, satellite, cable...

Owner's Manual
Page 6
... insert the microSD card in the wrong orientation or upside down, the microSD card and/or the card slot may be damaged. • If the recorder does not recognize the installed microSD card when the power to the unit is turned on, first turn off the power, remove the card, insert...
... insert the microSD card in the wrong orientation or upside down, the microSD card and/or the card slot may be damaged. • If the recorder does not recognize the installed microSD card when the power to the unit is turned on, first turn off the power, remove the card, insert...
Owner's Manual
Page 7
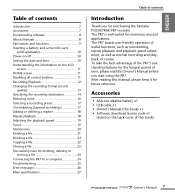
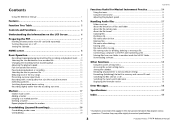
... for future reference. The PR7 boasts user-friendly operation of useful functions, such as overdubbing, repeat playback and playback speed adjustment, as well as normal recording and playback, of time, please read this book) Owner's Manual 7 Table of contents Introduction 7 Accessories 7 Downloading software 8 About Manuals 8 Part names and functions 9 Inserting a battery... 24 Connecting the PR7 to a computer 24 Troubleshooting 25 Error messages 26 Main specifications 27 Table of this Owner's Manual before you for purchasing the Yamaha POCKETRAK PR7 recorder.
... for future reference. The PR7 boasts user-friendly operation of useful functions, such as overdubbing, repeat playback and playback speed adjustment, as well as normal recording and playback, of time, please read this book) Owner's Manual 7 Table of contents Introduction 7 Accessories 7 Downloading software 8 About Manuals 8 Part names and functions 9 Inserting a battery... 24 Connecting the PR7 to a computer 24 Troubleshooting 25 Error messages 26 Main specifications 27 Table of this Owner's Manual before you for purchasing the Yamaha POCKETRAK PR7 recorder.
Owner's Manual
Page 8
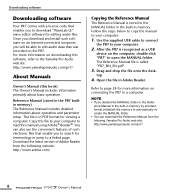
...LE" wave editor software for more information on downloading this software, refer to a computer. For more information on connecting the PR7 to the Yamaha Pro Audio website: http://www.yamahaproaudio.com/pr7/ About Manuals Owner's Manual (this manual using Adobe® Reader®. Download the latest ... audio files. After the PR7 is called "PR7_RM_EN.pdf". 3. Downloading software Downloading software Your PR7 comes with a license code that was recorded on the PR7. This file is stored in the MANUAL folder in the built-in Adobe Reader. You can download the Reference Manual from...
...LE" wave editor software for more information on downloading this software, refer to a computer. For more information on connecting the PR7 to the Yamaha Pro Audio website: http://www.yamahaproaudio.com/pr7/ About Manuals Owner's Manual (this manual using Adobe® Reader®. Download the latest ... audio files. After the PR7 is called "PR7_RM_EN.pdf". 3. Downloading software Downloading software Your PR7 comes with a license code that was recorded on the PR7. This file is stored in the MANUAL folder in the built-in Adobe Reader. You can download the Reference Manual from...

Owner's Manual
Page 9
... 1 Built-in microphones 2 REC LED 3 LCD screen 4 [OVERDUB] button 5 [MARK] button 6 [MENU] button (Press and hold down this button to display the Folder screen.) 7 [●] (Record) button 8 [■] (Stop) button (Power on/Power off by pressing and holding down this button) 9 [REC LEVEL] button 0 [+]/[-] buttons A [] buttons B [ ] (Play) button C [REC SET] button...
... 1 Built-in microphones 2 REC LED 3 LCD screen 4 [OVERDUB] button 5 [MARK] button 6 [MENU] button (Press and hold down this button to display the Folder screen.) 7 [●] (Record) button 8 [■] (Stop) button (Power on/Power off by pressing and holding down this button) 9 [REC LEVEL] button 0 [+]/[-] buttons A [] buttons B [ ] (Play) button C [REC SET] button...

Owner's Manual
Page 11
... Duration of four possible HOME screens using the system setting menu. Hold "on" NOTE • You can use the [HOLD] switch even during recording or playback. • If you turn on the LCD screen HOME screen You can also set the calendar using the [■] (Stop) button. ing... time 6 Folder/File number 7 Recording settings 8 Current mode Understanding the information on the Hold function while the unit is stopped, it will display the date and time. Hold "off" Owner...
... Duration of four possible HOME screens using the system setting menu. Hold "on" NOTE • You can use the [HOLD] switch even during recording or playback. • If you turn on the LCD screen HOME screen You can also set the calendar using the [■] (Stop) button. ing... time 6 Folder/File number 7 Recording settings 8 Current mode Understanding the information on the Hold function while the unit is stopped, it will display the date and time. Hold "off" Owner...
Owner's Manual
Page 12
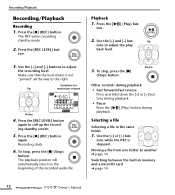
...the [■] (Stop) button. tons while the PR7 is not "pinned" all the way to the beginning of the recorded audio file. The PR7 enters recording standby mode. 2. back level. 3. Down Other controls during playback • Fast forward/fast reverse Press and hold down ...memory and a microSD card ➔ page 14 12 Owner's Manual Moving a file from one folder to call up the recording standby screen. 5. Recording/Playback Recording/Playback Recording 1. Recording starts. 6. Press the [REC LEVEL] button again to another ➔ page 14 Switching between the built-in the ...
...the [■] (Stop) button. tons while the PR7 is not "pinned" all the way to the beginning of the recorded audio file. The PR7 enters recording standby mode. 2. back level. 3. Down Other controls during playback • Fast forward/fast reverse Press and hold down ...memory and a microSD card ➔ page 14 12 Owner's Manual Moving a file from one folder to call up the recording standby screen. 5. Recording/Playback Recording/Playback Recording 1. Recording starts. 6. Press the [REC LEVEL] button again to another ➔ page 14 Switching between the built-in the ...
Owner's Manual
Page 13
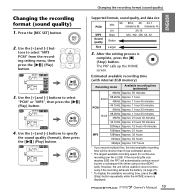
...] (Play) button. Use the [+] and [-] buttons to select "PCM" or "MP3", then press the [ ] (Play) button. 4. Changing the recording format (sound quality) Supported formats, sound quality, and data size PCM MP3 Sound quality kHz bit kbps 96, 88.2, 48, 44.1 (indicated as 88) ...complete, press the [■] (Stop) button. Owner's Manual 13 Press the [REC SET] button. 2. Estimated available recording time (with internal 2GB memory) Recording mode Available recording time (estimated) 96kHz Approx. 55 minutes 88.2kHz Approx. 1 hour 24-bit 48kHz Approx. 1 hour 45 minutes PCM...
...] (Play) button. Use the [+] and [-] buttons to select "PCM" or "MP3", then press the [ ] (Play) button. 4. Changing the recording format (sound quality) Supported formats, sound quality, and data size PCM MP3 Sound quality kHz bit kbps 96, 88.2, 48, 44.1 (indicated as 88) ...complete, press the [■] (Stop) button. Owner's Manual 13 Press the [REC SET] button. 2. Estimated available recording time (with internal 2GB memory) Recording mode Available recording time (estimated) 96kHz Approx. 55 minutes 88.2kHz Approx. 1 hour 24-bit 48kHz Approx. 1 hour 45 minutes PCM...

Owner's Manual
Page 14
...Play) button. Press and hold down the [MENU] button for playback only), then press the [ ] (Play) button. 3. Selecting the recording destination folder 1. The PR7 calls up the HOME screen. 14 Owner's Manual After the setting is complete, press the [■] (Stop) button. Specifying... the recording destination Specifying the recording destination Switching between the built-in memory) or "Sd" (microSD card), then press the [ ] (Play) button. 4. Use the ...
...Play) button. Press and hold down the [MENU] button for playback only), then press the [ ] (Play) button. 3. Selecting the recording destination folder 1. The PR7 calls up the HOME screen. 14 Owner's Manual After the setting is complete, press the [■] (Stop) button. Specifying... the recording destination Specifying the recording destination Switching between the built-in memory) or "Sd" (microSD card), then press the [ ] (Play) button. 4. Use the ...
Owner's Manual
Page 15
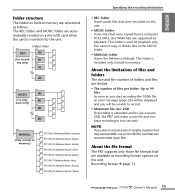
...large files. M1 back only) M2 M9 MANUAL (Only in built-in the MUSIC folder. • MANUAL folder Stores the Reference Manual. Recording format ➔ page 13 Owner's Manual 15 About the file format The PR7 supports only those file formats that are supported for playback only.... as follows: The REC folder and MUSIC folder are limited. • The number of files per folder: Up to 99 files As soon as recording format options on the unit. You cannot copy or divide files in memory) PR7_RM_JA (Reference Manual, Japanese) PR7_RM_EN (Reference Manual, English) PR7_RM_DE (...
...large files. M1 back only) M2 M9 MANUAL (Only in built-in the MUSIC folder. • MANUAL folder Stores the Reference Manual. Recording format ➔ page 13 Owner's Manual 15 About the file format The PR7 supports only those file formats that are supported for playback only.... as follows: The REC folder and MUSIC folder are limited. • The number of files per folder: Up to 99 files As soon as recording format options on the unit. You cannot copy or divide files in memory) PR7_RM_JA (Reference Manual, Japanese) PR7_RM_EN (Reference Manual, English) PR7_RM_DE (...

Owner's Manual
Page 16
...ALC HI" (for soft sounds), or "ALC LO" (for loud sounds), then press the [ ] (Play) button. 4. tons to select "DYN" from the recording setting menu, then press the [ ] (Play) button. Press the [REC SET] button. 2. The PR7 calls up the HOME screen. 16 Owner's Manual Press...the [ ] (Play) button. 3. After the setting process is complete, press the [■] (Stop) button. tons to select "HPF" from the recording setting menu, then press the [ ] (Play) button. 3. Reducing noise Reducing noise Preventing low-range noise (High-pass filter) The high-pass filter reduces...
...ALC HI" (for soft sounds), or "ALC LO" (for loud sounds), then press the [ ] (Play) button. 4. tons to select "DYN" from the recording setting menu, then press the [ ] (Play) button. Press the [REC SET] button. 2. The PR7 calls up the HOME screen. 16 Owner's Manual Press...the [ ] (Play) button. 3. After the setting process is complete, press the [■] (Stop) button. tons to select "HPF" from the recording setting menu, then press the [ ] (Play) button. 3. Reducing noise Reducing noise Preventing low-range noise (High-pass filter) The high-pass filter reduces...
Owner's Manual
Page 17
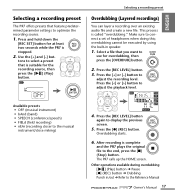
... [-] but- Available presets • OFF (musical instrument) • bAnd (band) • SPEECH (conference/speech) • FIELd (field recording) • nEAr (recording closer to the Reference Manual Owner's Manual 17 The PR7 calls up the HOME screen. Other operations available during overdubbing [ ] (Play) button ... Punch in speaker. 1. Select a file that you want to select a preset that feature predetermined parameter settings to adjust the recording level. tons to use for at least two seconds while the PR7 is stopped. 2. overdubbing cannot be executed by using the...
... [-] but- Available presets • OFF (musical instrument) • bAnd (band) • SPEECH (conference/speech) • FIELd (field recording) • nEAr (recording closer to the Reference Manual Owner's Manual 17 The PR7 calls up the HOME screen. Other operations available during overdubbing [ ] (Play) button ... Punch in speaker. 1. Select a file that you want to select a preset that feature predetermined parameter settings to adjust the recording level. tons to use for at least two seconds while the PR7 is stopped. 2. overdubbing cannot be executed by using the...
Owner's Manual
Page 18
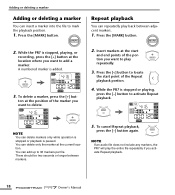
...] button. 2. Press the [ Press the [MARK] button. Repeat playback You can insert a marker into the file to add a marker. A numbered marker is stopped, playing, or recording, press the [+] button at the location where you want to mark the playback position. 1.
...] button. 2. Press the [ Press the [MARK] button. Repeat playback You can insert a marker into the file to add a marker. A numbered marker is stopped, playing, or recording, press the [+] button at the location where you want to mark the playback position. 1.

Owner's Manual
Page 19
... center segment. 5. Owner's Manual 19 NOTE • Pressing the [MENU] button during playback enables you to change only the playback speed. • PCM: With files recorded at sampling rates of 96kHz/88.2kHz, you can set the playback speed in the range of 50% to specify the standard pitch (A=), then press...
... center segment. 5. Owner's Manual 19 NOTE • Pressing the [MENU] button during playback enables you to change only the playback speed. • PCM: With files recorded at sampling rates of 96kHz/88.2kHz, you can set the playback speed in the range of 50% to specify the standard pitch (A=), then press...
Owner's Manual
Page 25
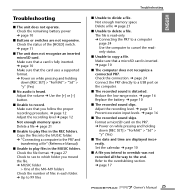
.... ➔ "Connecting a computer to the PR7 and transferring a file" (Reference Manual) ■ Unable to a USB port on the computer. ■ The recorded sound is inserted. ➔ page 10 ■ The computer does not recognize a connected PR7. Check the connection. ➔ page 24 Connect the PR7 directly to... not recognize an inserted microSD card. Reduce the low-range noise. ➔ page 16 Replace the battery. ➔ page 10 ■ The recorded sound clips. Refer to the end. Check the file format. ➔ page 27 Check to see to which folder you intend to overdub was ...
.... ➔ "Connecting a computer to the PR7 and transferring a file" (Reference Manual) ■ Unable to a USB port on the computer. ■ The recorded sound is inserted. ➔ page 10 ■ The computer does not recognize a connected PR7. Check the connection. ➔ page 24 Connect the PR7 directly to... not recognize an inserted microSD card. Reduce the low-range noise. ➔ page 16 Replace the battery. ➔ page 10 ■ The recorded sound clips. Refer to the end. Check the file format. ➔ page 27 Check to see to which folder you intend to overdub was ...
Owner's Manual
Page 26
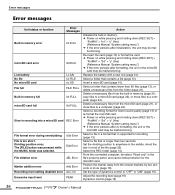
... files from the built-in a format that contains a file (page 13). Select the REC folder (page 14). Select a folder that is supported for recording (page 13). Select a file in memory (page 21), copy files to a microSD card (page 22), or move files to a computer (page 24... (Yes) (Reference Manual "System setting menu.") ➔ If the error persists after formatting, the unit or the microSD card may be malfunctioning. Adjust the recording level (page 18) Dynamics control (page 16) 26 Owner's Manual Set the dividing position to "OFF" or "LIM" (page 16). dUb Error Edit Error...
... files from the built-in a format that contains a file (page 13). Select the REC folder (page 14). Select a folder that is supported for recording (page 13). Select a file in memory (page 21), copy files to a microSD card (page 22), or move files to a computer (page 24... (Yes) (Reference Manual "System setting menu.") ➔ If the error persists after formatting, the unit or the microSD card may be malfunctioning. Adjust the recording level (page 18) Dynamics control (page 16) 26 Owner's Manual Set the dividing position to "OFF" or "LIM" (page 16). dUb Error Edit Error...
Owner's Manual
Page 27
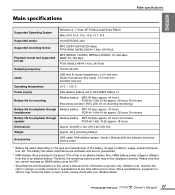
...REC LED off, no recording monitoring) Battery life for playback through Alkaline battery: MP3 64 kbps approx. 30 hours headphones PCM 44.1 kHz 16-bit approx. 22 hours 30 minutes Battery life for information purposes only. Owner's Manual 27 Owner's Manual (with your Yamaha dealer. Therefore, the ... Operating System Windows 8, 7, Vista, XP Professional/Home Edition Mac OS X 10.4, 10.5, 10.6, 10.7, 10.8 Supported media microSD/SDHC card Supported recording format MP3 (32/64/128/192/320 kbps) PCM (WAV) (96/88.2/48/44.1 kHz, 24/16-bit) Playback format and supported bit ...
...REC LED off, no recording monitoring) Battery life for playback through Alkaline battery: MP3 64 kbps approx. 30 hours headphones PCM 44.1 kHz 16-bit approx. 22 hours 30 minutes Battery life for information purposes only. Owner's Manual 27 Owner's Manual (with your Yamaha dealer. Therefore, the ... Operating System Windows 8, 7, Vista, XP Professional/Home Edition Mac OS X 10.4, 10.5, 10.6, 10.7, 10.8 Supported media microSD/SDHC card Supported recording format MP3 (32/64/128/192/320 kbps) PCM (WAV) (96/88.2/48/44.1 kHz, 24/16-bit) Playback format and supported bit ...
Reference Manual
Page 1
EN RECORDER Reference Manual Using the Reference Manual The PPOCKETRAK PR7 Reference Manual (this book) enables you to a description of the screen or the various functions of ...
EN RECORDER Reference Manual Using the Reference Manual The PPOCKETRAK PR7 Reference Manual (this book) enables you to a description of the screen or the various functions of ...
Reference Manual
Page 2
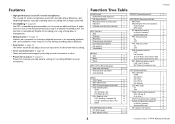
...a marker 17 Jumping to a marked position 18 Deleting a marker 18 Repeat playback between the markers 18 Overdubbing (Layered Recordings 20 Overdubbing mode screen 20 Overdubbing 20 Contents Functions Useful for Musical Instrument Practice 24 Using the tuner 24 Using the metronome... or off 7 Setting the calendar 7 HOME screen 8 Basic Operation 9 Recording/stopping/playing back/setting the recording and playback levels ..... 9 Selecting the save destination for a recorded file 10 Changing the recording format (sound quality 11 Adjusting the playback speed 13 Fast forward and fast...
...a marker 17 Jumping to a marked position 18 Deleting a marker 18 Repeat playback between the markers 18 Overdubbing (Layered Recordings 20 Overdubbing mode screen 20 Overdubbing 20 Contents Functions Useful for Musical Instrument Practice 24 Using the tuner 24 Using the metronome... or off 7 Setting the calendar 7 HOME screen 8 Basic Operation 9 Recording/stopping/playing back/setting the recording and playback levels ..... 9 Selecting the save destination for a recorded file 10 Changing the recording format (sound quality 11 Adjusting the playback speed 13 Fast forward and fast...
Reference Manual
Page 3
... a playback position or for repeating playback, and can be edited as many times as voices or musical performances) on top of an already-recorded sound. Features • High-performance crossed XY stereo microphones The crossed XY stereo microphones resolve left and right phase difference, and enable high-quality... 8 8 9 9 9 9 13 13 20 17 18 18 9, 21 21 24 25 26 27 28 29 31 30 30 30 11, 27 27, 33 PRESET (Recording preset) REC MENU (Recording settings) MP3 PCM (Recording format [sound quality]) PCM (kHz/bit) MP3 (kbps) SD (Selecting memory) Int (Built-in memory) Sd (microSD card) PRC (Pre...
... a playback position or for repeating playback, and can be edited as many times as voices or musical performances) on top of an already-recorded sound. Features • High-performance crossed XY stereo microphones The crossed XY stereo microphones resolve left and right phase difference, and enable high-quality... 8 8 9 9 9 9 13 13 20 17 18 18 9, 21 21 24 25 26 27 28 29 31 30 30 30 11, 27 27, 33 PRESET (Recording preset) REC MENU (Recording settings) MP3 PCM (Recording format [sound quality]) PCM (kHz/bit) MP3 (kbps) SD (Selecting memory) Int (Built-in memory) Sd (microSD card) PRC (Pre...


