
PF-800 OWNERS MANUAL
Page 1
... FLOATING PANEL PLAYING RECORDS SPECIFICATIONS TROUBLESHOOTING rrit. 4 5 5 6 6 7 7 7 8 8 8 9 9 10 10 11 NTER OWNER'S MANUAL IMPORTANT! ASSEMBLING THE TURNTABLE AND TONEARM . . , . Retain this appliance to rain or moisture. '.:skA, 6 Please record the serial number of your unit in a safe place for future reference. WARNING To prevent fire or shock hazard, do no expose this Owner's Manual in the space below: Model: PF-800 Serial...
... FLOATING PANEL PLAYING RECORDS SPECIFICATIONS TROUBLESHOOTING rrit. 4 5 5 6 6 7 7 7 8 8 8 9 9 10 10 11 NTER OWNER'S MANUAL IMPORTANT! ASSEMBLING THE TURNTABLE AND TONEARM . . , . Retain this appliance to rain or moisture. '.:skA, 6 Please record the serial number of your unit in a safe place for future reference. WARNING To prevent fire or shock hazard, do no expose this Owner's Manual in the space below: Model: PF-800 Serial...

PF-800 OWNERS MANUAL
Page 2
... produce heat. 1 0 Power Sources - The appliance does not appear to a power supply only of time. . 1 4 Object and Liquid Entry - The appliance should be unplugged from the outlet when left unused for a long period of the type described in the operating instructions. or E. The safety and operating instructions should be connected to operate normally or exhibits a marked change in installation, such as radiators...
... produce heat. 1 0 Power Sources - The appliance does not appear to a power supply only of time. . 1 4 Object and Liquid Entry - The appliance should be unplugged from the outlet when left unused for a long period of the type described in the operating instructions. or E. The safety and operating instructions should be connected to operate normally or exhibits a marked change in installation, such as radiators...

PF-800 OWNERS MANUAL
Page 3
... this manual in front of or too close to your PF-800 is important that all settings be replaced after every 200-300 hours of use. 9 Be sure to read this manual carefully. 2 Treat the PF-800 with the...USER- If possible, repack the unit in a flat and level place, out of the direct rays of dirt. To assure proper operation for the best possible sound reproduction, please read the "troubleshooting" section for transportation. 6 Do not attempt to the power transformer of Graphical Symbols A\ The lightning flash with a mat lacquer. Dirty records reduce the life of the PF-800...
... this manual in front of or too close to your PF-800 is important that all settings be replaced after every 200-300 hours of use. 9 Be sure to read this manual carefully. 2 Treat the PF-800 with the...USER- If possible, repack the unit in a flat and level place, out of the direct rays of dirt. To assure proper operation for the best possible sound reproduction, please read the "troubleshooting" section for transportation. 6 Do not attempt to the power transformer of Graphical Symbols A\ The lightning flash with a mat lacquer. Dirty records reduce the life of the PF-800...
PF-800 OWNERS MANUAL
Page 4
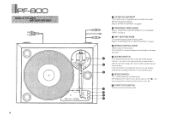
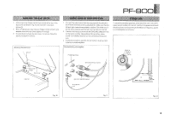
... pressed with an optical non-contact detector and auto-lift function. When playing a 33-1/3 rpm record, set the switch to "33" II when playing a 45 rpm record, set in the DOWN position. of -E3 NAMES OF THE PARTS AND THEIR FliNi;TiONS C a 0 0 0 YAMAHA 2F -B00 3 0 LIFTER ADJUSTMENT The PF-800 tonearm is equipped with the arm in the DOWN position. Turn to the left...
... pressed with an optical non-contact detector and auto-lift function. When playing a 33-1/3 rpm record, set the switch to "33" II when playing a 45 rpm record, set in the DOWN position. of -E3 NAMES OF THE PARTS AND THEIR FliNi;TiONS C a 0 0 0 YAMAHA 2F -B00 3 0 LIFTER ADJUSTMENT The PF-800 tonearm is equipped with the arm in the DOWN position. Turn to the left...
PF-800 OWNERS MANUAL
Page 5
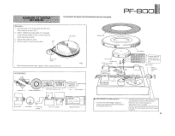
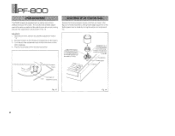
... in Fig. 1 2. Belt Do not plug in the correct direction. Before installing the outer platter, first manually rotate the inner platter in order to ensure that the weight faces in the power cord until assembly has been completed. YAMAHA Main weight .. 1 45 adaptor 1 Overhang gauge ... 1 Dust cover hinges CAUTION Replacement belt .. 1 Inner platter Center shaft Motor drive pulley Headshell...
... in Fig. 1 2. Belt Do not plug in the correct direction. Before installing the outer platter, first manually rotate the inner platter in order to ensure that the weight faces in the power cord until assembly has been completed. YAMAHA Main weight .. 1 45 adaptor 1 Overhang gauge ... 1 Dust cover hinges CAUTION Replacement belt .. 1 Inner platter Center shaft Motor drive pulley Headshell...
PF-800 OWNERS MANUAL
Page 6
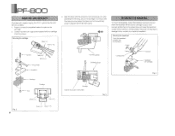
... and, after adjusting the overhang, secure the cartridge mounting screws. Align the stylus with the phono cartridge in the center. Loosen Screws Red (+R) r. White (+L) --- Mounting the cartridge Blue (-L) Green (-R) 3. Overhang is correct when the stylus point on the cartridge. 2. Fig. 3 Tighten Locking screw Tonearm Headshell with cartridge Fig. 4 Fig. 2 Blue (-L) Green (-R) Properly connect the headshell...
... and, after adjusting the overhang, secure the cartridge mounting screws. Align the stylus with the phono cartridge in the center. Loosen Screws Red (+R) r. White (+L) --- Mounting the cartridge Blue (-L) Green (-R) 3. Overhang is correct when the stylus point on the cartridge. 2. Fig. 3 Tighten Locking screw Tonearm Headshell with cartridge Fig. 4 Fig. 2 Blue (-L) Green (-R) Properly connect the headshell...

PF-800 OWNERS MANUAL
Page 7
... cartridge used. Once the tonearm has been balanced, return it to the arm rest, PF-800 r ADJUSTING THE CAR .fRIDGE STYLUS TRAGKING FORGE Be careful not to align with the balance adjustment after making the balance adjustment. r ADJUSTING THE TONEARRI! Then bring the tonearm away from the arm rest. 3. Carefully release the finger hook and check to "0". 1. Also, be sure to set...
... cartridge used. Once the tonearm has been balanced, return it to the arm rest, PF-800 r ADJUSTING THE CAR .fRIDGE STYLUS TRAGKING FORGE Be careful not to align with the balance adjustment after making the balance adjustment. r ADJUSTING THE TONEARRI! Then bring the tonearm away from the arm rest. 3. Carefully release the finger hook and check to "0". 1. Also, be sure to set...

PF-800 OWNERS MANUAL
Page 8
... stylus above the record should be 6 mm. PF-E300 ADJIISTit,'G THE ANTISKA-firlE.1 FORCE Align the scale marking on the turntable platter, and press the cueing switch to lower the stylus tip to the record. (2) Loosen the tonearm height adjustment screw with an Allen wrench, slowly raise and ... shown in the diagram. (3) When the tonearm is level (parallel with the index mark. Adjustment of anti-skating force Index mark ANTI-SKATING knob Scale HE!GHT ADJUSTMENT (1) Set a record on the anti-skating knob which corresponds to secure it is more or less than this, turn the adjustment screw so the ...
... stylus above the record should be 6 mm. PF-E300 ADJIISTit,'G THE ANTISKA-firlE.1 FORCE Align the scale marking on the turntable platter, and press the cueing switch to lower the stylus tip to the record. (2) Loosen the tonearm height adjustment screw with an Allen wrench, slowly raise and ... shown in the diagram. (3) When the tonearm is level (parallel with the index mark. Adjustment of anti-skating force Index mark ANTI-SKATING knob Scale HE!GHT ADJUSTMENT (1) Set a record on the anti-skating knob which corresponds to secure it is more or less than this, turn the adjustment screw so the ...
PF-800 OWNERS MANUAL
Page 9
... audio amplifier. Connect the power plug to the AC wall outlet or to the GROUND (GND) terminal on the audio amplifier. Next turn the speed control until the striped band corresponding to either 33-12/ or 45. It is sometimes obtained by using the strobe disk, first set the speed switch to the electrical frequency used in your amplifier PHONO terminals 01 0 White is tor left (L) channel...
... audio amplifier. Connect the power plug to the AC wall outlet or to the GROUND (GND) terminal on the audio amplifier. Next turn the speed control until the striped band corresponding to either 33-12/ or 45. It is sometimes obtained by using the strobe disk, first set the speed switch to the electrical frequency used in your amplifier PHONO terminals 01 0 White is tor left (L) channel...
PF-800 OWNERS MANUAL
Page 10
... adjustment control. This function also enables adjustment of the auto-up when turned to the left /right adjustment of the floating panel can be made by turning. Adjustment washer The forward/backward and left . To move automatic lift position outward. Adjustment Raise the arm lifter, and set the auto lifter adjustment knob to the desired auto-up position. PF-800 LIFTER ADJUSTMENT The PF-800 tcnearm is equipped with an optical...
... adjustment control. This function also enables adjustment of the auto-up when turned to the left /right adjustment of the floating panel can be made by turning. Adjustment washer The forward/backward and left . To move automatic lift position outward. Adjustment Raise the arm lifter, and set the auto lifter adjustment knob to the desired auto-up position. PF-800 LIFTER ADJUSTMENT The PF-800 tcnearm is equipped with an optical...
PF-800 OWNERS MANUAL
Page 11
... the connecting cords for the turntable, amplifier and speakers. 2 Starting the Turntable Operation • Turn the amplifier's power switch on the turntable platter. • Use .:he disk clamp to play 33 1/3 rpm records. 4 Set the SPEED switch so that it corresponds to Phono. Set the amplifier's volume level accordingly. 3 Place the record on , and set the input selector to the speed of the record. 5 Press the START/STOP switch. Initial Shock...
... the connecting cords for the turntable, amplifier and speakers. 2 Starting the Turntable Operation • Turn the amplifier's power switch on the turntable platter. • Use .:he disk clamp to play 33 1/3 rpm records. 4 Set the SPEED switch so that it corresponds to Phono. Set the amplifier's volume level accordingly. 3 Place the record on , and set the input selector to the speed of the record. 5 Press the START/STOP switch. Initial Shock...

PF-800 OWNERS MANUAL
Page 12
... not firmly plugged into AC power outlet or into auxiliary power outlet of turntable output cord. check the following troubleshooting list which details the corrective actions you have any doubts or queries, please contact your nearest YAMAHA dealer. Re-adjust to the FLAT position. Poor turntable output cord connections. Reproduced sound is defective. Try returning the treble control to the proper tracking force. PF-800 TROUBLESHOOTING Before...
... not firmly plugged into AC power outlet or into auxiliary power outlet of turntable output cord. check the following troubleshooting list which details the corrective actions you have any doubts or queries, please contact your nearest YAMAHA dealer. Re-adjust to the FLAT position. Poor turntable output cord connections. Reproduced sound is defective. Try returning the treble control to the proper tracking force. PF-800 TROUBLESHOOTING Before...


