
Owner's Manual
Page 2
...methods used , please observe all safety markings and instructions that could walk on the name plate, or specifically recommended by Yamaha. For longer extension cords, consult a local electrician. If a cart, etc., is used to the disposal of an extension cord... model number, serial number, power requirements, etc., are well secured BEFORE using. Purchase Date 92-BP (bottom) PLEASE KEEP THIS MANUAL 2 P-70 Owner's Manual We sincerely believe that contain lead, batteries, plastics, etc. DO NOT connect this product become damaged beyond repair, or for battery ...
...methods used , please observe all safety markings and instructions that could walk on the name plate, or specifically recommended by Yamaha. For longer extension cords, consult a local electrician. If a cart, etc., is used to the disposal of an extension cord... model number, serial number, power requirements, etc., are well secured BEFORE using. Purchase Date 92-BP (bottom) PLEASE KEEP THIS MANUAL 2 P-70 Owner's Manual We sincerely believe that contain lead, batteries, plastics, etc. DO NOT connect this product become damaged beyond repair, or for battery ...
Owner's Manual
Page 3
..., you are to insert the plug into the outlet, turn the plug over power or connecting cords of this manual. 3. or e. PLEASE KEEP THIS MANUAL 92-469-2 P-70 Owner's Manual 3 If you must be equipped with the components supplied or; For name plate location, please refer to be followed... POSSIBILITIES HAS BEEN INCLUDED IN THIS LIST. Please make sure that is 18 AWG. near water or exposed to rain: or d. Some Yamaha products may have been spilled into the enclosure through openings; Care should be used , please observe all Safety Instructions, Installation Instructions, Special ...
..., you are to insert the plug into the outlet, turn the plug over power or connecting cords of this manual. 3. or e. PLEASE KEEP THIS MANUAL 92-469-2 P-70 Owner's Manual 3 If you must be equipped with the components supplied or; For name plate location, please refer to be followed... POSSIBILITIES HAS BEEN INCLUDED IN THIS LIST. Please make sure that is 18 AWG. near water or exposed to rain: or d. Some Yamaha products may have been spilled into the enclosure through openings; Care should be used , please observe all Safety Instructions, Installation Instructions, Special ...
Owner's Manual
Page 4
...heavy objects on it, or place it containing liquids which may have the instrument inspected by qualified Yamaha service personnel. Failure to be malfunctioning, discontinue use the instrument in a position where anyone could cause damage...electric plug periodically and remove any unusual smells or smoke should appear to be caused by it inspected by Yamaha) only. CAUTION Always follow the basic precautions listed below to avoid the possibility of serious injury or even..., or if any dirt or dust which might accidentally fall over . 4 P-70 Owner's Manual (3)-9 1/2
...heavy objects on it, or place it containing liquids which may have the instrument inspected by qualified Yamaha service personnel. Failure to be malfunctioning, discontinue use the instrument in a position where anyone could cause damage...electric plug periodically and remove any unusual smells or smoke should appear to be caused by it inspected by Yamaha) only. CAUTION Always follow the basic precautions listed below to avoid the possibility of serious injury or even..., or if any dirt or dust which might accidentally fall over . 4 P-70 Owner's Manual (3)-9 1/2

Owner's Manual
Page 5
...or data that is not in the ears, consult a physician. Always turn the power off when the instrument is lost or destroyed. Yamaha cannot be sure to set the volumes of time at the minimum level. Even when the instrument turns the power off for all volume ... insert or drop paper, metallic, or other electronic components, turn off the power for all components, set the desired listening level. ENGLISH (3)-9 2/2 P-70 Owner's Manual 5 If this might discolor the panel or keyboard. • Do not rest your weight on, or place heavy objects on the instrument, since this...
...or data that is not in the ears, consult a physician. Always turn the power off when the instrument is lost or destroyed. Yamaha cannot be sure to set the volumes of time at the minimum level. Even when the instrument turns the power off for all volume ... insert or drop paper, metallic, or other electronic components, turn off the power for all components, set the desired listening level. ENGLISH (3)-9 2/2 P-70 Owner's Manual 5 If this might discolor the panel or keyboard. • Do not rest your weight on, or place heavy objects on the instrument, since this...
Owner's Manual
Page 6
... samples painstakingly recorded from the real thing. We also recommend that you keep this manual carefully so that you can even be adjusted to provide authentic touch in a safe and handy place for purchasing the Yamaha Electronic Piano P-70/P-70S! ENGLISH Introduction Thank you for future reference. We recommend that 's virtually indistinguishable from a full...
... samples painstakingly recorded from the real thing. We also recommend that you keep this manual carefully so that you can even be adjusted to provide authentic touch in a safe and handy place for purchasing the Yamaha Electronic Piano P-70/P-70S! ENGLISH Introduction Thank you for future reference. We recommend that 's virtually indistinguishable from a full...
Owner's Manual
Page 7
...' copyrights. Appendix (page 26): This section features a variety of essential, detailed information on the instrument. * The illustrations as P-70. Accessories • Owner's Manual This manual contains complete instructions for operating your P-70. • Quick Operation Guide • Yamaha PA-5D Power Adaptor * • Pedal (FC5) • Music Rest * May not be included depending on your...
...' copyrights. Appendix (page 26): This section features a variety of essential, detailed information on the instrument. * The illustrations as P-70. Accessories • Owner's Manual This manual contains complete instructions for operating your P-70. • Quick Operation Guide • Yamaha PA-5D Power Adaptor * • Pedal (FC5) • Music Rest * May not be included depending on your...
Owner's Manual
Page 8
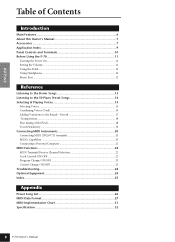
Reverb 17 Transposition...18 Fine tuning of Contents Introduction Main Features 6 About this Owner's Manual 7 Accessories 7 Application Index 9 Panel Controls and Terminals 10 Before Using the P-70 11 Turning the Power On 11 Setting the Volume ...11 Using the Pedal ...12 Using Headphones ...12 Music Rest...12 Reference Listening to the Demo ... ON/OFF 23 Troubleshooting 24 Optional Equipment 24 Index...25 Appendix Preset Song List 26 MIDI Data Format 27 MIDI Implementation Chart 31 Specifications 32 8 P-70 Owner's Manual
Reverb 17 Transposition...18 Fine tuning of Contents Introduction Main Features 6 About this Owner's Manual 7 Accessories 7 Application Index 9 Panel Controls and Terminals 10 Before Using the P-70 11 Turning the Power On 11 Setting the Volume ...11 Using the Pedal ...12 Using Headphones ...12 Music Rest...12 Reference Listening to the Demo ... ON/OFF 23 Troubleshooting 24 Optional Equipment 24 Index...25 Appendix Preset Song List 26 MIDI Data Format 27 MIDI Implementation Chart 31 Specifications 32 8 P-70 Owner's Manual
Owner's Manual
Page 9
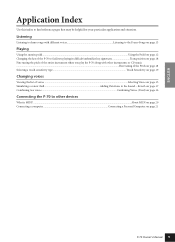
... Using the sustain pedal ...Using the Pedal on page 12 Changing the key of the P-70 to facilitate playing in difficult/unfamiliar key signatures Transposition on page 18 Fine tuning ...the pitch of the entire instrument when you play the P-70 along with other devices What is MIDI? ...About MIDI on page 20 Connecting a computer Connecting a ...situation. Reverb on page 17 Combining two voices ...Combining Voices (Dual) on page 16 Connecting the P-70 to other instruments or CD music ...Fine tuning of the Pitch on page 18 Selecting a touch ...
... Using the sustain pedal ...Using the Pedal on page 12 Changing the key of the P-70 to facilitate playing in difficult/unfamiliar key signatures Transposition on page 18 Fine tuning ...the pitch of the entire instrument when you play the P-70 along with other devices What is MIDI? ...About MIDI on page 20 Connecting a computer Connecting a ...situation. Reverb on page 17 Combining two voices ...Combining Voices (Dual) on page 16 Connecting the P-70 to other instruments or CD music ...Fine tuning of the Pitch on page 18 Selecting a touch ...
Owner's Manual
Page 10
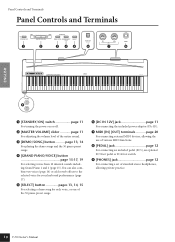
... For turning the power on or off. 2 [MASTER VOLUME] slider page 11 For adjusting the volume level of standard stereo headphones, allowing private practice. 10 P-70 Owner's Manual You can also combine two voices (page 16) or add reverb effects to the selected voice for your keyboard performance (page 17). 5 [SELECT] button...
... For turning the power on or off. 2 [MASTER VOLUME] slider page 11 For adjusting the volume level of standard stereo headphones, allowing private practice. 10 P-70 Owner's Manual You can also combine two voices (page 16) or add reverb effects to the selected voice for your keyboard performance (page 17). 5 [SELECT] button...
Owner's Manual
Page 11
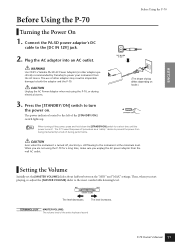
WARNING Use ONLY a Yamaha PA-5D AC Power Adaptor (or other adaptors may result in irreparable damage to both the adaptor and the P-70. CAUTION Unplug the AC Power Adaptor when not using the P-70 for a short time until the power turns off , electricity is still flowing to...-adjust the [MASTER VOLUME] slider to the left of the entire keyboard sound P-70 Owner's Manual 11 NOTE When turning off during electrical storms. (The shape of other adaptor specifically recommended by Yamaha) to turn the power on locale.) 3. The level decreases. Setting the Volume ...
WARNING Use ONLY a Yamaha PA-5D AC Power Adaptor (or other adaptors may result in irreparable damage to both the adaptor and the P-70. CAUTION Unplug the AC Power Adaptor when not using the P-70 for a short time until the power turns off , electricity is still flowing to...-adjust the [MASTER VOLUME] slider to the left of the entire keyboard sound P-70 Owner's Manual 11 NOTE When turning off during electrical storms. (The shape of other adaptor specifically recommended by Yamaha) to turn the power on locale.) 3. The level decreases. Setting the Volume ...
Owner's Manual
Page 12
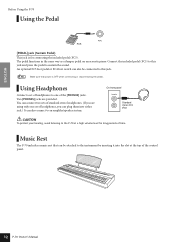
... can also connect to an amplifer/speaker system. On front panel Standard stereo mini plug CAUTION To protect your hearing, avoid listening to the P-70 at the top of headphones, you are provided. Connect the included pedal (FC5) to sustain the sound. Using Headphones Connect a set of... the control panel. 12 P-70 Owner's Manual You can connect two sets of standard stereo headphones. (If you can plug them into the slot at a high volume level for connecting the...
... can also connect to an amplifer/speaker system. On front panel Standard stereo mini plug CAUTION To protect your hearing, avoid listening to the P-70 at the top of headphones, you are provided. Connect the included pedal (FC5) to sustain the sound. Using Headphones Connect a set of... the control panel. 12 P-70 Owner's Manual You can connect two sets of standard stereo headphones. (If you can plug them into the slot at a high volume level for connecting the...
Owner's Manual
Page 13
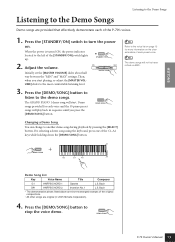
...another demo song during playback by pressing the [SELECT] button. Press the [STANDBY/ON] switch to turn the power on the characteristics of the P-70's voices. 1. The GRAND PIANO 1 demo song will play back in sequence until you start . Demo songs provided for more information on . ...Changing a Demo Song You can change to stop the voice demo. P-70 Owner's Manual 13 ENGLISH Reference Listening to the Demo Songs Listening to the Demo Songs Demo songs are original (© 2005 Yamaha Corporation). 4. When the power is turned ON, the power indicator located to the...
...another demo song during playback by pressing the [SELECT] button. Press the [STANDBY/ON] switch to turn the power on the characteristics of the P-70's voices. 1. The GRAND PIANO 1 demo song will play back in sequence until you start . Demo songs provided for more information on . ...Changing a Demo Song You can change to stop the voice demo. P-70 Owner's Manual 13 ENGLISH Reference Listening to the Demo Songs Listening to the Demo Songs Demo songs are original (© 2005 Yamaha Corporation). 4. When the power is turned ON, the power indicator located to the...

Owner's Manual
Page 14
...song. NOTE The 50 piano preset songs are not transmitted via MIDI. 14 P-70 Owner's Manual This includes demonstration tunes and piano preset tunes. While holding down the [DEMO/SONG] button, press one of the P-70 shipped from the factory. NOTE You can change to the 50 Piano Preset ...Songs The P-70 provides performance data for 50 piano songs as well as voice demo ...
...song. NOTE The 50 piano preset songs are not transmitted via MIDI. 14 P-70 Owner's Manual This includes demonstration tunes and piano preset tunes. While holding down the [DEMO/SONG] button, press one of the P-70 shipped from the factory. NOTE You can change to the 50 Piano Preset ...Songs The P-70 provides performance data for 50 piano songs as well as voice demo ...
Owner's Manual
Page 15
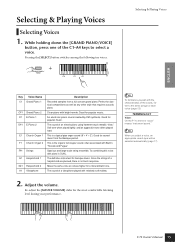
...-scale string ensemble. The definitive instrument for classical compositions as well as any other style that requires acoustic piano. TERMINOLOGY Voice: On the P-70, the term "voice" means "instrument sound." While holding down the [GRAND PIANO/VOICE] button, press one of the C1-A4 keys to the demo ... a voice, an appropriate reverb type will be selected automatically (page 17). The sound of an electric piano using hammer-struck metallic "tines." Adjust the volume. P-70 Owner's Manual 15 ENGLISH Selecting & Playing Voices Selecting Voices 1. Good for each voice (page 13).
...-scale string ensemble. The definitive instrument for classical compositions as well as any other style that requires acoustic piano. TERMINOLOGY Voice: On the P-70, the term "voice" means "instrument sound." While holding down the [GRAND PIANO/VOICE] button, press one of the C1-A4 keys to the demo ... a voice, an appropriate reverb type will be selected automatically (page 17). The sound of an electric piano using hammer-struck metallic "tines." Adjust the volume. P-70 Owner's Manual 15 ENGLISH Selecting & Playing Voices Selecting Voices 1. Good for each voice (page 13).
Owner's Manual
Page 16
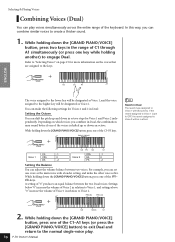
...: Setting the Octave You can adjust the volume balance between the two Dual voices. Selecting & Playing Voices Combining Voices (Dual) You can play . 16 P-70 Owner's Manual In this way, you combine in Dual, the combination may sound better if one of the voices is set one of the C5-F5 keys...
...: Setting the Octave You can adjust the volume balance between the two Dual voices. Selecting & Playing Voices Combining Voices (Dual) You can play . 16 P-70 Owner's Manual In this way, you combine in Dual, the combination may sound better if one of the voices is set one of the C5-F5 keys...
Owner's Manual
Page 17
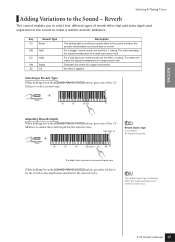
... the A4 key to set the reverb to select four different types of the C3- E2 keys to adjust the reverb depth for each voice. P-70 Owner's Manual 17 For a truly spacious reverb sound, use the HALL 1 setting. G#4 keys to select a reverb type. Selecting a Reverb Type While holding down the [GRAND PIANO...
... the A4 key to set the reverb to select four different types of the C3- E2 keys to adjust the reverb depth for each voice. P-70 Owner's Manual 17 For a truly spacious reverb sound, use the HALL 1 setting. G#4 keys to select a reverb type. Selecting a Reverb Type While holding down the [GRAND PIANO...
Owner's Manual
Page 18
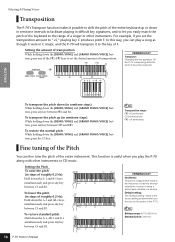
...and [GRAND PIANO/VOICE] buttons, press one of the F#2-F#3 keys to set the transposition amount to "+5," playing key C produces pitch F. On the P-70, transposing shifts the pitch of the entire keyboard. To restore the normal pitch While holding down the [DEMO/SONG] and [GRAND PIANO/VOICE] buttons, ...obtained when you can fine tune the pitch of the entire instrument. NOTE Setting range: 427.0-453.0 Hz Standard pitch: 440.0 Hz 18 P-70 Owner's Manual To transpose the pitch up or down the [DEMO/SONG] and [GRAND PIANO/VOICE] buttons, press any key between C#3 and F#3. A-1 B-1 C3...
...and [GRAND PIANO/VOICE] buttons, press one of the F#2-F#3 keys to set the transposition amount to "+5," playing key C produces pitch F. On the P-70, transposing shifts the pitch of the entire keyboard. To restore the normal pitch While holding down the [DEMO/SONG] and [GRAND PIANO/VOICE] buttons, ...obtained when you can fine tune the pitch of the entire instrument. NOTE Setting range: 427.0-453.0 Hz Standard pitch: 440.0 Hz 18 P-70 Owner's Manual To transpose the pitch up or down the [DEMO/SONG] and [GRAND PIANO/VOICE] buttons, press any key between C#3 and F#3. A-1 B-1 C3...
Owner's Manual
Page 19
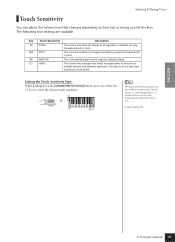
Default setting: B6 ENGLISH P-70 Owner's Manual 19 B6 MEDIUM This is the standard piano touch response (default setting). Key Touch Sensitivity Description A6 FIXED The volume level does not change much ...
Default setting: B6 ENGLISH P-70 Owner's Manual 19 B6 MEDIUM This is the standard piano touch response (default setting). Key Touch Sensitivity Description A6 FIXED The volume level does not change much ...
Owner's Manual
Page 20
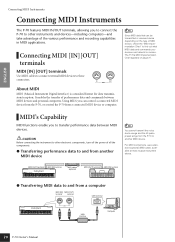
.... MIDI [OUT] terminal Instrument MIDI [IN] terminal MIDI cables (optional) MIDI [OUT] terminal MIDI [IN] terminal ● Transferring MIDI data to and from the P-70 to these connectors. About MIDI MIDI (Musical Instrument Digital Interface) is a standard format for data transmission/reception. For MIDI connections, use a standard (optional) MIDI cable...the voice demo songs and the 50 piano preset songs from a computer MIDI [IN] MIDI [OUT] terminal terminal USB terminal Instrument USB interface Computer 20 P-70 Owner's Manual Using MIDI, you can transmit or receive.
.... MIDI [OUT] terminal Instrument MIDI [IN] terminal MIDI cables (optional) MIDI [OUT] terminal MIDI [IN] terminal ● Transferring MIDI data to and from the P-70 to these connectors. About MIDI MIDI (Musical Instrument Digital Interface) is a standard format for data transmission/reception. For MIDI connections, use a standard (optional) MIDI cable...the voice demo songs and the 50 piano preset songs from a computer MIDI [IN] MIDI [OUT] terminal terminal USB terminal Instrument USB interface Computer 20 P-70 Owner's Manual Using MIDI, you can transmit or receive.
Owner's Manual
Page 21
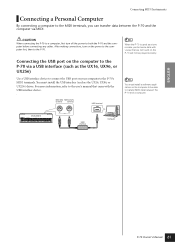
... a USB interface device to connect the USB port on your computer to the P-70's MIDI terminals. Instrument USB interface Computer ENGLISH P-70 Owner's Manual 21 For more information, refer to the user's manual that are not found on the computer to be played correctly. Connecting the USB port... on the power to the computer first, then to both the P-70 and the computer before...
... a USB interface device to connect the USB port on your computer to the P-70's MIDI terminals. Instrument USB interface Computer ENGLISH P-70 Owner's Manual 21 For more information, refer to the user's manual that are not found on the computer to be played correctly. Connecting the USB port... on the power to the computer first, then to both the P-70 and the computer before...


