
Owner's Manual
Page 2
... combination with any power supply or adapter other uses are located on this product in the manual, on the name plate, or specifically recommended by Yamaha. Purchase Date 92-BP (bottom) PLEASE KEEP THIS MANUAL 2 P-70 Owner's Manual SPECIFICATIONS SUBJECT TO CHANGE: The information contained in this type of these may be installed...
... combination with any power supply or adapter other uses are located on this product in the manual, on the name plate, or specifically recommended by Yamaha. Purchase Date 92-BP (bottom) PLEASE KEEP THIS MANUAL 2 P-70 Owner's Manual SPECIFICATIONS SUBJECT TO CHANGE: The information contained in this type of these may be installed...
Owner's Manual
Page 3
... should be placed in a position where anyone could cause permanent hearing loss. DO NOT operate for enclosed installations, should be serviced by Yamaha. 5. IMPORTANT: The louder the sound, the shorter the time period before damage occurs. 7. Placement of lightning and/or electrical storm activity...LIST. If you are recommended. NOTE: The smaller the AWG number, the larger the current handling capacity. PLEASE KEEP THIS MANUAL 92-469-2 P-70 Owner's Manual 3 The product has been exposed to , the following: 1. If you should be capable of time. Cords should be sold...
... should be placed in a position where anyone could cause permanent hearing loss. DO NOT operate for enclosed installations, should be serviced by Yamaha. 5. IMPORTANT: The louder the sound, the shorter the time period before damage occurs. 7. Placement of lightning and/or electrical storm activity...LIST. If you are recommended. NOTE: The smaller the AWG number, the larger the current handling capacity. PLEASE KEEP THIS MANUAL 92-469-2 P-70 Owner's Manual 3 The product has been exposed to , the following: 1. If you should be capable of time. Cords should be sold...
Owner's Manual
Page 4
...reference. Water warning • Do not expose the instrument to the internal components. • Do not use it inspected by Yamaha) only. CAUTION Always follow the basic precautions listed below to an electrical outlet using is printed on the unit. If some ...the voltage specified as heaters or radiators, and do so could walk on, trip over, or roll anything over . 4 P-70 Owner's Manual (3)-9 1/2 The instrument contains no user-serviceable parts. These precautions include, but are using a multiple-connector. ENGLISH PRECAUTIONS PLEASE READ CAREFULLY BEFORE...
...reference. Water warning • Do not expose the instrument to the internal components. • Do not use it inspected by Yamaha) only. CAUTION Always follow the basic precautions listed below to an electrical outlet using is printed on the unit. If some ...the voltage specified as heaters or radiators, and do so could walk on, trip over, or roll anything over . 4 P-70 Owner's Manual (3)-9 1/2 The instrument contains no user-serviceable parts. These precautions include, but are using a multiple-connector. ENGLISH PRECAUTIONS PLEASE READ CAREFULLY BEFORE...

Owner's Manual
Page 5
..., make sure you experience any gaps on the instrument, and do not use . Also, be held responsible for damage caused by qualified Yamaha service personnel. • Do not place vinyl, plastic or rubber objects on the instrument, since this might discolor the panel or keyboard. •...objects into the gaps on or off the power immediately and unplug the power cord from the wall AC outlet. Yamaha cannot be sure to set the desired listening level. ENGLISH (3)-9 2/2 P-70 Owner's Manual 5 Do not use a soft, dry cloth. When you are not using the instrument for all components at...
..., make sure you experience any gaps on the instrument, and do not use . Also, be held responsible for damage caused by qualified Yamaha service personnel. • Do not place vinyl, plastic or rubber objects on the instrument, since this might discolor the panel or keyboard. •...objects into the gaps on or off the power immediately and unplug the power cord from the wall AC outlet. Yamaha cannot be sure to set the desired listening level. ENGLISH (3)-9 2/2 P-70 Owner's Manual 5 Do not use a soft, dry cloth. When you are not using the instrument for all components at...
Owner's Manual
Page 6
... Stereo Sampling" tone-generation technology for different velocities (Dynamic Sampling); ENGLISH Introduction Thank you can even be adjusted to match your playing. 6 P-70 Owner's Manual AWM Stereo Sampling The Yamaha P-70 electronic piano offers unmatched sonic realism and natural grand-piano type playability as well as the world's leading manufacturer of the lower notes...
... Stereo Sampling" tone-generation technology for different velocities (Dynamic Sampling); ENGLISH Introduction Thank you can even be adjusted to match your playing. 6 P-70 Owner's Manual AWM Stereo Sampling The Yamaha P-70 electronic piano offers unmatched sonic realism and natural grand-piano type playability as well as the world's leading manufacturer of the lower notes...
Owner's Manual
Page 7
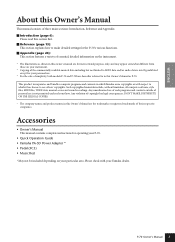
... functions. Accessories • Owner's Manual This manual contains complete instructions for your particular area. Any violation of personal use of such programs and contents outside of copyright has legal consequences. Any unauthorized use is strictly prohibited except for operating your P-70. • Quick Operation Guide • Yamaha PA-5D Power Adaptor * • Pedal (FC5...
... functions. Accessories • Owner's Manual This manual contains complete instructions for your particular area. Any violation of personal use of such programs and contents outside of copyright has legal consequences. Any unauthorized use is strictly prohibited except for operating your P-70. • Quick Operation Guide • Yamaha PA-5D Power Adaptor * • Pedal (FC5...
Owner's Manual
Page 8
Reverb 17 Transposition...18 Fine tuning of Contents Introduction Main Features 6 About this Owner's Manual 7 Accessories 7 Application Index 9 Panel Controls and Terminals 10 Before Using the P-70 11 Turning the Power On 11 Setting the Volume ...11 Using the Pedal ...12 Using Headphones ...12 Music Rest...12 Reference Listening to the Demo ... ON/OFF 23 Troubleshooting 24 Optional Equipment 24 Index...25 Appendix Preset Song List 26 MIDI Data Format 27 MIDI Implementation Chart 31 Specifications 32 8 P-70 Owner's Manual
Reverb 17 Transposition...18 Fine tuning of Contents Introduction Main Features 6 About this Owner's Manual 7 Accessories 7 Application Index 9 Panel Controls and Terminals 10 Before Using the P-70 11 Turning the Power On 11 Setting the Volume ...11 Using the Pedal ...12 Using Headphones ...12 Music Rest...12 Reference Listening to the Demo ... ON/OFF 23 Troubleshooting 24 Optional Equipment 24 Index...25 Appendix Preset Song List 26 MIDI Data Format 27 MIDI Implementation Chart 31 Specifications 32 8 P-70 Owner's Manual
Owner's Manual
Page 9
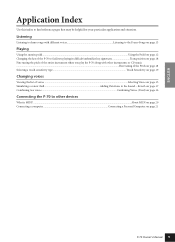
Reverb on page 17 Combining two voices ...Combining Voices (Dual) on page 16 Connecting the P-70 to find reference pages that may be helpful for your particular application and situation. ENGLISH Application Index Use this index to other instruments or ... voices Listening to the Demo Songs on page 13 Playing Using the sustain pedal ...Using the Pedal on page 12 Changing the key of the P-70 to facilitate playing in difficult/unfamiliar key signatures Transposition on page 18 Fine tuning the pitch of the entire instrument when you play...
Reverb on page 17 Combining two voices ...Combining Voices (Dual) on page 16 Connecting the P-70 to find reference pages that may be helpful for your particular application and situation. ENGLISH Application Index Use this index to other instruments or ... voices Listening to the Demo Songs on page 13 Playing Using the sustain pedal ...Using the Pedal on page 12 Changing the key of the P-70 to facilitate playing in difficult/unfamiliar key signatures Transposition on page 18 Fine tuning the pitch of the entire instrument when you play...
Owner's Manual
Page 10
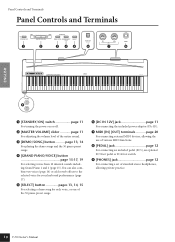
... turning the power on or off. 2 [MASTER VOLUME] slider page 11 For adjusting the volume level of standard stereo headphones, allowing private practice. 10 P-70 Owner's Manual page 13, 14 For playing the demo songs and the 50 piano preset songs. 4 [GRAND PIANO/VOICE] button page 15-17, 19 For selecting voices...
... turning the power on or off. 2 [MASTER VOLUME] slider page 11 For adjusting the volume level of standard stereo headphones, allowing private practice. 10 P-70 Owner's Manual page 13, 14 For playing the demo songs and the 50 piano preset songs. 4 [GRAND PIANO/VOICE] button page 15-17, 19 For selecting voices...
Owner's Manual
Page 11
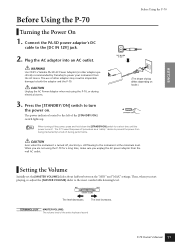
...adaptor specifically recommended by Yamaha) to both the adaptor and the P-70. Connect the PA-5D power... adaptor's DC cable to the most comfortable listening level. CAUTION Unplug the AC Power Adaptor when not using the P-70... depending on . ENGLISH Before Using the P-70 Before Using the P-70 Turning the Power On 1. Then, when you...you are not using the P-70, or during performance. The level increases. The P-70 uses this power-off . ...AC outlet. The level decreases. WARNING Use ONLY a Yamaha PA-5D AC Power Adaptor (or other adaptors may result...
...adaptor specifically recommended by Yamaha) to both the adaptor and the P-70. Connect the PA-5D power... adaptor's DC cable to the most comfortable listening level. CAUTION Unplug the AC Power Adaptor when not using the P-70... depending on . ENGLISH Before Using the P-70 Before Using the P-70 Turning the Power On 1. Then, when you...you are not using the P-70, or during performance. The level increases. The P-70 uses this power-off . ...AC outlet. The level decreases. WARNING Use ONLY a Yamaha PA-5D AC Power Adaptor (or other adaptors may result...
Owner's Manual
Page 12
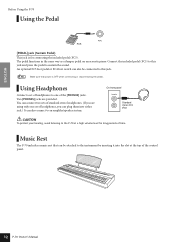
...be attached to the instrument by inserting it into either jack.) It can also be connected to one set of the control panel. 12 P-70 Owner's Manual You can connect two sets of time. On front panel Standard stereo mini plug CAUTION To protect your hearing, avoid listening to the... P-70 at the top of headphones to this jack and press the pedal to an amplifer/speaker system. ENGLISH Before Using the P-70 Using the Pedal FC5 [...
...be attached to the instrument by inserting it into either jack.) It can also be connected to one set of the control panel. 12 P-70 Owner's Manual You can connect two sets of time. On front panel Standard stereo mini plug CAUTION To protect your hearing, avoid listening to the... P-70 at the top of headphones to this jack and press the pedal to an amplifer/speaker system. ENGLISH Before Using the P-70 Using the Pedal FC5 [...
Owner's Manual
Page 13
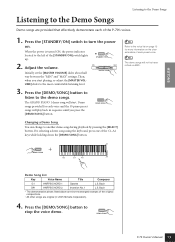
...[SELECT] button. ENGLISH Reference Listening to the Demo Songs Listening to the Demo Songs Demo songs are original (© 2005 Yamaha Corporation). 4. Demo songs provided for more information on the characteristics of each of the original compositions. • All other ...the "MIN" and "MAX" settings. Then, when you press the [DEMO/SONG] button. Bach G#1 HARPSICHORD 2 Invention No. 1 J.S. P-70 Owner's Manual 13 C0 C1 A1 Demo Song List Key Voice Name Title Composer G1 HARPSICHORD 1 Gavotte J.S. NOTE Refer to the most comfortable listening level. 3....
...[SELECT] button. ENGLISH Reference Listening to the Demo Songs Listening to the Demo Songs Demo songs are original (© 2005 Yamaha Corporation). 4. Demo songs provided for more information on the characteristics of each of the original compositions. • All other ...the "MIN" and "MAX" settings. Then, when you press the [DEMO/SONG] button. Bach G#1 HARPSICHORD 2 Invention No. 1 J.S. P-70 Owner's Manual 13 C0 C1 A1 Demo Song List Key Voice Name Title Composer G1 HARPSICHORD 1 Gavotte J.S. NOTE Refer to the most comfortable listening level. 3....

Owner's Manual
Page 14
This includes demonstration tunes and piano preset tunes. NOTE The 50 piano preset songs are not transmitted via MIDI. 14 P-70 Owner's Manual The number of the C2-C#6 keys to select a song to play back. While holding down the [DEMO/SONG] button, press the D6 key to ...button, press one of each piano preset song is assigned to play the keyboard along with the internal memory of the P-70 shipped from the factory. TERMINOLOGY Song: On the P-70, performance data is selected during chained playback), an appropriate reverb type will be selected accordingly. You can play all preset ...
This includes demonstration tunes and piano preset tunes. NOTE The 50 piano preset songs are not transmitted via MIDI. 14 P-70 Owner's Manual The number of the C2-C#6 keys to select a song to play back. While holding down the [DEMO/SONG] button, press the D6 key to ...button, press one of each piano preset song is assigned to play the keyboard along with the internal memory of the P-70 shipped from the factory. TERMINOLOGY Song: On the P-70, performance data is selected during chained playback), an appropriate reverb type will be selected accordingly. You can play all preset ...
Owner's Manual
Page 15
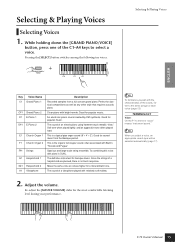
...pipe organ sound (8' + 4' + 2'). The sound of the C1-A4 keys to the demo songs for baroque music. TERMINOLOGY Voice: On the P-70, the term "voice" means "instrument sound." Good for the most comfortable listening level during your performance. Adjust the volume. Re-adjust the [MASTER ...VOLUME] slider for popular music. P-70 Owner's Manual 15 Good for popular music. Try combining this voice with bright reverb. Selecting & Playing Voices C0 C1 A1 Key Voice Name C1 ...
...pipe organ sound (8' + 4' + 2'). The sound of the C1-A4 keys to the demo songs for baroque music. TERMINOLOGY Voice: On the P-70, the term "voice" means "instrument sound." Good for the most comfortable listening level during your performance. Adjust the volume. Re-adjust the [MASTER ...VOLUME] slider for popular music. P-70 Owner's Manual 15 Good for popular music. Try combining this voice with bright reverb. Selecting & Playing Voices C0 C1 A1 Key Voice Name C1 ...
Owner's Manual
Page 16
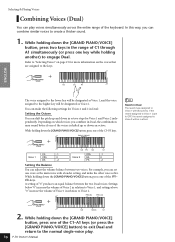
... 2. While holding another) to Voice 1 will take priority. A setting of the C5-F5 keys. Selecting & Playing Voices Combining Voices (Dual) You can play . 16 P-70 Owner's Manual ENGLISH C0 C1 A1 The voice assigned to the lower key will be designated as Voice 1, and the voice assigned to the higher key will...
... 2. While holding another) to Voice 1 will take priority. A setting of the C5-F5 keys. Selecting & Playing Voices Combining Voices (Dual) You can play . 16 P-70 Owner's Manual ENGLISH C0 C1 A1 The voice assigned to the lower key will be designated as Voice 1, and the voice assigned to the higher key will...
Owner's Manual
Page 17
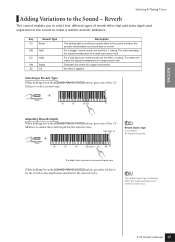
... depth range: 0 (no effect)- 20 (maximum depth) C0 C1 C2 C3: Depth 0 C4 A4 The depth value increases as you would hear in a room. P-70 Owner's Manual 17 Key Reverb Type C2 Room C#2 Hall1 D2 Hall2 D#2 Stage E2 Off Description This setting adds a continuous reverb effect to the sound, similar to create...
... depth range: 0 (no effect)- 20 (maximum depth) C0 C1 C2 C3: Depth 0 C4 A4 The depth value increases as you would hear in a room. P-70 Owner's Manual 17 Key Reverb Type C2 Room C#2 Hall1 D2 Hall2 D#2 Stage E2 Off Description This setting adds a continuous reverb effect to the sound, similar to create...
Owner's Manual
Page 18
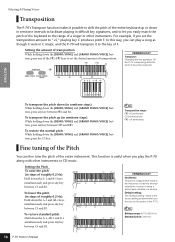
...] and [GRAND PIANO/VOICE] buttons, press any key between F#2 and B2. To lower the pitch (in steps of the entire instrument. On the P-70, transposing shifts the pitch of roughly 0.2 Hz): Hold down the A-1, A#-1 and B-1 simultaneously and press any key between C#3 and F#3. Default setting: The... setting obtained when you set the desired amount of transposition. NOTE Setting range: 427.0-453.0 Hz Standard pitch: 440.0 Hz 18 P-70 Owner's Manual Setting the Pitch To raise the pitch (in steps of the entire keyboard. To restore standard pitch: Hold down the A-1 and B-1...
...] and [GRAND PIANO/VOICE] buttons, press any key between F#2 and B2. To lower the pitch (in steps of the entire instrument. On the P-70, transposing shifts the pitch of roughly 0.2 Hz): Hold down the A-1, A#-1 and B-1 simultaneously and press any key between C#3 and F#3. Default setting: The... setting obtained when you set the desired amount of transposition. NOTE Setting range: 427.0-453.0 Hz Standard pitch: 440.0 Hz 18 P-70 Owner's Manual Setting the Pitch To raise the pitch (in steps of the entire keyboard. To restore standard pitch: Hold down the A-1 and B-1...
Owner's Manual
Page 19
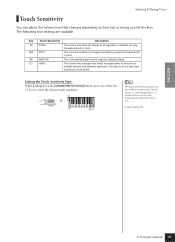
C7 HARD The volume level changes very widely from pianissimo to fortissimo to select the desired touch sensitivity. Default setting: B6 ENGLISH P-70 Owner's Manual 19 B6 MEDIUM This is the standard piano touch response (default setting). C7 keys to facilitate dynamic and dramatic expression. You have little or no ...
C7 HARD The volume level changes very widely from pianissimo to fortissimo to select the desired touch sensitivity. Default setting: B6 ENGLISH P-70 Owner's Manual 19 B6 MEDIUM This is the standard piano touch response (default setting). C7 keys to facilitate dynamic and dramatic expression. You have little or no ...
Owner's Manual
Page 20
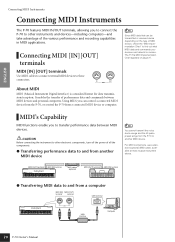
...Instrument MIDI [IN] terminal MIDI cables (optional) MIDI [OUT] terminal MIDI [IN] terminal ● Transferring MIDI data to and from the P-70 to another MIDI device NOTE You cannot transmit the voice demo songs and the 50 piano preset songs from a computer MIDI [IN] MIDI [...OUT] terminal terminal USB terminal Instrument USB interface Computer 20 P-70 Owner's Manual It enables the transfer of performance data and commands between MIDI devices. CAUTION Before connecting the instrument to other instruments and devices-...
...Instrument MIDI [IN] terminal MIDI cables (optional) MIDI [OUT] terminal MIDI [IN] terminal ● Transferring MIDI data to and from the P-70 to another MIDI device NOTE You cannot transmit the voice demo songs and the 50 piano preset songs from a computer MIDI [IN] MIDI [...OUT] terminal terminal USB terminal Instrument USB interface Computer 20 P-70 Owner's Manual It enables the transfer of performance data and commands between MIDI devices. CAUTION Before connecting the instrument to other instruments and devices-...
Owner's Manual
Page 21
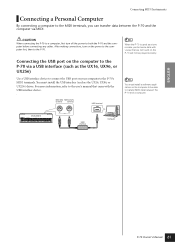
For more information, refer to the P-70. Instrument USB interface Computer ENGLISH P-70 Owner's Manual 21 After making connections, turn off the power to the MIDI terminals, you can transfer data between the P-70 and a computer. You must install a software application on the P-70 will not be able to the P-70's MIDI terminals. Connecting the USB port...
For more information, refer to the P-70. Instrument USB interface Computer ENGLISH P-70 Owner's Manual 21 After making connections, turn off the power to the MIDI terminals, you can transfer data between the P-70 and a computer. You must install a software application on the P-70 will not be able to the P-70's MIDI terminals. Connecting the USB port...

