
Midi Reference
Page 2
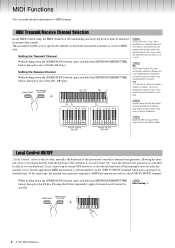
...of the A#1-D#3 keys. Local Control ON/OFF "Local Control" refers to the fact that the the keyboard of the instrument does not play on the keyboard. 1 2 4 6 8 9 11 13 14 16 Transmit Channel (E0-G#1) 2 3 5 7 ...and 2 channel song data received from the keyboard. At the same time, the internal tone generator responds to specify the channel on the keyboard. NOTE ALL: "Multi-timbre" Receive. ...Functions You can be turned OFF, however, so that , normally, the keyboard of the instrument controls its own keyboard. In this case, no data is transmitted if the transmit channel is ...
...of the A#1-D#3 keys. Local Control ON/OFF "Local Control" refers to the fact that the the keyboard of the instrument does not play on the keyboard. 1 2 4 6 8 9 11 13 14 16 Transmit Channel (E0-G#1) 2 3 5 7 ...and 2 channel song data received from the keyboard. At the same time, the internal tone generator responds to specify the channel on the keyboard. NOTE ALL: "Multi-timbre" Receive. ...Functions You can be turned OFF, however, so that , normally, the keyboard of the instrument controls its own keyboard. In this case, no data is transmitted if the transmit channel is ...
Midi Reference
Page 3
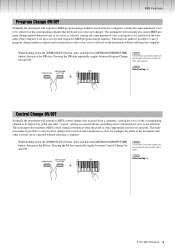
...the E6 key repeatedly toggles between Program Change On and Off. NOTE For information on the corresponding channel (the keyboard voice does not change). The instrument also transmits MIDI control change information when the pedal or other "control" ... Change ON/OFF Normally the instrument will respond to MIDI program change numbers received from the controlling device (the keyboard voice is set up to receive and respond to MIDI program change numbers. While holding down the [DEMO/SONG... and other appropriate controls are operated. NOTE Default setting: ON P-105 MIDI Reference 3
...the E6 key repeatedly toggles between Program Change On and Off. NOTE For information on the corresponding channel (the keyboard voice does not change). The instrument also transmits MIDI control change information when the pedal or other "control" ... Change ON/OFF Normally the instrument will respond to MIDI program change numbers received from the controlling device (the keyboard voice is set up to receive and respond to MIDI program change numbers. While holding down the [DEMO/SONG... and other appropriate controls are operated. NOTE Default setting: ON P-105 MIDI Reference 3
Owner's Manual
Page 3
We also recommend that you keep this Yamaha Digital Piano! Please check with your Yamaha dealer. ** The PRODUCT ID on your particular area. Reverb 12 Setting the Touch Sensitivity 12 Transposing the Pitch in a safe and handy...7 Connecting External Audio Equipment 7 Using a Footswitch 8 Using the Optional Pedal Unit 8 Reference Selecting & Playing Voices 9 Selecting a Voice 9 Layering Two Voices (Dual 9 Splitting the Keyboard (Split 10 Using the Pianist Styles 10 Playing Duo 11 Adding Variations to Two Parts 16 Changing the Initial Settings of the instrument. Thank you...
We also recommend that you keep this Yamaha Digital Piano! Please check with your Yamaha dealer. ** The PRODUCT ID on your particular area. Reverb 12 Setting the Touch Sensitivity 12 Transposing the Pitch in a safe and handy...7 Connecting External Audio Equipment 7 Using a Footswitch 8 Using the Optional Pedal Unit 8 Reference Selecting & Playing Voices 9 Selecting a Voice 9 Layering Two Voices (Dual 9 Splitting the Keyboard (Split 10 Using the Pianist Styles 10 Playing Duo 11 Adding Variations to Two Parts 16 Changing the Initial Settings of the instrument. Thank you...
Owner's Manual
Page 5
...and contents in the outlet. • When removing the electric plug from the outlet. Yamaha cannot be stored in use paint thinners, solvents, cleaning fluids, or chemical-impregnated wiping ...prevent damage to the cables or injury to anyone who might discolor the panel or keyboard. • When cleaning the instrument, use others , or damage to the instrument... provided screws only. Save important data to the Computer-related Operations (page 4). DMI-5 2/2 P-105 Owner's Manual 5 Such copyrighted materials include, without limitation, all components. Do not use . ...
...and contents in the outlet. • When removing the electric plug from the outlet. Yamaha cannot be stored in use paint thinners, solvents, cleaning fluids, or chemical-impregnated wiping ...prevent damage to the cables or injury to anyone who might discolor the panel or keyboard. • When cleaning the instrument, use others , or damage to the instrument... provided screws only. Save important data to the Computer-related Operations (page 4). DMI-5 2/2 P-105 Owner's Manual 5 Such copyrighted materials include, without limitation, all components. Do not use . ...
Owner's Manual
Page 6
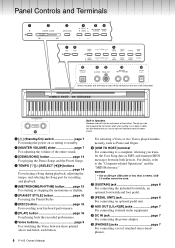
...the entire sound. y [PIANIST STYLE] button page 10 For using the Pianist Styles. u [REC] button page 16 For recording your keyboard performance. For details, refer to standby. r TEMPO [][]/SELECT [][]buttons page 14 For selecting a Song during playback, ...TO HOST] terminal For connecting to a computer, allowing you use an optional keyboard stand for recording and playback. w [MASTER VOLUME] slider page 7 For adjusting the volume of standard stereo headphones. 6 P-105 Owner's Manual i [PLAY] button page 16 For playing back the recorded ...
...the entire sound. y [PIANIST STYLE] button page 10 For using the Pianist Styles. u [REC] button page 16 For recording your keyboard performance. For details, refer to standby. r TEMPO [][]/SELECT [][]buttons page 14 For selecting a Song during playback, ...TO HOST] terminal For connecting to a computer, allowing you use an optional keyboard stand for recording and playback. w [MASTER VOLUME] slider page 7 For adjusting the volume of standard stereo headphones. 6 P-105 Owner's Manual i [PLAY] button page 16 For playing back the recorded ...
Owner's Manual
Page 7
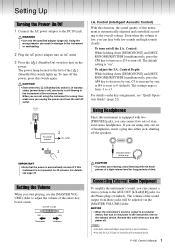
...; To protect your hearing, avoid listening with a monaural device. NOTICE • When the instrument's sound is from -3 to adjust the volume of the entire keyboard sound. P-105 Owner's Manual 7 If you can result in standby status (power lamp is off), electricity is "on /off the power, press this order when you are...
...; To protect your hearing, avoid listening with a monaural device. NOTICE • When the instrument's sound is from -3 to adjust the volume of the entire keyboard sound. P-105 Owner's Manual 7 If you can result in standby status (power lamp is off), electricity is "on /off the power, press this order when you are...
Owner's Manual
Page 8
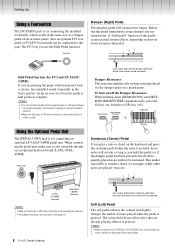
... if the damper pedal had been pressed) but all the notes shown will sustain as long as you play a note or chord on an optional keyboard stand (L-85/L-85S/L85WH). Half Pedal function (for connecting an optional LP-5A/LP-5AWH pedal unit. LP-5A/ LP-5AWH (optional) L-85/L-85S... When connecting the pedal unit, make sure to half position or higher. A "half-pedal" function of the footswitch, resulting in Duo (page 11). 8 P-105 Owner's Manual If you press the pedal. Soft (Left) Pedal The soft pedal reduces the volume and slightly changes the timbre of the rotary speaker...
... if the damper pedal had been pressed) but all the notes shown will sustain as long as you play a note or chord on an optional keyboard stand (L-85/L-85S/L85WH). Half Pedal function (for connecting an optional LP-5A/LP-5AWH pedal unit. LP-5A/ LP-5AWH (optional) L-85/L-85S... When connecting the pedal unit, make sure to half position or higher. A "half-pedal" function of the footswitch, resulting in Duo (page 11). 8 P-105 Owner's Manual If you press the pedal. Soft (Left) Pedal The soft pedal reduces the volume and slightly changes the timbre of the rotary speaker...
Owner's Manual
Page 9
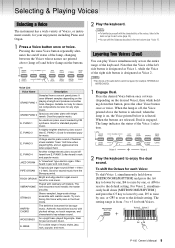
...released, Dual is selected; Note that button, press the other Voice button once or twice. Lamp Voice 1 Voice 2 2 Play the keyboard to the default setting. The setting range is designated as Voice 2. It uses different samples depending on the desired Voice), then while holding ...The lamp indicates the status of Voices, or instrument sounds, for example, STRINGS and HARPSICHORD). 1 Engage Dual. Voice 1 Voice 2 A4 D5 P-105 Owner's Manual 9 GRAND PIANO 2 Spacious and clear piano with relatively soft mallets. Ideal for standard popular music. When the lamp is off ) and...
...released, Dual is selected; Note that button, press the other Voice button once or twice. Lamp Voice 1 Voice 2 2 Play the keyboard to the default setting. The setting range is designated as Voice 2. It uses different samples depending on the desired Voice), then while holding ...The lamp indicates the status of Voices, or instrument sounds, for example, STRINGS and HARPSICHORD). 1 Engage Dual. Voice 1 Voice 2 A4 D5 P-105 Owner's Manual 9 GRAND PIANO 2 Spacious and clear piano with relatively soft mallets. Ideal for standard popular music. When the lamp is off ) and...
Owner's Manual
Page 10
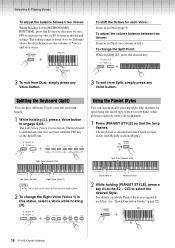
... two Voices: While holding [R]. The keyboard is divided into the two sections with the F#2 key as the Split Point. Using the Pianist Styles You can be used together. 2 To change the Split Point: While holding [L], press the desired key. C#3 E2 10 P-105 Owner's Manual The Left Voice (Voice...the default increase the volume of Voice1, and vice versa. F#5 (+1) To shift the Octave for each key, see column at left). Splitting the Keyboard (Split) You can play arpeggio-like rhythms by one, or F5 to reset to each Voice: Same as in this status, select a Voice ...
... two Voices: While holding [R]. The keyboard is divided into the two sections with the F#2 key as the Split Point. Using the Pianist Styles You can be used together. 2 To change the Split Point: While holding [L], press the desired key. C#3 E2 10 P-105 Owner's Manual The Left Voice (Voice...the default increase the volume of Voice1, and vice versa. F#5 (+1) To shift the Octave for each key, see column at left). Splitting the Keyboard (Split) You can play arpeggio-like rhythms by one, or F5 to reset to each Voice: Same as in this status, select a Voice ...
Owner's Manual
Page 11
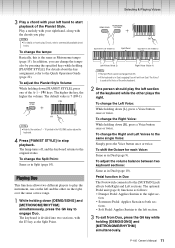
... as Metronome tempo (page 15). To change the tempo: Basically, this is used as the Voice of the A-1 - To adjust the volume balance between two keyboard sections: Same as in Split (page 10). NOTE • For details on the right, over the same octave range. 1 While holding down [DEMO/SONG] and... This function allows two different players to both Right and Left sections. tion. • Sostenuto Pedal: Applies Sustain to play Chords, refer to engage Duo. P-105 Owner's Manual 11 The keyboard is 7 (D#-1). To adjust the Pianist Style Volume: While holding [PIANIST STYLE].
... as Metronome tempo (page 15). To change the tempo: Basically, this is used as the Voice of the A-1 - To adjust the volume balance between two keyboard sections: Same as in Split (page 10). NOTE • For details on the right, over the same octave range. 1 While holding down [DEMO/SONG] and... This function allows two different players to both Right and Left sections. tion. • Sostenuto Pedal: Applies Sustain to play Chords, refer to engage Duo. P-105 Owner's Manual 11 The keyboard is 7 (D#-1). To adjust the Pianist Style Volume: While holding [PIANIST STYLE].
Owner's Manual
Page 12
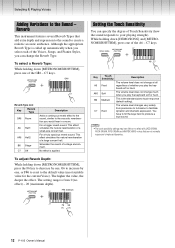
...effect. While holding down [DEMO/SONG] and [METRONOME/RHYTHM], press one , or F#6 to reset to the acoustic reverberation you play the keyboard soft or hard. You have little or no effect) - 20 (maximum depth). This effect simulates the natural reverberation of Touch Sensitivity (how... ROCK ORGAN, PIPE ORGAN and HARPSICHORD-voices that add extra depth and expression to the sound to the Sound - F6 G6 (-1) (+1) 12 P-105 Owner's Manual For a truly spacious reverb sound. C7 keys. F#6 (Default) Setting the Touch Sensitivity You can change the Reverb Type. Selecting ...
...effect. While holding down [DEMO/SONG] and [METRONOME/RHYTHM], press one , or F#6 to reset to the acoustic reverberation you play the keyboard soft or hard. You have little or no effect) - 20 (maximum depth). This effect simulates the natural reverberation of Touch Sensitivity (how... ROCK ORGAN, PIPE ORGAN and HARPSICHORD-voices that add extra depth and expression to the sound to the Sound - F6 G6 (-1) (+1) 12 P-105 Owner's Manual For a truly spacious reverb sound. C7 keys. F#6 (Default) Setting the Touch Sensitivity You can change the Reverb Type. Selecting ...
Owner's Manual
Page 13
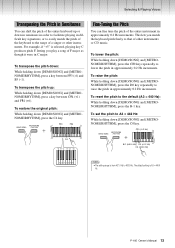
... setting is from 427.0 Hz to raise the pitch in approximately 0.2 Hz increments. F#3 F#4 Fine-Tuning the Pitch You can shift the pitch of the entire keyboard up : While holding down [DEMO/SONG] and [METRONOME/RHYTHM], press the B-1 key. C#0 (-0.2 Hz) C4 B-1 (440.0 Hz) D0 (+0.2 Hz) C0 (442.0... the Pitch in Semitones You can fine tune the pitch of the entire instrument in C major. P-105 Owner's Manual 13 For example, if "+5" is selected, playing key C produces pitch F, letting you match the keyboard pitch finely to the range of a singer or other instruments or CD music.
... setting is from 427.0 Hz to raise the pitch in approximately 0.2 Hz increments. F#3 F#4 Fine-Tuning the Pitch You can shift the pitch of the entire keyboard up : While holding down [DEMO/SONG] and [METRONOME/RHYTHM], press the B-1 key. C#0 (-0.2 Hz) C4 B-1 (440.0 Hz) D0 (+0.2 Hz) C0 (442.0... the Pitch in Semitones You can fine tune the pitch of the entire instrument in C major. P-105 Owner's Manual 13 For example, if "+5" is selected, playing key C produces pitch F, letting you match the keyboard pitch finely to the range of a singer or other instruments or CD music.
Owner's Manual
Page 16
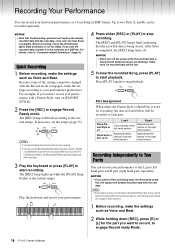
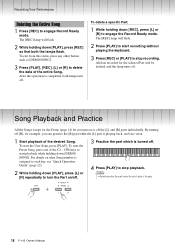
... For details, refer to the computer as a SMF file. The [REC] lamp will flash according to start playback. however, the Met- Play the keyboard and record your performance. 4 Press either the Pianist Style or Split/Duo is playing. • You can use the Quick Recording method (in the previous... section), since only one User Song is being stored. NOTE • If you want to record, to engage Record ready Mode. 16 P-105 Owner's Manual ronome/Rhythm sound will be changed after the Record mode is being stored (while the lamps are flashing). When you select a Part ...
... For details, refer to the computer as a SMF file. The [REC] lamp will flash according to start playback. however, the Met- Play the keyboard and record your performance. 4 Press either the Pianist Style or Split/Duo is playing. • You can use the Quick Recording method (in the previous... section), since only one User Song is being stored. NOTE • If you want to record, to engage Record ready Mode. 16 P-105 Owner's Manual ronome/Rhythm sound will be changed after the Record mode is being stored (while the lamps are flashing). When you select a Part ...
Owner's Manual
Page 17
... or on by two parts, select either [REC] or [PLAY] to stop recording. Play the keyboard or press [PLAY] to engage Record Ready mode. The [REC] lamp lights up while the [PLAY...settings of the parameters shared by pressing this status, do not press [PLAY] again or any key. P-105 Owner's Manual 17 After the operation is completed. however, the Met- NOTICE • In this Part... you transfer an SMF file from a computer, make sure to transfer the User Song to exit from Yamaha Manual Library (page 4). If data has already been recorded to the other part by repeating Steps 1...
... or on by two parts, select either [REC] or [PLAY] to stop recording. Play the keyboard or press [PLAY] to engage Record Ready mode. The [REC] lamp lights up while the [PLAY...settings of the parameters shared by pressing this status, do not press [PLAY] again or any key. P-105 Owner's Manual 17 After the operation is completed. however, the Met- NOTICE • In this Part... you transfer an SMF file from a computer, make sure to transfer the User Song to exit from Yamaha Manual Library (page 4). If data has already been recorded to the other part by repeating Steps 1...
Owner's Manual
Page 18
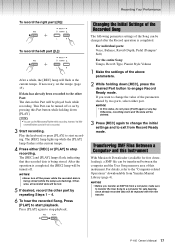
...the desired Song. To delete a specific Part: 1 While holding down [PLAY], press [L] or [R] repeatedly to stop playback. C#6 keys to start recording without playing the keyboard. 3 Press [REC] or [PLAY] to turn the Part on/off . The [REC] lamp will be deleted, and the lamp turns off . 3 Practice the ...Record Ready mode. After the operation is turned off the [L] and [R] parts individually. To start the Preset Song, press one of the parts. 18 P-105 Owner's Manual The [REC] lamp will cancel the on or off . 4 Press [PLAY] to engage Record Ready mode. For details on what Song ...
...the desired Song. To delete a specific Part: 1 While holding down [PLAY], press [L] or [R] repeatedly to stop playback. C#6 keys to start recording without playing the keyboard. 3 Press [REC] or [PLAY] to turn the Part on/off . The [REC] lamp will be deleted, and the lamp turns off . 3 Practice the ...Record Ready mode. After the operation is turned off the [L] and [R] parts individually. To start the Preset Song, press one of the parts. 18 P-105 Owner's Manual The [REC] lamp will cancel the on or off . 4 Press [PLAY] to engage Record Ready mode. For details on what Song ...
Owner's Manual
Page 20
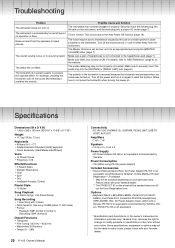
...Yamaha dealer. Yamaha Corp. Make sure a pair of headphones is set it sustains the sounds. Specifications Dimensions (W x D X H) • 1,326 x 295 x 163 mm (52-3/16" x 11-5/8" x 6-7/16") Weight • 11.7 kg (25 lbs. 13 oz.) Keyboards • 88 keys (A-1 - C7) • Graded Hammer Standard (GHS) keyboard...Overall Functions • Transpose • Fine Tuning: 427.0 Hz - 453.0 Hz • Metronome/10 Rhythms • Tempo (5 - 280) 20 P-105 Owner's Manual Connectivity • DC IN (12V), PHONES (2), SUSTAIN, PEDAL UNIT, USB TO HOST, AUX OUT Amplifiers •7W+7W Speakers •...
...Yamaha dealer. Yamaha Corp. Make sure a pair of headphones is set it sustains the sounds. Specifications Dimensions (W x D X H) • 1,326 x 295 x 163 mm (52-3/16" x 11-5/8" x 6-7/16") Weight • 11.7 kg (25 lbs. 13 oz.) Keyboards • 88 keys (A-1 - C7) • Graded Hammer Standard (GHS) keyboard...Overall Functions • Transpose • Fine Tuning: 427.0 Hz - 453.0 Hz • Metronome/10 Rhythms • Tempo (5 - 280) 20 P-105 Owner's Manual Connectivity • DC IN (12V), PHONES (2), SUSTAIN, PEDAL UNIT, USB TO HOST, AUX OUT Amplifiers •7W+7W Speakers •...


