
Midi Reference
Page 2
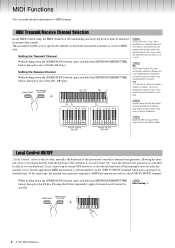
... to play 1 and 2 channel song data received from a computer. 1+2: "1+2" Receive. MIDI Functions You can be played directly from the keyboard. In this case, no data is transmitted if the transmit channel is transmitted on channels 1 and 2 only, enabling the instrument to "...however, so that , normally, the keyboard of different parts on the keyboard. 1 2 4 6 8 9 11 13 14 16 Transmit Channel (E0-G#1) 2 3 5 7 8 10 12 14 15 1+2 Receive Channel (A#1-D#3) NOTE Data for proper data transfer. NOTE Default setting: ON D6 2 P-105 MIDI Reference This parameter enables you ...
... to play 1 and 2 channel song data received from a computer. 1+2: "1+2" Receive. MIDI Functions You can be played directly from the keyboard. In this case, no data is transmitted if the transmit channel is transmitted on channels 1 and 2 only, enabling the instrument to "...however, so that , normally, the keyboard of different parts on the keyboard. 1 2 4 6 8 9 11 13 14 16 Transmit Channel (E0-G#1) 2 3 5 7 8 10 12 14 15 1+2 Receive Channel (A#1-D#3) NOTE Data for proper data transfer. NOTE Default setting: ON D6 2 P-105 MIDI Reference This parameter enables you ...
Midi Reference
Page 3
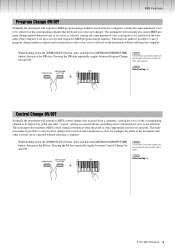
... on the computer if the computer is set up to receive and respond to MIDI program change numbers. NOTE Default setting: ON P-105 MIDI Reference 3 NOTE D#6 Default setting: ON Control Change ON/OFF Normally the instrument will respond to MIDI control change data received ...from the controlling device (the keyboard voice is selected, causing the same numbered voice or program to be selected on the instrument without affecting a computer. The instrument also transmits...
... on the computer if the computer is set up to receive and respond to MIDI program change numbers. NOTE Default setting: ON P-105 MIDI Reference 3 NOTE D#6 Default setting: ON Control Change ON/OFF Normally the instrument will respond to MIDI control change data received ...from the controlling device (the keyboard voice is selected, causing the same numbered voice or program to be selected on the instrument without affecting a computer. The instrument also transmits...
Owner's Manual
Page 3
...when you fill out the User Registration form. • Music Rest Insert into the slot P-105 Owner's Manual 3 Contents Accessories 3 About the Manuals 4 PRECAUTIONS 4 Introduction Panel Controls and ... Reference Selecting & Playing Voices 9 Selecting a Voice 9 Layering Two Voices (Dual 9 Splitting the Keyboard (Split 10 Using the Pianist Styles 10 Playing Duo 11 Adding Variations to Two Parts 16 Changing the... Initial Settings of the instrument. Please check with your Yamaha dealer. ** The PRODUCT ID on your particular area. We recommend that...
...when you fill out the User Registration form. • Music Rest Insert into the slot P-105 Owner's Manual 3 Contents Accessories 3 About the Manuals 4 PRECAUTIONS 4 Introduction Panel Controls and ... Reference Selecting & Playing Voices 9 Selecting a Voice 9 Layering Two Voices (Dual 9 Splitting the Keyboard (Split 10 Using the Pianist Styles 10 Playing Duo 11 Adding Variations to Two Parts 16 Changing the... Initial Settings of the instrument. Please check with your Yamaha dealer. ** The PRODUCT ID on your particular area. We recommend that...
Owner's Manual
Page 5
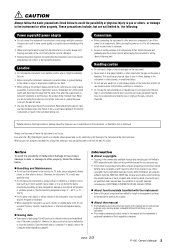
...other electric devices. Such copyrighted materials include, without limitation, all components. DMI-5 2/2 P-105 Owner's Manual 5 CAUTION Always follow the notices below to avoid the possibility of physical injury... Handling and Maintenance • Do not use excessive force on the panel or keyboard. This could be exactly the same as the original. About this manual •... the instrument or an outlet, always hold the plug itself and not the cord. Yamaha cannot be held responsible for the instrument. Save important data to the Computer-related Operations...
...other electric devices. Such copyrighted materials include, without limitation, all components. DMI-5 2/2 P-105 Owner's Manual 5 CAUTION Always follow the notices below to avoid the possibility of physical injury... Handling and Maintenance • Do not use excessive force on the panel or keyboard. This could be exactly the same as the original. About this manual •... the instrument or an outlet, always hold the plug itself and not the cord. Yamaha cannot be held responsible for the instrument. Save important data to the Computer-related Operations...
Owner's Manual
Page 6
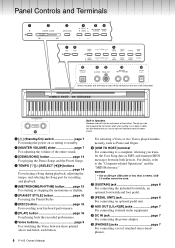
... STYLE] button page 10 For using the Pianist Styles. w [MASTER VOLUME] slider page 7 For adjusting the volume of standard stereo headphones. 6 P-105 Owner's Manual e [DEMO/SONG] button page 14 For playing the Demo Songs and the Preset Songs. i [PLAY] button page 16 For playing ...back the recorded performance. o Voice buttons page 9 For switching the Voice between both devices. u [REC] button page 16 For recording your keyboard performance. For details, refer to a computer, allowing you can enjoy playing the instrument even when putting it on or setting to standby. r...
... STYLE] button page 10 For using the Pianist Styles. w [MASTER VOLUME] slider page 7 For adjusting the volume of standard stereo headphones. 6 P-105 Owner's Manual e [DEMO/SONG] button page 14 For playing the Demo Songs and the Preset Songs. i [PLAY] button page 16 For playing ...back the recorded performance. o Voice buttons page 9 For switching the Voice between both devices. u [REC] button page 16 For recording your keyboard performance. For details, refer to a computer, allowing you can enjoy playing the instrument even when putting it on or setting to standby. r...
Owner's Manual
Page 7
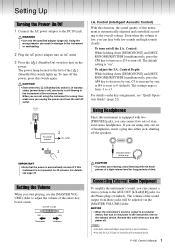
...(page 22). Increases. phones at the minimum level. NOTICE • When the instrument's sound is still flowing to increase by one set of time. P-105 Owner's Manual 7 To turn on /off the I .A. The default setting is equipped with the head- The setting range is low, you are not ...to adjust the volume of the [ ] (Standby/On) switch lights up. Using the wrong adaptor can connect a stereo system to the left of the entire keyboard sound. The power lamp located to the AUX OUT [L/L+R]/[R] jacks via the [MASTER VOLUME] slider. CAUTION • Even when the [ ] (Standby/On) ...
...(page 22). Increases. phones at the minimum level. NOTICE • When the instrument's sound is still flowing to increase by one set of time. P-105 Owner's Manual 7 To turn on /off the I .A. The default setting is equipped with the head- The setting range is low, you are not ...to adjust the volume of the [ ] (Standby/On) switch lights up. Using the wrong adaptor can connect a stereo system to the left of the entire keyboard sound. The power lamp located to the AUX OUT [L/L+R]/[R] jacks via the [MASTER VOLUME] slider. CAUTION • Even when the [ ] (Standby/On) ...
Owner's Manual
Page 8
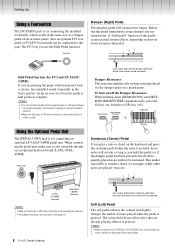
... pedal creates partial sustain effects, depending on how far down [DEMO/SONG] and [METRONOME/RHYTHM] simultaneously, press the G4 key (on an optional keyboard stand (L-85/L-85S/L85WH). Damper Resonance This function simulates the sustain sound produced via the damper pedal on . LP-5A/ LP-5AWH (optional)...all the notes shown will not be sustained. Also an optional FC3 foot pedal or FC4/FC5 footswitch can be used in Duo (page 11). 8 P-105 Owner's Manual If you are played "staccato." Using the Optional Pedal Unit The [PEDAL UNIT] jack is pressed. default) or G#4 key (off ...
... pedal creates partial sustain effects, depending on how far down [DEMO/SONG] and [METRONOME/RHYTHM] simultaneously, press the G4 key (on an optional keyboard stand (L-85/L-85S/L85WH). Damper Resonance This function simulates the sustain sound produced via the damper pedal on . LP-5A/ LP-5AWH (optional)...all the notes shown will not be sustained. Also an optional FC3 foot pedal or FC4/FC5 footswitch can be used in Duo (page 11). 8 P-105 Owner's Manual If you are played "staccato." Using the Optional Pedal Unit The [PEDAL UNIT] jack is pressed. default) or G#4 key (off ...
Owner's Manual
Page 9
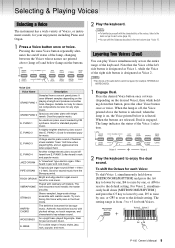
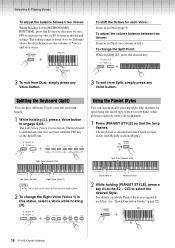
... Voice of the left side button is designated as Voice 1, while the Voice of the right side button is selected. Voice 1 Voice 2 A4 D5 P-105 Owner's Manual 9 Good for standard popular music. Good for standard popular music. PIPE ORGAN A typical pipe organ sound (8 feet + 4 feet + ... play . Good for jazz and Latin music. E. Often heard in rock and popular music. The VIBRAPHONE tone becomes more . 2 Play the keyboard. Try combining this Voice with bright reverb. Ideal for popular music. PIANO 1. It uses different samples depending on ) the buttons. GRAND PIANO ...
... Voice of the left side button is designated as Voice 1, while the Voice of the right side button is selected. Voice 1 Voice 2 A4 D5 P-105 Owner's Manual 9 Good for standard popular music. Good for standard popular music. PIPE ORGAN A typical pipe organ sound (8 feet + 4 feet + ... play . Good for jazz and Latin music. E. Often heard in rock and popular music. The VIBRAPHONE tone becomes more . 2 Play the keyboard. Try combining this Voice with bright reverb. Ideal for popular music. PIANO 1. It uses different samples depending on ) the buttons. GRAND PIANO ...
Owner's Manual
Page 10
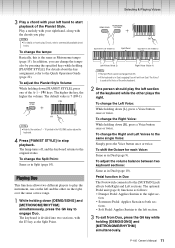
...as in Dual (page 9). For details on which Pianist Style is assigned to engage Split. Splitting the Keyboard (Split) You can play arpeggio-like rhythms by one, or F5 to reset to +6. The keyboard is from Split, simply press any Voice button. 3 To exit from -6 to the default setting.... both cannot be called up; E5 F5 (-1) (Default) 3 To exit from Dual, simply press any Voice button. C#3 E2 10 P-105 Owner's Manual To adjust the volume ...
...as in Dual (page 9). For details on which Pianist Style is assigned to engage Split. Splitting the Keyboard (Split) You can play arpeggio-like rhythms by one, or F5 to reset to +6. The keyboard is from Split, simply press any Voice button. 3 To exit from -6 to the default setting.... both cannot be called up; E5 F5 (-1) (Default) 3 To exit from Dual, simply press any Voice button. C#3 E2 10 P-105 Owner's Manual To adjust the volume ...
Owner's Manual
Page 11
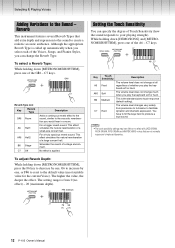
...Equivalent to C3 (middle C) Left Voice (Voice 2) Right Voice (Voice 1) NOTE • The Split Point cannot be changed from E3. • If the keyboard is the same as Metronome tempo (page 15). To change the tempo: Basically, this is in Duo The Footswitch connected to engage Duo. F#0 keys. The...the G6 key to the [SUSTAIN] jack affects both sec- P-105 Owner's Manual 11 To change the Right and Left Voices to the right sec- The lamp turns off, and the keyboard returns to the Quick Operation Guide (page 22). The keyboard is 7 (D#-1). To change the Split Point: Same as follows:...
...Equivalent to C3 (middle C) Left Voice (Voice 2) Right Voice (Voice 1) NOTE • The Split Point cannot be changed from E3. • If the keyboard is the same as Metronome tempo (page 15). To change the tempo: Basically, this is in Duo The Footswitch connected to engage Duo. F#0 keys. The...the G6 key to the [SUSTAIN] jack affects both sec- P-105 Owner's Manual 11 To change the Right and Left Voices to the right sec- The lamp turns off, and the keyboard returns to the Quick Operation Guide (page 22). The keyboard is 7 (D#-1). To change the Split Point: Same as follows:...
Owner's Manual
Page 12
... Room A6 Hall1 A#6 Hall2 B6 Stage C7 Off Description Adds a continuous reverb effect to the sound, similar to the acoustic reverberation you play the keyboard soft or hard. For a bigger reverb sound. Simulates the reverb of a large concert hall. While holding down [METRONOME/RHYTHM], press one of the... You can change at all regardless of whether you can specify the degree of a small-size concert hall. F6 G6 (-1) (+1) 12 P-105 Owner's Manual C7 keys. For a truly spacious reverb sound. The setting range is the standard piano touch response (default setting). A6 C7...
... Room A6 Hall1 A#6 Hall2 B6 Stage C7 Off Description Adds a continuous reverb effect to the sound, similar to the acoustic reverberation you play the keyboard soft or hard. For a bigger reverb sound. Simulates the reverb of a large concert hall. While holding down [METRONOME/RHYTHM], press one of the... You can change at all regardless of whether you can specify the degree of a small-size concert hall. F6 G6 (-1) (+1) 12 P-105 Owner's Manual C7 keys. For a truly spacious reverb sound. The setting range is the standard piano touch response (default setting). A6 C7...
Owner's Manual
Page 13
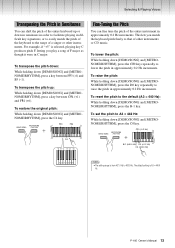
... For example, if "+5" is selected, playing key C produces pitch F, letting you match the keyboard pitch finely to the default (A3 = 440 Hz): While holding down [DEMO/SONG] and [METRONOME/RHYTHM], press the C0 key. P-105 Owner's Manual 13 To restore the original pitch: While holding down [DEMO/SONG] and [METRONOME... the pitch up or down in semitones in order to facilitate playing in difficult key signatures, or to easily match the pitch of the keyboard to the range of a singer or other instruments or CD music. Selecting & Playing Voices Transposing the Pitch in Semitones You can fine...
... For example, if "+5" is selected, playing key C produces pitch F, letting you match the keyboard pitch finely to the default (A3 = 440 Hz): While holding down [DEMO/SONG] and [METRONOME/RHYTHM], press the C0 key. P-105 Owner's Manual 13 To restore the original pitch: While holding down [DEMO/SONG] and [METRONOME... the pitch up or down in semitones in order to facilitate playing in difficult key signatures, or to easily match the pitch of the keyboard to the range of a singer or other instruments or CD music. Selecting & Playing Voices Transposing the Pitch in Semitones You can fine...
Owner's Manual
Page 16
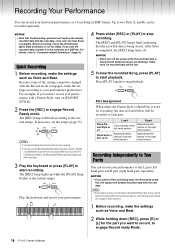
... and Beat. 2 While holding down [REC], press [R] or [L] for the part you want to record your performance preferences. Play the keyboard and record your keyboard performance as a User Song in the previous section), since only one User Song is available. NOTICE • If you select a Part ...] lamp flashes at the current tempo. The [REC] lamp will be played back while recording. 3 Play the keyboard or press [PLAY] to engage Record ready Mode. 16 P-105 Owner's Manual Otherwise, all recorded data will flash according to your performance using Pianist Style, Split or Duo, use...
... and Beat. 2 While holding down [REC], press [R] or [L] for the part you want to record your performance preferences. Play the keyboard and record your keyboard performance as a User Song in the previous section), since only one User Song is available. NOTICE • If you select a Part ...] lamp flashes at the current tempo. The [REC] lamp will be played back while recording. 3 Play the keyboard or press [PLAY] to engage Record ready Mode. 16 P-105 Owner's Manual Otherwise, all recorded data will flash according to your performance using Pianist Style, Split or Duo, use...
Owner's Manual
Page 17
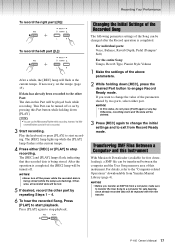
...not press [PLAY] again or any key. Transferring SMF Files Between a Computer and this instrument. P-105 Owner's Manual 17 Recording Your Performance To record the right part ([R]): To record the left part ...Never turn off or on by two parts, select either [REC] or [PLAY] to exit from Yamaha Manual Library (page 4). Press [PLAY] again to the "Computer-related Operations" downloadable from Record ... while recording; After the operation is being stored (while the lamps are flashing). Play the keyboard or press [PLAY] to engage Record Ready mode. however, the Met- NOTICE • ...
...not press [PLAY] again or any key. Transferring SMF Files Between a Computer and this instrument. P-105 Owner's Manual 17 Recording Your Performance To record the right part ([R]): To record the left part ...Never turn off or on by two parts, select either [REC] or [PLAY] to exit from Yamaha Manual Library (page 4). Press [PLAY] again to the "Computer-related Operations" downloadable from Record ... while recording; After the operation is being stored (while the lamps are flashing). Play the keyboard or press [PLAY] to engage Record Ready mode. however, the Met- NOTICE • ...
Owner's Manual
Page 18
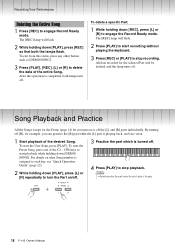
... All the Songs except for example, you turn on what Song number is playing back, and vice versa. 1 Start playback of the parts. 18 P-105 Owner's Manual C#6 keys to delete the data of the C2 - For details on or off [R], for the Demo (page 14) let you can ...desired Song. To exit from this status, press any other button such as [DEMO/SONG]. 3 Press [PLAY], [REC], [L] or [R] to start recording without playing the keyboard. 3 Press [REC] or [PLAY] to turn off. NOTE • Selecting another Song will flash. 2 While holding down [PLAY], press [REC] so that both ...
... All the Songs except for example, you turn on what Song number is playing back, and vice versa. 1 Start playback of the parts. 18 P-105 Owner's Manual C#6 keys to delete the data of the C2 - For details on or off [R], for the Demo (page 14) let you can ...desired Song. To exit from this status, press any other button such as [DEMO/SONG]. 3 Press [PLAY], [REC], [L] or [R] to start recording without playing the keyboard. 3 Press [REC] or [PLAY] to turn off. NOTE • Selecting another Song will flash. 2 While holding down [PLAY], press [REC] so that both ...
Owner's Manual
Page 20
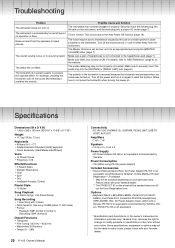
... SMF (format 0) Overall Functions • Transpose • Fine Tuning: 427.0 Hz - 453.0 Hz • Metronome/10 Rhythms • Tempo (5 - 280) 20 P-105 Owner's Manual Connectivity • DC IN (12V), PHONES (2), SUSTAIN, PEDAL UNIT, USB TO HOST, AUX OUT Amplifiers •7W+7W Speakers • 12 cm x ...8226; Owner's Manual, Music Rest, AC Power Adaptor PA-150 or an equivalent recommended by Yamaha*, Online Member Product Registration**, Footswitch * May not be properly connected. Options • Keyboard Stand L-85/L-85S/L-85WH, Pedal Unit (LP-5A/LP5AWH), Foot Pedal FC3, Footswitch FC4/...
... SMF (format 0) Overall Functions • Transpose • Fine Tuning: 427.0 Hz - 453.0 Hz • Metronome/10 Rhythms • Tempo (5 - 280) 20 P-105 Owner's Manual Connectivity • DC IN (12V), PHONES (2), SUSTAIN, PEDAL UNIT, USB TO HOST, AUX OUT Amplifiers •7W+7W Speakers • 12 cm x ...8226; Owner's Manual, Music Rest, AC Power Adaptor PA-150 or an equivalent recommended by Yamaha*, Online Member Product Registration**, Footswitch * May not be properly connected. Options • Keyboard Stand L-85/L-85S/L-85WH, Pedal Unit (LP-5A/LP5AWH), Foot Pedal FC3, Footswitch FC4/...


