
Owner's Manual
Page 2
...rack unless proper ventilation is operated. 2 Retain Instructions - The exclamation point within the product's enclosure that they exit from battery power, or other hazards. Do not place this product from the wall outlet before the product is provided or the manufacturer's instructions ... (OR BACK). REFER SERVICING TO QUALIFIED SERVICE PERSONNEL. • Explanation of electric shock to keep from the type of overhead power lines or other similar surface. All the safety and operating instructions should be followed. 5 Cleaning - The safety and operating instructions...
...rack unless proper ventilation is operated. 2 Retain Instructions - The exclamation point within the product's enclosure that they exit from battery power, or other hazards. Do not place this product from the wall outlet before the product is provided or the manufacturer's instructions ... (OR BACK). REFER SERVICING TO QUALIFIED SERVICE PERSONNEL. • Explanation of electric shock to keep from the type of overhead power lines or other similar surface. All the safety and operating instructions should be followed. 5 Cleaning - The safety and operating instructions...

Owner's Manual
Page 3
..., be used according to the instructions found to the operation of interference, which can not locate the appropriate retailer, please contact Yamaha Electronics Corp., U.S.A. 6660 Orangethorpe Ave., Buena Park, CA 90620. Compliance with other products (including amplifiers) that produce heat. ...CODE ANTENNA LEAD IN WIRE ANTENNA DISCHARGE UNIT (NEC SECTION 810-20) GROUNDING CONDUCTORS (NEC SECTION 810-21) GROUND CLAMPS POWER SERVICE GROUNDING ELECTRODE SYSTEM (NEC ART 250. Failure to follow instructions could void your authority, granted by using one of antenna...
..., be used according to the instructions found to the operation of interference, which can not locate the appropriate retailer, please contact Yamaha Electronics Corp., U.S.A. 6660 Orangethorpe Ave., Buena Park, CA 90620. Compliance with other products (including amplifiers) that produce heat. ...CODE ANTENNA LEAD IN WIRE ANTENNA DISCHARGE UNIT (NEC SECTION 810-20) GROUNDING CONDUCTORS (NEC SECTION 810-21) GROUND CLAMPS POWER SERVICE GROUNDING ELECTRODE SYSTEM (NEC ART 250. Failure to follow instructions could void your authority, granted by using one of antenna...
Owner's Manual
Page 4
... conforme à la norme NMB-003 du Canada. a room with high humidity (i.e. Contact qualified Yamaha service personnel when any service is turned off by lightning, keep the power cord and outdoor antennas disconnected from other than specified is dangerous and may cause electrical shock to the... this unit with a higher voltage than specified. 13 To prevent damage by ASTANDBY/ON. Yamaha will not be held responsible for future reference. IMPORTANT Please record the serial number of power. MODEL: Serial No.: The serial number is designed to this unit. 6 Do not cover...
... conforme à la norme NMB-003 du Canada. a room with high humidity (i.e. Contact qualified Yamaha service personnel when any service is turned off by lightning, keep the power cord and outdoor antennas disconnected from other than specified is dangerous and may cause electrical shock to the... this unit with a higher voltage than specified. 13 To prevent damage by ASTANDBY/ON. Yamaha will not be held responsible for future reference. IMPORTANT Please record the serial number of power. MODEL: Serial No.: The serial number is designed to this unit. 6 Do not cover...

Owner's Manual
Page 5
... Canada models only 12 Information on jacks and cable plugs 13 Information on HDMI 14 Connecting video components 15 Connecting audio components 17 Connecting a Yamaha iPod™ universal dock and Bluetooth™ adapter 18 Connecting to the VIDEO AUX jacks on the front panel 18 Connecting the FM and ...AM antennas 19 Connecting the power cable 19 Turning on and off the power 19 Front panel display 20 Basic setup 22 BASIC OPERATION Selecting the SCENE templates 24 Selecting the desired SCENE template ...
... Canada models only 12 Information on jacks and cable plugs 13 Information on HDMI 14 Connecting video components 15 Connecting audio components 17 Connecting a Yamaha iPod™ universal dock and Bluetooth™ adapter 18 Connecting to the VIDEO AUX jacks on the front panel 18 Connecting the FM and ...AM antennas 19 Connecting the power cable 19 Turning on and off the power 19 Front panel display 20 Basic setup 22 BASIC OPERATION Selecting the SCENE templates 24 Selecting the desired SCENE template ...

Owner's Manual
Page 6
..." are trademarks or registered trademarks of HDMI Licensing LLC. and, most out of Apple Inc., registered in 5-channel power amplifier ◆ Minimum RMS output power [U.S.A. Since hearing damage from loud sounds is a trademark of your sensitive hearing. Other features ◆ 192-kHz/24...function ◆ Preset SCENE templates for various situations ◆ SCENE template customizing capability Decoders and DSP circuits ◆ Proprietary Yamaha technology for standard, enhanced or high-definition video (includes 1080p video signal transmission) DOCK terminal ◆ DOCK terminal to ...
..." are trademarks or registered trademarks of HDMI Licensing LLC. and, most out of Apple Inc., registered in 5-channel power amplifier ◆ Minimum RMS output power [U.S.A. Since hearing damage from loud sounds is a trademark of your sensitive hearing. Other features ◆ 192-kHz/24...function ◆ Preset SCENE templates for various situations ◆ SCENE template customizing capability Decoders and DSP circuits ◆ Proprietary Yamaha technology for standard, enhanced or high-definition video (includes 1080p video signal transmission) DOCK terminal ◆ DOCK terminal to ...

Owner's Manual
Page 7
... not throw away batteries with your local voltage using a straight slot screwdriver. When the memory is without batteries for your local voltage BEFORE plugging the power cable into contact with clothing, etc. the operation range of the remote control decreases. • Do not use an old battery and a new one together...
... not throw away batteries with your local voltage using a straight slot screwdriver. When the memory is without batteries for your local voltage BEFORE plugging the power cable into contact with clothing, etc. the operation range of the remote control decreases. • Do not use an old battery and a new one together...
Owner's Manual
Page 8
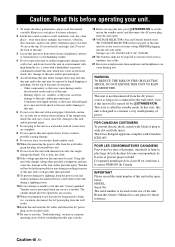
... equipped with a composite video input jack. ❏ Video cable x 2 Select an RCA composite video cable. ❏ Digital coaxial audio cable x 1 ☞ P. 6 Step 3: Turn on the power and press SCENE 1 button ☞ P. 7 Enjoy DVD playback! 4 En Quick start guide Quick start guide The following items. ❏ Speakers ❏ Front speaker x 2 ❏ Center...
... equipped with a composite video input jack. ❏ Video cable x 2 Select an RCA composite video cable. ❏ Digital coaxial audio cable x 1 ☞ P. 6 Step 3: Turn on the power and press SCENE 1 button ☞ P. 7 Enjoy DVD playback! 4 En Quick start guide Quick start guide The following items. ❏ Speakers ❏ Front speaker x 2 ❏ Center...

Owner's Manual
Page 10
DVD player AV receiver Video input jack Video cable VIDEO MONITOR OUT jack 4 Connect the power plug of speaker combinations ☞ P. 10 • Connecting a video monitor and DVD player ☞ P. 15 Digital coaxial audio output jack Digital coaxial audio cable DVD ...
DVD player AV receiver Video input jack Video cable VIDEO MONITOR OUT jack 4 Connect the power plug of speaker combinations ☞ P. 10 • Connecting a video monitor and DVD player ☞ P. 15 Digital coaxial audio output jack Digital coaxial audio cable DVD ...

Owner's Manual
Page 11
... this unit is deactivated and the indicator on the SCENE button turns off. ■ About SCENE function Just by pressing one SCENE button, you connect a Yamaha product that has been assigned to the SCENE template that has capability of the connected speakers. INTRODUCTION Step 3: Turn on the...
... this unit is deactivated and the indicator on the SCENE button turns off. ■ About SCENE function Just by pressing one SCENE button, you connect a Yamaha product that has been assigned to the SCENE template that has capability of the connected speakers. INTRODUCTION Step 3: Turn on the...

Owner's Manual
Page 12
... unit... Press ASTANDBY/ON on the front panel to set to the standby mode. Note In the standby mode, this unit consumes a small amount of power in order to receive infrared signals from the standby mode, press ASTANDBY/ON (or DPOWER) on this unit in advance. Quick start guide Notes *1 You...
... unit... Press ASTANDBY/ON on the front panel to set to the standby mode. Note In the standby mode, this unit consumes a small amount of power in order to receive infrared signals from the standby mode, press ASTANDBY/ON (or DPOWER) on this unit in advance. Quick start guide Notes *1 You...

Owner's Manual
Page 15
... striped (grooved, etc.) cable to "6ΩMIN" before using this unit (see page 12). • Before connecting the speakers, make sure that this the AC power plug is actually a pair of this unit. • If you are to use 6 ohm speakers, be sure to set "SP IMP." PREPARATION Connections Connecting speakers...
... striped (grooved, etc.) cable to "6ΩMIN" before using this unit (see page 12). • Before connecting the speakers, make sure that this the AC power plug is actually a pair of this unit. • If you are to use 6 ohm speakers, be sure to set "SP IMP." PREPARATION Connections Connecting speakers...
Owner's Manual
Page 23
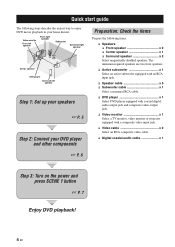
... window. A good earth ground is connected to receive infrared signals from this unit. • A properly installed outdoor antenna provides clearer reception than an indoor one. Power cable (U.S.A. Note In the standby mode, this unit consumes a small amount of the wire to 32 ft) of the supplied AM loop antenna is different...Press ASTANDBY/ON (or E STANDBY) to set this unit to turn on the models. If you turn on this unit. Consult the nearest authorized Yamaha dealer or service center about outdoor antennas. • The AM loop antenna should provide sufficient signal strength.
... window. A good earth ground is connected to receive infrared signals from this unit. • A properly installed outdoor antenna provides clearer reception than an indoor one. Power cable (U.S.A. Note In the standby mode, this unit consumes a small amount of the wire to 32 ft) of the supplied AM loop antenna is different...Press ASTANDBY/ON (or E STANDBY) to set this unit to turn on the models. If you turn on this unit. Consult the nearest authorized Yamaha dealer or service center about outdoor antennas. • The AM loop antenna should provide sufficient signal strength.
Owner's Manual
Page 32
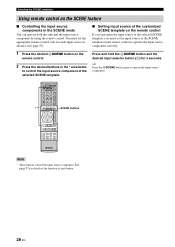
.... 1 Press the desired 5SCENE button on the SCENE feature ■ Controlling the input source components in the * area below to operate the input source component. * POWER POWER STANDBY POWER TV AV A B C MUTE CD MD/CD-R TUNER DVD DTV/CBL DVR TV CH V-AUX/DOCK D E AMP TV INPUT TV MUTE TV VOL SCENE 1 2 3 4 BAND...
.... 1 Press the desired 5SCENE button on the SCENE feature ■ Controlling the input source components in the * area below to operate the input source component. * POWER POWER STANDBY POWER TV AV A B C MUTE CD MD/CD-R TUNER DVD DTV/CBL DVR TV CH V-AUX/DOCK D E AMP TV INPUT TV MUTE TV VOL SCENE 1 2 3 4 BAND...
Owner's Manual
Page 38
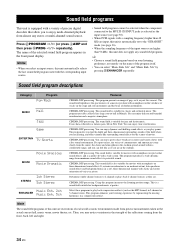
... 4AMP and then press 0PROG l / h repeatedly). You can enjoy clear reverberation. It uses data collected in a famous jazz club in Munich. Select these programs to powerful sounds. You can enjoy delicate and beautiful reverberation and a majestic atmosphere. CINEMA DSP processing. The program lets you feel like as they are input, this...
... 4AMP and then press 0PROG l / h repeatedly). You can enjoy clear reverberation. It uses data collected in a famous jazz club in Munich. Select these programs to powerful sounds. You can enjoy delicate and beautiful reverberation and a majestic atmosphere. CINEMA DSP processing. The program lets you feel like as they are input, this...

Owner's Manual
Page 44
... nano iPod mini Battery charge feature Your iPod battery is automatically charged when your iPod is stationed in a Yamaha iPod universal dock connected to the instruction manuals of your iPod for iPod™ POWER POWER STANDBY POWER TV AV A B C MUTE CD MD/CD-R TUNER DVD DTV/CBL DVR TV CH V-AUX/DOCK D ... of the selected menu level, or change the selected setting. USING IPOD™ Using iPod™ Once you have stationed your iPod in a Yamaha iPod universal dock (such as the YDS-10, sold separately) connected to the DOCK terminal of this unit is selected as the input source. ...
... nano iPod mini Battery charge feature Your iPod battery is automatically charged when your iPod is stationed in a Yamaha iPod universal dock connected to the instruction manuals of your iPod for iPod™ POWER POWER STANDBY POWER TV AV A B C MUTE CD MD/CD-R TUNER DVD DTV/CBL DVR TV CH V-AUX/DOCK D ... of the selected menu level, or change the selected setting. USING IPOD™ Using iPod™ Once you have stationed your iPod in a Yamaha iPod universal dock (such as the YDS-10, sold separately) connected to the DOCK terminal of this unit is selected as the input source. ...

Owner's Manual
Page 48
... and enter the desired menu. Using set menu parameters while this unit is reproducing sound. 1 Press 4AMP and then press HMENU on the power of the front panel display. y You can change the parameter value. • Press 7h to increase the value. • Press 7l... MENU 2 INPUT MENU 3 OPTION MENU 2 Press 7 k / n to select "MANUAL SETUP". .MANUAL SETUP 3 Press 7ENTER to exit from set menu settings. Pairs the connected Yamaha Bluetooth adapter (such as you want to adjust. • To return to the previous menu level, press 8 RETURN. 6 Press 7k / n to select the desired parameter...
... and enter the desired menu. Using set menu parameters while this unit is reproducing sound. 1 Press 4AMP and then press HMENU on the power of the front panel display. y You can change the parameter value. • Press 7h to increase the value. • Press 7l... MENU 2 INPUT MENU 3 OPTION MENU 2 Press 7 k / n to select "MANUAL SETUP". .MANUAL SETUP 3 Press 7ENTER to exit from set menu settings. Pairs the connected Yamaha Bluetooth adapter (such as you want to adjust. • To return to the previous menu level, press 8 RETURN. 6 Press 7k / n to select the desired parameter...

Owner's Manual
Page 52
... following parameters to set to your needs. This may be used if the initial settings of this unit is set the volume level when the power of this unit. For example, if "INI.VOL." Initial volume INI.VOL. For DIGITAL INPUT COAXIAL jacks 1 IN (1) Choices: (1) CD, MD/CD-R, DVD, DTV/CBL... -30 dB Control step: 5 dB Note The "MAX VOL." Use this feature to be necessary when using NINPUT l / h (or the input selector buttons (3) on the power of this unit do not correspond to -30 dB when you assign "CD" to both "IN (2)" and "IN (3)". Use this feature to assign the input...
... following parameters to set to your needs. This may be used if the initial settings of this unit is set the volume level when the power of this unit. For example, if "INI.VOL." Initial volume INI.VOL. For DIGITAL INPUT COAXIAL jacks 1 IN (1) Choices: (1) CD, MD/CD-R, DVD, DTV/CBL... -30 dB Control step: 5 dB Note The "MAX VOL." Use this feature to be necessary when using NINPUT l / h (or the input selector buttons (3) on the power of this unit do not correspond to -30 dB when you assign "CD" to both "IN (2)" and "IN (3)". Use this feature to assign the input...

Owner's Manual
Page 53
CD MD/CD-R TUNER DVD DTV/CBL DVR or V-AUX/DOCK MULTI CH IN 2 Press 4AMP and then press 7l / h on the power of this unit. This is renamed "My DVD". Press one of the input selector buttons (3) or BMULTI CH IN to select the input source you ...
CD MD/CD-R TUNER DVD DTV/CBL DVR or V-AUX/DOCK MULTI CH IN 2 Press 4AMP and then press 7l / h on the power of this unit. This is renamed "My DVD". Press one of the input selector buttons (3) or BMULTI CH IN to select the input source you ...

Owner's Manual
Page 54
... "BLUETOOTH" and then press 7ENTER to turn on the Bluetooth component. Choices: OFF, ON • Select "OFF" to start pairing the connected Yamaha Bluetooth adapter (such as YBA-10, sold separately) with your Bluetooth™ component" on page 41. If the Bluetooth component the Bluetooth adapter, ..."YBA-10 YAMAHA" (example) appears in the Bluetooth device list. 3 Select the Bluetooth adapter in the Bluetooth device list and then enter the pass key "0000" on the power of 8 minutes is not connected to this feature to exit from...
... "BLUETOOTH" and then press 7ENTER to turn on the Bluetooth component. Choices: OFF, ON • Select "OFF" to start pairing the connected Yamaha Bluetooth adapter (such as YBA-10, sold separately) with your Bluetooth™ component" on page 41. If the Bluetooth component the Bluetooth adapter, ..."YBA-10 YAMAHA" (example) appears in the Bluetooth device list. 3 Select the Bluetooth adapter in the Bluetooth device list and then enter the pass key "0000" on the power of 8 minutes is not connected to this feature to exit from...

Owner's Manual
Page 55
... highlighted above (*1 and *2) when you press 3DTV/CBL or not. TV MUTE Mutes the audio output. *2 These buttons control your TV. DTV/CBL *2 POWER POWER STANDBY POWER TV AV A B C MUTE CD MD/CD-R TUNER DVD DTV/CBL DVR TV CH V-AUX/DOCK D E AMP TV INPUT TV MUTE TV VOL SCENE... SUR. Remote control features Remote control features In addition to controlling this unit, the remote control can control more than one TV by Yamaha and other manufacturers. To control your TV, set up the appropriate remote control code for any input source selector buttons other than 3DTV/CBL...
... highlighted above (*1 and *2) when you press 3DTV/CBL or not. TV MUTE Mutes the audio output. *2 These buttons control your TV. DTV/CBL *2 POWER POWER STANDBY POWER TV AV A B C MUTE CD MD/CD-R TUNER DVD DTV/CBL DVR TV CH V-AUX/DOCK D E AMP TV INPUT TV MUTE TV VOL SCENE... SUR. Remote control features Remote control features In addition to controlling this unit, the remote control can control more than one TV by Yamaha and other manufacturers. To control your TV, set up the appropriate remote control code for any input source selector buttons other than 3DTV/CBL...


