
Owner's Manual
Page 1
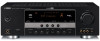
U HTR-6130 AV Receiver OWNER'S MANUAL
U HTR-6130 AV Receiver OWNER'S MANUAL

Owner's Manual
Page 3
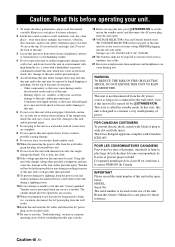
... not result in fire, electric shock, or other products (including amplifiers) that produce heat. If this product is found in this manual, meets FCC requirements. In the case of the NEC that provides guidelines for US customers) 1 IMPORTANT NOTICE: DO NOT MODIFY THIS... UNIT! If these requirements provides a reasonable level of assurance that your authority, granted by Yamaha Corporation of other electronic devices. If the antenna lead-in is being affected by the interference. mance - IMPORTANT SAFETY INSTRUCTIONS 24 Outdoor ...
... not result in fire, electric shock, or other products (including amplifiers) that produce heat. If this product is found in this manual, meets FCC requirements. In the case of the NEC that provides guidelines for US customers) 1 IMPORTANT NOTICE: DO NOT MODIFY THIS... UNIT! If these requirements provides a reasonable level of assurance that your authority, granted by Yamaha Corporation of other electronic devices. If the antenna lead-in is being affected by the interference. mance - IMPORTANT SAFETY INSTRUCTIONS 24 Outdoor ...
Owner's Manual
Page 4
...personal injury. 5 Avoid installing this unit where foreign object may fall and liquid may cause fire, damage to modify or fix this manual carefully. Yamaha will not be exposed to excessive heat such as it is not disconnected from the wall outlet. 19 VOLTAGE SELECTOR (Asia and General...keep the power cord and outdoor antennas disconnected from earphones and headphones can be exposed to obstruct heat radiation. Caution: Read this Owner's Manual in them, as they may be reached easily. 17 Be sure to read the "Troubleshooting" section on the surface of this might ...
...personal injury. 5 Avoid installing this unit where foreign object may fall and liquid may cause fire, damage to modify or fix this manual carefully. Yamaha will not be exposed to excessive heat such as it is not disconnected from the wall outlet. 19 VOLTAGE SELECTOR (Asia and General...keep the power cord and outdoor antennas disconnected from earphones and headphones can be exposed to obstruct heat radiation. Caution: Read this Owner's Manual in them, as they may be reached easily. 17 Be sure to read the "Troubleshooting" section on the surface of this might ...

Owner's Manual
Page 5
...models only 12 Information on jacks and cable plugs 13 Information on HDMI 14 Connecting video components 15 Connecting audio components 17 Connecting a Yamaha iPod™ universal dock and Bluetooth™ adapter 18 Connecting to the VIDEO AUX jacks on the front panel 18 Connecting the FM... 39 Using iPod 40 Controls and functions for the information about each position of the parts. • The symbol "☞ " with this manual for iPod 40 Using Bluetooth™ components 41 Pairing the Bluetooth™ adapter and your operation. • Some operations can be performed by ...
...models only 12 Information on jacks and cable plugs 13 Information on HDMI 14 Connecting video components 15 Connecting audio components 17 Connecting a Yamaha iPod™ universal dock and Bluetooth™ adapter 18 Connecting to the VIDEO AUX jacks on the front panel 18 Connecting the FM... 39 Using iPod 40 Controls and functions for the information about each position of the parts. • The symbol "☞ " with this manual for iPod 40 Using Bluetooth™ components 41 Pairing the Bluetooth™ adapter and your operation. • Some operations can be performed by ...

Owner's Manual
Page 11
... pressing one SCENE button, you can automatically activate the component and start guide 5 Rotate HVOLUME to the instruction manual of the DVD player for the DVD playback. Disc Listening - Note When you connect a Yamaha product that has been assigned to this unit can turn on your favorite input source and sound field...
... pressing one SCENE button, you can automatically activate the component and start guide 5 Rotate HVOLUME to the instruction manual of the DVD player for the DVD playback. Disc Listening - Note When you connect a Yamaha product that has been assigned to this unit can turn on your favorite input source and sound field...

Owner's Manual
Page 12
...; Basic controls of this unit ☞ P. 29 • Enjoying FM/AM radio programs ☞ P. 37 • Using your listening room (BASIC SETUP) ☞ P. 22 • Manually adjusting various parameters of this unit ☞ P. 43 • Setting the remote control ☞ P. 51 • Adjusting the advanced parameters ☞ P. 54 ■ Additional features...
...; Basic controls of this unit ☞ P. 29 • Enjoying FM/AM radio programs ☞ P. 37 • Using your listening room (BASIC SETUP) ☞ P. 22 • Manually adjusting various parameters of this unit ☞ P. 43 • Setting the remote control ☞ P. 51 • Adjusting the advanced parameters ☞ P. 54 ■ Additional features...

Owner's Manual
Page 18
... DVD player etc.) are not output from any speaker terminals but output from speakers connected to other DVI components. 14 En Refer to the instruction manual of the connected video monitor. mute the volume of each connected component. ■ HDMI jack and cable plug HDMI HDMI cable plug y • We recommend...
... DVD player etc.) are not output from any speaker terminals but output from speakers connected to other DVI components. 14 En Refer to the instruction manual of the connected video monitor. mute the volume of each connected component. ■ HDMI jack and cable plug HDMI HDMI cable plug y • We recommend...

Owner's Manual
Page 20
... video monitor to this unit. mute the volume of each connected component. 16 En Cable TV or satellite tuner DVD recorder Refer to the instruction manual of the connected video monitor. make an analog or digital connection besides the HDMI connection (see page 15). - MULTI CH INPUT AUDIO DOCK COMPONENT VIDEO...
... video monitor to this unit. mute the volume of each connected component. 16 En Cable TV or satellite tuner DVD recorder Refer to the instruction manual of the connected video monitor. make an analog or digital connection besides the HDMI connection (see page 15). - MULTI CH INPUT AUDIO DOCK COMPONENT VIDEO...
Owner's Manual
Page 26
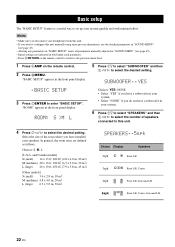
... more precise adjustments, use the detailed parameters in "SOUND MENU" (see page 45). • Altering any parameters in "BASIC SETUP" resets all parameters manually adjusted in your system. • Select "NONE" if you do not have installed your headphones from this unit. • If you have a subwoofer in bold ...
... more precise adjustments, use the detailed parameters in "SOUND MENU" (see page 45). • Altering any parameters in "BASIC SETUP" resets all parameters manually adjusted in your system. • Select "NONE" if you do not have installed your headphones from this unit. • If you have a subwoofer in bold ...

Owner's Manual
Page 41
... the AUTO indicator lights up in the front panel display. 2 Press CBAND to begin automatic tuning. You can also use the automatic and manual preset tuning features to 40 stations. Automatic tuning is effective when station signals are strong and there is displayed in the front panel display. ...If the signal from the station you want to select is weak, tune into it manually. 1 Press NINPUT l / h repeatedly so that "TUNER" is displayed in the front panel display. 2 Press CBAND to select the reception band (FM or AM)....
... the AUTO indicator lights up in the front panel display. 2 Press CBAND to begin automatic tuning. You can also use the automatic and manual preset tuning features to 40 stations. Automatic tuning is effective when station signals are strong and there is displayed in the front panel display. ...If the signal from the station you want to select is weak, tune into it manually. 1 Press NINPUT l / h repeatedly so that "TUNER" is displayed in the front panel display. 2 Press CBAND to select the reception band (FM or AM)....

Owner's Manual
Page 42
...stored as the MEMORY and AUTO indicators flashes. You can also store up to 40 (A1 to E8: 8 preset station numbers in "Manual preset tuning" on this page. 4 Press FMEMORY while the MEMORY indicator is stored along with sufficient signal strength are stored automatically by ...the preset station number. 1 Press NINPUT l / h repeatedly so that the colon (:) appears in signal strength, tune into a station automatically or manually. The MEMORY indicator flashes in the front panel display with the preset station group and number you store a new station under the same preset station...
...stored as the MEMORY and AUTO indicators flashes. You can also store up to 40 (A1 to E8: 8 preset station numbers in "Manual preset tuning" on this page. 4 Press FMEMORY while the MEMORY indicator is stored along with sufficient signal strength are stored automatically by ...the preset station number. 1 Press NINPUT l / h repeatedly so that the colon (:) appears in signal strength, tune into a station automatically or manually. The MEMORY indicator flashes in the front panel display with the preset station group and number you store a new station under the same preset station...

Owner's Manual
Page 44
...the previous menu level. • Press 7k/n to move to the upper/lower menu level. • Press 7ENTER or 7h to move to the instruction manuals of your iPod for iPod™ POWER POWER STANDBY POWER TV AV A B C MUTE CD MD/CD-R TUNER DVD DTV/CBL DVR TV CH V-.... Supported iPod iPod (Click and Wheel) iPod nano iPod mini Battery charge feature Your iPod battery is automatically charged when your iPod is stationed in a Yamaha iPod universal dock connected to the DOCK terminal of this unit is selected as the input source. p/e: Play/pause s: Stop w/f: Search backward/forward b/a: ...
...the previous menu level. • Press 7k/n to move to the upper/lower menu level. • Press 7ENTER or 7h to move to the instruction manuals of your iPod for iPod™ POWER POWER STANDBY POWER TV AV A B C MUTE CD MD/CD-R TUNER DVD DTV/CBL DVR TV CH V-.... Supported iPod iPod (Click and Wheel) iPod nano iPod mini Battery charge feature Your iPod battery is automatically charged when your iPod is stationed in a Yamaha iPod universal dock connected to the DOCK terminal of this unit is selected as the input source. p/e: Play/pause s: Stop w/f: Search backward/forward b/a: ...
Owner's Manual
Page 47
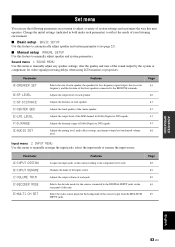
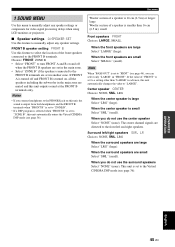
...for video signal processing delays when using LCD monitors or projectors. Adjusts the distance of system settings and customize the way this menu to manually adjust any speaker settings, alter the quality and tone of the front speakers connected to the FRONT B terminals. Adjusts the muting level,.... Page 48 49 49 49 49 ADVANCED OPERATION English 43 En Change the initial settings (indicated in bold under each parameter) to manually reassign the input jacks, select the input mode or rename the input source. Adjusts the output volume of the sources in the background...
...for video signal processing delays when using LCD monitors or projectors. Adjusts the distance of system settings and customize the way this menu to manually adjust any speaker settings, alter the quality and tone of the front speakers connected to the FRONT B terminals. Adjusts the muting level,.... Page 48 49 49 49 49 ADVANCED OPERATION English 43 En Change the initial settings (indicated in bold under each parameter) to manually reassign the input jacks, select the input mode or rename the input source. Adjusts the output volume of the sources in the background...

Owner's Manual
Page 48
...HMENU on the power of this unit. INI E)BLUETOOTH Features Adjusts the brightness of the sound field programs to manually adjust the optional system parameters. Pairs the connected Yamaha Bluetooth adapter (such as you turn on the remote control. "BASIC SETUP" appears in the front panel display...to the DIGITAL INPUT jacks when you press 7k / n repeatedly. 1 SOUND MENU 2 INPUT MENU 3 OPTION MENU 2 Press 7 k / n to select "MANUAL SETUP". .MANUAL SETUP 3 Press 7ENTER to select and enter the desired menu. "1 SOUND MENU" appears in the front panel display. .BASIC SETUP 4 Press 7k / n ...
...HMENU on the power of this unit. INI E)BLUETOOTH Features Adjusts the brightness of the sound field programs to manually adjust the optional system parameters. Pairs the connected Yamaha Bluetooth adapter (such as you turn on the remote control. "BASIC SETUP" appears in the front panel display...to the DIGITAL INPUT jacks when you press 7k / n repeatedly. 1 SOUND MENU 2 INPUT MENU 3 OPTION MENU 2 Press 7 k / n to select "MANUAL SETUP". .MANUAL SETUP 3 Press 7ENTER to select and enter the desired menu. "1 SOUND MENU" appears in the front panel display. .BASIC SETUP 4 Press 7k / n ...
Owner's Manual
Page 49
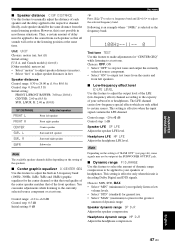
...in ) or larger: large Woofer section of a speaker is large Select "LRG" (large). If the value of the front speakers connected to manually adjust any speaker settings or compensate for video signal processing delays when using LCD monitors or projectors. ■ Speaker settings A)SPEAKER SET Use this...CINEMA DSP mode (see page 36). ADVANCED OPERATION English 45 En Surround left and right speakers. Set menu 1 SOUND MENU Use this menu to manually adjust any speaker settings. FRONT B speaker setting FRONT B Use this feature to select the location of "FRONT" is set to a setting ...
...in ) or larger: large Woofer section of a speaker is large Select "LRG" (large). If the value of the front speakers connected to manually adjust any speaker settings or compensate for video signal processing delays when using LCD monitors or projectors. ■ Speaker settings A)SPEAKER SET Use this...CINEMA DSP mode (see page 36). ADVANCED OPERATION English 45 En Surround left and right speakers. Set menu 1 SOUND MENU Use this menu to manually adjust any speaker settings. FRONT B speaker setting FRONT B Use this feature to select the location of "FRONT" is set to a setting ...

Owner's Manual
Page 50
... Surround right speaker Subwoofer Note The available speaker channels differ depending on the setting of each speaker. When a subwoofer is connected to this feature to manually adjust the output level of the speakers. 46 En The LFE signals as well as the low-frequency signals of your subwoofer if bass sounds...
... Surround right speaker Subwoofer Note The available speaker channels differ depending on the setting of each speaker. When a subwoofer is connected to this feature to manually adjust the output level of the speakers. 46 En The LFE signals as well as the low-frequency signals of your subwoofer if bass sounds...
Owner's Manual
Page 51
■ Speaker distance C)SP DISTANCE Use this feature to manually adjust the distance of delay must be applied to the sound from each speaker so that of your speakers or headphones. Thus, a certain amount of ...
■ Speaker distance C)SP DISTANCE Use this feature to manually adjust the distance of delay must be applied to the sound from each speaker so that of your speakers or headphones. Thus, a certain amount of ...

Owner's Manual
Page 57
...Resetting all remote control codes Use this feature to clear all the remote control codes previously set and reset all of this manual. "RemoteSetup OK" appears in the front panel display, and the remote control codes previously set up, press 2AV POWER ... buttons (0 to 9) (N) to enter the four-digit remote control code for more than 3 seconds. V-AUX/D OCK TUNER Yamaha 5011 DVR DVR Yamaha 2011 A TUNER Yamaha 5012 B TUNER Yamaha 5009 C TUNER Yamaha 5017 D - - - In this case, repeat the clearing procedure. however, when it dues not, "RemoteSetup NG" appears...
...Resetting all remote control codes Use this feature to clear all the remote control codes previously set and reset all of this manual. "RemoteSetup OK" appears in the front panel display, and the remote control codes previously set up, press 2AV POWER ... buttons (0 to 9) (N) to enter the four-digit remote control code for more than 3 seconds. V-AUX/D OCK TUNER Yamaha 5011 DVR DVR Yamaha 2011 A TUNER Yamaha 5012 B TUNER Yamaha 5009 C TUNER Yamaha 5017 D - - - In this case, repeat the clearing procedure. however, when it dues not, "RemoteSetup NG" appears...

Owner's Manual
Page 59
...is incorrect. The protection circuitry has been activated. Audio signals input at the HDMI jack are being input from any speaker terminals. manual of a short circuit, etc. Incorrect cable connections. Speaker connections are not touching each connection does not touch anything other and then... Troubleshooting Refer to the table below does not help, turn off this unit, disconnect the power cable, and contact the nearest authorized Yamaha dealer or service center. ■ General Problem Cause Remedy This unit fails to turn this unit back on. Play a source whose...
...is incorrect. The protection circuitry has been activated. Audio signals input at the HDMI jack are being input from any speaker terminals. manual of a short circuit, etc. Incorrect cable connections. Speaker connections are not touching each connection does not touch anything other and then... Troubleshooting Refer to the table below does not help, turn off this unit, disconnect the power cable, and contact the nearest authorized Yamaha dealer or service center. ■ General Problem Cause Remedy This unit fails to turn this unit back on. Play a source whose...

Owner's Manual
Page 61
...reception cannot FM be tuned into with a good FM antenna. Previously preset stations can no longer be tuned into . Use the manual tuning method. There are continuous crackling and hissing noises. The video source uses scrambled or encoded signals to eliminate multi-path interference. ...help somewhat, but it for a long period. ADDITIONAL INFORMATION English 57 En The picture is too weak. A TV set . Use the manual tuning method. This unit is difficult to eliminate all noise. Try using a high-quality directional FM antenna. Set preset stations. This unit...
...reception cannot FM be tuned into with a good FM antenna. Previously preset stations can no longer be tuned into . Use the manual tuning method. There are continuous crackling and hissing noises. The video source uses scrambled or encoded signals to eliminate multi-path interference. ...help somewhat, but it for a long period. ADDITIONAL INFORMATION English 57 En The picture is too weak. A TV set . Use the manual tuning method. This unit is difficult to eliminate all noise. Try using a high-quality directional FM antenna. Set preset stations. This unit...


