
Owner's Manual
Page 9
...to the "-" (black) terminals. 3 Connect each other. 4 Do not let the bare speaker wires touch any metal part of your speaker. IN MD/ OUT (PLAY) CD-R (REC) OUTPUT SUB WOOFER R FRONT A L 1 Place your speakers and subwoofer in the room and connect them to this unit. Quick start guide Be sure... to connect the left speaker Center and surround speakers Press down Insert Release Cables ...
...to the "-" (black) terminals. 3 Connect each other. 4 Do not let the bare speaker wires touch any metal part of your speaker. IN MD/ OUT (PLAY) CD-R (REC) OUTPUT SUB WOOFER R FRONT A L 1 Place your speakers and subwoofer in the room and connect them to this unit. Quick start guide Be sure... to connect the left speaker Center and surround speakers Press down Insert Release Cables ...

Owner's Manual
Page 10
... iPod/Bluetooth dock ☞ P. 18 6 En DVD player AV receiver Video input jack Video cable VIDEO MONITOR OUT jack 4 Connect the power plug of speaker combinations ☞ P. 10 • Connecting a video monitor and DVD player ☞ P. 15 Digital coaxial audio output jack Digital coaxial audio cable DVD... the video cable to the composite video output jack on your video monitor and the VIDEO MONITOR OUT jack on this unit. IN MD/ OUT (PLAY) CD-R (REC) OUTPUT SUB WOOFER R FRONT A L 3 Connect the video cable to the digital coaxial audio output jack on your DVD player...
... iPod/Bluetooth dock ☞ P. 18 6 En DVD player AV receiver Video input jack Video cable VIDEO MONITOR OUT jack 4 Connect the power plug of speaker combinations ☞ P. 10 • Connecting a video monitor and DVD player ☞ P. 15 Digital coaxial audio output jack Digital coaxial audio cable DVD... the video cable to the composite video output jack on your video monitor and the VIDEO MONITOR OUT jack on this unit. IN MD/ OUT (PLAY) CD-R (REC) OUTPUT SUB WOOFER R FRONT A L 3 Connect the video cable to the digital coaxial audio output jack on your DVD player...

Owner's Manual
Page 13
.../CBL DVR IN OUT MONITOR OUT DVD DTV/CBL AUDIO DVR CD IN OUT L DVD 1 R COAXIAL R SUBWOOFER ANTENNA SPEAKERS SURROUND CENTER FRONT B R L R L AM GND FM 75 UNBAL. IN MD/ OUT (PLAY) CD-R (REC) OUTPUT SUB WOOFER R FRONT A L Connections 7 8 9 0 Name 1 DOCK terminal 2 COMPONENT ...VIDEO jacks 3 HDMI jacks 4 VIDEO jacks 5 ANTENNA terminals 6 SPEAKERS terminals 7 DIGITAL INPUT jacks 8 MULTI CH INPUT jacks 9 AUDIO jacks 0 ...
.../CBL DVR IN OUT MONITOR OUT DVD DTV/CBL AUDIO DVR CD IN OUT L DVD 1 R COAXIAL R SUBWOOFER ANTENNA SPEAKERS SURROUND CENTER FRONT B R L R L AM GND FM 75 UNBAL. IN MD/ OUT (PLAY) CD-R (REC) OUTPUT SUB WOOFER R FRONT A L Connections 7 8 9 0 Name 1 DOCK terminal 2 COMPONENT ...VIDEO jacks 3 HDMI jacks 4 VIDEO jacks 5 ANTENNA terminals 6 SPEAKERS terminals 7 DIGITAL INPUT jacks 8 MULTI CH INPUT jacks 9 AUDIO jacks 0 ...

Owner's Manual
Page 15
...side. Connect the striped (grooved, etc.) cable to "6ΩMIN" before using this unit (see page 12). • Before connecting the speakers, make sure that this unit. Remove approximately 10 mm (3/8") of this unit cannot reproduce the input sources accurately. to the "+" (red)... terminals of insulation from the monitor. IN MD/ OUT (PLAY) CD-R (REC) OUTPUT SUB WOOFER R FRONT A L Subwoofer Right Left Front speakers (A) ■ Before connecting to the SPEAKERS terminal A speaker cord is disconnected from the AC wall outlet. • Do not let the bare...
...side. Connect the striped (grooved, etc.) cable to "6ΩMIN" before using this unit (see page 12). • Before connecting the speakers, make sure that this unit. Remove approximately 10 mm (3/8") of this unit cannot reproduce the input sources accurately. to the "+" (red)... terminals of insulation from the monitor. IN MD/ OUT (PLAY) CD-R (REC) OUTPUT SUB WOOFER R FRONT A L Subwoofer Right Left Front speakers (A) ■ Before connecting to the SPEAKERS terminal A speaker cord is disconnected from the AC wall outlet. • Do not let the bare...

Owner's Manual
Page 18
... HDMI connection (see page 16). - Connections Information on HDMI™ Audio signals input at the HDMI jack are not output from any speaker terminals but output from the connected component (such as DVD player etc.) are output to the connected video monitor only when this unit is...manual of each connected component. ■ HDMI jack and cable plug HDMI HDMI cable plug y • We recommend using HDMI connections. You can play back pictures by connecting your video monitor and video source component to connect this unit, - Furthermore, available audio/video signals depend on it. •...
... HDMI connection (see page 16). - Connections Information on HDMI™ Audio signals input at the HDMI jack are not output from any speaker terminals but output from the connected component (such as DVD player etc.) are output to the connected video monitor only when this unit is...manual of each connected component. ■ HDMI jack and cable plug HDMI HDMI cable plug y • We recommend using HDMI connections. You can play back pictures by connecting your video monitor and video source component to connect this unit, - Furthermore, available audio/video signals depend on it. •...

Owner's Manual
Page 21
... you connect your multi-format player or external decoder to the MULTI CH INPUT jacks This unit is given to accommodate for missing speakers. IN MD/ OUT (PLAY) CD-R (REC) OUTPUT SUB WOOFER O Audio out LR Audio out LR Audio out LR Audio in CD player CD recorder ... DIGITAL INPUT PB OPTICAL Y CD 3 DTV/ CBL 2 COAXIAL DVD 1 MULTI CH INPUT FRONT SURROUND CENTER L L R R SUBWOOFER Make sure that you connect a 5.1-channel speaker system before using this unit and other components are unplugged from a multi-format player, external decoder or sound processor.
... you connect your multi-format player or external decoder to the MULTI CH INPUT jacks This unit is given to accommodate for missing speakers. IN MD/ OUT (PLAY) CD-R (REC) OUTPUT SUB WOOFER O Audio out LR Audio out LR Audio out LR Audio in CD player CD recorder ... DIGITAL INPUT PB OPTICAL Y CD 3 DTV/ CBL 2 COAXIAL DVD 1 MULTI CH INPUT FRONT SURROUND CENTER L L R R SUBWOOFER Make sure that you connect a 5.1-channel speaker system before using this unit and other components are unplugged from a multi-format player, external decoder or sound processor.

Owner's Manual
Page 33
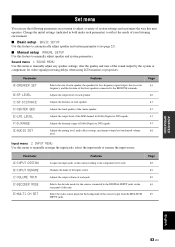
... field programs Enjoy the sources which have wide dynamic range at night Use headphones Select a decoder to play back CDs encoded in DTS. Adjust the tonal quality of the front speakers Edit parameters of the program. • When you select an input source, this unit automatically selects ...the last sound field program used with the corresponding input source. • Sound field programs cannot be exercised when you play back sources with Set this...
... field programs Enjoy the sources which have wide dynamic range at night Use headphones Select a decoder to play back CDs encoded in DTS. Adjust the tonal quality of the front speakers Edit parameters of the program. • When you select an input source, this unit automatically selects ...the last sound field program used with the corresponding input source. • Sound field programs cannot be exercised when you play back sources with Set this...
Owner's Manual
Page 39
...each parameter. Control range: 0 (center channel sound is output only from center speaker) to 7 (center channel sound is 3. Although you do not have to change the initial settings, you can also be played back on the type of the parameters to better suit the input source or ... for movie sources Dolby Pro Logic II processing for music sources Dolby Pro Logic II processing for a wraparound effect. Sound field programs y Initial settings are playing and your listening room. 1 While listening to a source, press 4AMP and then press 7k / n to select the desired parameter. 2 Press 7l...
...each parameter. Control range: 0 (center channel sound is output only from center speaker) to 7 (center channel sound is 3. Although you do not have to change the initial settings, you can also be played back on the type of the parameters to better suit the input source or ... for movie sources Dolby Pro Logic II processing for music sources Dolby Pro Logic II processing for a wraparound effect. Sound field programs y Initial settings are playing and your listening room. 1 While listening to a source, press 4AMP and then press 7k / n to select the desired parameter. 2 Press 7l...
Owner's Manual
Page 46
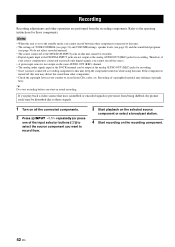
...REC) jacks for recording. Notes • When this unit. • The settings of the input selector buttons (3)) to select the source component you play back a video source that uses scrambled or encoded signals to provide only digital signals, you cannot record the source. • A given input source... 1 Turn on all the connected components. 2 Press NINPUT l / h repeatedly (or press one of TONE CONTROL (see page 31) and VOLUME settings, speaker levels (see page 32) and the sound field programs (see page 34) do not affect recorded material. • The source connected to record from CDs...
...REC) jacks for recording. Notes • When this unit. • The settings of the input selector buttons (3)) to select the source component you play back a video source that uses scrambled or encoded signals to provide only digital signals, you cannot record the source. • A given input source... 1 Turn on all the connected components. 2 Press NINPUT l / h repeatedly (or press one of TONE CONTROL (see page 31) and VOLUME settings, speaker levels (see page 32) and the sound field programs (see page 34) do not affect recorded material. • The source connected to record from CDs...
Owner's Manual
Page 47
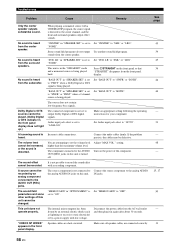
...Selects the size of each speaker, the speakers for video signal processing delays when using LCD monitors or projectors. Adjusts the distance of the front speakers connected to the FRONT B terminals. Select the video source played in the background of the center speaker. Adjusts the tonal quality of... the sources in bold under each speaker. Sound menu 1 SOUND MENU Use this menu ...
...Selects the size of each speaker, the speakers for video signal processing delays when using LCD monitors or projectors. Adjusts the distance of the front speakers connected to the FRONT B terminals. Select the video source played in the background of the center speaker. Adjusts the tonal quality of... the sources in bold under each speaker. Sound menu 1 SOUND MENU Use this menu ...

Owner's Manual
Page 59
...Secure the connections. The sound is incorrect. The sleep timer has turned off . on . The speaker impedance setting is muted. Incorrect input or output cable connections. been set. Play a source whose signals can be used have not been selected properly. Connect the cables properly. ...remote control to turn this unit and on all speaker wire connections on this unit back on the remote control to be reproduced by this unit, disconnect the power cable, and contact the nearest authorized Yamaha dealer or service center. ■ General Problem Cause...
...Secure the connections. The sound is incorrect. The sleep timer has turned off . on . The speaker impedance setting is muted. Incorrect input or output cable connections. been set. Play a source whose signals can be used have not been selected properly. Connect the cables properly. ...remote control to turn this unit and on all speaker wire connections on this unit back on the remote control to be reproduced by this unit, disconnect the power cable, and contact the nearest authorized Yamaha dealer or service center. ■ General Problem Cause...
Owner's Manual
Page 60
... appropriate setting following the operating instructions for your component. "MEM.GUARD" in "SPEAKER SET" is set to "ANALOG". Make sure all speaker cables are short-circuited. "SUR. LR" in "OPTION MENU" is being played. Dolby Digital or DTS sources cannot be increased, or the sound is heard ...BASS OUT" to "SWFR" or "BOTH". Set Audio input jack select to "SML" or "LRG". The volume level cannot be played. (Dolby Digital or DTS indicator in "SPEAKER SET" is set to "SWFR" or "FRNT" when a 2-channel source is set to the AUDIO OUT (REC) jacks. higher ...
... appropriate setting following the operating instructions for your component. "MEM.GUARD" in "SPEAKER SET" is set to "ANALOG". Make sure all speaker cables are short-circuited. "SUR. LR" in "OPTION MENU" is being played. Dolby Digital or DTS sources cannot be increased, or the sound is heard ...BASS OUT" to "SWFR" or "BOTH". Set Audio input jack select to "SML" or "LRG". The volume level cannot be played. (Dolby Digital or DTS indicator in "SPEAKER SET" is set to "SWFR" or "FRNT" when a 2-channel source is set to the AUDIO OUT (REC) jacks. higher ...
Owner's Manual
Page 64
... II is from monaural up to minimum volume reproduced by the number of this unit employs a digital signal processing system that can be played back, and the higher the number of quantized bits, the more accurate moving sound effects and directionality. The PCM system uses a technique... With an additional channel especially for bass effects, called the number of only 1 surround channel for the surround speakers, more finely the sound level can be played back is determined based on each channel to replace the analog soundtracks of existing Dolby Surround sources. The Dolby ...
... II is from monaural up to minimum volume reproduced by the number of this unit employs a digital signal processing system that can be played back, and the higher the number of quantized bits, the more accurate moving sound effects and directionality. The PCM system uses a technique... With an additional channel especially for bass effects, called the number of only 1 surround channel for the surround speakers, more finely the sound level can be played back is determined based on each channel to replace the analog soundtracks of existing Dolby Surround sources. The Dolby ...

Owner's Manual
Page 67
...15 Connecting a video monitor 15 Connecting audio components 17 Connecting speakers 11 Connecting the AM antennas 19 Connecting the FM antennas 19 Connecting the power cable 19 Connecting the Yamaha Bluetooth adapter 18 Connecting the Yamaha iPod universal dock ...........18 Connecting to the CENTER terminals 12 ...stations 39 ■F F)D.RANGE 47 FM tuning 37 FRONT 45 FRONT B 45 FRONT B speaker setting 45 Front panel display 20 Front speakers 45 ■G G)AUDIO SET 48 Game 34 Game Playing 26 ■H Hall 34 HDMI 14 HDMI jack, HDMI cable plug 14 Headphone dynamic range...
...15 Connecting a video monitor 15 Connecting audio components 17 Connecting speakers 11 Connecting the AM antennas 19 Connecting the FM antennas 19 Connecting the power cable 19 Connecting the Yamaha Bluetooth adapter 18 Connecting the Yamaha iPod universal dock ...........18 Connecting to the CENTER terminals 12 ...stations 39 ■F F)D.RANGE 47 FM tuning 37 FRONT 45 FRONT B 45 FRONT B speaker setting 45 Front panel display 20 Front speakers 45 ■G G)AUDIO SET 48 Game 34 Game Playing 26 ■H Hall 34 HDMI 14 HDMI jack, HDMI cable plug 14 Headphone dynamic range...
Owner's Manual
Page 68
...43 SP A B indicators 20 SP D.R 47 SP IMP 54 SP LFE 47 Speaker distance 47 Speaker distances 47 Speaker dynamic range 47 Speaker impedance 54 Speaker level 46 Speaker LFE 47 Speaker settings 45 SPEAKERS terminals 9 Specifications 62 START PAIRING 50 Start pairing 50 Straight mode 36 SUBWOOFER ...9632;O Option menu 44 ■P Pairing, Bluetooth control 41 PANORAMA 35 Panorama 35 Parameter initialization 50 PCM indicator 20 Placing speakers 10 Playing video sources in the background 33 Pop/Rock 34 PRESET 54 Preset SCENE templates 26 ■R Radio Listening 26 Rear ...
...43 SP A B indicators 20 SP D.R 47 SP IMP 54 SP LFE 47 Speaker distance 47 Speaker distances 47 Speaker dynamic range 47 Speaker impedance 54 Speaker level 46 Speaker LFE 47 Speaker settings 45 SPEAKERS terminals 9 Specifications 62 START PAIRING 50 Start pairing 50 Straight mode 36 SUBWOOFER ...9632;O Option menu 44 ■P Pairing, Bluetooth control 41 PANORAMA 35 Panorama 35 Parameter initialization 50 PCM indicator 20 Placing speakers 10 Playing video sources in the background 33 Pop/Rock 34 PRESET 54 Preset SCENE templates 26 ■R Radio Listening 26 Rear ...


