

Owner's Manual
Page 5
... ADVANCED OPERATION SET MENU 46 Using SET MENU 47 1 SOUND MENU 48 2 INPUT MENU 52 3 OPTION MENU 54 Remote control features 56 Using remote control on the SCENE feature........... 56 Controlling this unit, a TV, or other components 6 Step 3: Turn on the power and press SCENE 1 button 8 ... memory device or a USB portable audio player 43 Playback operation 43 Recording 45 About this manual) Front panel i Remote control ii List of remote control codes iii BASIC OPERATION Selecting the SCENE templates 28 Selecting the desired SCENE template 28 Creating your operation. • ...
... ADVANCED OPERATION SET MENU 46 Using SET MENU 47 1 SOUND MENU 48 2 INPUT MENU 52 3 OPTION MENU 54 Remote control features 56 Using remote control on the SCENE feature........... 56 Controlling this unit, a TV, or other components 6 Step 3: Turn on the power and press SCENE 1 button 8 ... memory device or a USB portable audio player 43 Playback operation 43 Recording 45 About this manual) Front panel i Remote control ii List of remote control codes iii BASIC OPERATION Selecting the SCENE templates 28 Selecting the desired SCENE template 28 Creating your operation. • ...

Owner's Manual
Page 6
...; Sleep timer ◆ Cinema and music night listening modes ◆ Remote control with the technologies developed by playing it is equipped with preset remote control codes Manufactured under license from excessive volume levels. 2 En "HDMI", ...the "HDMI" logo and "High-Definition Multimedia Interface" are registered trademarks of Dolby Laboratories. and others. Since hearing damage from loud sounds is often undetectable until it at a safe level. This unit is too late, Yamaha...
...; Sleep timer ◆ Cinema and music night listening modes ◆ Remote control with the technologies developed by playing it is equipped with preset remote control codes Manufactured under license from excessive volume levels. 2 En "HDMI", ...the "HDMI" logo and "High-Definition Multimedia Interface" are registered trademarks of Dolby Laboratories. and others. Since hearing damage from loud sounds is often undetectable until it at a safe level. This unit is too late, Yamaha...
Owner's Manual
Page 7
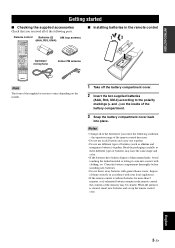
... START l PROG h ENHANCER STRAIGHT 1 2 3 4 SUR.DECODE NIGHT 5 6 DIRECT ST. 7 8 9 0 10 ENT ■ Installing batteries in the remote control 13 2 Note The form of the supplied accessories varies depending on the models. 1 Take off the battery compartment cover. 2 Insert the two supplied batteries (AAA...BAND LEVEL TITLE MENU VOLUME ENTER RETURN REC DISPLAY Optimizer microphone Indoor FM antenna FREQ/TEXT EON MODE - the operation range of the remote control decreases. • Do not use an old battery and a new one together. • Do not use different types of batteries ...
... START l PROG h ENHANCER STRAIGHT 1 2 3 4 SUR.DECODE NIGHT 5 6 DIRECT ST. 7 8 9 0 10 ENT ■ Installing batteries in the remote control 13 2 Note The form of the supplied accessories varies depending on the models. 1 Take off the battery compartment cover. 2 Insert the two supplied batteries (AAA...BAND LEVEL TITLE MENU VOLUME ENTER RETURN REC DISPLAY Optimizer microphone Indoor FM antenna FREQ/TEXT EON MODE - the operation range of the remote control decreases. • Do not use an old battery and a new one together. • Do not use different types of batteries ...

Owner's Manual
Page 12
Case A: "I want to listen to a music disc from the remote control. 3 Press FSCENE 1. y The indicator on the selected SCENE button lights up while this room..." to "6Ω MIN" before using this unit (see page 13). 4 Start ...
Case A: "I want to listen to a music disc from the remote control. 3 Press FSCENE 1. y The indicator on the selected SCENE button lights up while this room..." to "6Ω MIN" before using this unit (see page 13). 4 Start ...
Owner's Manual
Page 13
..., you can select and change the assigned SCENE template for the SCENE buttons. See pages 40 to receive infrared signals from the remote control. ■ Adjusting the parameters of this unit • Automatically optimizing the speaker parameters for your USB portable device with this unit...room (AUTO SETUP) ☞ P. 24 • Manually adjusting various parameters of this unit ☞ P. 46 • Setting the remote control ☞ P. 56 • Adjusting the advanced parameters ☞ P. 60 ■ Additional features Automatically turning off this unit ☞ P. 36 English 9 ...
..., you can select and change the assigned SCENE template for the SCENE buttons. See pages 40 to receive infrared signals from the remote control. ■ Adjusting the parameters of this unit • Automatically optimizing the speaker parameters for your USB portable device with this unit...room (AUTO SETUP) ☞ P. 24 • Manually adjusting various parameters of this unit ☞ P. 46 • Setting the remote control ☞ P. 56 • Adjusting the advanced parameters ☞ P. 60 ■ Additional features Automatically turning off this unit ☞ P. 36 English 9 ...
Owner's Manual
Page 25
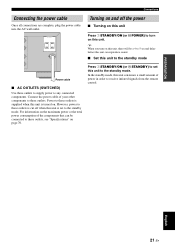
..., this unit consumes a small amount of the components that can reproduce sound. ■ Set this unit can be connected to receive infrared signals from the remote control. Connect the power cable of your other components to turn on this unit, there will be a 4 to 5-second delay before this unit to the standby...
..., this unit consumes a small amount of the components that can reproduce sound. ■ Set this unit can be connected to receive infrared signals from the remote control. Connect the power cable of your other components to turn on this unit, there will be a 4 to 5-second delay before this unit to the standby...

Owner's Manual
Page 27
places of conditions: - y To set the remote control codes for other liquids on this window at the remote control sensor on the remote control. • Do not drop the remote control. • Do not leave or store the remote control in the following types of extremely low temperatures - Aim this unit during ... temperature, such as near a heater or stove - dusty places Connections English 23 En PREPARATION ■ Using the remote control The remote control transmits a directional infrared ray. Notes • Do not spill water or other components, see page 59. Be sure to aim ...
places of conditions: - y To set the remote control codes for other liquids on this window at the remote control sensor on the remote control. • Do not drop the remote control. • Do not leave or store the remote control in the following types of extremely low temperatures - Aim this unit during ... temperature, such as near a heater or stove - dusty places Connections English 23 En PREPARATION ■ Using the remote control The remote control transmits a directional infrared ray. Notes • Do not spill water or other components, see page 59. Be sure to aim ...

Owner's Manual
Page 32
...or press DAMP and then press Gl / h) to confirm the selection. The selected SCENE template is assigned to the button. 1 Front panel or 1 Remote control Notes • If you do not carry out any operation within 30 seconds from the SCENE template library and assign the templates to the SCENE...you can select the desired SCENE templates from the last operation in the front panel display. 3 seconds 3 seconds 1 or 1 Front panel Remote control DVD Movie View 3 Press the FSCENE (or ESCENE) button again to select the desired template. The indicator on the selected SCENE button on ...
...or press DAMP and then press Gl / h) to confirm the selection. The selected SCENE template is assigned to the button. 1 Front panel or 1 Remote control Notes • If you do not carry out any operation within 30 seconds from the SCENE template library and assign the templates to the SCENE...you can select the desired SCENE templates from the last operation in the front panel display. 3 seconds 3 seconds 1 or 1 Front panel Remote control DVD Movie View 3 Press the FSCENE (or ESCENE) button again to select the desired template. The indicator on the selected SCENE button on ...

Owner's Manual
Page 35
.... • The newly created template is not assigned to any of the ESCENE button, press Gl / h repeatedly to recall the desired SCENE template on the remote control. AMP 1 3 seconds 3 Press Gk / n to select the desired parameter of the original SCENE template.
.... • The newly created template is not assigned to any of the ESCENE button, press Gl / h repeatedly to recall the desired SCENE template on the remote control. AMP 1 3 seconds 3 Press Gk / n to select the desired parameter of the original SCENE template.

Owner's Manual
Page 38
...this unit so that of the front left speaker SUR.R Surround right speaker y Once you press FLEVEL on the remote control, you can press 4A/B/C/D/E to select a speaker and then 5PRESET/TUNING l / h to select "DIRECT STEREO... and headphone adjustments are not effective. • The front panel display automatically dims. ■ Adjusting the tonal quality Press 0TONE CONTROL repeatedly to select "BASS" or "TREBLE" and then press APROGRAM l / h (or JPROGl / h) to adjust the corresponding...hi-fi sound from the subwoofer. • "TONE CONTROL" (on the remote control to adjust.
...this unit so that of the front left speaker SUR.R Surround right speaker y Once you press FLEVEL on the remote control, you can press 4A/B/C/D/E to select a speaker and then 5PRESET/TUNING l / h to select "DIRECT STEREO... and headphone adjustments are not effective. • The front panel display automatically dims. ■ Adjusting the tonal quality Press 0TONE CONTROL repeatedly to select "BASS" or "TREBLE" and then press APROGRAM l / h (or JPROGl / h) to adjust the corresponding...hi-fi sound from the subwoofer. • "TONE CONTROL" (on the remote control to adjust.

Owner's Manual
Page 39
... compression. • Select "MAX" for all sounds. • Select "OFF" if you do not want to use . 1 Press DAMP and then press QMENU on the remote control. when the DIRECT STEREO mode (see page 34) is selected as the input source. - Notes • You cannot use the night listening modes in effectiveness...
... compression. • Select "MAX" for all sounds. • Select "OFF" if you do not want to use . 1 Press DAMP and then press QMENU on the remote control. when the DIRECT STEREO mode (see page 34) is selected as the input source. - Notes • You cannot use the night listening modes in effectiveness...

Owner's Manual
Page 40
... automatically (see page 21). ■ Using your headphones Connect a pair of time. y • To cancel the sleep timer, press PSLEEP on the remote control repeatedly until "SLEEP OFF" appears in the front panel display. • You can also cancel the sleep timer setting by using "MUTE TYPE" in ... while viewing beautiful scenery from the front panel display when the audio output is muted and disappears from the video source on the remote control to automatically set the amount of time for the sleep timer. Press the input selector buttons on the video monitor. MULTI CH ...
... automatically (see page 21). ■ Using your headphones Connect a pair of time. y • To cancel the sleep timer, press PSLEEP on the remote control repeatedly until "SLEEP OFF" appears in the front panel display. • You can also cancel the sleep timer setting by using "MUTE TYPE" in ... while viewing beautiful scenery from the front panel display when the audio output is muted and disappears from the video source on the remote control to automatically set the amount of time for the sleep timer. Press the input selector buttons on the video monitor. MULTI CH ...

Owner's Manual
Page 41
... sound effects, and is suitable for jazz and fusion music. This program enhances your listening preference, not merely on the name of vocals on the remote control repeatedly. English 37 En Category Program Pop/Rock MUSIC Hall Jazz Game ENTERTAIN TV Sports MOVIE Movie Spacious Movie Dramatic STEREO 2ch Stereo 5ch Stereo...
... sound effects, and is suitable for jazz and fusion music. This program enhances your listening preference, not merely on the name of vocals on the remote control repeatedly. English 37 En Category Program Pop/Rock MUSIC Hall Jazz Game ENTERTAIN TV Sports MOVIE Movie Spacious Movie Dramatic STEREO 2ch Stereo 5ch Stereo...

Owner's Manual
Page 46
E1:FM 87.5 MHz y You can tune into any desired station simply by pressing the numeric buttons on the remote control. "E1" and the MEMORY indicator flash in the front panel display. "EDIT E1-A5" appears in the front panel display and the .../TUNING for more than 3 seconds. See "Selecting preset stations" on this page. The example below describes the procedure to exchange preset station "E1" with the remote control, press CTUNER to select "TUNER" as the input source. 1 Press 4A/B/C/D/E (or GA/B/C/D/E l / h) repeatedly to select the desired preset station group (A to E). See...
E1:FM 87.5 MHz y You can tune into any desired station simply by pressing the numeric buttons on the remote control. "E1" and the MEMORY indicator flash in the front panel display. "EDIT E1-A5" appears in the front panel display and the .../TUNING for more than 3 seconds. See "Selecting preset stations" on this page. The example below describes the procedure to exchange preset station "E1" with the remote control, press CTUNER to select "TUNER" as the input source. 1 Press 4A/B/C/D/E (or GA/B/C/D/E l / h) repeatedly to select the desired preset station group (A to E). See...

Owner's Manual
Page 48
... being played. 7 (shuffle) icon When "SHUFFLE" of the play the selected file. Using a USB memory device or a USB portable audio player 3 Press Gk / n / l / h on the remote control to select the desired file. • Press Gk / n to select the desired file/folder. • Press GENTER or G h to enter the selected folder. • Press...
... being played. 7 (shuffle) icon When "SHUFFLE" of the play the selected file. Using a USB memory device or a USB portable audio player 3 Press Gk / n / l / h on the remote control to select the desired file. • Press Gk / n to select the desired file/folder. • Press GENTER or G h to enter the selected folder. • Press...

Owner's Manual
Page 51
... MENU Use this menu to access and adjust each parameter. Locks sound field program parameters and other "SET MENU" settings. p p Using SET MENU Use the remote control to manually adjust the optional system parameters. SET MENU TOPAMENU . ;AUTO SETUP .A;MANUAL SETUP ;SIGNAL INFO [ ]/[ ]:Up/Down [ENTER]:Enter 2 Press Gk / n to the factory...
... MENU Use this menu to access and adjust each parameter. Locks sound field program parameters and other "SET MENU" settings. p p Using SET MENU Use the remote control to manually adjust the optional system parameters. SET MENU TOPAMENU . ;AUTO SETUP .A;MANUAL SETUP ;SIGNAL INFO [ ]/[ ]:Up/Down [ENTER]:Enter 2 Press Gk / n to the factory...

Owner's Manual
Page 57
...Down [p]/[[]:Select Decoder select mode Use this unit. Choices: CD, MD/CD-R, TUNER, DVD, DTV/CBL, V-AUX, DVR, USB, MULTI CH IN Control range: -6.0 to +6.0 dB Control step: 1.0 dB Initial setting: 0.0 dB p p 1 Press one of the input selector buttons (C) or AMULTI CH IN to select the input source...VOLUME TRIM DVD DVD ;;;;;;0.0dB [p]/[[]:Adjust [RETURN]:Exit ■ Decoder mode D)DECODER MODE V-AUX USB 2 Press DAMP and then press Gl / h on the remote control to place the "_" (underscore) under the space or the character you want to edit. 3 Press Gk / n to adjust the output volume of . ...
...Down [p]/[[]:Select Decoder select mode Use this unit. Choices: CD, MD/CD-R, TUNER, DVD, DTV/CBL, V-AUX, DVR, USB, MULTI CH IN Control range: -6.0 to +6.0 dB Control step: 1.0 dB Initial setting: 0.0 dB p p 1 Press one of the input selector buttons (C) or AMULTI CH IN to select the input source...VOLUME TRIM DVD DVD ;;;;;;0.0dB [p]/[[]:Adjust [RETURN]:Exit ■ Decoder mode D)DECODER MODE V-AUX USB 2 Press DAMP and then press Gl / h on the remote control to place the "_" (underscore) under the space or the character you want to edit. 3 Press Gk / n to adjust the output volume of . ...

Owner's Manual
Page 60
... VOLUME SCENE buttons ENTER RETURN REC DISPLAY FREQ/TEXT EON MODE - Using remote control on the remote control. 2 Press the desired buttons in the * area below to controlling this unit and the input source component by Yamaha and other components, you must set the appropriate remote control code for 3 seconds. Press and hold the ESCENE button and the...
... VOLUME SCENE buttons ENTER RETURN REC DISPLAY FREQ/TEXT EON MODE - Using remote control on the remote control. 2 Press the desired buttons in the * area below to controlling this unit and the input source component by Yamaha and other components, you must set the appropriate remote control code for 3 seconds. Press and hold the ESCENE button and the...

Owner's Manual
Page 61
... 1 2 3 4 SUR.DECODE NIGHT 5 6 DIRECT ST. 7 8 9 0 10 ENT Notes *1 These buttons always control this unit regardless of whether you must set to TV. Remote control Digital TV/Cable TV TV POWER Turns on page 58. Increases or decreases the volume level. For details, see page 59)....Notes *1 These buttons always control your TV, you press CDTV/CBL or not. TV VOL +/- Remote control features Controlling this unit, a TV, or other components ■ Controlling this unit Press DAMP to control this unit only when DAMP is set the appropriate remote control code for DTV/CBL (...
... 1 2 3 4 SUR.DECODE NIGHT 5 6 DIRECT ST. 7 8 9 0 10 ENT Notes *1 These buttons always control this unit regardless of whether you must set to TV. Remote control Digital TV/Cable TV TV POWER Turns on page 58. Increases or decreases the volume level. For details, see page 59)....Notes *1 These buttons always control your TV, you press CDTV/CBL or not. TV VOL +/- Remote control features Controlling this unit, a TV, or other components ■ Controlling this unit Press DAMP to control this unit only when DAMP is set the appropriate remote control code for DTV/CBL (...

Owner's Manual
Page 62
... the appropriate remote control code for DVR (see page 59). You must set the appropriate remote control code for each input selector button. Remote control features ■ Controlling other components Press one of each control button used to control other components. y The remote control has 10 ... component. START l PROG h ENHANCER STRAIGHT 1 2 3 4 SUR.DECODE NIGHT 5 6 DIRECT ST. 7 8 9 0 10 ENT 7 8 9 Remote control DVD player/ recorder VCR Digital TV/ Cable TV LD player CD player MD/CD recorder Tuner USB 1 AV POWER Power *1 Power *1 Power *2 Power ...
... the appropriate remote control code for DVR (see page 59). You must set the appropriate remote control code for each input selector button. Remote control features ■ Controlling other components Press one of each control button used to control other components. y The remote control has 10 ... component. START l PROG h ENHANCER STRAIGHT 1 2 3 4 SUR.DECODE NIGHT 5 6 DIRECT ST. 7 8 9 0 10 ENT 7 8 9 Remote control DVD player/ recorder VCR Digital TV/ Cable TV LD player CD player MD/CD recorder Tuner USB 1 AV POWER Power *1 Power *1 Power *2 Power ...


