
Owners Manual
Page 2
.... 18 VOLTAGE SELECTOR (Asia and General models only) The VOLTAGE SELECTOR on common operating errors before concluding that lets the sound come through loud and clear without affecting your equipment by lightning, disconnect the power cord from excessive volume levels. this manual...8 Do not operate this unit. This Class B digital apparatus complies with high humidity (i.e. We Want You Listening For A Lifetime YAMAHA and the Electronic Industries Association's Consumer Electronics Group want you to avoid prolonged exposure from the wall outlet during an electrical storm. 14...
.... 18 VOLTAGE SELECTOR (Asia and General models only) The VOLTAGE SELECTOR on common operating errors before concluding that lets the sound come through loud and clear without affecting your equipment by lightning, disconnect the power cord from excessive volume levels. this manual...8 Do not operate this unit. This Class B digital apparatus complies with high humidity (i.e. We Want You Listening For A Lifetime YAMAHA and the Electronic Industries Association's Consumer Electronics Group want you to avoid prolonged exposure from the wall outlet during an electrical storm. 14...

Owners Manual
Page 3
... the speaker levels during playback ......... 46 Using the test tone 46 ADDITIONAL INFORMATION EDITING SOUND FIELD PARAMETERS ..... 47 Changing parameter settings 47 Sound field parameter descriptions 48 TROUBLESHOOTING 49 Resetting the factory presets 52 GLOSSARY 53 SPECIFICATIONS 55 ...ADVANCED OPERATION ADDITIONAL INFORMATION English 1 RANGE (dynamic range 40 SOUND 5 CENTER GEQ (center graphic equalizer 41 SOUND 6 HP TONE CTRL (headphone tone control 41 INPUT 1 I/O ASSIGN (input/output assignment) .. 41 INPUT 2...
... the speaker levels during playback ......... 46 Using the test tone 46 ADDITIONAL INFORMATION EDITING SOUND FIELD PARAMETERS ..... 47 Changing parameter settings 47 Sound field parameter descriptions 48 TROUBLESHOOTING 49 Resetting the factory presets 52 GLOSSARY 53 SPECIFICATIONS 55 ...ADVANCED OPERATION ADDITIONAL INFORMATION English 1 RANGE (dynamic range 40 SOUND 5 CENTER GEQ (center graphic equalizer 41 SOUND 6 HP TONE CTRL (headphone tone control 41 INPUT 1 I/O ASSIGN (input/output assignment) .. 41 INPUT 2...

Owners Manual
Page 4
..."Dolby", "Pro Logic", and the double-D symbol are subject to production. "DTS" and "DTS Digital Surround" are registered trademarks of YAMAHA CORPORATION. 2 Built-in operativity ability, and others. In this manual • y indicates a tip for your operation. • Some ... 100 W Center: 100 W Surround: 100 W + 100 W [Other models] Front: 90 W + 90 W Center: 90 W Surround: 90 W + 90 W FEATURES Sound field features N Dolby Pro Logic/Dolby Pro Logic II decoder N Dolby Digital/Dolby Digital + Matrix 6.1 Decoder N DTS/DTS + Matrix 6.1 Decoder N CINEMA DSP: Combination of ...
..."Dolby", "Pro Logic", and the double-D symbol are subject to production. "DTS" and "DTS Digital Surround" are registered trademarks of YAMAHA CORPORATION. 2 Built-in operativity ability, and others. In this manual • y indicates a tip for your operation. • Some ... 100 W Center: 100 W Surround: 100 W + 100 W [Other models] Front: 90 W + 90 W Center: 90 W Surround: 90 W + 90 W FEATURES Sound field features N Dolby Pro Logic/Dolby Pro Logic II decoder N Dolby Digital/Dolby Digital + Matrix 6.1 Decoder N DTS/DTS + Matrix 6.1 Decoder N CINEMA DSP: Combination of ...

Owners Manual
Page 6
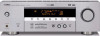
... o RDS MODE/FREQ EON PTY SEEK MODE START 1 STANDBY/ON Turns on this unit or sets it to 5-second delay before this unit can reproduce sound. Note In standby mode, this unit consumes a small amount of power in order to receive infrared-signals from the remote control. 2 PRESET/TUNING Switches the...
... o RDS MODE/FREQ EON PTY SEEK MODE START 1 STANDBY/ON Turns on this unit or sets it to 5-second delay before this unit can reproduce sound. Note In standby mode, this unit consumes a small amount of power in order to receive infrared-signals from the remote control. 2 PRESET/TUNING Switches the...

Owners Manual
Page 7
...for the types of input signals (AUTO, DTS, ANALOG) received when one of input jacks. o 6CH INPUT Selects the audio source connected to select sound field programs. y BASS/TREBLE -/+ Increase or decrease low/high-frequency response when the unit is in Bass/Treble control mode. English 5 When you to... to cycle the display mode among PS mode, PTY mode, RT mode, CT mode (if the station offers those 2-channel signals without effect sounds to set the unit in turn off the speakers, press the button repeatedly and select OFF. INTRODUCTION 0 VOLUME Controls the output level of front...
...for the types of input signals (AUTO, DTS, ANALOG) received when one of input jacks. o 6CH INPUT Selects the audio source connected to select sound field programs. y BASS/TREBLE -/+ Increase or decrease low/high-frequency response when the unit is in Bass/Treble control mode. English 5 When you to... to cycle the display mode among PS mode, PTY mode, RT mode, CT mode (if the station offers those 2-channel signals without effect sounds to set the unit in turn off the speakers, press the button repeatedly and select OFF. INTRODUCTION 0 VOLUME Controls the output level of front...

Owners Manual
Page 8
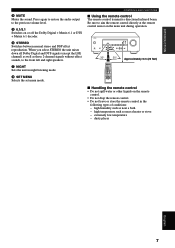
... - Aim this emitter at the component you want to operate. 2 Input selector buttons Select the input source and change the control area. 3 Sound field program/Numeric buttons Use to select sound field programs or input numbers. 4 LEVEL Selects the effect speaker channel to adjust. 5 Cursor buttons u / d / j / i / ...SELECT Use to select and adjust sound field program parameters or SET MENU items. 6 TEST Outputs the test tone to the 6CH INPUT jacks. CONTROLS AND FUNCTIONS Remote control This section describes...
... - Aim this emitter at the component you want to operate. 2 Input selector buttons Select the input source and change the control area. 3 Sound field program/Numeric buttons Use to select sound field programs or input numbers. 4 LEVEL Selects the effect speaker channel to adjust. 5 Cursor buttons u / d / j / i / ...SELECT Use to select and adjust sound field program parameters or SET MENU items. 6 TEST Outputs the test tone to the 6CH INPUT jacks. CONTROLS AND FUNCTIONS Remote control This section describes...
Owners Manual
Page 9
... control transmits a directional infrared beam. high humidity such as near a heater or stove - dusty places English 7 INTRODUCTION r MUTE Mutes the sound. high temperature such as those 2-channel signals without effect sounds, to the previous volume level. STANDBY /ON PHONES SILENT CINEMA SPEAKERS A/B/OFF PRESET/TUNING EDIT STEREO EFFECT CONTROL FM/AM A/B/C/D/E NEXT...
... control transmits a directional infrared beam. high humidity such as near a heater or stove - dusty places English 7 INTRODUCTION r MUTE Mutes the sound. high temperature such as those 2-channel signals without effect sounds, to the previous volume level. STANDBY /ON PHONES SILENT CINEMA SPEAKERS A/B/OFF PRESET/TUNING EDIT STEREO EFFECT CONTROL FM/AM A/B/C/D/E NEXT...

Owners Manual
Page 10
... indicators When any of speakers are connected to the headphone jack. 4 Input source indicator Highlights the current input source with a cursor. 5 Sound field indicator Light to a radio station. o MEMORY indicator Flashes to night listening mode. p LFE indicator Lights up when the unit is ...that this unit's decoders function, the respective indicator lights up. 2 SILENT CINEMA indicator Lights up when headphones are connected and a sound field program is reproducing PCM (pulse code modulation) digital audio signals. 0 VIRTUAL indicator Lights up when both sets of this unit...
... indicators When any of speakers are connected to the headphone jack. 4 Input source indicator Highlights the current input source with a cursor. 5 Sound field indicator Light to a radio station. o MEMORY indicator Flashes to night listening mode. p LFE indicator Lights up when the unit is ...that this unit's decoders function, the respective indicator lights up. 2 SILENT CINEMA indicator Lights up when headphones are connected and a sound field program is reproducing PCM (pulse code modulation) digital audio signals. 0 VIRTUAL indicator Lights up when both sets of this unit...

Owners Manual
Page 11
.... You can use the digital jacks to input PCM, Dolby Digital and DTS bitstreams. Use digital connections if you wish to enjoy the multi-channel sound track of digital signals through either a coaxial or fiber optic cable. Note • The OPTICAL jack on the input selector. PREPARATION CONNECTIONS Before connecting components...
.... You can use the digital jacks to input PCM, Dolby Digital and DTS bitstreams. Use digital connections if you wish to enjoy the multi-channel sound track of digital signals through either a coaxial or fiber optic cable. Note • The OPTICAL jack on the input selector. PREPARATION CONNECTIONS Before connecting components...

Owners Manual
Page 12
... AUDIO OUT jacks on this unit. Connect the audio signal output jacks on the component to the AUDIO jacks on this unit may distort the sound from other components. I Connecting a recording component Connect the audio signal input jacks on your component to the VIDEO jack on this unit. FM ANT SUB...
... AUDIO OUT jacks on this unit. Connect the audio signal output jacks on the component to the AUDIO jacks on this unit may distort the sound from other components. I Connecting a recording component Connect the audio signal input jacks on your component to the VIDEO jack on this unit. FM ANT SUB...

Owners Manual
Page 13
... you have connected a recording component to this unit, keep its power turned on this unit. Connect the output jacks on this unit may distort the sound from other components. PREPARATION Connecting audio components I Connecting a CD recorder or MD recorder Connect the input jacks on your recording component. I Connecting a CD player Connect...
... you have connected a recording component to this unit, keep its power turned on this unit. Connect the output jacks on this unit may distort the sound from other components. PREPARATION Connecting audio components I Connecting a CD recorder or MD recorder Connect the input jacks on your recording component. I Connecting a CD player Connect...

Owners Manual
Page 15
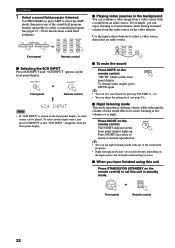
...-channel input from a component equipped with a multi-channel decoder and 6 channel output jacks such as the input source, this unit automatically turns off the digital sound field processor, and you select 6CH INPUT as a DVD/Super Audio CD player. 6CH INPUT FRONT AUDIO R L VIDEO DVD DIGITAL INPUT CD 3 SURROUND SUB WOOFER... ANT GND 75Ω UNBAL. CONNECTIONS English 13 LR LR CENTER SURROUND SUBWOOFER FRONT DVD/Super Audio CD player Notes • When you cannot select sound field programs. • When headphones are used, only front L/R channels are output.
...-channel input from a component equipped with a multi-channel decoder and 6 channel output jacks such as the input source, this unit automatically turns off the digital sound field processor, and you select 6CH INPUT as a DVD/Super Audio CD player. 6CH INPUT FRONT AUDIO R L VIDEO DVD DIGITAL INPUT CD 3 SURROUND SUB WOOFER... ANT GND 75Ω UNBAL. CONNECTIONS English 13 LR LR CENTER SURROUND SUBWOOFER FRONT DVD/Super Audio CD player Notes • When you cannot select sound field programs. • When headphones are used, only front L/R channels are output.

Owners Manual
Page 16
.... If for some reason it is not practical to use it to the monitor as possible, such as the YAMAHA Active Servo Processing Subwoofer System, is for effect and surround sounds. Best results, however, are not highly directional. Center speaker (C) The center speaker is effective not only for ...reinforcing bass frequencies from any or all channels, but also for the main source sound plus effect sounds. The speaker layout above the floor. 14 Align the front face of the center speaker with the full system. Place the speaker ...
.... If for some reason it is not practical to use it to the monitor as possible, such as the YAMAHA Active Servo Processing Subwoofer System, is for effect and surround sounds. Best results, however, are not highly directional. Center speaker (C) The center speaker is effective not only for ...reinforcing bass frequencies from any or all channels, but also for the main source sound plus effect sounds. The speaker layout above the floor. 14 Align the front face of the center speaker with the full system. Place the speaker ...

Owners Manual
Page 17
... "+" (red) terminals on the rear panel of this unit. • Before connecting the speakers, make sure that the power of this unit is incorrect, the sound will be unnatural and lack bass. This could damage this unit and your speaker. CAUTION • Use speakers with a stripe, groove or ridges. One cable.... 4 Insert one bare wire into the hole in the side of insulated cables running side by side. English 15 If the connections are faulty, no sound will be heard from the monitor.
... "+" (red) terminals on the rear panel of this unit. • Before connecting the speakers, make sure that the power of this unit is incorrect, the sound will be unnatural and lack bass. This could damage this unit and your speaker. CAUTION • Use speakers with a stripe, groove or ridges. One cable.... 4 Insert one bare wire into the hole in the side of insulated cables running side by side. English 15 If the connections are faulty, no sound will be heard from the monitor.

Owners Manual
Page 18
... direct low bass signals distributed from the front, center and/or surround channels to this jack in accordance with built-in amplifier, including the YAMAHA Active Servo Processing Subwoofer System, connect the input jack of the subwoofer system to this unit's remote control (see "SETTING THE SPEAKER LEVELS"... on the subwoofer to either of "SOUND 1 SPEAKER SET" item "1D BASS" on the set menu to FRONT. • Use the control on page 46). 16 The LFE (lowfrequency effect...
... direct low bass signals distributed from the front, center and/or surround channels to this jack in accordance with built-in amplifier, including the YAMAHA Active Servo Processing Subwoofer System, connect the input jack of the subwoofer system to this unit's remote control (see "SETTING THE SPEAKER LEVELS"... on the subwoofer to either of "SOUND 1 SPEAKER SET" item "1D BASS" on the set menu to FRONT. • Use the control on page 46). 16 The LFE (lowfrequency effect...

Owners Manual
Page 19
... (Asia and General models) I VOLTAGE SELECTOR (Asia and General models only) The VOLTAGE SELECTOR on the rear panel of the volume, and then the current sound field program name appear on the power of this unit.
... (Asia and General models) I VOLTAGE SELECTOR (Asia and General models only) The VOLTAGE SELECTOR on the rear panel of the volume, and then the current sound field program name appear on the power of this unit.
Owners Manual
Page 20
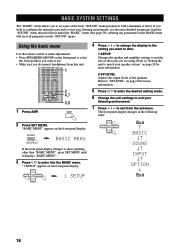
...MENU". 3 Press j / i to suit the size of effort. "1 SETUP" appears on page 20 for more detailed parameters from the "SOUND" menu instead of the speakers. Refer to "Setting the unit to match your listening environment, use . • Make sure you disconnect headphones .... 2 SP LEVEL Adjusts the output levels of those under the "BASIC" menu (See page 38). SELECT + PRESET/CH Exit ↑ BASIC ↓↑ SOUND ↓↑ INPUT ↓↑ OPTION ↓ Exit PRESET/CH 18 MUTE INPUT MUTE HALL 1 JAZZ 2 ROCK ENTERTAINMENT 3 4 MUSIC TV THTR MOVIE1 MOVIE2...
...MENU". 3 Press j / i to suit the size of effort. "1 SETUP" appears on page 20 for more detailed parameters from the "SOUND" menu instead of the speakers. Refer to "Setting the unit to match your listening environment, use . • Make sure you disconnect headphones .... 2 SP LEVEL Adjusts the output levels of those under the "BASIC" menu (See page 38). SELECT + PRESET/CH Exit ↑ BASIC ↓↑ SOUND ↓↑ INPUT ↓↑ OPTION ↓ Exit PRESET/CH 18 MUTE INPUT MUTE HALL 1 JAZZ 2 ROCK ENTERTAINMENT 3 4 MUSIC TV THTR MOVIE1 MOVIE2...

Owners Manual
Page 21
Use d to move to adjust the balance between the front left speaker. English 19 PREPARATION I Basic menu operation sequence SET MENU BASIC SOUND INPUT OPTION BASIC SYSTEM SETTINGS 1 SETUP Press j / i to the next setting. 1 ROOM Choose from S/M/L. 2 SUBWOOFER Choose either of YES/NONE. 3 SPEAKERS Choose from 2/3/4/5 spk. SET ...; After altering the "1 SETUP" parameters, readjust the output levels of the speakers at "2 SP LEVEL". • See pages 37 - 42 for a detailed explanation of the "SOUND", "INPUT" and "OPTION" menus.
Use d to move to adjust the balance between the front left speaker. English 19 PREPARATION I Basic menu operation sequence SET MENU BASIC SOUND INPUT OPTION BASIC SYSTEM SETTINGS 1 SETUP Press j / i to the next setting. 1 ROOM Choose from S/M/L. 2 SUBWOOFER Choose either of YES/NONE. 3 SPEAKERS Choose from 2/3/4/5 spk. SET ...; After altering the "1 SETUP" parameters, readjust the output levels of the speakers at "2 SP LEVEL". • See pages 37 - 42 for a detailed explanation of the "SOUND", "INPUT" and "OPTION" menus.

Owners Manual
Page 23
...7 8 /DTS 9 NIGHT 0 6.1/5.1 +10 STEREO ENTER EVE SET MENU 1 7 6 7 1 Press STANDBY/ON (SYSTEM POWER on the recording component. These controls only effect the sound from other components, try turning on the remote control) to select the input you desire. STANDBY /ON SYSTEM POWER or VCR V-AUX DTV/CBL DVD..., use . English 21 CONTROL BASS/TREBLE Front panel Notes • If you increase or decrease the high-frequency or the lowfrequency sound to an extreme level, the tonal quality from the center and surround speakers may not match that of the input selector buttons on ...
...7 8 /DTS 9 NIGHT 0 6.1/5.1 +10 STEREO ENTER EVE SET MENU 1 7 6 7 1 Press STANDBY/ON (SYSTEM POWER on the recording component. These controls only effect the sound from other components, try turning on the remote control) to select the input you desire. STANDBY /ON SYSTEM POWER or VCR V-AUX DTV/CBL DVD..., use . English 21 CONTROL BASS/TREBLE Front panel Notes • If you increase or decrease the high-frequency or the lowfrequency sound to an extreme level, the tonal quality from the center and surround speakers may not match that of the input selector buttons on ...
Owners Manual
Page 24
... once more to return to select a video source, then select an audio source. For example, you use. PLAYBACK 7 Select a sound field program if desired. I To mute the sound Press MUTE on the remote control) to classical music while having beautiful scenery from the video source on the video monitor. To... input source, first press 6CH INPUT so that "6CH INPUT" disappears from an audio source. Use PROGRAM (or press AMP to select a sound field program. CD MD/CD-R TUNER SLEEP DVD D-TV/CBL VCR V-AUX I Playing video sources in the front panel display lights up.
... once more to return to select a video source, then select an audio source. For example, you use. PLAYBACK 7 Select a sound field program if desired. I To mute the sound Press MUTE on the remote control) to classical music while having beautiful scenery from the video source on the video monitor. To... input source, first press 6CH INPUT so that "6CH INPUT" disappears from an audio source. Use PROGRAM (or press AMP to select a sound field program. CD MD/CD-R TUNER SLEEP DVD D-TV/CBL VCR V-AUX I Playing video sources in the front panel display lights up.


