

HTR-3066 Owners Manual
Page 1
AV Receiver Owner's Manual English Read the supplied booklet "Safety Brochure" before using the unit.
AV Receiver Owner's Manual English Read the supplied booklet "Safety Brochure" before using the unit.
HTR-3066 Owners Manual
Page 4
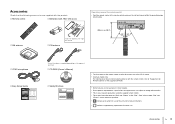
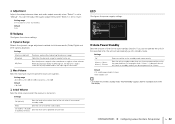
...YPAO microphone … Easy Setup Guide *One of the above is supplied depending on the region of purchase. … CD-ROM (Owner's Manual) … Safety Brochure • The illustrations of the remote control used in certain regions. • Due to product improvements, specifications and ... feature limitations. • indicates supplementary explanations for Remote Control" on the supplied CD-ROM. • Some features are not available in this manual are supplied with the product. … Remote control … Batteries (AAA, R03, UM-4) (x2) Operating range of the remote control ...
...YPAO microphone … Easy Setup Guide *One of the above is supplied depending on the region of purchase. … CD-ROM (Owner's Manual) … Safety Brochure • The illustrations of the remote control used in certain regions. • Due to product improvements, specifications and ... feature limitations. • indicates supplementary explanations for Remote Control" on the supplied CD-ROM. • Some features are not available in this manual are supplied with the product. … Remote control … Batteries (AAA, R03, UM-4) (x2) Operating range of the remote control ...
HTR-3066 Owners Manual
Page 18
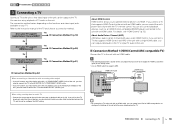
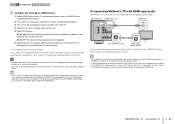
...'s power and volume with an HDMI cable. For details, see "HDMI Control" (p.75). About Audio Return Channel (ARC) ARC allows audio signals to the instruction manual of the TV and choose a connection method. If you connect a TV that supports HDMI Control and ARC to the unit with a single HDMI cable, you...
...'s power and volume with an HDMI cable. For details, see "HDMI Control" (p.75). About Audio Return Channel (ARC) ARC allows audio signals to the instruction manual of the TV and choose a connection method. If you connect a TV that supports HDMI Control and ARC to the unit with a single HDMI cable, you...
HTR-3066 Owners Manual
Page 19
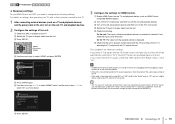
... the settings of the unit. c Press SETUP. Setup Speaker HDMI Sound ECO Function Language Configuration e Press ENTER again. If not, select the input source manually. a Check that ARC is displayed. b Switch the TV input to display video from the unit. c Turn on the unit and playback devices and then... turn on settings and operating your TV, refer to the instruction manual for HDMI Control. It may solve the problem. • If the unit is not synchronized to the TV's power operations, check the priority...
... the settings of the unit. c Press SETUP. Setup Speaker HDMI Sound ECO Function Language Configuration e Press ENTER again. If not, select the input source manually. a Check that ARC is displayed. b Switch the TV input to display video from the unit. c Turn on the unit and playback devices and then... turn on settings and operating your TV, refer to the instruction manual for HDMI Control. It may solve the problem. • If the unit is not synchronized to the TV's power operations, check the priority...
HTR-3066 Owners Manual
Page 20
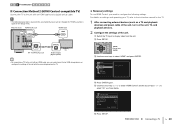
... cable and a digital optical cable. • The following settings. SETUP OPTION ENTER RETURN VOLUME SETUP Cursor keys ENTER c Use the cursor keys to the instruction manual for the TV. 1 After connecting external devices (such as shown below. For details on settings and operating your iPod or USB storage device, or configure...
... cable and a digital optical cable. • The following settings. SETUP OPTION ENTER RETURN VOLUME SETUP Cursor keys ENTER c Use the cursor keys to the instruction manual for the TV. 1 After connecting external devices (such as shown below. For details on settings and operating your iPod or USB storage device, or configure...
HTR-3066 Owners Manual
Page 21
...'s main power and then turn on the TV and playback devices (such as TV audio input at the factory. If not, select the input source manually. e Check the following. f Check that the unit is properly synchronized with the TV by turning off the unit and playback devices. PREPARATIONS ➤ Connecting a TV...
...'s main power and then turn on the TV and playback devices (such as TV audio input at the factory. If not, select the input source manually. e Check the following. f Check that the unit is properly synchronized with the TV by turning off the unit and playback devices. PREPARATIONS ➤ Connecting a TV...

HTR-3066 Owners Manual
Page 33
... or TONE CONTROL on the selected input source. INFO 2 Use the input selection keys to each input source group. Press MUTE again to the instruction manual for the displayed item appears. VOL. PLAYBACK ➤ Basic playback procedure En 33
... or TONE CONTROL on the selected input source. INFO 2 Use the input selection keys to each input source group. Press MUTE again to the instruction manual for the displayed item appears. VOL. PLAYBACK ➤ Basic playback procedure En 33

HTR-3066 Owners Manual
Page 41
VOL. Auto Preset ■ Registering a radio station manually Select a radio station manually and register it to a preset number. 1 Follow "Selecting a frequency for reception" (p.40) to tune into the desired radio station, press PRESET to the preset number "... during Auto Preset VOL. 01:FM 87.50MHz Preset number from which to 40 stations). • To register AM radio stations, follow "Registering a radio station manually". • (U.K. VOL.
VOL. Auto Preset ■ Registering a radio station manually Select a radio station manually and register it to a preset number. 1 Follow "Selecting a frequency for reception" (p.40) to tune into the desired radio station, press PRESET to the preset number "... during Auto Preset VOL. 01:FM 87.50MHz Preset number from which to 40 stations). • To register AM radio stations, follow "Registering a radio station manually". • (U.K. VOL.

HTR-3066 Owners Manual
Page 45
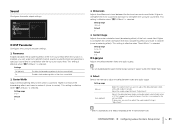
... the previous screen, press RETURN. • To switch the display to the browse screen during playback, press the cursor key (e). • To operate the iPod manually to select content or control playback, switch to the playback screen. Moves to the simple play mode (p.46). ■ Browse screen 1 2 iPod Music Playlists Artists...
... the previous screen, press RETURN. • To switch the display to the browse screen during playback, press the cursor key (e). • To operate the iPod manually to select content or control playback, switch to the playback screen. Moves to the simple play mode (p.46). ■ Browse screen 1 2 iPod Music Playlists Artists...

HTR-3066 Owners Manual
Page 48
... not in use. • You cannot connect the PC to the USB jack of USB storage device contents Follow the procedure below to the instruction manuals for the USB storage device for characters not supported by the unit. 1 Press USB to the unit via HDMI. USB Top Blues Classical Electronica Jazz...
... not in use. • You cannot connect the PC to the USB jack of USB storage device contents Follow the procedure below to the instruction manuals for the USB storage device for characters not supported by the unit. 1 Press USB to the unit via HDMI. USB Top Blues Classical Electronica Jazz...
HTR-3066 Owners Manual
Page 55
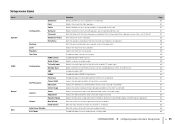
... the front sound field. Selects a device to prevent excessive loudness. Enables/disables SCENE link playback. Adjusts the difference in level between video and audio output manually. Page 57 57 57 57 57 58 58 58 58 58 59 59 59 60 60 60 60 61 61 61 61 61 62 62...
... the front sound field. Selects a device to prevent excessive loudness. Enables/disables SCENE link playback. Adjusts the difference in level between video and audio output manually. Page 57 57 57 57 57 58 58 58 58 58 59 59 59 60 60 60 60 61 61 61 61 61 62 62...

HTR-3066 Owners Manual
Page 57
... from other channels. Settings Small (default) Large None Select this option when no center speaker is connected and its size. Speaker Configures the speaker settings manually.
... from other channels. Settings Small (default) Large None Select this option when no center speaker is connected and its size. Speaker Configures the speaker settings manually.
HTR-3066 Owners Manual
Page 58
... Selects the type of the front speakers, either the subwoofer or front speakers produce the front channel low-frequency components. For details, see "Manual equalizer adjustment". Does not use the equalizer. • "PEQ" is lacking or unclear, switch the subwoofer phase. Settings Off (default) On... the speakers reach the listening position at the same time. When the bass sound is available only when the YPAO has been performed (p.29). ■ Manual equalizer adjustment 1 Set "EQ Select" to "GEQ". 2 Use the cursor keys (q/w) to select "Channel" and the cursor keys (e/r) to 80.0 ft), ...
... Selects the type of the front speakers, either the subwoofer or front speakers produce the front channel low-frequency components. For details, see "Manual equalizer adjustment". Does not use the equalizer. • "PEQ" is lacking or unclear, switch the subwoofer phase. Settings Off (default) On... the speakers reach the listening position at the same time. When the bass sound is available only when the YPAO has been performed (p.29). ■ Manual equalizer adjustment 1 Set "EQ Select" to "GEQ". 2 Use the cursor keys (q/w) to select "Channel" and the cursor keys (e/r) to 80.0 ft), ...
HTR-3066 Owners Manual
Page 61
...and lower to reduce it (closer to 7 Default 3 ❑ Dimension Adjusts the difference in level between video and audio output manually. Setting range 0 to center). Settings Off (default) On Disables the broadening effect of the center sound field. Enables the broadening effect ... sound field and lower to weaken (more broadening effect). CONFIGURATIONS ➤ Configuring various functions (Setup menu) En 61 Setting range Manual Auto (default) Select this function is enabled, you can fine-adjust the audio output timing in combination with the surround sound field...
...and lower to reduce it (closer to 7 Default 3 ❑ Dimension Adjusts the difference in level between video and audio output manually. Setting range 0 to center). Settings Off (default) On Disables the broadening effect of the center sound field. Enables the broadening effect ... sound field and lower to weaken (more broadening effect). CONFIGURATIONS ➤ Configuring various functions (Setup menu) En 61 Setting range Manual Auto (default) Select this function is enabled, you can fine-adjust the audio output timing in combination with the surround sound field...
HTR-3066 Owners Manual
Page 62
...; Volume Configures the volume settings. ❑ Dynamic Range Selects the dynamic range adjustment method for the specified time, the unit will switch to "Manual". ECO Configures the power supply settings. and Europe models: 8 hours Other models: Off • Just before the unit enters standby mode, ..."AutoPowerStdby" appears and then countdown starts in the front display. ❑ Adjustment Adjusts the delay between video and audio output manually when "Select" is set the unit to standby mode automatically. If you do not operate it last entered standby mode. Sets ...
...; Volume Configures the volume settings. ❑ Dynamic Range Selects the dynamic range adjustment method for the specified time, the unit will switch to "Manual". ECO Configures the power supply settings. and Europe models: 8 hours Other models: Off • Just before the unit enters standby mode, ..."AutoPowerStdby" appears and then countdown starts in the front display. ❑ Adjustment Adjusts the delay between video and audio output manually when "Select" is set the unit to standby mode automatically. If you do not operate it last entered standby mode. Sets ...
HTR-3066 Owners Manual
Page 67
... Rename" (p.63) in the "Option" menu (p.52). We recommend using multiple Yamaha products, the remote control may work on how HDMI Control works between input sources... If you want to adjust the speaker settings manually, use "Initial Volume" in the "Setup" menu to fix the volume, use... "Speaker" in the "Setup" menu (p.64). I am occasionally startled by utilizing "Memory Guard" in the "Setup" menu (p.57). For information on another Yamaha product or another Yamaha product as well as...
... Rename" (p.63) in the "Option" menu (p.52). We recommend using multiple Yamaha products, the remote control may work on how HDMI Control works between input sources... If you want to adjust the speaker settings manually, use "Initial Volume" in the "Setup" menu to fix the volume, use... "Speaker" in the "Setup" menu (p.64). I am occasionally startled by utilizing "Memory Guard" in the "Setup" menu (p.57). For information on another Yamaha product or another Yamaha product as well as...

HTR-3066 Owners Manual
Page 69
.... Audio Problem Cause Remedy Another input source is coming from the subwoofer. No sound is selected. Perform YPAO (p.29) or set "Amp" to the instruction manuals for the channel. Change the audio output setting on your TV so that does not support ARC is connected to make an audio connection (p.20).
.... Audio Problem Cause Remedy Another input source is coming from the subwoofer. No sound is selected. Perform YPAO (p.29) or set "Amp" to the instruction manuals for the channel. Change the audio output setting on your TV so that does not support ARC is connected to make an audio connection (p.20).

HTR-3066 Owners Manual
Page 70
...supported by the TV, refer to display the video from the unit is not supported by the unit. Switch the TV input to the instruction manuals for the TV and check the TV's specifications. The unit is not supported by the TV. Turn on the playback device. The input video... signal (resolution) is too close to the instruction manuals for the TV. To check the information about the current video signal (resolution), use an HDMI cable to connect them (p.18 to output 2-channel audio...
...supported by the TV, refer to display the video from the unit is not supported by the unit. Switch the TV input to the instruction manuals for the TV and check the TV's specifications. The unit is not supported by the TV. Turn on the playback device. The input video... signal (resolution) is too close to the instruction manuals for the TV. To check the information about the current video signal (resolution), use an HDMI cable to connect them (p.18 to output 2-channel audio...

HTR-3066 Owners Manual
Page 71
... jack together with FAT 16 or FAT 32 format, except USB HDDs. We recommend using a sensitive multi-element antenna. Select the station manually (p.40). Use an outdoor AM antenna. The unit supports folder hierarchies of the USB device is too far from the FM station transmitter. ... be reduced by fluorescent lamps, motors, thermostats, or other electrical equipment. Press MODE to 65,000 files per level. Select the station manually (p.40). Cause There is weak or noisy. Folders and files in a different location. We recommend using a sensitive multi-element antenna. Register ...
... jack together with FAT 16 or FAT 32 format, except USB HDDs. We recommend using a sensitive multi-element antenna. Select the station manually (p.40). Use an outdoor AM antenna. The unit supports folder hierarchies of the USB device is too far from the FM station transmitter. ... be reduced by fluorescent lamps, motors, thermostats, or other electrical equipment. Press MODE to 65,000 files per level. Select the station manually (p.40). Cause There is weak or noisy. Folders and files in a different location. We recommend using a sensitive multi-element antenna. Register ...

HTR-3066 Owners Manual
Page 76
...; The unit is not synchronized to the TV's power operations, check the priority of connected devices exceeds the limit. For details, refer to the instruction manual for the playback device. To enable HDMI Control on the unit, set the input source device appropriately so that HDMI Control works more effectively. For... each device. • To decode audio bitstream signals on the playback device). If not, select the input source manually. It may not work properly, try unplugging the TV in Step 2 and plugging in the TV again in Step 3. APPENDIX ➤ Information on the TV. &#...
...; The unit is not synchronized to the TV's power operations, check the priority of connected devices exceeds the limit. For details, refer to the instruction manual for the playback device. To enable HDMI Control on the unit, set the input source device appropriately so that HDMI Control works more effectively. For... each device. • To decode audio bitstream signals on the playback device). If not, select the input source manually. It may not work properly, try unplugging the TV in Step 2 and plugging in the TV again in Step 3. APPENDIX ➤ Information on the TV. &#...


