Owners Manual
Page 2
... 33 Playing back tunes from Bluetooth™ components....... 35 Connecting a Yamaha Bluetooth wireless audio receiver 35 Pairing Bluetooth™ components 35 Using Bluetooth™ components 36 SETUP Configuring the settings specific for each input source (Option menu 37 Option menu display and setup...Displaying/Setting the Advanced Setup menu 53 Setting the impedance of speakers 53 Avoiding crossing remote control signals when using multiple Yamaha receivers 54 Initializing various settings for this unit 54 APPENDIX Troubleshooting 55 General 55 HDMI 57 Tuner (FM/AM 58 Remote...
... 33 Playing back tunes from Bluetooth™ components....... 35 Connecting a Yamaha Bluetooth wireless audio receiver 35 Pairing Bluetooth™ components 35 Using Bluetooth™ components 36 SETUP Configuring the settings specific for each input source (Option menu 37 Option menu display and setup...Displaying/Setting the Advanced Setup menu 53 Setting the impedance of speakers 53 Avoiding crossing remote control signals when using multiple Yamaha receivers 54 Initializing various settings for this unit 54 APPENDIX Troubleshooting 55 General 55 HDMI 57 Tuner (FM/AM 58 Remote...
Owners Manual
Page 3
Subwoofer cable connection ...12 ■ Acoustic parameter adjustment to 5.1-channel configurations - Volume control for each speaker...42 - Speaker impedance configuration...10 - Sound quality control with the equalizer Speaker layout...10 - Speaker cable connection...10 - Speaker channels and functions ...9 - to match your speakers and listening environment - Specifying the settings for each speaker 41 - INTRODUCTION Features and capabilities ■ Built-in high-quality, high-power 5-channel amplifier ■ 1-button input/sound field program switching (...
Subwoofer cable connection ...12 ■ Acoustic parameter adjustment to 5.1-channel configurations - Volume control for each speaker...42 - Speaker impedance configuration...10 - Sound quality control with the equalizer Speaker layout...10 - Speaker cable connection...10 - Speaker channels and functions ...9 - to match your speakers and listening environment - Specifying the settings for each speaker 41 - INTRODUCTION Features and capabilities ■ Built-in high-quality, high-power 5-channel amplifier ■ 1-button input/sound field program switching (...
Owners Manual
Page 4
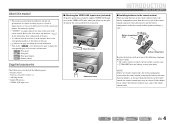
... (included) To protect against dust, attach the supplied VIDEO AUX input cover to the VIDEO AUX jacks when you received all of it. Design and specifications are remote control codes for external components registered to change in part as a result of the parts on the " " at the bottom of the remote...
... (included) To protect against dust, attach the supplied VIDEO AUX input cover to the VIDEO AUX jacks when you received all of it. Design and specifications are remote control codes for external components registered to change in part as a result of the parts on the " " at the bottom of the remote...
Owners Manual
Page 16
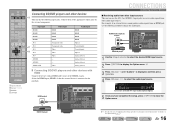
... player OPTICAL AV 1 COAXIAL AV 2 COAXIAL (CD) AV 3 OPTICAL ( TV ) AV 4 AV 5 AV OUT AUDIO 1 AUDIO 2 AUDIO OUT J 1 : See the section on "Configuring the settings specific for each input source (Option menu)" for playback. HDMI1 VOL. For example, if an external device cannot produce audio signals from other input sources This...
... player OPTICAL AV 1 COAXIAL AV 2 COAXIAL (CD) AV 3 OPTICAL ( TV ) AV 4 AV 5 AV OUT AUDIO 1 AUDIO 2 AUDIO OUT J 1 : See the section on "Configuring the settings specific for each input source (Option menu)" for playback. HDMI1 VOL. For example, if an external device cannot produce audio signals from other input sources This...
Owners Manual
Page 22
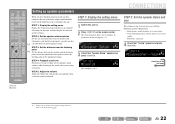
... sound normally. Subwoofer: connected 4 Check that the sound from which you have finished connecting your settings are not necessary with the following steps to designate a specific speaker i (or subwoofer) for speaker settings. STEP 2: Set the speaker status and size Set the size and connection status of speakers and subwoofers, and whether...
... sound normally. Subwoofer: connected 4 Check that the sound from which you have finished connecting your settings are not necessary with the following steps to designate a specific speaker i (or subwoofer) for speaker settings. STEP 2: Set the speaker status and size Set the size and connection status of speakers and subwoofers, and whether...

Owners Manual
Page 30
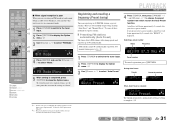
... tuning) 1 Press dTUNER to switch to the tuner input. 2 Press eFM or eAM to select a band to a desired FM/AM station by registering them to specific numbers, and later just select those numbers to tune in to receive. J 2 : "Wrong Station!" Leave the decimal point out when entering a number. J1 Lights up...
... tuning) 1 Press dTUNER to switch to the tuner input. 2 Press eFM or eAM to select a band to a desired FM/AM station by registering them to specific numbers, and later just select those numbers to tune in to receive. J 2 : "Wrong Station!" Leave the decimal point out when entering a number. J1 Lights up...
Owners Manual
Page 31
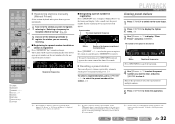
... MUTE 1 2 3 4 5 6 7 8 9 INPUT MUTE 0 10 TV TV VOL TV CH ENT d TUNER e PRESET F / G j Cursor B / C / D / E j ENTER j RETURN q OPTION j OPTION VOL. J 1 : See the section on "Configuring the settings specific for each input source (Option menu)" for stations MEMORY When Auto Preset is complete. V-AUX [ A ] [ B ] DOCK TUNER 1 d Press dTUNER to switch to display the Option...
... MUTE 1 2 3 4 5 6 7 8 9 INPUT MUTE 0 10 TV TV VOL TV CH ENT d TUNER e PRESET F / G j Cursor B / C / D / E j ENTER j RETURN q OPTION j OPTION VOL. J 1 : See the section on "Configuring the settings specific for each input source (Option menu)" for stations MEMORY When Auto Preset is complete. V-AUX [ A ] [ B ] DOCK TUNER 1 d Press dTUNER to switch to display the Option...
Owners Manual
Page 32
..." on the Option menu (☞p. 37). En 32 The station will appear. J 3 : See the section on the front panel display. appears on "Configuring the settings specific for each input source (Option menu)" for about 30 seconds. ■ Recalling a preset station You can call preset stations registered by selecting a preset number, use...
..." on the Option menu (☞p. 37). En 32 The station will appear. J 3 : See the section on the front panel display. appears on "Configuring the settings specific for each input source (Option menu)" for about 30 seconds. ■ Recalling a preset station You can call preset stations registered by selecting a preset number, use...

Owners Manual
Page 37
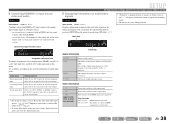
... Option menu items section. DECODE MUSIC STEREO STRAIGHT BD DVD SETUP SCENE TV CD RADIO OPTION Configuring the settings specific for each input source (Option menu) This receiver has a unique option menu specific for the desired input source. Option menu items Volume Trim Input source: All Reduces any change in volume when...
... Option menu items section. DECODE MUSIC STEREO STRAIGHT BD DVD SETUP SCENE TV CD RADIO OPTION Configuring the settings specific for each input source (Option menu) This receiver has a unique option menu specific for the desired input source. Option menu items Volume Trim Input source: All Reduces any change in volume when...
Owners Manual
Page 38
Set as follows according on the desired combination of input signal channels (front/surround/ LFE). SETUP Configuring the settings specific for the selected input. The number of audio input jacks. Video information V IN V OUT V.MSG (appears only when an error has occurred) Format and resolution ...
Set as follows according on the desired combination of input signal channels (front/surround/ LFE). SETUP Configuring the settings specific for the selected input. The number of audio input jacks. Video information V IN V OUT V.MSG (appears only when an error has occurred) Format and resolution ...

Owners Manual
Page 39
SETUP Configuring the settings specific for each input source (Option menu) ■ Bluetooth™ wireless connections Connect Disconnect Input source: Bluetooth (DOCK) Enables/disables the Bluetooth wireless connection (☞p. 36). ...
SETUP Configuring the settings specific for each input source (Option menu) ■ Bluetooth™ wireless connections Connect Disconnect Input source: Bluetooth (DOCK) Enables/disables the Bluetooth wireless connection (☞p. 36). ...

Owners Manual
Page 56
... used to try the following. 1) Change to the unit do not support the HDCP copy protection standards. If the corresponding indicator is being input from a specific speaker. Balance the volume of the same type (ex. Display "Speaker Setup" in the Setup menu ("Speaker Setup" → "Level"). input video is turned off...
... used to try the following. 1) Change to the unit do not support the HDCP copy protection standards. If the corresponding indicator is being input from a specific speaker. Balance the volume of the same type (ex. Display "Speaker Setup" in the Setup menu ("Speaker Setup" → "Level"). input video is turned off...
Owners Manual
Page 62
... signal" because the luminance signal is a more extensive color space than sRGB, and allows the expression of the HDMI specification. Composite video signal With the composite video signal system, the video signal comprises the three basic elements of available colors ...with HDCP (High-bandwidth Digital Content Protection), HDMI provides a secure audio/video interface that were not hitherto possible. SILENT CINEMA Yamaha has developed a natural, realistic sound effect DSP algorithm for chrominance. Video information Component video signal With the component video signal system...
... signal" because the luminance signal is a more extensive color space than sRGB, and allows the expression of the HDMI specification. Composite video signal With the composite video signal system, the video signal comprises the three basic elements of available colors ...with HDCP (High-bandwidth Digital Content Protection), HDMI provides a secure audio/video interface that were not hitherto possible. SILENT CINEMA Yamaha has developed a natural, realistic sound effect DSP algorithm for chrominance. Video information Component video signal With the component video signal system...

Owners Manual
Page 64
...; shortened 60 dB/45 dB or more • Frequency Response [MONITOR OUT] Component (Video Conversion Off 5 Hz to 60 MHz, ±3 dB En 64 Specifications ■ HDMI specification • Deep Color • x.v.Color • Auto Lip sync ■ INPUT/OUTPUT Input jacks • HDMI input x 4 • AV input x 5 [Audio] Digital input (optical...
...; shortened 60 dB/45 dB or more • Frequency Response [MONITOR OUT] Component (Video Conversion Off 5 Hz to 60 MHz, ±3 dB En 64 Specifications ■ HDMI specification • Deep Color • x.v.Color • Auto Lip sync ■ INPUT/OUTPUT Input jacks • HDMI input x 4 • AV input x 5 [Audio] Digital input (optical...

Owners Manual
Page 65
...; Standby Power Consumption [General models 1.0 W or less [Other models 0.5 W or less • Dimensions (W x H x D) 435 x 151 x 315 mm (17-1/8 x 6 x 12-3/8 in) • Weight 7.5 kg (16.5 lbs) * Specifications are subject to 1611 kHz ■ GENERAL • Power Supply [U.S.A. APPENDIX ■ FM SECTION • Tuning Range [U.S.A. and Canada models 87.5 to 107.9 MHz [Asia...
...; Standby Power Consumption [General models 1.0 W or less [Other models 0.5 W or less • Dimensions (W x H x D) 435 x 151 x 315 mm (17-1/8 x 6 x 12-3/8 in) • Weight 7.5 kg (16.5 lbs) * Specifications are subject to 1611 kHz ■ GENERAL • Power Supply [U.S.A. APPENDIX ■ FM SECTION • Tuning Range [U.S.A. and Canada models 87.5 to 107.9 MHz [Asia...
Owners Manual
Page 78
places of the remote control narrows - If the leaked material comes into contact with the letter N or coloured BLACK. Specification of batteries may be different even though they look the same. • Before inserting new batteries, wipe the compartment clean. • If...such a case, install new batteries and set the remote control code. • Dispose of batteries according to the terminal which is too late, Yamaha and the Electronic Industries Association's Consumer Electronics Group recommend you to avoid prolonged exposure from the remote control to prevent an explosion or acid leak...
places of the remote control narrows - If the leaked material comes into contact with the letter N or coloured BLACK. Specification of batteries may be different even though they look the same. • Before inserting new batteries, wipe the compartment clean. • If...such a case, install new batteries and set the remote control code. • Dispose of batteries according to the terminal which is too late, Yamaha and the Electronic Industries Association's Consumer Electronics Group recommend you to avoid prolonged exposure from the remote control to prevent an explosion or acid leak...

Owners Manual
Page 79
...that product does not conform to the technical or safety standards of the country of use and/or to the standard specification of a product sold by Yamaha, where that it is guaranteed to be returned at the customer's expense. 2 The product MUST have been purchased from... or otherwise, save valuable resources and prevent any potential negative effects on the products, packaging, and/or accompanying documents mean that your Yamaha product needs guarantee service, please contact the dealer from the customer. You can find full details on the proper use, maintenance and storage...
...that product does not conform to the technical or safety standards of the country of use and/or to the standard specification of a product sold by Yamaha, where that it is guaranteed to be returned at the customer's expense. 2 The product MUST have been purchased from... or otherwise, save valuable resources and prevent any potential negative effects on the products, packaging, and/or accompanying documents mean that your Yamaha product needs guarantee service, please contact the dealer from the customer. You can find full details on the proper use, maintenance and storage...