Owners Manual
Page 1
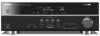
AV Receiver Owner's Manual English for North America
AV Receiver Owner's Manual English for North America
Owners Manual
Page 2
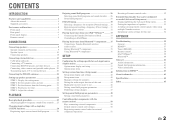
CONTENTS INTRODUCTION Features and capabilities 3 About this manual 4 Supplied accessories 4 Part names and functions 5 Front panel 5 Rear panel 6 Front panel display 7 Remote control 8 CONNECTIONS Connecting speakers 9 Speaker channels and functions 9 Speaker...Advanced Setup menu 53 Displaying/Setting the Advanced Setup menu 53 Setting the impedance of speakers 53 Avoiding crossing remote control signals when using multiple Yamaha receivers 54 Initializing various settings for this unit 54 APPENDIX Troubleshooting 55 General 55 HDMI 57 Tuner (FM/AM 58 Remote control 59 iPod...
CONTENTS INTRODUCTION Features and capabilities 3 About this manual 4 Supplied accessories 4 Part names and functions 5 Front panel 5 Rear panel 6 Front panel display 7 Remote control 8 CONNECTIONS Connecting speakers 9 Speaker channels and functions 9 Speaker...Advanced Setup menu 53 Displaying/Setting the Advanced Setup menu 53 Setting the impedance of speakers 53 Avoiding crossing remote control signals when using multiple Yamaha receivers 54 Initializing various settings for this unit 54 APPENDIX Troubleshooting 55 General 55 HDMI 57 Tuner (FM/AM 58 Remote control 59 iPod...
Owners Manual
Page 4
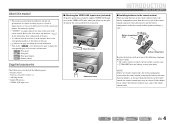
If this manual • This manual is in the footnote. Attach the cover PUSH Remove the cover INTRODUCTION Features and capabilities ■ Installing batteries in the remote control When inserting batteries ... bottom of the page. • ☞ indicates the page describing the related information. • Click on the remote control. In case of differences between the manual and product, the product has priority. • "dHDMI1" (example) indicates the name of the following symptoms become evident: • The remote control can only be...
If this manual • This manual is in the footnote. Attach the cover PUSH Remove the cover INTRODUCTION Features and capabilities ■ Installing batteries in the remote control When inserting batteries ... bottom of the page. • ☞ indicates the page describing the related information. • Click on the remote control. In case of differences between the manual and product, the product has priority. • "dHDMI1" (example) indicates the name of the following symptoms become evident: • The remote control can only be...
Owners Manual
Page 25
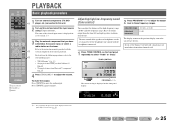
... panel display as the source input, or select a radio station on this unit and select the input source using dInput selector. Refer to the instruction manuals provided with the headphones connected. 1 Press TONE CONTROL on playback. To mute the output. If you release the key. TONE CONTROL PHONES SILENT CINEMA INFO...
... panel display as the source input, or select a radio station on this unit and select the input source using dInput selector. Refer to the instruction manuals provided with the headphones connected. 1 Press TONE CONTROL on playback. To mute the output. If you release the key. TONE CONTROL PHONES SILENT CINEMA INFO...
Owners Manual
Page 31
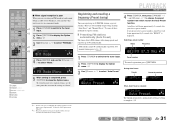
.... J1 3 Use jCursor B / C to start the Auto Preset function. SW L CR SL SR Preset number To cancel registration, press jRETURN. Use manual station preset (☞p. 32). PLAYBACK FM/AM tuning 4 Press jENTER, then press ePRESET F / G or jCursor B / C to choose the preset ...input source (Option menu)" for stations MEMORY When Auto Preset is complete. If you select a preset number. Use one of presetting stations, "Auto Preset" and "Manual Preset." V-AUX [ A ] [ B ] DOCK TUNER 1 d Press dTUNER to switch to select "FM Mode." J1 STRAIGHT BD DVD SETUP SCENE TV CD...
.... J1 3 Use jCursor B / C to start the Auto Preset function. SW L CR SL SR Preset number To cancel registration, press jRETURN. Use manual station preset (☞p. 32). PLAYBACK FM/AM tuning 4 Press jENTER, then press ePRESET F / G or jCursor B / C to choose the preset ...input source (Option menu)" for stations MEMORY When Auto Preset is complete. If you select a preset number. Use one of presetting stations, "Auto Preset" and "Manual Preset." V-AUX [ A ] [ B ] DOCK TUNER 1 d Press dTUNER to switch to select "FM Mode." J1 STRAIGHT BD DVD SETUP SCENE TV CD...
Owners Manual
Page 32
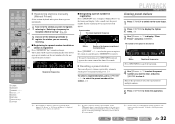
... MENU REC POP-UP MENU MUTE 1 2 3 4 5 6 7 8 9 INPUT MUTE 0 10 TV TV VOL TV CH ENT ■ Registering stations manually (Manual Preset) Select stations by selecting a preset number, use the lNumeric keys to enter the preset number of the preset to . e 2 Use one registered most... previously. Press ePRESET F / G to select the preset to register the station to, and then press eMEMORY to display "Manual Preset" on "Configuring the settings specific for each input source (Option menu)" for about 30 seconds. ■ Recalling a preset station You can ...
... MENU REC POP-UP MENU MUTE 1 2 3 4 5 6 7 8 9 INPUT MUTE 0 10 TV TV VOL TV CH ENT ■ Registering stations manually (Manual Preset) Select stations by selecting a preset number, use the lNumeric keys to enter the preset number of the preset to . e 2 Use one registered most... previously. Press ePRESET F / G to select the preset to register the station to, and then press eMEMORY to display "Manual Preset" on "Configuring the settings specific for each input source (Option menu)" for about 30 seconds. ■ Recalling a preset station You can ...
Owners Manual
Page 40
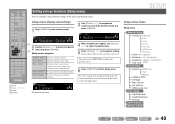
.... LR Crossover SWFR Phase Extra Bass Level (speakers) Distance (unit and speakers) Equalizer (speakers and frequency Test Tone bands) Sound Setup Lipsync HDMI Auto Auto Manual Adaptive DRC D.Range Max Volume Init.Volume HDMI Audio Out Func. SETUP VOL.
.... LR Crossover SWFR Phase Extra Bass Level (speakers) Distance (unit and speakers) Equalizer (speakers and frequency Test Tone bands) Sound Setup Lipsync HDMI Auto Auto Manual Adaptive DRC D.Range Max Volume Init.Volume HDMI Audio Out Func. SETUP VOL.
Owners Manual
Page 41
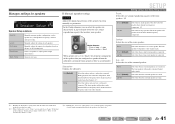
... channel audio signals. Select this when the surround speakers are connected. LR Selects the size of each speaker based on manually set the frequency components of audio signals transmitted from the front speakers if there is no subwoofer). The front speakers will...this for speakers SETUP VOL. J 3 : Enabling the "Crossover" setting allows you can select the speaker size characteristic (Large or Small). Manually adjusts the output of the speakers that matches your speakers. Yes (Default) None Select this when you change to adjust speaker output characteristics. ...
... channel audio signals. Select this when the surround speakers are connected. LR Selects the size of each speaker based on manually set the frequency components of audio signals transmitted from the front speakers if there is no subwoofer). The front speakers will...this for speakers SETUP VOL. J 3 : Enabling the "Crossover" setting allows you can select the speaker size characteristic (Large or Small). Manually adjusts the output of the speakers that matches your speakers. Yes (Default) None Select this when you change to adjust speaker output characteristics. ...
Owners Manual
Page 42
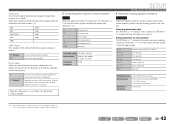
... less). Use jCursor B / C to +10.0 dB Default setting 0 dB (FL / FR / SWFR) -1.0 dB (C / SL / SR) Adjustment increments 0.5 dB SETUP Setting various functions (Setup menu) ■ Manually setting speaker distance Distance Adjusts the timing at the same time. R) Adjustment increments 0.5 ft (0.10 m) J 1 : If your listening position. J1 40Hz 60Hz 80Hz (Default) 90Hz...
... less). Use jCursor B / C to +10.0 dB Default setting 0 dB (FL / FR / SWFR) -1.0 dB (C / SL / SR) Adjustment increments 0.5 dB SETUP Setting various functions (Setup menu) ■ Manually setting speaker distance Distance Adjusts the timing at the same time. R) Adjustment increments 0.5 ft (0.10 m) J 1 : If your listening position. J1 40Hz 60Hz 80Hz (Default) 90Hz...
Owners Manual
Page 44
...submenu Lipsync Adjusts the delay between audio and video output (Lipsync function). HDMI Auto When connecting to 240 ms Adjustment 1 ms increments Manual Manually adjusts the correction time. J1 Auto Off (Default) Adjusts the dynamic range automatically. En 44 D.Range Selects the dynamic range adjustment method...by entering the correction time provided when "HDMI Auto" is set parameter to "On." Set the correction time in "Manual." Setting the audio output function of this receiver is turned on. Init.Volume Sets the initial volume for digital audio playback.
...submenu Lipsync Adjusts the delay between audio and video output (Lipsync function). HDMI Auto When connecting to 240 ms Adjustment 1 ms increments Manual Manually adjusts the correction time. J1 Auto Off (Default) Adjusts the dynamic range automatically. En 44 D.Range Selects the dynamic range adjustment method...by entering the correction time provided when "HDMI Auto" is set parameter to "On." Set the correction time in "Manual." Setting the audio output function of this receiver is turned on. Init.Volume Sets the initial volume for digital audio playback.
Owners Manual
Page 57
... HDMI connection has occurred. Turn the subwoofer power on the remote control) to other digital or radio frequency equipment. Combine input connected to its instruction manual. The audio input sources cannot be played by digital connection and play back the DTS-CD. Problem No sound is being played back.
... HDMI connection has occurred. Turn the subwoofer power on the remote control) to other digital or radio frequency equipment. Combine input connected to its instruction manual. The audio input sources cannot be played by digital connection and play back the DTS-CD. Problem No sound is being played back.

Owners Manual
Page 58
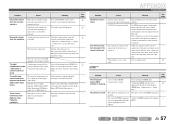
... far from a station, or input from the TV set is Connect the AM loop antenna correctly 21 not connected. It is not Use manual station preset. 32 preset does not available for AM stations. An invalid FM/AM frequency has been input. Adjust the antenna height or orientation... TV set . - Input a frequency that can be obtained even with the automatic tuning method. The supplied AM loop antenna is being used nearby. Use the manual tuning method. 30 with a good FM antenna. See page 21 31 - - - 30 31 - There is weak. You are loose. The noises may be...
... far from a station, or input from the TV set is Connect the AM loop antenna correctly 21 not connected. It is not Use manual station preset. 32 preset does not available for AM stations. An invalid FM/AM frequency has been input. Adjust the antenna height or orientation... TV set . - Input a frequency that can be obtained even with the automatic tuning method. The supplied AM loop antenna is being used nearby. Use the manual tuning method. 30 with a good FM antenna. See page 21 31 - - - 30 31 - There is weak. You are loose. The noises may be...
Owners Manual
Page 63
... input (optical or coaxial) connections. • Refer to the supplied instruction manuals for example, the special audio contents downloaded via Internet) of Blu-ray Disc or HD DVD. "iPhone" is a trademark of Yamaha Corporation. "SILENT CINEMA" is a trademark of Apple Inc. All Rights Reserved... component). • This unit is not compatible with HDCP-incompatible HDMI or DVI components. • Refer to the supplied instruction manuals of the input source component, and set the input source component appropriately so that the component outputs the bitstream audio signals directly ...
... input (optical or coaxial) connections. • Refer to the supplied instruction manuals for example, the special audio contents downloaded via Internet) of Blu-ray Disc or HD DVD. "iPhone" is a trademark of Yamaha Corporation. "SILENT CINEMA" is a trademark of Apple Inc. All Rights Reserved... component). • This unit is not compatible with HDCP-incompatible HDMI or DVI components. • Refer to the supplied instruction manuals of the input source component, and set the input source component appropriately so that the component outputs the bitstream audio signals directly ...

Owners Manual
Page 76
...-type plug. FCC INFORMATION (for your outlet, consult an electrician for replacement of this manual, meets FCC requirements. This product, when installed as radiators, heat registers, stoves, or other electronic devices. Modifications not expressly approved by Yamaha may be used according to the instructions found to alert you can be the source...
...-type plug. FCC INFORMATION (for your outlet, consult an electrician for replacement of this manual, meets FCC requirements. This product, when installed as radiators, heat registers, stoves, or other electronic devices. Modifications not expressly approved by Yamaha may be used according to the instructions found to alert you can be the source...
Owners Manual
Page 77
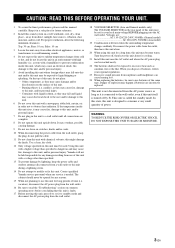
...on the rear panel of the same type. Other components, as they may become warm. It may happen if batteries are incorrectly replaced. Yamaha will form when the surrounding temperature changes suddenly. candles), as they may cause damage and/or discoloration on the surface of batteries, follow...When using this unit for long periods of this unit may cause fire, damage to this unit with high humidity (i.e. In this state, this manual carefully. If the temperature inside this unit, which may cause an electrical shock, fire, damage to this unit, and/or personal injury. 5...
...on the rear panel of the same type. Other components, as they may become warm. It may happen if batteries are incorrectly replaced. Yamaha will form when the surrounding temperature changes suddenly. candles), as they may cause damage and/or discoloration on the surface of batteries, follow...When using this unit for long periods of this unit may cause fire, damage to this unit with high humidity (i.e. In this state, this manual carefully. If the temperature inside this unit, which may cause an electrical shock, fire, damage to this unit, and/or personal injury. 5...
Owners Manual
Page 78
... wide slot and fully insert. This may shorten the life of high temperatures, such as near a heater or stove - Retain this Owner's Manual in a safe place for the plug supplied with this appliance, it is located on the remote control. • Do not drop the remote...As the colours of the wires in the home are not suitable for future reference. ■ For U.K. We Want You Listening For A Lifetime Yamaha and the Electronic Industries Association's Consumer Electronics Group want you notice the following conditions: - This Class B digital apparatus complies with the letter N ...
... wide slot and fully insert. This may shorten the life of high temperatures, such as near a heater or stove - Retain this Owner's Manual in a safe place for the plug supplied with this appliance, it is located on the remote control. • Do not drop the remote...As the colours of the wires in the home are not suitable for future reference. ■ For U.K. We Want You Listening For A Lifetime Yamaha and the Electronic Industries Association's Consumer Electronics Group want you notice the following conditions: - This Class B digital apparatus complies with the letter N ...
Quick Reference Guide
Page 3
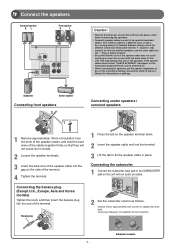
...) cable into the "+" (positive, red) terminal on the speaker terminal down. 2 Insert the speaker cable end into the end of the terminal. Refer to Owner's Manual for information on this unit with the metal areas of these cables is switched on. • When connecting 6Ω speakers, set the speaker impedance to...
...) cable into the "+" (positive, red) terminal on the speaker terminal down. 2 Insert the speaker cable end into the end of the terminal. Refer to Owner's Manual for information on this unit with the metal areas of these cables is switched on. • When connecting 6Ω speakers, set the speaker impedance to...
Quick Reference Guide
Page 5
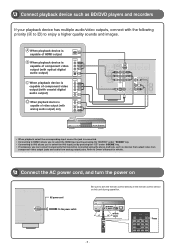
To the power outlet. Refer to Owner's Manual for details. 4 Connect the AC power cord, and turn the power on AC power cord Be sure to enjoy a higher quality sounds and images. A When ...
To the power outlet. Refer to Owner's Manual for details. 4 Connect the AC power cord, and turn the power on AC power cord Be sure to enjoy a higher quality sounds and images. A When ...


